
Do it yourself rattlecan painting

I'm going to show you guys what I spent about 10 combined hours doing yesterday and today.
Painting the windshiled trim, the sunroof, and the gas door, and we'll do it for only $25.
Am I a fool? No. Because I've made it my life's mission to make **** look good.
Like?
Now let me walk you through how I did it.
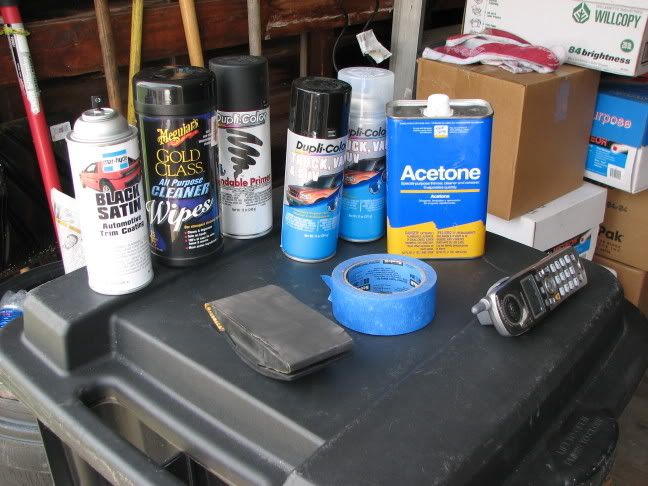
Products and prices. Buy em at Wal-Mart kiddies!
Duplicolor Truck, Van, and SUV in Universal Black - $4.44
Duplicolor Truck, Van, and SUV in Clear - $4.44
Duplicolor Sandable Primer - $3.89
3M 400Grit Sandpaper (four sheets) - $4.99
3M Rubber Sanding Block - $4.59
Something Hyde Trim Paint, made by Bondo - $5 (got this stuff at Murray's Discount Auto)
I had the following around the house
-Acetone
-Meguires All Purpose cleaning wipes
-Painting Tape
-Phone (so the women can get to me)
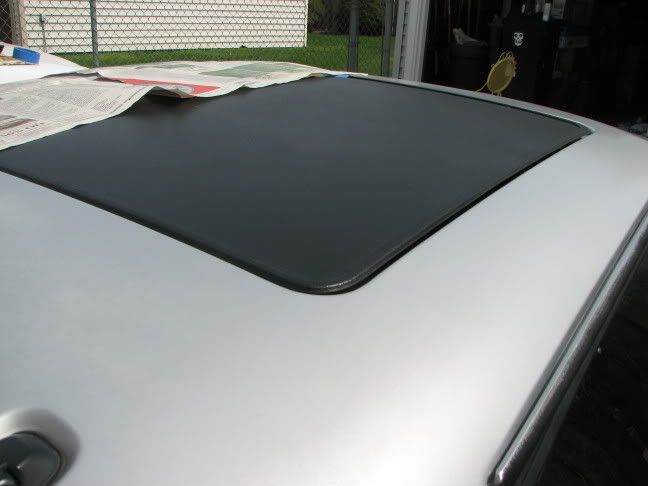
Okay, so its about 7:00 PM and I just got home from mowing my grandparents lawn. I have all of my materials so I pull off my sunroof and start sanding it. Its simple, after sanding I wipe it down with some Acetone on a paper towel to clear everything off, and then I lay down some Duplicolor Primer. I STRONGLY suggest you use the Primer stage to learn how to paint. It looked all streaky, but I soon got it down. After three coats of primer I let it dry for about half an hour. Then I proceeded to lay down seven coats of Black. It took that many to get an even coat, maybe I just suck at painting.
Its now 10:45, an hour after I laid down my last coat of Black. Time to ClearCoat!! I start off with a fine mist. I soon learn that even though you have a perfectly even coat of Black, the Clear will make it look streaky. After a few fine coats of ClearCoat I took Duplicolor's phone tech's suggestion and laid down a nice wet coat. Made it look very pretty. Overrall a little more flat black than I expected (I was hoping for a semi-gloss), but I'm thuroughly satisfied.
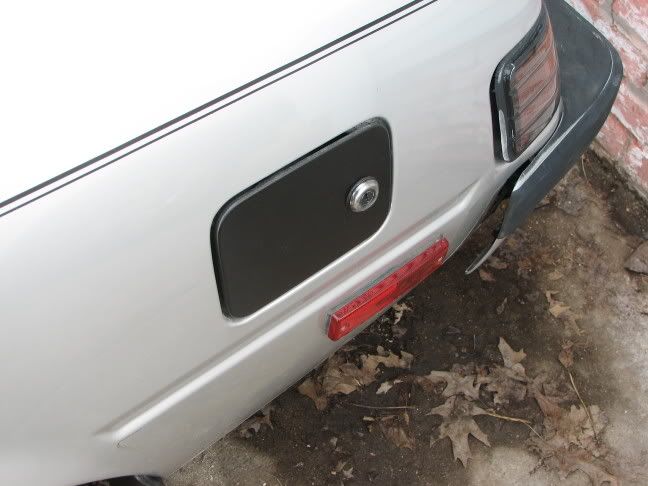
While the Sunroof was drying I went out and tried taking my fuel door off. One of the screws was stripped of the head, but luckily I discovered that a 5/16 socket fits on top of them and will torque them out nicely.
The Fuel Door only needed three coats and then two coats of clear. It turned out lovely and consistant:
Finished Sunroof:
Its now Midnight and I went to go watch Saved by the Bell
Next day, Hitler's Birthday. Happy Birthday!!!!
I wake up at 8:30, take a shower, and then proceed outside after a nice breakfast. Its now 11:30. I spend a good hour in the shower.'
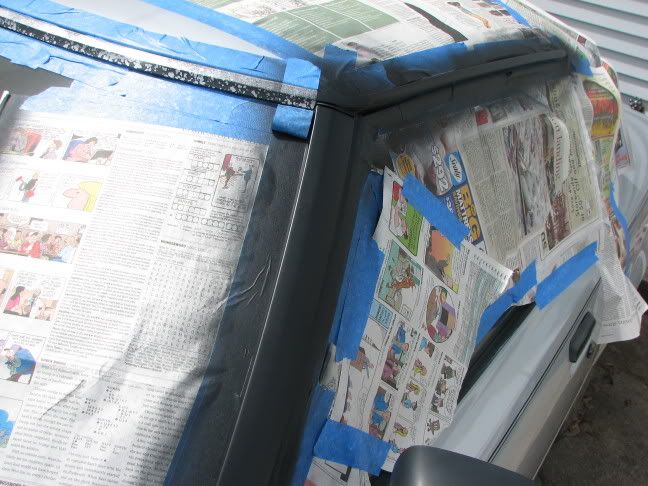
Time to start taping everything to prevent overspray.

After a substantial amount of tape and newspaper I start on the driver's side. This Bondo Black Trim Paint stuff looks amazing, but it isn't very strong. It scratches off easily.
No matter, I still have more than half a can of it left if I ever want to touch it up.
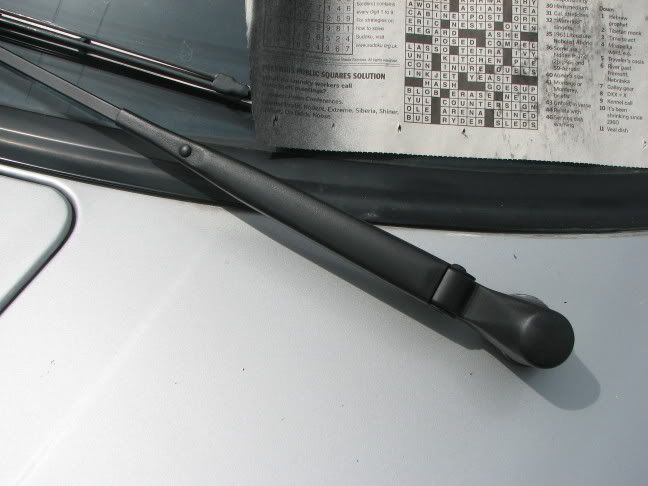
I also decide to paint my windshield wiper arms with it. Looks much better and doesn't scratch off as easy. Maybe I should've done more coats on the trim?
Its now about 2:00 and I come in and take a poop.
Now at 4:00 I get around to typing this all up with what little pictures I have for you.
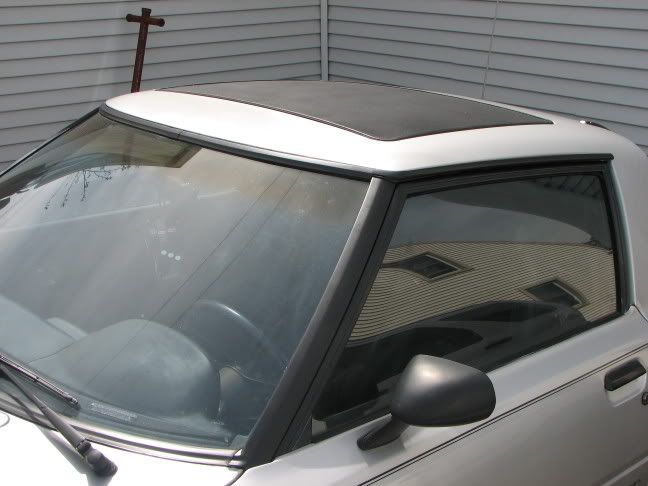
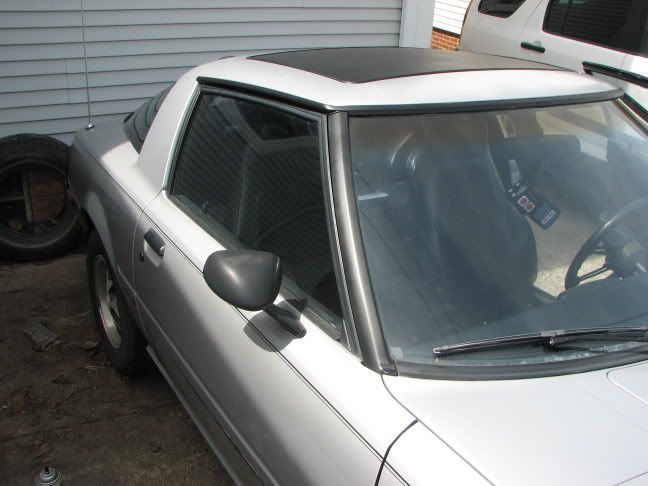
So you can turn this!
Into This!
Painting the windshiled trim, the sunroof, and the gas door, and we'll do it for only $25.
Am I a fool? No. Because I've made it my life's mission to make **** look good.
Like?
Now let me walk you through how I did it.
Products and prices. Buy em at Wal-Mart kiddies!
Duplicolor Truck, Van, and SUV in Universal Black - $4.44
Duplicolor Truck, Van, and SUV in Clear - $4.44
Duplicolor Sandable Primer - $3.89
3M 400Grit Sandpaper (four sheets) - $4.99
3M Rubber Sanding Block - $4.59
Something Hyde Trim Paint, made by Bondo - $5 (got this stuff at Murray's Discount Auto)
I had the following around the house
-Acetone
-Meguires All Purpose cleaning wipes
-Painting Tape
-Phone (so the women can get to me)
Okay, so its about 7:00 PM and I just got home from mowing my grandparents lawn. I have all of my materials so I pull off my sunroof and start sanding it. Its simple, after sanding I wipe it down with some Acetone on a paper towel to clear everything off, and then I lay down some Duplicolor Primer. I STRONGLY suggest you use the Primer stage to learn how to paint. It looked all streaky, but I soon got it down. After three coats of primer I let it dry for about half an hour. Then I proceeded to lay down seven coats of Black. It took that many to get an even coat, maybe I just suck at painting.
Its now 10:45, an hour after I laid down my last coat of Black. Time to ClearCoat!! I start off with a fine mist. I soon learn that even though you have a perfectly even coat of Black, the Clear will make it look streaky. After a few fine coats of ClearCoat I took Duplicolor's phone tech's suggestion and laid down a nice wet coat. Made it look very pretty. Overrall a little more flat black than I expected (I was hoping for a semi-gloss), but I'm thuroughly satisfied.
While the Sunroof was drying I went out and tried taking my fuel door off. One of the screws was stripped of the head, but luckily I discovered that a 5/16 socket fits on top of them and will torque them out nicely.
The Fuel Door only needed three coats and then two coats of clear. It turned out lovely and consistant:
Finished Sunroof:
Its now Midnight and I went to go watch Saved by the Bell
Next day, Hitler's Birthday. Happy Birthday!!!!
I wake up at 8:30, take a shower, and then proceed outside after a nice breakfast. Its now 11:30. I spend a good hour in the shower.'
Time to start taping everything to prevent overspray.
After a substantial amount of tape and newspaper I start on the driver's side. This Bondo Black Trim Paint stuff looks amazing, but it isn't very strong. It scratches off easily.
No matter, I still have more than half a can of it left if I ever want to touch it up.
I also decide to paint my windshield wiper arms with it. Looks much better and doesn't scratch off as easy. Maybe I should've done more coats on the trim?
Its now about 2:00 and I come in and take a poop.
Now at 4:00 I get around to typing this all up with what little pictures I have for you.
So you can turn this!
Into This!

Whatsa Rotor?
Joined: Apr 2006
Posts: 90
Likes: 0
From: Abilene, Texas
Looks nice dude. Not crazy about the fuel door but the sunroof looks like you have a glass one!!lol Gonna do that to my window trim as it looks just like yours did. Wiper arms too. Good job!!


the trim looks phenominal!! i like your little story, lol. hitler's birthday, you character, lol. seriously though, looks great. how easialy does the paint scratch off of the trim??

The main idea was originally a quick fix for my sunroof. It was down to the primer, probably from a previous owner washing the car with dishwashing detergent.
The fuel door had an old grimy sticker on it that said "Unleaded Fuel Only" and underneath the same phrase but in Spainish. The general consensus among me and my friends was that is just had to go.
I'm also going to be getting a front airdam and headlight cover vent(s) that I will be painting the same way in the same color.
Black and silver, to me, is teh secks.
Originally Posted by mazdaverx713b
how easialy does the paint scratch off of the trim??
Who knows how much money I saved doing it this way.


Trending Topics
Now with more 1st Gen!
Joined: Dec 2001
Posts: 1,534
Likes: 0
From: Ottawa
Good job!
I like the black trim, looks much better... gonna have to do that to my car... not sure about the black sunroof/fuel door, unless you plan on painting it all black?
But the fuel door does look better without the sticker
I like the black trim, looks much better... gonna have to do that to my car... not sure about the black sunroof/fuel door, unless you plan on painting it all black?
But the fuel door does look better without the sticker
Rotary Enthusiast
Joined: Jun 2004
Posts: 1,081
Likes: 2
From: Richmond, VA
looks good, but it took you 2 hours to take a poop? or did you do something else? i think something might be wrong.
any overall pictures of the car? I used duplicolor black semi- gloss (after sanding with 220 and then 400) on all my moulding, and it came out great. Great contrast with the new white paint.
any overall pictures of the car? I used duplicolor black semi- gloss (after sanding with 220 and then 400) on all my moulding, and it came out great. Great contrast with the new white paint.

SoCal STi Hitman
Joined: Mar 2005
Posts: 880
Likes: 0
From: In a paint booth
Just want to make sure that everyone knows that it is necessary to wipe of the acetone with clean cloth after you put in on while it is still wet. If you let the acetone dry at all It will cause paint problems down the road and your paint will probably peel off.
Originally Posted by Cowboyfun
Just want to make sure that everyone knows that it is necessary to wipe of the acetone with clean cloth after you put in on while it is still wet. If you let the acetone dry at all It will cause paint problems down the road and your paint will probably peel off.
Its the poor man's way! Duplicolor sells tack cloth and prep pads. Prep pads with a chemical to clean, and tack cloth to take the chemical cleaner off.


UPDATE:
We had our first rain since I painted her. The water beaded and air dried normally. No water spots at all! Quite the opposite of what I was expecting, since some water fell on the RX-7 shortly after I painted it and in the morning I awoke to a ton of water spots.
Going to wash the sunroof and give it a spray wax sometime this weekend.
Screw that, I bombed over it. The sunroof was down to the primer and the rubber was practically gray as well. Now it looks like its all one piece. I love it.
We had our first rain since I painted her. The water beaded and air dried normally. No water spots at all! Quite the opposite of what I was expecting, since some water fell on the RX-7 shortly after I painted it and in the morning I awoke to a ton of water spots.
Going to wash the sunroof and give it a spray wax sometime this weekend.
Originally Posted by wrigh003
I like it, minus the gas door, but I see your motivation, so good work. when you were doing the sunroof, did you mask the black rubber seal around the edge or just bomb over it?
Originally Posted by fcdrifter13
All you need to do now is the rear bumper.
Cholo with the Bolo
Joined: Nov 2005
Posts: 469
Likes: 0
From: Las Cruces, NM
Just something to note about the sunroof.
The clear paint won't make it glossy. Never will. You have to bomb down and buy some gloss paint.
High heat engine paint (it's what I use for. . . everything) is cheaper than the other paints at Wally world and comes out with a real beautiful glossy shine. We used the ford engine blue on my friend's interior (Jays83gsl) and it came out striking.
Just note that it doesn't stick to raw surfaces very well at all. A good primer is an absolute necessity. Once on, though, it's sturdy enough.
To avoid the 'streakies' spray on a very thin coat, let it dry until it's sticky (not wet, not dry, you'll know when) and spray another very thin coat. Keep up the process and you'll eliminate any problem of the 'streakies.'
That process does have the ability to 'orange peel' if done incorectly, but I've only had it happen once (on my shift boot).
Ended up looking nice, though. If you had one of the gas caps without a keyhole, it would've looked a tad better (the keyhole just throws it off a bit).
Good job, though. Good job indeed.

Joined: Apr 2002
Posts: 1,916
Likes: 1
From: Hampton, Virginia
Check out my rattle can paint job on the driver's door in my 79.
http://pg.photos.yahoo.com/ph/perezj...17.jpg&.src=ph
http://pg.photos.yahoo.com/ph/perezj...88.jpg&.src=ph
http://pg.photos.yahoo.com/ph/perezj...90.jpg&.src=ph
http://pg.photos.yahoo.com/ph/perezj...d1.jpg&.src=ph
http://pg.photos.yahoo.com/ph/perezj...1b.jpg&.src=ph
http://pg.photos.yahoo.com/ph/perezj...68.jpg&.src=ph
