
Anyone interested in a sleepy eye how-to?

Thread Starter
Yeah, shutup kid.
Joined: Mar 2002
Posts: 1,686
Likes: 2
From: Columbus, OH
Anyone interested in a sleepy eye how-to?
I figured out an easy way to do the sleepy eye headlight conversion using all stock parts, just a simple mod to the headlight motor. It's up to you what headlights you want to use and to figure that part out, but this will make them pop up to any level you set them to using all stock wiring and switches. I bet most people can figure it out just from this picture, but I can do a complete how-to if anyone is interested.

Joined: Jun 2008
Posts: 8,376
Likes: 30
From: Chino Hills, CA
What a coincidence; I just bought a spare motor assembly from Dave with the intention of working out & writing up the same process. Looks like I'll end up with a spare, instead.
Thread Starter
Yeah, shutup kid.
Joined: Mar 2002
Posts: 1,686
Likes: 2
From: Columbus, OH
I'm waiting for my wheels to get here from Australia so I decided to work on some smaller details on my car before I get it rolling. You can do a writeup too if you want 
Excuse the dust, my car has been sitting for way too long. I need to make a bracket to hold the lights in and some shielding to cover the sides, but this is basically the look.

Tools you'll need: Dremel with cutoff wheel, epoxy, phillips and flat screwdrivers, 8mm, 10mm, and a deep well 14mm socket, small pick/scribe, and a hammer.

Here's the wiring diagram for the headlight motor

First you need to get the motor and bracket out of the car, use a long screwdriver to pop off the linkage with the X on it, then remove the 3 10mm bolts and 1 10mm nut.

With it out of the car, you can now remove the motor from the bracket, first take off the crank arm.

Then remove the 3 8mm bolts

Use a small screwdriver to gently pry off the clip, there are 2 thin washers and an o-ring underneath so try not to damage them.


Remove the 2 screws from the other side of the motor.

And pull off the plastic cap, there's a large o-ring inside to seal this.

Excuse the dust, my car has been sitting for way too long. I need to make a bracket to hold the lights in and some shielding to cover the sides, but this is basically the look.
Tools you'll need: Dremel with cutoff wheel, epoxy, phillips and flat screwdrivers, 8mm, 10mm, and a deep well 14mm socket, small pick/scribe, and a hammer.
Here's the wiring diagram for the headlight motor
First you need to get the motor and bracket out of the car, use a long screwdriver to pop off the linkage with the X on it, then remove the 3 10mm bolts and 1 10mm nut.
With it out of the car, you can now remove the motor from the bracket, first take off the crank arm.
Then remove the 3 8mm bolts
Use a small screwdriver to gently pry off the clip, there are 2 thin washers and an o-ring underneath so try not to damage them.
Remove the 2 screws from the other side of the motor.
And pull off the plastic cap, there's a large o-ring inside to seal this.
Thread Starter
Yeah, shutup kid.
Joined: Mar 2002
Posts: 1,686
Likes: 2
From: Columbus, OH
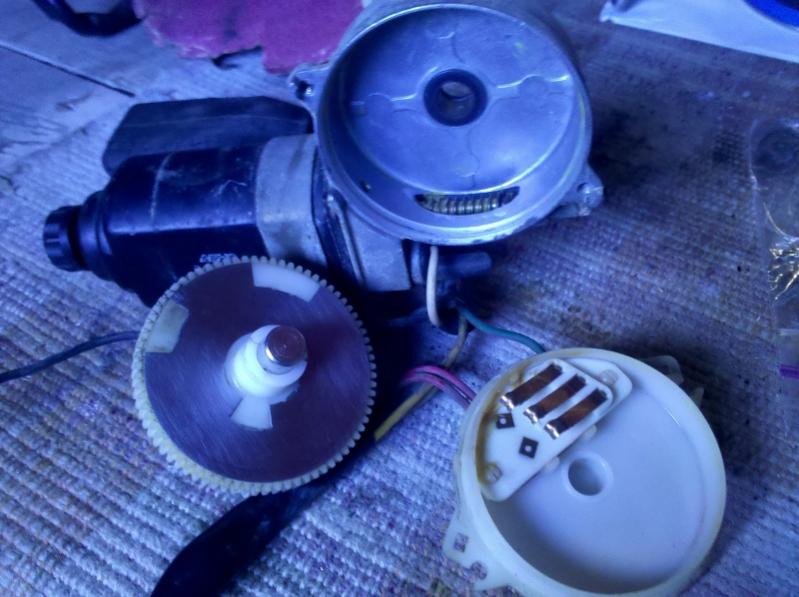
The gear should now come out with a push from the backside, there's another thin washer underneath

Use a small pick to gently push on all the tabs, they aren't clipped onto anything, just a slight press fit

Sorry, no pictures of actually modding the plate since I already had it done and epoxied it back in.
Now that the plate is off, you'll see there's a rib of plastic on the gear every 90degrees. Set the metal plate on top and mark where these are on the plate so you know where the center of the notch should be. Cut out the notch with a dremel, be very careful because the plate will bend easily if the cutoff wheels grabs it. Sand the edges of the notch smooth so the brushes won't catch while the plate is spinning. Now you'll need to fill in the gap left by the new notch you cut out. Take the scribe and scratch up the plastic gear so the epoxy will stick better. Mix up the epoxy and wait a couple minutes for it to get a bit thicker, put some down on the gear and then press the metal plate back on. Now fill up the rest of the gap and let it dry. Once it has hardened sand it down so it is flush with the plate, you want a nice smooth surface so the electrical contact will ride smoothly over it.
Assemble everything, use a deep well socket and hammer to put the retaining clip back on the gear. When putting the crank arm back on look at the 4th picture with the bolts circled in red, the arm should be pointing at the bolt in the top left corner when the motor is in the down position.

Use a small pick to gently push on all the tabs, they aren't clipped onto anything, just a slight press fit
Sorry, no pictures of actually modding the plate since I already had it done and epoxied it back in.
Now that the plate is off, you'll see there's a rib of plastic on the gear every 90degrees. Set the metal plate on top and mark where these are on the plate so you know where the center of the notch should be. Cut out the notch with a dremel, be very careful because the plate will bend easily if the cutoff wheels grabs it. Sand the edges of the notch smooth so the brushes won't catch while the plate is spinning. Now you'll need to fill in the gap left by the new notch you cut out. Take the scribe and scratch up the plastic gear so the epoxy will stick better. Mix up the epoxy and wait a couple minutes for it to get a bit thicker, put some down on the gear and then press the metal plate back on. Now fill up the rest of the gap and let it dry. Once it has hardened sand it down so it is flush with the plate, you want a nice smooth surface so the electrical contact will ride smoothly over it.
Assemble everything, use a deep well socket and hammer to put the retaining clip back on the gear. When putting the crank arm back on look at the 4th picture with the bolts circled in red, the arm should be pointing at the bolt in the top left corner when the motor is in the down position.
Trending Topics
cool. i think the best pic would be to show how and where u notched the plate as my understanding is that is where it tells motor to stop, correct? a simple drawing on one of ur existing pics with where the notch would help significantly. btw, what lights are u using? thanks for all the info!


Thread Starter
Yeah, shutup kid.
Joined: Mar 2002
Posts: 1,686
Likes: 2
From: Columbus, OH
Yeah, the notch out of the metal plate breaks the connection to the motor and stops it. Once you get the metal plate off there is a plastic rib underneath where the notch needs to be, you can't see it in my pictures because the epoxy covers it up. It's very easy to set the plate back on and mark where the rib is with a sharpie, then use that as the centerline for the notch. I can't get a picture of this without re-doing the epoxy on mine and probably bending the plate.
You could make a new plate if you're bored and want to make extra work for yourself, or if you somehow trash the plate.
The lights in the picture are some cheap Pilot fog lights from Autozone, I'll probably get HID's later but I still have lots of work to do and parts to buy to get my car back on the road, expensive headlights aren't a top priority right now on things to buy.

Thread
Thread Starter
Forum
Replies
Last Post
Jeff20B
1st Generation Specific (1979-1985)
73
Sep 16, 2018 07:16 PM
Cameron38
1st Gen General Discussion
2
Sep 19, 2015 11:45 PM