
45 DCOE info and references

Thread Starter
Dreamin of drivin my 7!
iTrader: (18)
Joined: Feb 2009
Posts: 1,073
Likes: 1
From: Seabeck, Washington
45 DCOE info and references
Ok, since deciding to go with the weber 45 DCOE, I had to read through what seemed like a million postings to find the info I needed. Since questions about these carbs seem to be a pretty frequent occurrence, I decided I'd create this post and try to compress alot of the info into one spot. Hopefully this helps others in my spot later. I'm still in the "learning" stage with mine, so all the info I post is found and credited to others than me. This info is for easy reference and not to be taken as "gospel" or a "how to", just a wealth of info and etc. to help you figure it out on your own.
That said, I need to state that alot of the "suggestions" here will be 12a specific, since that is what I have, alot may apply to other engines as well but I don't promise anything.
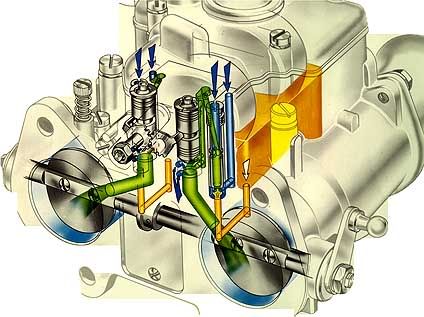
The first thing I should have learned is the general way this carb works. That way you can better understand the way it acts and how/wheere to start tuning. So, here is a visual to help.
That said, I need to state that alot of the "suggestions" here will be 12a specific, since that is what I have, alot may apply to other engines as well but I don't promise anything.
The first thing I should have learned is the general way this carb works. That way you can better understand the way it acts and how/wheere to start tuning. So, here is a visual to help.
Thread Starter
Dreamin of drivin my 7!
iTrader: (18)
Joined: Feb 2009
Posts: 1,073
Likes: 1
From: Seabeck, Washington
DCOE operation
Ok, this was extremely helpful to me as I'm a visual kinda guy.
Normal operation
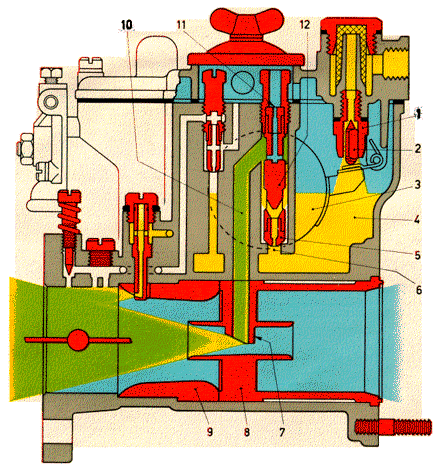

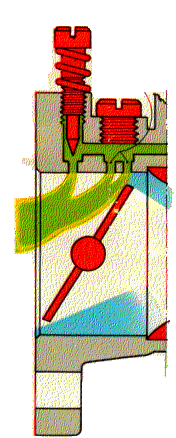
The fuel arrives through the needle valve (1) to the bowl (4) where the float (3) controls the opening of the needle (2) in order to maintain a constant fuel level. Through the ducts (6) and the main jets (5), it reaches the emulsioning tubes (12) from which after having been mixed with the air coming from the air corrector jets (11), through the pipes (10) and the nozzles (7) it reaches the carburation area consisting of the auxiliary Venturi's (8) and chokes (9).
Normal operation
The fuel arrives through the needle valve (1) to the bowl (4) where the float (3) controls the opening of the needle (2) in order to maintain a constant fuel level. Through the ducts (6) and the main jets (5), it reaches the emulsioning tubes (12) from which after having been mixed with the air coming from the air corrector jets (11), through the pipes (10) and the nozzles (7) it reaches the carburation area consisting of the auxiliary Venturi's (8) and chokes (9).
Thread Starter
Dreamin of drivin my 7!
iTrader: (18)
Joined: Feb 2009
Posts: 1,073
Likes: 1
From: Seabeck, Washington
DCOE operation
DCOE starting device
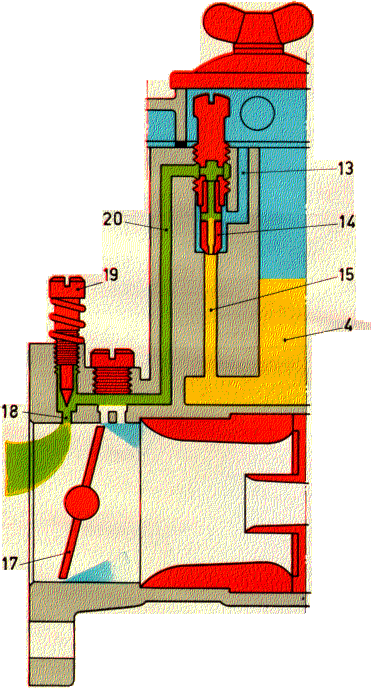
The fuel flowing from the bowl (4) arrives to the starting device through the ducts (32) and the starting jets (30). Emulsified with the air coming from the hole (29) it reaches the valves opening (35) through the ducts (31) and definitely emulsified by the air entering from orifices (34) is then carried by means of the ducts (33) to the carburetor throats below the throttles.
Engine cold starts: starting device inserted (position A)
Engine starts half warm: partial insertion of the device (position B)
Engine warm ups: during engine warming up, even if the vehicle is under way,
the starting device must be gradually pushed into the rest position.
Normal operation: starting device must be pushed back as soon as the engine
has reached the operating temperature (position C)
Thread Starter
Dreamin of drivin my 7!
iTrader: (18)
Joined: Feb 2009
Posts: 1,073
Likes: 1
From: Seabeck, Washington
DCOE operation
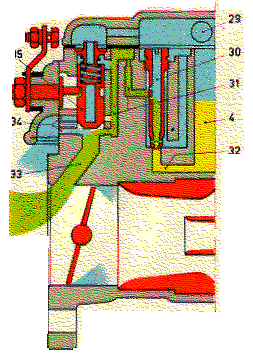
Idling operation and progressive action
The fuel is carried from the bowl (4) to the calibrated holes of the idling jets (14) through the ducts (15). Emulsified with the air coming from the ducts (13) through the ducts (20) and the idling feed holes (18) adjustable by means of screws (19) the fuel reaches the ducts (20) the mixture can reach the carburetor throats also through the progression holes (16)
The fuel is carried from the bowl (4) to the calibrated holes of the idling jets (14) through the ducts (15). Emulsified with the air coming from the ducts (13) through the ducts (20) and the idling feed holes (18) adjustable by means of screws (19) the fuel reaches the ducts (20) the mixture can reach the carburetor throats also through the progression holes (16)
Thread Starter
Dreamin of drivin my 7!
iTrader: (18)
Joined: Feb 2009
Posts: 1,073
Likes: 1
From: Seabeck, Washington
DCOE operation
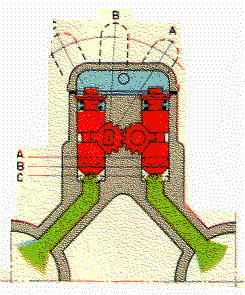
Acceleration
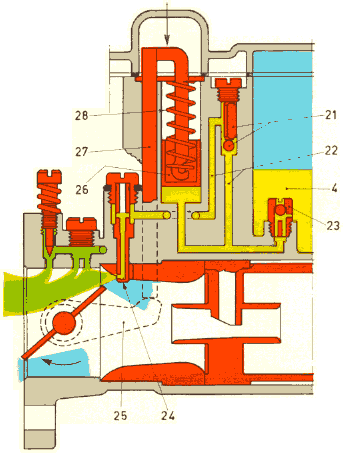
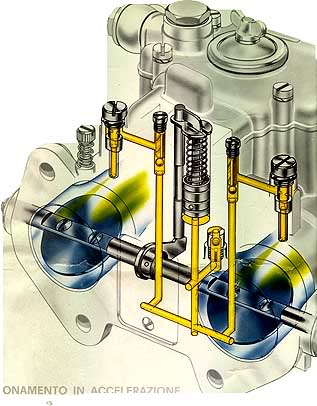
By closing the throttle valves, the lever (25) , by means of the shaft (27), lifts the piston (26). the fuel is thus drawn from the bowl (4) into the pump cylinder through the suction valve (23). By opening the throttles, the shaft (27) is free and the piston (26) is pushed down under the action of the spring (28), by means of the ducts (22) the fuel is injected into the carburetor throats. The inlet valve (23) is provided with a calibrated hole which is discharges the excess fuel delivered by the accelerating pump in to the float bowl.
By closing the throttle valves, the lever (25) , by means of the shaft (27), lifts the piston (26). the fuel is thus drawn from the bowl (4) into the pump cylinder through the suction valve (23). By opening the throttles, the shaft (27) is free and the piston (26) is pushed down under the action of the spring (28), by means of the ducts (22) the fuel is injected into the carburetor throats. The inlet valve (23) is provided with a calibrated hole which is discharges the excess fuel delivered by the accelerating pump in to the float bowl.
Thread Starter
Dreamin of drivin my 7!
iTrader: (18)
Joined: Feb 2009
Posts: 1,073
Likes: 1
From: Seabeck, Washington
12a jetting suggestions
Ok, here is some cut/paste jetting suggestions from the archive postings. You will see that they are pretty close on most jets, this isn't meant to tell you what to use, just helpfull in getting a decent baseline and knowing what other rotorheads have.
QUOTE-
A good base line (the one I use,and the guys above useas well)
65F9 idle
180-190 main fuel
150-160 main air
F-11 emulsion tubes
Also, it is very important to have the correct fuel pressure. Shoot for 3.5 psi, and fuel supply. I like to run a 190lph-250lph inline fuel injection fuel pump and an Aeromotive fuel pressure regulator.
yep it's totally your timing! the 60f9's should work fine that's what I run in my car. 65 f9 would be better, but 60f9 works fine. ni said before to run your 170's on the main with the 155 air correctors. this should run perfect if is a 12a and if it's a 13b it'll be a little lean up above 5k. If your running what I tell you and you're still glowing it HAS to be your timing.
sorry lol I should have clarified more. 12a stockport (for now).
170 mains
f-11 e-tubes
160 air corrector
36mm venturis
3 psi of fuel.
Good luck
Ryan
Stock 12a with stock fuel system
my recomendation
65F9 idle jets
F3 e-tubes
155 air jets
185 main jets
45 pump jets
36mm choke tubes.
Your biggest problem is the idle jets. take those 65f8's and throw them in the trash. they will never come close to working in any rotary application. 65F9's will cure most of your problems.
you're both wrong... f8's are most likely going to be too lean for washington driving.
Personally I'd try
idle: 60f9
aux choke: 3.5mm
main choke: 40mm
Accel jet: 45
main: 180
a/c: 150
e-tube: f-11
Quote:
Originally posted by RotorMotorDriver
I was told to run (by Fast Freddies) for stock port 12A :
40mm Venturies
180 Main Jet
F-11 Emulsion Tube
160-175 Air Corrector
F-9 65 Idle Jet
65 Accelerator Pump Jet
0 (Closed) Pump Discharge Valve
???? Needle & Seat
Ok once again, I played with my jetting trying to get a little more out of it, and to no avail. I know its running wrong the way it is with the stuff I posted above this. I talked to another person at another place, and they say for a 12A to run:
36mm Venturies
180-195 Main Jet
F-16 Emulsion Tube
160 Air Corrector
F9-65 Idle Jet
45-65 Accelerator Pump Jet
0 (Closed) Pump Discharge Valve
300 Needle & Seat
As you can see, the jetting offered by these two places seems prettly close. Looks like Im gonna try and get me some F-16's...
QUOTE-
I personally started with
F11 E-tube
175 Main jets
55 Pump jets
65F9 Idle jets
36 Chokes
160 Air Correction jets
300 Needle and seat
However, I also purchased one size above and below on most all of those for tuning as this was just a baseline, not a garunteed setup.
QUOTE-
A good base line (the one I use,and the guys above useas well)
65F9 idle
180-190 main fuel
150-160 main air
F-11 emulsion tubes
Also, it is very important to have the correct fuel pressure. Shoot for 3.5 psi, and fuel supply. I like to run a 190lph-250lph inline fuel injection fuel pump and an Aeromotive fuel pressure regulator.
yep it's totally your timing! the 60f9's should work fine that's what I run in my car. 65 f9 would be better, but 60f9 works fine. ni said before to run your 170's on the main with the 155 air correctors. this should run perfect if is a 12a and if it's a 13b it'll be a little lean up above 5k. If your running what I tell you and you're still glowing it HAS to be your timing.
sorry lol I should have clarified more. 12a stockport (for now).
170 mains
f-11 e-tubes
160 air corrector
36mm venturis
3 psi of fuel.
Good luck
Ryan
Stock 12a with stock fuel system
my recomendation
65F9 idle jets
F3 e-tubes
155 air jets
185 main jets
45 pump jets
36mm choke tubes.
Your biggest problem is the idle jets. take those 65f8's and throw them in the trash. they will never come close to working in any rotary application. 65F9's will cure most of your problems.
you're both wrong... f8's are most likely going to be too lean for washington driving.
Personally I'd try
idle: 60f9
aux choke: 3.5mm
main choke: 40mm
Accel jet: 45
main: 180
a/c: 150
e-tube: f-11
Quote:
Originally posted by RotorMotorDriver
I was told to run (by Fast Freddies) for stock port 12A :
40mm Venturies
180 Main Jet
F-11 Emulsion Tube
160-175 Air Corrector
F-9 65 Idle Jet
65 Accelerator Pump Jet
0 (Closed) Pump Discharge Valve
???? Needle & Seat
Ok once again, I played with my jetting trying to get a little more out of it, and to no avail. I know its running wrong the way it is with the stuff I posted above this. I talked to another person at another place, and they say for a 12A to run:
36mm Venturies
180-195 Main Jet
F-16 Emulsion Tube
160 Air Corrector
F9-65 Idle Jet
45-65 Accelerator Pump Jet
0 (Closed) Pump Discharge Valve
300 Needle & Seat
As you can see, the jetting offered by these two places seems prettly close. Looks like Im gonna try and get me some F-16's...
QUOTE-
I personally started with
F11 E-tube
175 Main jets
55 Pump jets
65F9 Idle jets
36 Chokes
160 Air Correction jets
300 Needle and seat
However, I also purchased one size above and below on most all of those for tuning as this was just a baseline, not a garunteed setup.
Trending Topics
Thread Starter
Dreamin of drivin my 7!
iTrader: (18)
Joined: Feb 2009
Posts: 1,073
Likes: 1
From: Seabeck, Washington
Links ....
Here's a link with instructions on setting up your idle etc.
http://www.webercarburetors.com/ppw/..._typical_i.htm
and another of the same
http://www.redlineweber.com/html/Tec..._typical_i.htm
Here's one on tuning.
http://www.teglerizer.com/dcoe/webertune.htm
http://www.webercarburetors.com/ppw/..._typical_i.htm
and another of the same
http://www.redlineweber.com/html/Tec..._typical_i.htm
Here's one on tuning.
http://www.teglerizer.com/dcoe/webertune.htm
Thread Starter
Dreamin of drivin my 7!
iTrader: (18)
Joined: Feb 2009
Posts: 1,073
Likes: 1
From: Seabeck, Washington
Parts and linkage
Here's some helpful links to places you can get parts and linkage
http://www.piercemanifolds.com/linkage.htm
http://www.summitracing.com/search/?...r%20dcoe&dds=1
http://www.pegasusautoracing.com/keywordsearch.asp
http://www.redlineweber.com/
http://www.piercemanifolds.com/linkage.htm
http://www.summitracing.com/search/?...r%20dcoe&dds=1
http://www.pegasusautoracing.com/keywordsearch.asp
http://www.redlineweber.com/
Thread Starter
Dreamin of drivin my 7!
iTrader: (18)
Joined: Feb 2009
Posts: 1,073
Likes: 1
From: Seabeck, Washington
More to come.
I'll post more a bit later. I need to go out and work on MY weber, I still haven't gotten it tuned yet. I've been hoarding all the info I could find for months. I just hope this saves some others from all the hours of searching and reading through conflicting info and opinions that are out there, to find facts and helpful suggestions.

I've been hoarding all the info I could find for months. I just hope this saves some others from all the hours of searching and reading through conflicting info and opinions that are out there, to find facts and helpful suggestions.
Thread Starter
Dreamin of drivin my 7!
iTrader: (18)
Joined: Feb 2009
Posts: 1,073
Likes: 1
From: Seabeck, Washington
High altitude tuning
An article on high altitude tuning.....
Tuning Weber Carbs for High Altitude
Note...From Sea Level to 2500 Feet there will be very little change.
This is a question we get asked all the time. There is no exact answer or formula to altitude jetting Sidedraft or Downdraft Weber carbs. Here are the steps you need to take in order to Re-Jet your carb for High Altitude operation. This applies to both Single and Dual Sidedraft Carbs and Single and Dual Downdraft Carbs. Bear in mind that there is nothing you can do to stop the power loss you experience at high altitude. That is just a function of the lack of Air to mix with fuel for combustion. Jetting the carb properly to get the correct fuel mixture is the key to maximizing the available power.
Step-1: Find out what is in the carb now ! Do not guess and think that you have the jetting that supposedly came from the Weber factory. Find out what Main Jets, Air Jets and Idle jets you have in your carb. If it is a progressive carb make a note of what what jets were in the Primary and what jets were in the secondary. The Primary is the barrel that opens first. If you have Sidedrafts or Downdrafts with removable venturis then find out what size venturis are in your carb(s).
This is CRITICAL. You cannot tune a carb without knowing what you are starting with.
Idle Jets: You will normally need to drop 1 Idle jet size (Meaning a step of 5. 50 to 45) for every 2000 feet above 3000 feet of altitude. This assumes the car ran properly at seal level. If you have No Sea Level Reference then you just have to get a range of jets smaller than your starting point.
Main Jets: You will normally need to drop 1 main jet size (Meaning a step of 5. 150 to 145) for every 1000 feet above 3000 feet of altitude. This assumes the car ran properly at seal level. If you have No Sea Level Reference then you just have to get a range of jets smaller than your starting point.
Air Jets: You will normally need to Increase 2 Air jet sizes (Meaning a step of 10. 150 to 160) for every 1000 feet above 3000 feet of altitude. This assumes the car ran properly at seal level. If you have No Sea Level Reference then you just have to get a range of jets Larger than your starting point.
Flat Levels anf Fuel Pressure: No changes to these for High Altitude operation.
There is no shortcut or magic formulas. You just have to work through it. The guidelines above are starting points based on correct seal level operation. You will just need to invest in a range of jets to properly tune the engine at the altitude you are operatin at.

Ok, since deciding to go with the weber 45 DCOE, I had to read through what seemed like a million postings to find the info I needed. Since questions about these carbs seem to be a pretty frequent occurrence, I decided I'd create this post and try to compress alot of the info into one spot. Hopefully this helps others in my spot later. I'm still in the "learning" stage with mine, so all the info I post is found and credited to others than me. This info is for easy reference and not to be taken as "gospel" or a "how to", just a wealth of info and etc. to help you figure it out on your own.
That said, I need to state that alot of the "suggestions" here will be 12a specific, since that is what I have, alot may apply to other engines as well but I don't promise anything.
The first thing I should have learned is the general way this carb works. That way you can better understand the way it acts and how/wheere to start tuning. So, here is a visual to help.
Good Work Bro! This is goin to help me when I drop my IDA on my SA22. I vote for this thread to be archived onced your done adding all your info!
Thread Starter
Dreamin of drivin my 7!
iTrader: (18)
Joined: Feb 2009
Posts: 1,073
Likes: 1
From: Seabeck, Washington
Thanks!

Thread Starter
Dreamin of drivin my 7!
iTrader: (18)
Joined: Feb 2009
Posts: 1,073
Likes: 1
From: Seabeck, Washington
A good article on the weber carb
WEBER CARBURETORS
A Technical Primer By: Mickey Luaria
"If you have always wanted to know what makes these carburetors so special, here's a basic, easy-to-understand introduction to the world of Weber exotica."
Weber carburetors have been seen as standard equipment on the finest racing and street machinery to come out of Europe for over three decades. Maybe you've been lucky enough to get a ride in a Ferrari or a Weber carburetor 289 Cobra; if you have, chances are, it's a ride you've never forgotten! Weber-carburetor engines all have one thing in common: they assault the senses with a rush of torque and a brutal sense of urgency that is generally unmatched among carbureted engines (and they have a sound all their own...go to a Shelby American convention on Open Track day and you can pick out the Weber-carbureted Cobras just by their sound; there is no mistaking it!). The world's most beautiful, exotic and most powerful engines have traditionally been fed through Weber carburetors. But why Weber?
For starters, it's a modular carburetor design. It is produced in a wide variety of styles which incorporate different features, enabling the user to select exactly the right design and size for the intended use. You can even change its CFM to suit your needs, which should begin to explain the Weber's superior adaptability for all kinds of applications.
Now, if you're one of those people who has always had trouble accepting the idea that the Weber is a terrific street carburetor, consider it this way: Weber carburetion is like an expensive musical instrument. If it is not tuned properly, that instrument will never make beautiful music for you-no matter what! And therein, lies the secret of making beautiful music with Weber carburetors-initial preparation...... It's what "tuned induction" is all about!
THE CONCEPT
The Weber carburetor was designed to be totally adaptable to any size engine, for any purpose, at any altitude. There is no such thing as taking four of these out of their boxes and bolting them on to an intake manifold...it simply isn't done that way. This carburetor was intended for serious tuners and performance enthusiasts who want the most that their engine can give them. Welcome to the Big Time!
TERMINOLOGY
All Weber carburetors carry a basic model number which is stamped at the base of the carburetor on its mounting flange. The most well-known is the good-old "48 IDA", a masterpiece of design and a marvel of precision machining that has been around since the early 60's with only minor revisions. In this case, the number 48 indicates the carburetor's size. It tells us the carburetor has a bore diameter and throttle plate size of 48 millimeters (about 1 15/16"), while the IDA suffix tells us that it is a high performance downdraft carburetor. There is also a 40 & 46 IDA/3C. Again, a high performance downdraft, available in 40 and 46 mm sizes. The 3C means this one's a "3-choke" (the in-line three barrel). The 40, 42 and 44 DCNF's are compact twin-throats which feature a cold-start. As the prefix numbers indicate, they are available with bore diameters of 40, 42 and 44 mm. Then there are the sidedrafts - all Weber sidedraft carburetors carry the suffix DCOE, their prefix numbers (sizes) ranging from 38 mm all the way to 55 mm (that's close to 2 1/4"). So you see, all those numbers and letters really mean something. It's all pretty simple.....So, the next time someone mentions he's running Weber's, ask him whether he's running DCOE's or IDA's and pick up a few bench-racing pointers.
THE VARIABLE CFM FEATURE
Some where along the line, you can probably recall seeing four 48 IDA's on a big, nasty rat motor. You've also probably noticed that the same four 48 IDA setup is used on 289 Ford engines, as on the Cobras, for instance, You may have wondered how the same carburetor setup could work on two such vastly different engines. It seems that one engine would have to be either over or under carbureted, if we assume that the carburetion is "right" on one engine. Actually, this isn't true at all, because either engine is running the same set of carburetors as the other. Assuming the Webers are set up properly, the only thing the two systems will have in common is their outward appearance. The Weber's most interesting design feature is it's removable "choke" or venturi, allowing it to be instantly converted from a large-CFM carburetor to one of small CFM, or vice-versa.
By installing a smaller choke, the carburetor is constricted and it flows less CFM, to make it perform in the midrange, or to make it suitable for use on a low-compression small block engine. Pull out those small chokes, drop in some large-diameter ones, which may be nothing more than thin-wall "sleeves", and you've got a set of 48 IDA's that will flow enough CFM to make a big block scream. But don't try putting those "big" carburetors on the small block motor! It will fall flat on it's face, lack throttle response and become a complete nightmare in traffic("....My buddy had a set of those Webers on his engine, and boy! did that car run badly!!!!!"). In order to get drivability, throttle response and lots of torque from the Weber-carbureted engine, the choke size, therefore, is the first consideration. How big is the motor, what's the compression ratio and what do you want to do with it, once the correct size choke has been selected for your application, the jetting for all the rest of the circuits can be established around that choke size.
THREE CIRCUITS
For the sake of simplicity, let's look at the Weber carburetor as having three basic circuits- the idle circuit, the accelerator pump circuit and the main circuit.
The idle circuit is comprised of two components, the idle jet and the idle jet carrier. With these two pieces, the tuner can select exactly how much fuel and how much air he wants to provide the engine at idle and during the low rpm operation, while making very fine adjustments to either, if necessary. The idle mixture is delivered as a proportioned mixture whose total volume can be further regulated with the idle mixture screw, which is located on the lower part of each carburetor barrel. On a correctly-jetted idle circuit, the mixture screw on a 48 IDA is never more than 3/4 of a turn out. This will hold true 100% of the time, no matter what anyone else tells you. If you have to go more than that, you'd better heavy-up the idle jet. Even if you get it to idle, going more than 3/4 turn tells you the jet is lean and you're going to have other drivability problems, which brings us to the next part of the idle jet's function.
The idle circuit in the Weber isn't just an idle circuit - it does more than that. It is actually the circuit which must carry the engine all the way up to about 2,800-3,000 rpm, where the transition to the main circuit take place. That means if you don't drive over 3,000 rpm, you're only running on the idle jets. After 3,000 rpm or so, the idle circuit is entirely bypassed and no longer has anything to announce. So, if you have a tuning problem that "goes away" after about 3,000 rpm, that tells you to play with the idle circuit. Or maybe the opposite is true. Either way, it's very cut and dried as far as the two circuits are concerned - so isolating the problem is a breeze.
One the most frequently experienced "gremlins" with Weber carburetors is a seemingly incurable and very annoying flat spot which rears its ugly head at about 2,200-2,800 rpm. This condition is generally caused by one of two things - you either have the wrong emulsion tube in the carburetor, which is causing a rich stumble due to an under-emulsified mixture at that particular rpm range or the idle circuit is falling off too early to carry the engine up to the point where the main circuit can take over, leaving a "lean hole". In simple terms, the idle circuit is going lean too early. Either condition is easily rectified. In the case of the emulsion tube, there are really only a few which work really well for V8 applications; and if you aren't using one of them it is certainly a big part of the problem. If the flat spot is still there even with the correct emulsion tube, then you'll need to richen up the idle circuit. This is sometimes a tricky area, because the first thing you want to do is throw in a bigger idle jet, but sometimes playing with air bleeds, mixture screws, or choke sizes can accomplish the same thing while sticking with the original jet size. Seeking a little bit of sound advice here can save a lot of time and hassle. The point here is that these carburetors are designed to come off idle and run smoothly all the way up. Your problems can be solved with a little tuning on your own or by relating the symptoms to someone who is knowledgeable enough to help you. Remember, these carburetors will do just about anything you want them to, except maybe wash your socks.
The accelerator pump circuit, just like on any carburetor, is responsible for eliminating "bog" and making a passing maneuver without a hesitation or stumble. The circuit also has two basic elements. These are the pump exhaust valve and the pump jet. The pump exhaust is nothing more than a bypass valve and this is located in the bottom of the float bowl. This is the piece that regulates how much fuel you want to make available when you need that pump shot. Putting a bigger bypass hole in the valve allows more fuel to bleed back into the float bowl instead of out of the shooters. The smaller the hole, the more fuel you're making available. You can even put in a "closed" bypass for drag racing, when you need all the juice you can get in order to get those slicks turning. Obviously, there is nothing complicated about a simple bypass system. The duration of the pump shot is varied by installing a larger or smaller pump jet (shooter). Larger pump jets give a heavy blast over a short period, while the smaller ones will give a finer, longer-duration shot. As long as you leave the bypass valve alone, you're still getting the same overall volume. In most cases, the stock pump jets can be left alone.
The main circuit is the easy one. This is where you make your power. This circuit has three primary elements you should concern yourself with - the main jet itself, the emulsion tube and the air corrector. You're thinking that's a lot of pairs - usually, it's just a main jet. You know how to "read" what your Webers can tell you on a road test, you wouldn't have it any other way. The capability for fine adjustment is what you pay for. Let's take a look at this main circuit......
The main jet is stuck into the bottom of the emulsion tube and sits in fuel. As the carburetor begins to work, the main jet meters the amount of fuel allowed to pass through it and up into the "main well" around the emulsion tube. Air enters the top of the emulsion tube through the air corrector which meters the amount of air to be mixed with the fuel. The air blows out of the emulsion tube through a series of holes along its length and aerates the fuel that is rising up the well around the tube. This emulsified mixture is then sucked out of the main delivery nozzle as the "depression" in the carburetor increases to the point where it's strong enough to pull it out. This occurs by 3,000 rpm or so, and you're down the road like a shot.
Tuning the main circuit for maximum power is something that can be done by a series of road tests and a handful of jets. The simple rule of thumb for jetting Weber carburetors is, if you want to implement a change over the entire rpm range, you play with the main jet. If you want to change the way the car feels at the high end, that's where the air corrector comes in. Also, you should keep in mind that the air corrector is a finer adjustment that the main jet. Example: One step upward in the main jet (richer) equals about the same as three steps down on the air (less air: richer). A change of air corrector would be appropriate; for instance, if the engine pulls strong to 5,000 rpm and then goes flat. This would mean she's going lean on you up top; drop the air corrector three sizes or so, and you'll probably be able to buzz that engine right up to 7,000 rpm. If the motor feels sour all the way up, go one or two sizes heavier on the mains only. No magic! So, tell me, what's so hard about jetting these Webers?
STREETABILITY
Most people don't realize that this carburetor, like all highly efficient items, is an extremely simple design with very few moving parts. There are no metering rods, power valves, rubber seals or plastic parts. The accelerator pump on the 48 IDA is a brass piston. The throttle shaft rides in a set of precision roller bearings. Webers use brass floats, which cannot become fuel-logged, and gradually sink with age. It is a superior example of precision machining and "beautifully-fitting" components...it's really very unlikely that one of these carburetors is going to "fail" and cause you to be stranded somewhere. That's another reason why they're well suited to street use and long-distance cruising - they are extremely reliable.
With the infinite tune ability of Weber carburetors, there is no need to compromise the drivability or road manners of your car. If you know someone who suffers from drivability problems with such a nice carburetion system, he is doing so unnecessarily. A Weber unit should be crisp, responsive and smooth. If it is not, something is wrong - let's just say he's not through tuning it yet, that's all!
The first thing most people notice when they go to Webers is an increased flexibility from the motor. There is a natural tendency for a Weber-carbureted engine to idle smoother, have a slicker "feel" to it a low speeds (particularly if a hot camshaft prevented that feeling before), and generally feel much more powerful throughout the entire rpm range. This is largely because they use an independent-runner manifold, which does not incorporate a plenum. In a typical four two-barrel Weber layout, there is one barrel directly feeding each cylinder without any intercommunication between barrels or cylinders. This totally "isolated runner" design ensures that each cylinder is fed exactly the same as the next, without any chance of charge-robbing or over-feeding. What you are doing, in effect, is separately tuning each cylinder. This results in a dramatic increase in horsepower output and torque in midrange, right where street engines spend 90% of their time, making this an ideal carburetion system for street use, where maximum flexibility creates greater driving enjoyment. The throttle response with an independent runner induction system is also a new experience, it's second to none. A Weber carburetion system will respond like a fuel injection unit, with which it shares some similarities: short runner length, isolated design and essentially a low fuel mass to move when you hit the throttle. (Remember, you're not asking that cylinder to gulp all the mixture from that big plenum area - that's a lot of mass, by comparison. The only mass to move is what's in that one short runner). The main difference between fuel injection and Weber carburetion is that one relies on fuel being injected under very high pressure, while the other responds to the needs of the engine via the depression principle. For street use, the Webers have the edge - it's what they were made for.
In the mileage department, it really depends on the rest of the engine and your driving habits, but 16 to 18 mpg is not unusual on the highway. This is pretty respectable, when you stop to consider that the engine is fed by all eight barrels constantly. There is no such thing as a progressive system here. Another thing: Webers will run happily on regular gas. If you can run regular now, you can continue doing so after installing the Webers. This is purely a function of compression ratio and ignition timing, not induction. In fact, if you're running a 10.5:1 engine, you may find it's a little bit fussy about which brand of fuel it wants. giving you detonation at times. Generally speaking, the Weber carburetion will likely change this for the better, suppressing the tendency to "ping". One reason for this phenomenon is that the fuel distribution is now fully controlled, eliminating the "lean spots" which sometimes are present in conventional manifolds which distribute fuel from a central plenum. Lean cylinders run hot - excessive cylinder heat means detonation.
TUNING AND MAINTENANCE
A Weber carburetion system will not be right, unless it's synchronized to ensure that each carburetor is doing exactly the same as the next - the name of the game is perfect cylinder tuning. The synchronization procedure can either be a breeze or a nightmare, depending on whether you have a well-designed linkage system or not. The secret to a good linkage setup is that it must allow independent adjustment of each carburetor without affecting all the rest as you go through the procedure. Here again, if someone tells you they're absolutely impossible to synchronize, you might study his linkage. Chances are, it's incorrect and he's fighting himself. The right components are now available to take this out of the dark ages.
The final idle mixture adjustment on each barrel is a simple adjustment which is performed by ear, but because there are four carburetors, a lot of guys feel intimidated. It's done the same way you do a single four barrel, except in this case, you can listen to each cylinder separately. It may take you four times longer, but it's no more difficult at all. Each mixture screw, as it is turned, will have a noticeable effect on engine rpm, as the wrong setting will cause the cylinder to "go away" - it's just like pulling a plug wire. No matter how hard you try, you can't mess this up if you remember one thing: always start from scratch at 3/4 turn out. From there, you go 1/8 of a turn either way and it's usually in, not out. This will get you out of the woods if you ever get lost.
Once the unit is synchronized and the idle mixtures are dialed in to give you the smoothest possible idle, you can hang up your Unisyn and screwdriver til' next spring, because now it's set! And when it's set, it's set!! They will not suddenly "go out" on you and ruin your day at the picnic.
EXPENSE
When it comes to the Price of Admission to "Weberdom", what can one say...... Webers are not for everyone. This type of induction unit represents a sizeable investment. It's still possible to put a unit together on your own with bits and pieces, and if you're a fast-lane spender, you can opt for a ready-to-run unit created especially for your engine. Dollarwise, Webers usually fall into the category of a supercharger with carburetors. The price of opening up a box and pulling out a science-out Weber unit with all the right pieces and associated hardware will run you from $3,000.00-$4,000.00, depending on how much flash you have to have. Sound expensive? Maybe not, if you consider that all things are relative. When you figure the price of a top quality paint job at $5,000.00 to $10,000.00, a completely redone interior at $3,000.00 to $5,000.00, a set of trick wheels and tires at maybe $3,500.00, and your basic "nice street engine" at $3,000.00 to $5,000.00, another two grand for an item that changes the car's whole personality falls right in line.
And as they say, "the fun's in the driving". Weber carburetion is a lot more than something that's exciting to look at. Every time you take that machine of yours down the road, you become more aware of your engine's ability to do everything it should do with a minimum of fuss. Throttle response, quick acceleration and overall flexibility are the constant reminders of what you've spent your money on - the ultimate carburetion system!
Thread Starter
Dreamin of drivin my 7!
iTrader: (18)
Joined: Feb 2009
Posts: 1,073
Likes: 1
From: Seabeck, Washington
Weber circuits explained.
How does a Weber carburetor work?
For the sake of simplicity, let's look at a Weber carburetor as having three basic circuits- the idle circuit, the accelerator pump circuit and the main circuit.
Idle circuit
The idle circuit is comprised of two components: the idle jet and the idle jet carrier. With these two pieces, the tuner can select exactly how much fuel and how much air he wants to provide the engine at idle and at low rpm, while making very fine adjustments to either. The idle mixture�s total volume can be further regulated with the idle mixture screw, which is located on the lower part of each carburetor barrel.
On a correctly-jetted idle circuit, the mixture screw on a 48 IDA is never more than 3/4 of a turn out. This holds true 100% of the time, no matter what anyone else tells you. If you have to go more than that, your idle jet is too small. Even if you get it to idle, adjusting more than 3/4 turn tells you that the jet is lean and you're going to have other drivability problems, which brings us to the next part of the idle jet's function.
The idle circuit in a Weber carb isn't just an idle circuit -it is actually the circuit that carries the engine all the way up to about 2,800-3,000 rpm, where the transition to the main circuit takes place. After 3,000 rpm or so, the idle circuit is entirely bypassed in favor if the main circuit. So, if you have a tuning problem that "goes away" after about 3,000 rpm, take it as your cue to look for the problem within the idle circuit.
Accelerator pump circuit
The accelerator pump circuit, just like on any carburetor, is responsible for eliminating "bog" and making a passing maneuver without a hesitation or stumble. The accelerator pump circuit has two basic elements: the pump exhaust valve and the pump jet.
The pump exhaust is nothing more than a bypass valve located in the bottom of the float bowl. This is the piece that regulates how much fuel is made available when you need that pump shot. Putting a bigger bypass hole in the valve allows more fuel to bleed back into the float bowl instead of out of the accelerator pump jets. Putting a smaller hole in the bypass valve causes more fuel to squirt out of the accelerator pump jets. You can even put in a "closed" bypass for drag racing, when you need all the fuel you can get in order to get those slicks turning.
The duration of the pump shot is varied by installing a larger or smaller pump jet. Larger pump jets give a heavy blast over a short period, while the smaller ones will give a finer, longer-duration shot. As long as you leave the bypass valve alone, you're still getting the same overall volume. In most cases, the stock pump jets can be left alone.
Main circuit
The main circuit is the easy one. This is where you make your power. This circuit has three primary elements that you should concern yourself with - the main jet, the emulsion tube, and the air corrector.
The main jet is stuck into the bottom of the emulsion tube and sits in fuel. As the carburetor begins to work, the main jet meters the amount of fuel allowed to pass through it and up into the "main well" around the emulsion tube. Air enters the top of the emulsion tube through the air corrector which meters the amount of air to be mixed with the fuel. The air blows out of the emulsion tube through a series of holes along its length and aerates the fuel that is rising up the well around the tube. This emulsified mixture is then sucked out of the main delivery nozzle as the vacuum in the carburetor increases to the point where it's strong enough to pull the air/fuel mixture out. This occurs by 3,000 rpm or so, and you're down the road like a shot.
Tuning the main circuit for maximum power is something that can be done by a series of road tests and a handful of jets. The simple rule of thumb for jetting Weber carburetors is, if you want to implement a change over the entire rpm range, you change the main jet. If you want to change the way the car feels at high rpm, you change the air corrector. Keep in mind that the air corrector is a finer adjustment that the main jet. As an example, one step upward in the main jet (richer) produces the same change in engine behavior as three steps down on the air corrector (less air: richer).
A change of air corrector would be appropriate, for instance, if the engine pulls strong to 5,000 rpm and then goes flat. This would mean it's running lean at the top end; drop the air corrector three sizes or so, and you'll probably be able to buzz that engine right up to 7,000 rpm. If the motor feels sour all the way up, go one or two sizes heavier on the main jets.
Thread Starter
Dreamin of drivin my 7!
iTrader: (18)
Joined: Feb 2009
Posts: 1,073
Likes: 1
From: Seabeck, Washington
Step by step tuning guide
FROM: PerformanceCarbkits.com
I am not going to explain everything about these carbs. The Weber Factory Tuning manual has all the good technical information already written. This is the backyard mechanics guide to the basics you need to know to make your carbs run right....
Step-1: If you are having a problem with how the engine runs...Poor idle quality, stalling, etc then this is the first thing to do. CHECK FOR VACUUM LEAKS ! This is particulary true of new installations where you just purchased and installed a conversion kit and you are having problems. You have to remember that most Weber conversion have been around for many years and have been installed on hundreds of cars and trucks. They work. The likelyhood of having a defective carb out of the box is about like being hit by lightning. If you are having a problem on a new install it is most likely this problem or one of the steps below... See the Vacuum leak tech page for this info. DO NOT OVERLOOK this as a problem...This is the #1 problem with any Weber carb conversion.
* Do a compression test..If the compression is off by more than 10% per hole you will have a really bad time tuning the carbs.
* Always start with a fresh set of Spark Plugs. So not clean them...Start fresh. This will give you a good reading of fuel mixture and enable you to make a good judgement of what you need to do.
* Set the Timing...Generally speaking you need a little more advance with a Weber than with the stock carb. A good place to start for most cars with Webers on pump gas is 12-14 Degrees advance at 1000 RPM idle and 36 Degrees total advance by 3000 RPM...This is not cast in stone and you need to make sure your car does not Detonate at these setting. If you get any detonation then you need to back off the timing...
Step-2: If you have a single carb you can skip this step...If you have multiple carbs then the 1st thing you need to do is make sure the carbs are Synchronized properly using a Correct Synch tool. This is CRITICAL to multiple carb performance...I don't care how good you think you are at synching a set of multiple carbs by ear (I'm very good and I'm not half as good as the tool is.) you are not close enough. The Synch tool will also alert you to other problems in the system like Bent throttle shafts, etc.... Linkage...This cannot be stressed too highly. Badly designed or Worn linkage is the #1 cause of problems with Multiple carb systems. More people have given up on Dual and Triple carb systems because of linkage than any other problems combined. If the carbs are not hooked together in a fashion that has no slop and allows minute adjustment between the carbs you are always going to have problems. Poor idle quality and "sticky high idle" problems are the most common symptom of this. A slight imbalance between the carbs at 1/3 throttle and up is not really noticeable to most people but a miniscule difference at idle will cause all sorts of problems. So in short...Get the carbs synched right FIRST. Repair or replace the linkage as needed to make them work together properly.
Step-3: Know what is in your carb NOW. Do not rely on a list on a website or a book that says what your carb might have come with. Actually remove the jets and chokes and check the sizes and WRITE THEM DOWN. Use this form to write it in so you know what you have. You cannot make jet decisions unless you kow what you are starting with...
Step-4: Make Sure your Ignition system is working properly. Remember...A Weber carb is always a performance upgrade and is designed to deliver more fuel and air and make more HP then the stock carb did. This means you need to have adequate spark to burn the extra fuel or you will have problems tuning and jetting your carbs. This is especially true of old British cars and cars that have point type igntion systems. A lack of spark or weak spark will make it impossible to tune the carbs properly or to their maximum potential. This is especially true of all multiple carb installations. You cannot hang multiple carbs on any engine without an increase in spark output and even hope to burn the extra fuel being delivered. A good electronic Ignition system to replace points and the addition of an MSD unit and good coil and wires are the best way to go. See our Ignition tech page for more details.
Step-5: Make sure that your Fuel Delivery is right....Once again, you cannot tune carbs that do not have adequate or proper fuel delivery. See our Fuel pump Tech Page for this information. Do not ignore this step.
Step-6: Okay...Now that you have everything else sorted out ( Right ? You did do all that other boring stuff didn't you ? ) you can actually start tuning the carbs...The good news is that you probably made the car run good enough by doing those other steps that there is not alot else to do..... If your car is still not running properly or you feel that you should have more power (Be realistic about that. A 4 cylinder 2.0 with a 32/36 is only going to make about 120-125 HP max so don't expect miracles.) then it is time to jet and tune the carb(s) You need to establish if you are running lean or rich. There is no way around this. There are a few easy ways to establish this and it is important to know otherwise you cannot get different jets to cure the problem. You can be running Rich at idle and Lean on the main circuit and Vice Versa...You need to do a plug check....Unless you have access to a 3 Gas or 4 Gas anaylzer or Smog Machine to do your tuning then reading the plugs is the next best thing..Another good option is to install a Halmeter AF30 Air Fuel Ratio Gauge to help you with tuning. It is fast and accurate and will take alot of the guesswork out of it. This is a particularly valuable tool for cars that get track use so that you make sure you do not lean out and put a hole in a piston...
You need to check your spark plugs to see if you running rich or lean. White plugs are lean and Black plugs are Rich. Ideally you want the ceramic part of the plug a nice Dark Tan to medium Brown color with a slightly darker ring right at the base of the threads of the plug. A new set of plugs may take a few minutes to get some color on it...
Idle Mixture and Fuel Mixture:
There are alot of theories about setting idle mixture adjustment on a Weber carb to determine Rich or Lean jetting....A Weber will run correctly with the mixture screws from 1/2 turn to 3 turns out...The late style DCOE carbs with the extra Air Bleed Screws on the top take 2.5 to 3 turns to operate correctly...So you cannot say that because it is 1/2 turn out that you need smaller jets....You need to find what is right for that particular engine...An engine with a strong vacuum signal will draw more fuel in with less turns of the screw than an engine with a weak vacuum signal will...This is the kind of thing that throws the "certain number of turns" theory out the window..
The Mixture screw and idle circuit is CRITICAL to the overall driveability of the car. It does not just control idle but the entire low speed running and part throttle transition. The mixture screw lets in an ALREADY MIXED volume of Fuel and Air to the engine. This is not an Air Screw. The more you open it the more mixed fuel and air enters the engine. Clockwise is Leaner and Counter-Clockwise is Richer.
The mixture screew is very easy to set whether it be a downdraft, sidedraft or multiple sidedrafts. Start with the screw or screws out 1.5 turns....Start the car and let it warm up. Set the Idle SPEED to approx 900-1000 RPM..Make sure multiple carbs are synchronized...Turn the mixture screws in until the idle starts to stumble and get rough...On a sidedraft with 2 screws do them each a little at a time....Then back them out until the best idle quality is acheived. This is a very simple operation...The car should idle well and small adjustments leaner (Turning them in) should make the idle drop off. Opening the screws more should make it a bit richer but it should still idle. Assuming you have no vacuum leaks this is a very simple process. If you cannot get a good adjustment on these screws and you have to open the idle speed screws quite a bit to get the engine to idle there is a good chance you have a Vacuum Leak and you need to fix it.
Specific Information on Mixture Screw Setting for:
32/36 DGV, DGEV Carbs. If you have to open the mixture screw more than 2 turns on a 32/36 DGV or 38 DGES your idle jets are too small...If you have to shut them below 1/2 turn they are too big....
38 DGES. If you have to open the mixture screw more than 2 turns on a 32/36 DGV or 38 DGES your idle jets are too small...If you have to shut them below 1/2 turn they are too big....Also the 38 DGES can be a little tricky because you are idling on both barrels at the same time. You have 2 mixture screws and they will not be set the same on most cars. This is because the plenum type manifold that they are on distributes fuel unevenly. By having 2 mixture screws you are delivering fuel from 2 places in the intake manifold. The Mixture screw closest to the engine will no doubt need to be in much farther than the outer mixture screw. This is Okay. I do not recommend Stagger jetting the idle circuit on a 38 DGES (In other words, do not use 2 different size idle jets even though you need to adjust the screws differently. This can cause part throttle dirveability issues.)
DCOE Series and IDF / IDA. On a DCOE or multiple DCOE's you should be between 3/4 turn and 1.5 turns out for all older model DCOE's (DCOE 2, 9, 18, etc.) and 2 1/4 to 3 turns out for late style DCOES (151 and 152 with air bleed screws under the white caps.)
Idle Jets and tuning the idle circuit: Very Simply..The bigger the number the richer the jet. A 50 Idle jet is a .5mm fuel hole. On the DCOE and IDA series carbs they have 2 numbers on them like 50F8. The 50 refers to the .5mm fuel hole and the F8 Refers to the Air Bleed hole in the side.
A DGV, DFV, DGES mix the air internally in the carb and do not have these air bleed holes in the idle jet. In a DCOE you are acutally tuning the Air and Fuel for the idle circuit with the idle jets. This is a little more tricky but not too bad...Basically you can tune just about any car in the world with an F8 or an F9 idle jet. ( YES there are exceptions to this and I am well aware of them so don't send me nasty e-mails saying that your Mini only runs on F6 idles. This is a basic tuning primer and there is no need to get into vehicle specific problems.) The F8 is Leaner (Has a larger Air hole) than the F9...Soooooo. You can have a 50F8 and a 50F9 and both have the same amount of fuel but the 50F9 has a richer MIXTURE (Less Air to the same volume of fuel.) Generally speaking you should start with an F8 and play with the fuel size until you get close then experiment with an F9 to see if that works any better...
IDF carbs are similar to the DGV and DFV series in that the air is mixed internally. There is no F Number to deal with. The IDA carbs have no Air Bleed Hole but do have an F number to identify this feature. It is an F10. The Air Bleed for the IDA carb is in the Idle Jet holder and it is metered similar to the DCOE. For those of you with multiple IDA or Rotary engines running a single 48 IDA you usually know what you are doing so I won't go into all the details on this.,..
Idle jets are in .5 steps...50,55,60,65 etc. The bigger the Idle jet number the richer the jet. 1 step in idle jet size can make a HUGE differerence. Do not go up or down more than 1 step at a time when tuning the idle circuit.
Choke Tubes and the Main Circuit:
Okay...So now your car should idle correctly, the carbs are synched, the timing is set, everything is good....Time to get the main circuit right. Drive the car. It should come off of idle good and transition to the main circuit smoothly...If it falls on its face and will not take any throttle or runs better if you back off the then you could have a few different problems depending the type of carb. Before you blame the carb make sure you have the Fuel delivery right and the Spark Timing. If you do not have enough advance you will have this problem and it will have nothing to do with the carb tuning.
32/36 DGV, DGEV, DFV and DFEV
These carbs have fixed venturis so the choke size is not an issue. The pump jets are also not a problem. Do not mess with them. If you have a flat spot or hesitation when you first take off then it is likely that the idle circuit is too lean. If you know you have the idle circuit right then the primary main jet is too small. Increase the main jet size 2 steps at a time. (150 main is a 1.5mm hole...Main jets are in steps of 5. eg: 150, 155,160,etc.) Keep checking the plugs after driving it for a few minutes (Do not let it idle when checking the spark plug color for the main jets. Drive the car above 2000-3000 RPM for a few minutes then shut the engine off before letting it idle then check the plugs. If the car then transitions fine but hesitates or falls on it face when the secondary is opened you need to work on the Secondary main jet....
A good option to playing around with your 32/36 Weber jetting is to just get one of our Custom Performance Jetting Kits....We offer these for all Single 32/36 DGV and DGEV applications operating from Sea Level to approx 4000 Ft...Above 4000 Ft you start having more altitude problems and the vehicle needs to be tuned as outlined here. Another good option is to install a Halmeter AF30 Air Fuel Ratio Gauge to help you with tuning. It is fast and accurate and will take alot of the guesswork out of it. This is a particularly valuable tool for cars that get track use so that you make sure you do not lean out and put a hole in a piston...
38/38 DGES
These carbs have fixed venturis so the choke size is not an issue. The pump jets are also not a problem. Do not mess with them. If you have a flat spot or hesitation when you firts take off then it is likely that the idle circuit is too lean. If you know you have the idle circuit right then the main jet is too small....Increase the main jet size 2 steps at a time. (150 main is a 1.5mm hole...Main jets are in steps of 5. eg: 150, 155,160,etc.) Keep checking the plugs after driving it for a few minutes (Do not let it idle when checking the spark plug color for the main jets. Another good option is to install a Halmeter AF30 Air Fuel Ratio Gauge to help you with tuning. It is fast and accurate and will take alot of the guesswork out of it. This is a particularly valuable tool for cars that get track use so that you make sure you do not lean out and put a hole in a piston...
DCOE, IDF or IDA
Here we go....This is the real tricky part. I feel that Sidedraft DCOE , IDF and IDA carbs are easy to tune but you have to have a real feel for Rich and Lean and understand how the carb works. To get a good understanding of this I cannot recommend too highly to get the Weber Factory Tuning manual and really understand what each component does. That said this is the real Cliff Notes version of tuning the power circuit of these carbs.
Choke Tube or Main Venturi size is the basis for everything in tuning DCOE, IDA and IDF carbs. If you get the Venturis wrong you will never get it running right. Too big and you will always have a flat spot that you cannot tune...Too small and it will always run rich and not make any power. If you have poor throttle response at low RPM
This is a guideline only to get you started or to make sure you are not totally out of range making it very difficult to tune. There are many of you running cars successfully with choke sizes outside this range so don't e-mail me about it. The difficulty in tuning these types of cars is that there are many combinations that work well depending on the engine and the state of tune. That is why everything is tunable. You can tailor the carbs to suit your needs, driving style, engine, location, weather and altitude conditions, etc.....
Here is a very basic chart of what venturi sizes you need to popular vehicles and engine sizes for STREET USE...All out race engines are a totally different story. Use the engine size and HP rating to estimate what you need for your car or engine if it is not listed.
This is a guideline only to get you started or to make sure you are not totally out of range making it very difficult to tune. There are many of you running cars successfully with choke sizes outside this range so don't e-mail me about it. The difficulty in tuning these types of cars is that there are many combinations that work well depending on the engine and the state of tune. That is why everything is tunable. You can tailor the carbs to suit your needs, driving style, engine, location, weather and altitude conditions, etc.....
Engine / Car Approximate HP Carb or Carbs Starting Choke Tube Size
Datsun Z 2.8 - 3.0 250-280 Triple 45 DCOE 36mm
Datsun Z 2.4 - 2.8 200-250 Triple 40 DCOE 34mm
BMW 2002 130-140 Dual 40 DCOE 34mm
BMW 2002 150-160 Dual 45 DCOE 36mm
BMW 2002 130-140 Single 45 DCOE 36mm
BMW 2002 120-130 Single 40 DCOE 32mm
Toyota 22R 140-150 Dual 45 DCOE 34mm
Toyota 4AGE 130-140 Dual 40 DCOE 34mm
Porsche 914 2.0 120-130 Dual 40 IDF 32mm
Porsche 914 1.8 110-115 Dual 40 IDF 30mm
Mazda RX7 Stock Engine Single 48 IDA 42mm
Mazda RX7 Street or Bridge Port Single 48 IDA 44mm
Do not try to choke down a DCOE carb that is too large to try and cure a problem...you will just create more problems....A 45 DCOE should NEVER need less than a 34mm choke to run properly. If it does then the carbs are too large or you have another problem...A 40 DCOE can use as small as a 28mm choke tube but chances are the performance will not be good with anything smaller than a 30mm choke....I have found that a correctly sized 40 DCOE application should always stat with a 30mm choke and do up to a 34mm max....Bigger or smaller than that and you probably have either the wrong size carbs or another problem that is causing you to tune outside of this range...This same info applies to IDF carbs as well..
Thread Starter
Dreamin of drivin my 7!
iTrader: (18)
Joined: Feb 2009
Posts: 1,073
Likes: 1
From: Seabeck, Washington
Weber service manual
Ok, I have the weber service manual and a few other goodies too, but they are in PDF. So, if anyone would like a copy of that, pm me with your email and I'll try to shoot you a zipped copy. Or, if anyone knows how to put it up somewhere, let me know and I'll forward it. Hope this stuff helps someone.
PS- a couple shots of my weber.
PS- a couple shots of my weber.


Thread Starter
Dreamin of drivin my 7!
iTrader: (18)
Joined: Feb 2009
Posts: 1,073
Likes: 1
From: Seabeck, Washington
More references and manuals
Sgt.Fox is kind enough to host a site with MANY FSM's for the RX7,8 and miata. Also parts books and wiring diagrams. At the bottom of this page he also has a few books on weber/Dellorto's. Look here.
http://foxed.ca/foxed/index.php?page=rx7manual
http://foxed.ca/foxed/index.php?page=rx7manual
Thread Starter
Dreamin of drivin my 7!
iTrader: (18)
Joined: Feb 2009
Posts: 1,073
Likes: 1
From: Seabeck, Washington
1. "Improving" or "Better" depends on the purpose and application of the part and how/why you use it. Grandma would do better to use the stock carb than a blowthrough for daily driving.

2. Since alot of people I respect on here seem to feel a modded nikki is the way to go, simply being equal to or "a little" better than that is saying alot.
3. Like the old school argument over Ford vs. Chevy, which is best depends on what your drivin.
4. I'm building a sports car, not a race car. So, I don't need to be faster than everyone else on the road, just fast enough to feel like I am. On the winding hilly roads I mostly drive on, faster wouldn't matter anyway, the hairpins don't care if you have more horsepower, they're only gonna let you stick at a certain speed or spin.
IF you can't afford the one you want, love the one your with!
Last edited by installer67; Jan 19, 2010 at 10:15 PM. Reason: typo