
12a Rebuild: Time to clean engine parts


12a Rebuild: Time to clean engine parts
Continuation of the DYI 12a rebuild in the family garage....
Engine is disassembled.
Time to clean.
I've razor cleaned the iron faces to remove the left-over seals.
I have the rotors cleaned but now the iron, rotor housings, stationary gears, bearings, etc., need to be cleaned. I also want to clean the apex and side seals, oil control rings and all the springs to see what needs to be replaced.
Large tubs available to hold one iron or housing at a time.
Which cleaner for which parts?
I have:
Gunk concentrated liquid (can mix up enough for a "dunk-tank")
Purple Power
Simple Green
and whatever is under the kitchen sink.
I want to clean without damage and read here that Simple Green can corrode aluminum.
Suggestions welcomed.
Thanks for reading.


I did not use Simplegreen because I didn't like the results but I did use purplepower. On the three engines I've torn down, I used a can of gunk and a brush to remove the gross amount of grease, dirt and oil off the keg and rinsed with a hose. After I broke them down I'd soak the pieces in a 15 gallon tote of water and purplepower for a few days to continue to loosen the oil and grease. I then had a smaller 5 gallon tote I made into a parts washer with a garden fountain pump and a section of fuel hose and used purplepower and water and scrubbed, scrubbed, scrubbed each piece individually. I used lots of stiff plastic bristle brushes and brass bristled brushes. Coated each piece with a light coat of oil when done.
I basically followed Aaron Cake's video including using the abrasive pad on the irons to clean off 100% of the burned/caked on remnants of the large diameter water jacket O-rings, but I wish I hadn't done that though... On every set I did that to I found pitting that was out of tolerance on depth and width that crept out into the water passages or inward toward the inside combustion chamber portion of the engine. Now I have 9 irons that are good for taking up space, using as anchors, door stops, and whatnot. Basically no good for rebuild. I think other users on here don't do that with their irons - they only scrape them like you have and then clean with a soft bristle brush. I could be wrong about that, but I never found anyone that also used the scotchbrite pad on the O-ring seating surfaces, and had the iron survive to rebuild with.
I basically followed Aaron Cake's video including using the abrasive pad on the irons to clean off 100% of the burned/caked on remnants of the large diameter water jacket O-rings, but I wish I hadn't done that though...
On every set I did that to I found pitting that was out of tolerance on depth and width that crept out into the water passages or inward toward the inside combustion chamber portion of the engine. Now I have 9 irons that are good for taking up space, using as anchors, door stops, and whatnot. Basically no good for rebuild. I think other users on here don't do that with their irons - they only scrape them like you have and then clean with a soft bristle brush. I could be wrong about that, but I never found anyone that also used the scotchbrite pad on the O-ring seating surfaces, and had the iron survive to rebuild with.
Don't use Purple Power on any of your aluminum stuff. It'll etch it badly. Try tossing an aluminum pie pan in some of the stuff and see what happens. That pan will be completely gone in a few days, if not hours.
I don't know if Simple Green will do the same or not. Many of these products will say in (far too small) small print "don't use on aluminum" or "test on aluminum first".
I wish you luck. I'd like to know what the best cleaner is, too.
I don't know if Simple Green will do the same or not. Many of these products will say in (far too small) small print "don't use on aluminum" or "test on aluminum first".
I wish you luck. I'd like to know what the best cleaner is, too.
my thoughts ...
1. every so often i see people say that they use Purple Power on their aluminum parts with no ill effect. i'm not that brave. i will use it on iron and steel, but i don't use it on my aluminum. my apprehension actually comes from the fact that they say so on the label and nothing more.
2. for any of you that have a Harbor Freight near you, they sell an industrial strength degreaser (kinda has a neon-ish yellow color). that stuff is great. it seems to work wonders on grease, carbon, just about anything. i've used it on rotaries and piston engines alike. these days, the only things i insist on using carb cleaner, kerosene or diesel on are the rotors themselves.
Purple power took the paint off my rotor housing... my fault since i sprayed it when the motor was still hot (15min after 2 hours of driving time) and then i forgot about it. Came back 1/2 hour later, 3 layers of ford blue paint were wrinkled lol
Originally Posted by woodmv
I think other users on here don't do that with their irons - they only scrape them like you have and then clean with a soft bristle brush.
Here is my procedure for cleaning irons and housings. It's very simple. You're gonna love it. No ruined irons for me.
I place an iron on a piece of paperboard (an old cereal box opened up, layed flat). Spray with wd40 and brush/push the oil-dust mixture off of the part with a toothbrush or a screwdriver to get into the tight areas. Then wipe down with an old sock or terry towel. Then degrease with some Gunk brand original degereaser. I might use their foamy engine bright sometimes, or their new thick gel stuff but the orignal works fine. Then rinse off. Then dry thoroughly with a towel and air compressor. The parts are now clean enough to handle but not clean enough for paint. This is when I do any porting and can see clearly the problem areas that need another degreasing. Or sometimes I wait on the porting because fresh exposed iron will flash rust. Then I take a razor blade (box cutter style) held in a small vice grip on the coolant seal areas to cut all that stuff down flat. Never ruined an iron this way. Never needed to glass bead the outside (retarded idea) and thus never needed to use tons of duct tape (lol). Never needed to block sand either (retarded idea). The irons keep their anti-rust outside coating and the all important nitrided surface stays intact.
Final degreasing, if necessary, comes next. Now clean enough for paint. I have a set of studs I install in the iron's threaded holes to keep paint out. Also mask off the nitrided surface and anything else you don't want painted. Sometimes primer and sometimes not. It depends. Or leave them natural. They won't rust unlike some people's engines.
I actually use Purple Power for stripping paint of off plastic models. So, I know for a fact that it's a great paint remover. As stated earlier, though, never use it on aluminum.
Trending Topics
Thanks to all for the suggestions.
Basically its follow the label directions and take my time, and listen carefully to those who have the experience.
I just tried the wd40 on the stationary gears. I was using 1:20 diluted Dawn as a de-greaser/cleaner, but the wd40 actually works better for cleaning.
I have two rotor housings I'm not going to use (previous thread indicated they would be excellent paper weights) so I can test cleaners on them before working on the two I'm planning on for the rebuild.
 ) when you rebuild with those irons, you have a dark area all around where the water jacket o-ring seal seats rather than a bright shiny surface? I never really got an answer about rebuilding with irons that haven't had the remnants of the old O-rings fully removed (as I did with the scotchbrite and as Aaron Cake did in his video), but only removed with a razor blade scraper. I wish I had before I wasted three sets of irons.

Here is an iron that is ready to go in an engine. Notice the outer coolant seal area has a couple pits but they are shallow and you can clearly see the discoloration where they and the inner coolant seals were. This is 100% useable. I'm sorry you ruined so many good parts.
Think of it this way. The coolant seals are blind. They can't see. lol They only care about a surface that feels flat to them, so they will seal. They don't care if it's clean enough to eat off of or how shiny it is. This always made sense to me. Never had a coolant leak.
No block sanding. No glass beading. No lapping. Ever.
Thanks for the pic Jeff20B! I should have learned after the first set that I shouldn't be using scotchbrite on the irons. I only used it on the coolant seating surfaces, but wish I hadn't.
I guess my lot in life on this forum so far is as an example to others of what NOT to do!
So TimWilbers, follow Jeff20Bs advice!
Joined: Jun 2006
Posts: 4,815
Likes: 24
From: Columbia, Tennessee
I seriously dont think purple power is that strong. I use it mainly to rinse the GUNK off. The GUNK is your main cleaner. After its rinsed with water an Purple Power I hit the parts with aerosol brake parts cleaner and a dab of WD40 on vital surfaces such as rotors. I usually paint parts within a day after cleaning.
Thanks everyone.
So far the only thing I've done to the irons is to scrape off the water seal residue with the utility knife blade, and wide the side surfaces with a soft cloth & acetone. (Brake cleaner would be more efficient.) Still can feel some residue remaining to be removed.
So, here's my plan compiled from all the sources:
1. wd40 and scraping the exterior of the irons and housing to remove the big-goop.
2. Gunk to degrease irons and housings. Scrub with nylon/brass brushes, toothbrushes, wooden golf-tees, and maybe scotchbrright only on exterior areas if needed.
3. Small flat-head screwdrivers for the water-jacket seals in the housings if needed.
4. Diluted Purplepower as a mild-degreaser and rinse to remove Gunk and residue.
5. Clean rinse and dry.
6. Brake cleaner/acetone as final clean.
7. Light wd40 on iron interior (removed later with acetone/brake cleaner on water jacket seal areas during assembly), stationary gears, rotors.
8. Zip-lock bags or cover to keep clean until ready to assemble.
Sound reasonable?
Your list sounds ok other than 4.
I've never used purplepower and don't intend to. Too many horror stories. I stick with engine degreaser and rince off with water. There is no residue. You can paint the surfaces as long as there is no silicone. It'll fisheye away from any silicone residue. Engine paint is kinda ok over a slightly oily surface though, but I always make sure my irons and housings are clean.
I've never used purplepower and don't intend to. Too many horror stories. I stick with engine degreaser and rince off with water. There is no residue. You can paint the surfaces as long as there is no silicone. It'll fisheye away from any silicone residue. Engine paint is kinda ok over a slightly oily surface though, but I always make sure my irons and housings are clean.
Fine brushes. Also a dremel with a small round brass brush. Or just get out what you can and don't worry about it. It's just a residue that won't really hurt heat transfer. Think about how thick and gross that was before you cleaned it, and it came out of a running engine that didn't overheat. You'll be fine.
Fine brushes. Also a dremel with a small round brass brush. Or just get out what you can and don't worry about it. It's just a residue that won't really hurt heat transfer. Think about how thick and gross that was before you cleaned it, and it came out of a running engine that didn't overheat. You'll be fine.
Thanks.
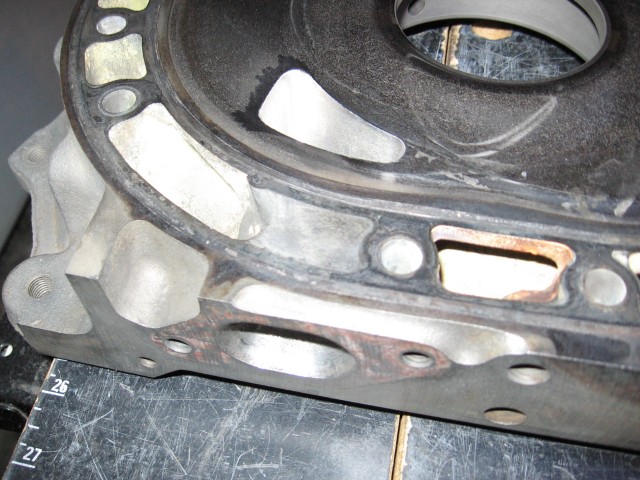
The previous image is of one of the two used housing I purchased. I do not have the complete history if there was overheating or not.
Are there visual indications of overheated housing, or is micrometer measurement the only sure way to tell?
The condition of the water jacket seal grooves looks like the seals may have failed, but there are no cracks or evidence of gross metal damage.
Are there visual indications of overheated housing, or is micrometer measurement the only sure way to tell?
The condition of the water jacket seal grooves looks like the seals may have failed, but there are no cracks or evidence of gross metal damage.
Measure the top of the housing chrome edge. Should be 70mm. Now measure next to the spark plugs. If any crush is present, subtract and you'll get your number. The FSM has a procedure.
I think the limit is .06mm. I once used a housing like that. Turned out fine and had like 100 compression.
I think the limit is .06mm. I once used a housing like that. Turned out fine and had like 100 compression.
Tonight's project after work.
