
Mazda Rx-7 Oil Cooler Repair Information

Mazda Rx-7 Oil Cooler Repair Information
found this good tip on how to repair your leaking oil cooler This repair information will work equally well on any of the 'radiator' style oil coolers that Mazda has used on Rx7s,RX3,2,4 in the past.. The 2nd generation cars have this type of oil cooler, but I have rarely seen one leak... they must have figured out the problem and corrected it.At any rate the leak is common on the later 1st gen cars ('84-'85 se), especially if the cooler fittings have been removed and reinstalled. People/mechanics generally don't use the proper procedure for removing/installing the hoses, there by causing stress on the oil cooler necks. Age will also cause the stress fractures, mostly from the weight of the oil lines hanging from the necks and the repeated heating up/cooling down cycle they are exposed to.
You will also want to make sure it is the oil cooler leaking and not the lines. If the end of the oil cooler where the lines attach is wet or caked with oil then it is probably the cooler. The oil lines will probably look oily from previous spills or from oil running onto them from the cooler. The lines themselves can also leak, but generally they will just rupture under pressure and when they do you have a pretty darn good idea where the oil is coming from.
REMOVAL is straightforward and I'll let you figure out everything except the oil line fitting removal. You will need a 21mm open end wrench and a decent size adjustable (crescent) wrench. It is a tight fit, and you will need to use both wrenches to remove the line from the cooler fitting (use them both to prevent further stress on the cooler). After removing the cooler from the car, use the 21mm wrench to remove the threaded fittings from the cooler. They are usually in there quite tight and will require some torque to get them out. You should end up with something that looks like one of the pictures below.
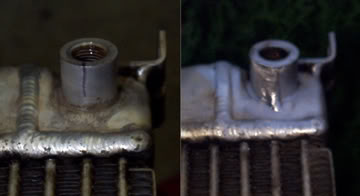
Clean the fitting area and use a magnifying glass to inspect the fittings. You will probably see some hairline fractures running along the axis of the fittings. In the 'before' picture below I have traced the fracture with a permanent marker to aid the welding shop with the repair.
Locate a welding shop that can perform aluminum welding. Most radiator repair shops can also do this. If the welders at the shops have been around very long, they'll know exactly what you want done. They will need to grind a shallow groove along the length of the crack, and then lay a bead (weld) down the groove. Some shops have also repaired the face of the neck for me, but that is a bit more tricky and the brass gasket that goes between there and the threaded fitting will stop any oil from leaking there.
INSTALLATION is the reverse of removal. Reinstall the brass gaskets (better yet, get new ones from Mazda) and tighten the threaded fittings down on them. Just get them good and snug, don't go crazy on them or you will cause another leak. Be ABSOLUTELY SURE you use both wrenches when reattaching the oil lines. You want to do this so that you are tightening the oil lines against the fitting and not against the cooler neck... most people make the mistake of using one wrench and tightening the whole assembly against the oil cooler... which cracks the fittings.
I have had four coolers repaired this way so far and have had 100% success. Cost should be in the $60-$75range. This method is, IMHO, the best, most reliable way to repair the leak. It's definitely better than buying a new cooler ($500) or trying to fit some piece of junk aftermarket replacement in there.
it works i just got the one on my se turbo fix
You will also want to make sure it is the oil cooler leaking and not the lines. If the end of the oil cooler where the lines attach is wet or caked with oil then it is probably the cooler. The oil lines will probably look oily from previous spills or from oil running onto them from the cooler. The lines themselves can also leak, but generally they will just rupture under pressure and when they do you have a pretty darn good idea where the oil is coming from.
REMOVAL is straightforward and I'll let you figure out everything except the oil line fitting removal. You will need a 21mm open end wrench and a decent size adjustable (crescent) wrench. It is a tight fit, and you will need to use both wrenches to remove the line from the cooler fitting (use them both to prevent further stress on the cooler). After removing the cooler from the car, use the 21mm wrench to remove the threaded fittings from the cooler. They are usually in there quite tight and will require some torque to get them out. You should end up with something that looks like one of the pictures below.
Clean the fitting area and use a magnifying glass to inspect the fittings. You will probably see some hairline fractures running along the axis of the fittings. In the 'before' picture below I have traced the fracture with a permanent marker to aid the welding shop with the repair.
Locate a welding shop that can perform aluminum welding. Most radiator repair shops can also do this. If the welders at the shops have been around very long, they'll know exactly what you want done. They will need to grind a shallow groove along the length of the crack, and then lay a bead (weld) down the groove. Some shops have also repaired the face of the neck for me, but that is a bit more tricky and the brass gasket that goes between there and the threaded fitting will stop any oil from leaking there.
INSTALLATION is the reverse of removal. Reinstall the brass gaskets (better yet, get new ones from Mazda) and tighten the threaded fittings down on them. Just get them good and snug, don't go crazy on them or you will cause another leak. Be ABSOLUTELY SURE you use both wrenches when reattaching the oil lines. You want to do this so that you are tightening the oil lines against the fitting and not against the cooler neck... most people make the mistake of using one wrench and tightening the whole assembly against the oil cooler... which cracks the fittings.
I have had four coolers repaired this way so far and have had 100% success. Cost should be in the $60-$75range. This method is, IMHO, the best, most reliable way to repair the leak. It's definitely better than buying a new cooler ($500) or trying to fit some piece of junk aftermarket replacement in there.
it works i just got the one on my se turbo fix
I've had several 1st gen FMOCs with cracked bungs repaired this way. Cutting a U or V groove the length of the crack is paramount to a successful repair. Before the welding is done, it's best to have the FMOC cleaned and the repair area needs to 100% oil free.


