
Diy modifications (those of us on a budget)


Thread Starter
Senior Member
Joined: Oct 2008
Posts: 380
Likes: 3
From: palmetto
I finished my 2nd Gen oil cooler install (no welding required). And all it cost was 50.00 to lengthen the stock 2nd Gen oil cooler hoses. Ill post pics up this evening, showing it all.
Thread Starter
Senior Member
Joined: Oct 2008
Posts: 380
Likes: 3
From: palmetto
 well I guess this thread died LOL, no biggie. Ill go ahead and show pics of my 2nd Gen oil cooler install. All you need is a set of 2nd Gen oil cooler hoses, the rear hose doesn't change. But the front hose I had lengthened 12 more inches. You will also need some angle.
The first pic is the left side, the second is of the right. Installing it this way gives you the option of keeping a/c as I did.

I figure I'll add. I went to a local autocross event and one of the older 50+ racers was talking to me about his suspension. I told him I was thinking of buying some coilovers and he told me not to waste my time and just refill a cheap set.
Basically you drill a hole in the lower end of the shock, syphon ALL the gas out and then re pump the same amoun that you pulled out back into the cylinder. The trick is that you refill it with a heavy weight oil. Once full you bend a piece of sheet metal tight around the cylinder and weld it all the way around. The result is a stiffer suspension with little to no cost. I'm not saying that it's better than i nice set of coilovers but the way it handled I never would've guesses it was just refilled with heavy weight oil. I'll be trying it over the next few weeks.
Basically you drill a hole in the lower end of the shock, syphon ALL the gas out and then re pump the same amoun that you pulled out back into the cylinder. The trick is that you refill it with a heavy weight oil. Once full you bend a piece of sheet metal tight around the cylinder and weld it all the way around. The result is a stiffer suspension with little to no cost. I'm not saying that it's better than i nice set of coilovers but the way it handled I never would've guesses it was just refilled with heavy weight oil. I'll be trying it over the next few weeks.
Thread Starter
Senior Member
Joined: Oct 2008
Posts: 380
Likes: 3
From: palmetto
I figure I'll add. I went to a local autocross event and one of the older 50+ racers was talking to me about his suspension. I told him I was thinking of buying some coilovers and he told me not to waste my time and just refill a cheap set.
Basically you drill a hole in the lower end of the shock, syphon ALL the gas out and then re pump the same amoun that you pulled out back into the cylinder. The trick is that you refill it with a heavy weight oil. Once full you bend a piece of sheet metal tight around the cylinder and weld it all the way around. The result is a stiffer suspension with little to no cost. I'm not saying that it's better than i nice set of coilovers but the way it handled I never would've guesses it was just refilled with heavy weight oil. I'll be trying it over the next few weeks.
Basically you drill a hole in the lower end of the shock, syphon ALL the gas out and then re pump the same amoun that you pulled out back into the cylinder. The trick is that you refill it with a heavy weight oil. Once full you bend a piece of sheet metal tight around the cylinder and weld it all the way around. The result is a stiffer suspension with little to no cost. I'm not saying that it's better than i nice set of coilovers but the way it handled I never would've guesses it was just refilled with heavy weight oil. I'll be trying it over the next few weeks.
Well I found the guys email he gave me and he stated that he does it to All of the front of his cars. When he does both front and rear he said he had good results with a heavier weight in the front and a tad lighter weight in the rear. He also mentioned that buying acheap set of ebay collars/ springs can make the shocks act like a resonable set of adjustable height coilovers. My biggest question was how often he's blown them. He didn't recommend them for rallying (go figure..) but for autocross or weekend warrior cars he hasn't had a problem in his 20 years he's been doing it. I wouldn't expect them to last 10 seasons but definietly worth a try while you're deciding to save up for a good set of coilovers. Especially if you can get your hands on a cheap spare set of stock shocks to play with. I'll be in search for some cheap sets and some 100 lb springs to test it out.
*Sorry for such a late reply
*Sorry for such a late reply
How bout my custom stereo suround,
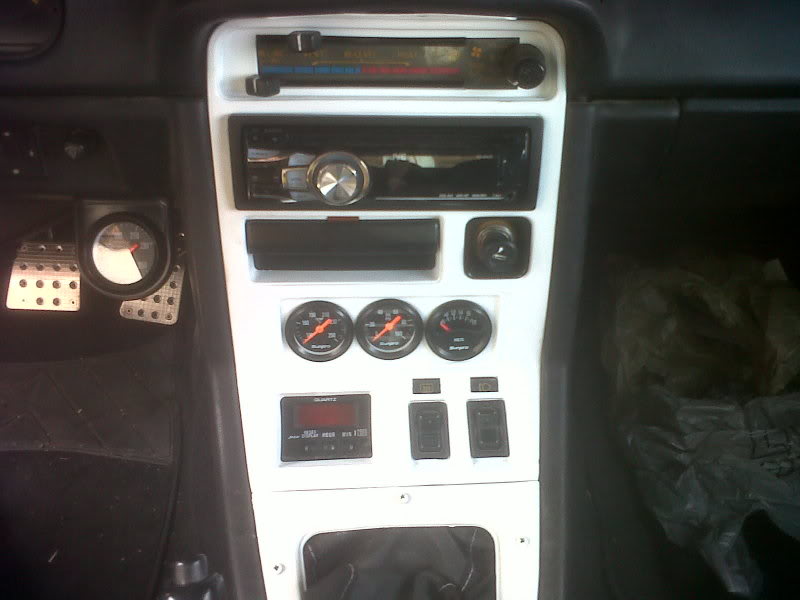
It was all ready cut so I put in a modern stereo and filled the pocket
slot for gauges and added a working temp next to center.
It was all ready cut so I put in a modern stereo and filled the pocket
slot for gauges and added a working temp next to center.
Last edited by PK_12A; Jan 15, 2013 at 02:02 PM.
I have debated it, may find a second one to do black. I had intended to do black and white
problem is the white shows more dirt than the black and staims on sight, if I do it I'm thinking
semi gloss and new switch gear or making some swiches.
problem is the white shows more dirt than the black and staims on sight, if I do it I'm thinking
semi gloss and new switch gear or making some swiches.
Last edited by PK_12A; Jan 16, 2013 at 02:18 PM.
When I converted my interior pieces to black, I took lots of time sanding and prepping all of the pieces before painting.
When I painted, I used Krylon Fusion for plastic, in a Satin finish. I did about 5 coats, and after a few days of hardening, the results were great.
Personally, I'd stay away from anything with a gloss or semi gloss finish for interior pieces. Its much more difficult to apply evenly, and tends to look blotchy in the sunlight.
Thread Starter
Senior Member
Joined: Oct 2008
Posts: 380
Likes: 3
From: palmetto
Well I found the guys email he gave me and he stated that he does it to All of the front of his cars. When he does both front and rear he said he had good results with a heavier weight in the front and a tad lighter weight in the rear. He also mentioned that buying acheap set of ebay collars/ springs can make the shocks act like a resonable set of adjustable height coilovers. My biggest question was how often he's blown them. He didn't recommend them for rallying (go figure..) but for autocross or weekend warrior cars he hasn't had a problem in his 20 years he's been doing it. I wouldn't expect them to last 10 seasons but definietly worth a try while you're deciding to save up for a good set of coilovers. Especially if you can get your hands on a cheap spare set of stock shocks to play with. I'll be in search for some cheap sets and some 100 lb springs to test it out.
*Sorry for such a late reply
*Sorry for such a late reply
its supposed to do that
Joined: Jan 2003
Posts: 1,352
Likes: 2
From: PNW
He said that he bought a few sets of collars on ebay and goes to shops in the area and asks what kind of springs they might sell to fit them. The ebay springs they come with are alright but are all the same spring rate so buying different rates is a must. I talked to him somemore and he said that the collars can be used on ANY shocks/struts but the gas/oil refill can only be done on shocks;which use oil. High pressure struts are usually nitrogen filled and will explode if punctured so let me be sure to mention that. As of now I purchased a set off ebay shipped to my door for $35. Obviously the ride will suck on stock suspension. The point isn't to lower the vehicle at this pointbut to give the suspension some stability while lowering maybe an inch. If the ride isn't terrible and no noticible tire wear then I'll upgrade to tokiko struts. If it sucks then it's time to save for coilovers. The point to remember about these are that they aren't for comfort but to cut down on the money used on an autocross car as there are limits to the amount you can spend in different classes. Hope that answers some questions.
As long as you play with the settings and don't mind fabricating or modifying parts then it works. The suspension mods will work as good as you make them work. A lot cheaper than a full set of adjustable coilovers though. And you can always return to stock. I like the look. Depending on how you set them up will alter stiff to spongy. Worth a try in my opinion; especially if using for autocross due to budget limits for certain classses.

 well I guess this thread died LOL, no biggie. Ill go ahead and show pics of my 2nd Gen oil cooler install. All you need is a set of 2nd Gen oil cooler hoses, the rear hose doesn't change. But the front hose I had lengthened 12 more inches. You will also need some angle.
The first pic is the left side, the second is of the right. Installing it this way gives you the option of keeping a/c as I did.
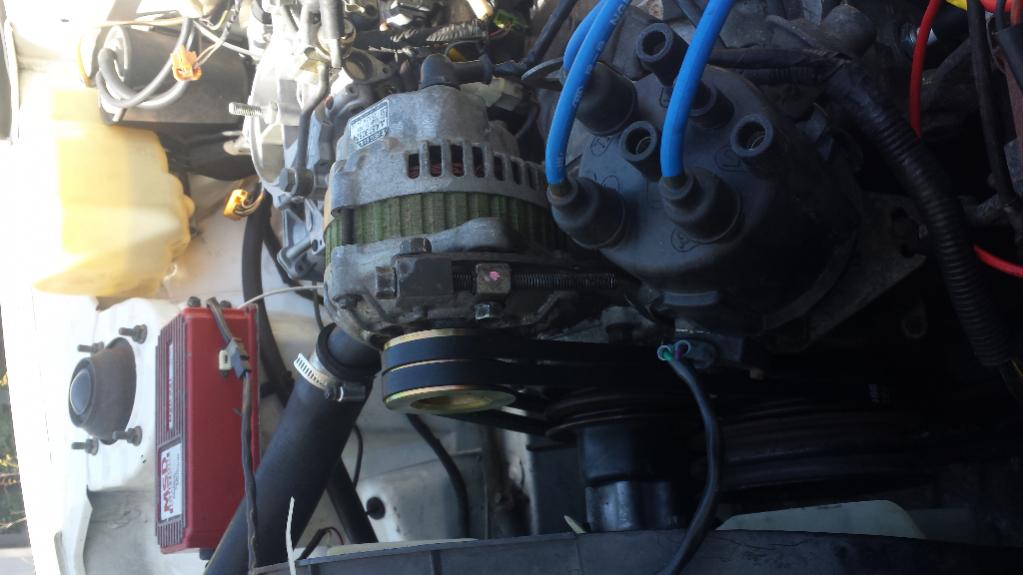
Why didn't you just route the short timing cover line below the battery tray?
You don't need to make new lines if you don't go under everything.
I just put an FC FMOC on my 84 with A/C today. Factory lines and all. I mounted it just about where you mounted yours.
EDIT: Oh I see you don't have a banjo fitting on the short line.
Thread Starter
Senior Member
Joined: Oct 2008
Posts: 380
Likes: 3
From: palmetto
Why didn't you just route the short timing cover line below the battery tray?
You don't need to make new lines if you don't go under everything.
I just put an FC FMOC on my 84 with A/C today. Factory lines and all. I mounted it just about where you mounted yours.
EDIT: Oh I see you don't have a banjo fitting on the short line.
You don't need to make new lines if you don't go under everything.
I just put an FC FMOC on my 84 with A/C today. Factory lines and all. I mounted it just about where you mounted yours.
EDIT: Oh I see you don't have a banjo fitting on the short line.


In particular, what size gauges are they and did you have to massage the pocket slot to get the gauges in?
I'm measuring up to fit 3 52mm (2 5/16") gauges in the same spot (previously oem graphic equaliser) but will have to cut a fair bit off either end.
Thread Starter
Senior Member
Joined: Oct 2008
Posts: 380
Likes: 3
From: palmetto
Finished my alternator adjusting assembly.
Went to the junkyard and got some alternator adjusting bolt parts from 2 vehicles, a 98 altima and a 2000 sportage, spent $2 and now no more prybars to adjust this alt.
Another contribution to the diy mods, next is the gas shock for the hood to raise it up almost hands free

Sent from my samsung gs4 using RX7Club app
Went to the junkyard and got some alternator adjusting bolt parts from 2 vehicles, a 98 altima and a 2000 sportage, spent $2 and now no more prybars to adjust this alt.
Another contribution to the diy mods, next is the gas shock for the hood to raise it up almost hands free
Sent from my samsung gs4 using RX7Club app
Is that a standard console under the white paint and new stereo? It looks the same as my Aus '85 s3 console.
In particular, what size gauges are they and did you have to massage the pocket slot to get the gauges in?
I'm measuring up to fit 3 52mm (2 5/16") gauges in the same spot (previously oem graphic equaliser) but will have to cut a fair bit off either end.
Last edited by PK_12A; Apr 1, 2015 at 12:02 AM.

Junior Member
Joined: Feb 2015
Posts: 8
Likes: 0
From: Kansas
