
(DRIVETRAIN) How To: Rebuild your LSD


Thread Starter
FB+FC=F-ME
Joined: Jul 2004
Posts: 3,353
Likes: 5
From: Rohnert Park CA
(DRIVETRAIN) How To: Rebuild your LSD
OK kids,heres part 2 to go along with the LSD rebuild I outlined a couple weeks ago.Sorry about the delay,its been busy lately and the weather has been bad too.
So,assuming you have the 3rd member out of the car already and have rebuilt your LSD,are adding an LSD to an open diff unit,or are changing gear ratios,here are the steps for rebuilding the entire unit.You WILL need a few special tools,a vice and a clean work space.You do not have to own a press,although one will make things easier.Also,nearly all the special tools needed can be bought on a child's allowance from Harbor Freight......not that I advocate shopping there,but some items they sell do work fine and are dirt cheap.Heres a list of tools needed.
Micrometer and magnetic stand. (cheaper than you might think)
Vernier calipers. (digitals are great and are getting cheaper)
Inch lb torque wrench. (must be dial or beam "bendy" type)
Foot lb torque wrench. (I preffer "clickers" for the bigger stuff).
Gear puller. (2 jaw,or bearing splitter type....or a small grinder and a steady hand)
First off,get the entire unit stripped down and clean.Lay out all the parts on a clean table and keep left and right stuff in place.The bearing caps for the differential MUST be kept in order,so mark or stamp them "R" and "L".Strip off all the old bearings using a puller,press or demolish them with a screwdriver and CAREFULLY grind a slit in the inner race until you can pop a crack in it with a hammer and chisel.They will pull right off after that,but I dont recommend this method because of the potential for damage and the grinding grit is thrown everywhere.....but it does work.
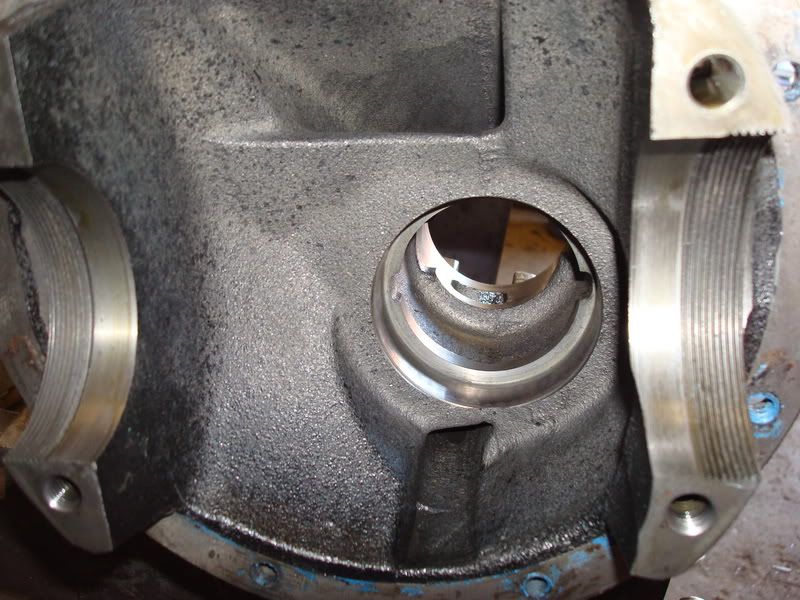
Here is the bare housing.A vice works well for holding it,just slip the fat rib at the bottom into the jaws and tighten.Be sure EVERYTHING is clean,especially where the bearings slip in.
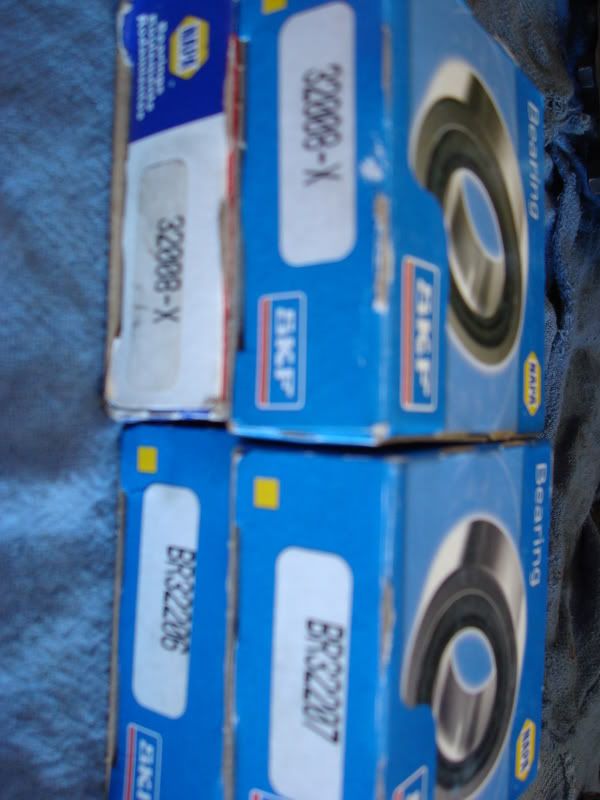
Here are the 4 bearings youll need for the rebuild.They are NAPA parts and they are the same numbers as the stock Japanese bearings.These are German made,but Timkins will also work and are the same number.Much cheaper than the dealer or Mazdatrix,especially with my discount!
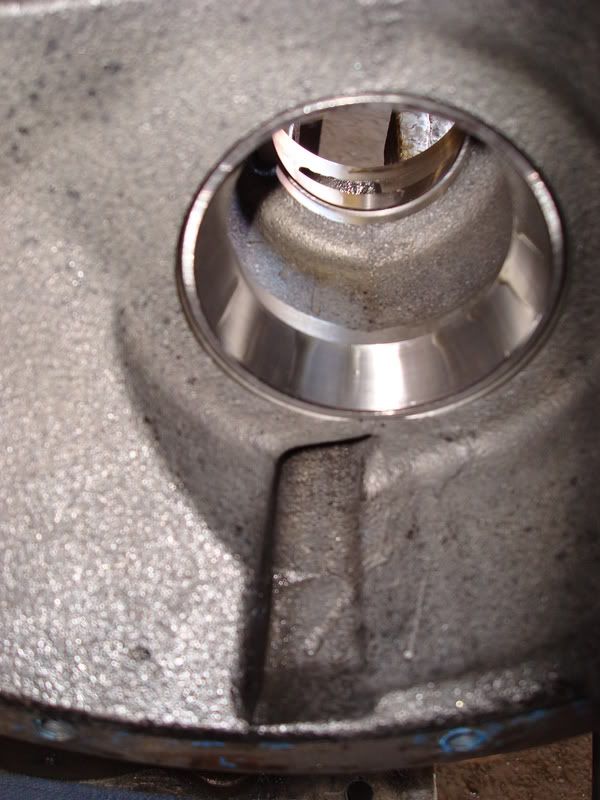
First,drive in the new pinion outer races with a hammer and punch.Be careful not to slip and gouge the running surface,but be sure to seat them well.Youll hear and feel the difference when they seat.
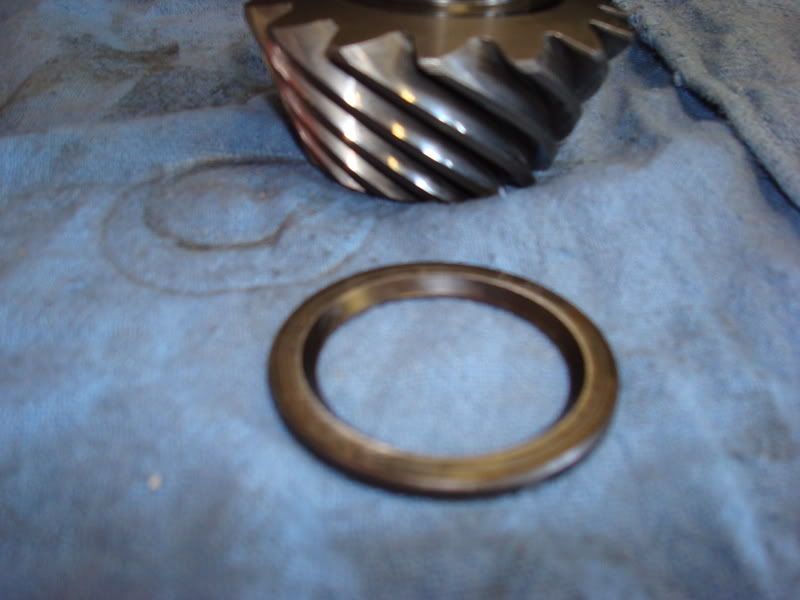
Next,we have the depth shim for the pinion,mine measured 3.11 MM.
These place the gears at the right position dependant on the housing you are using.Getting the right shim for a given housing requires a lot of special factory tools and measuring.If you use the shim that goes with the 3rd member housing you are using,then it should be close, regardless of what gears you install.If your just adding an LSD carrier or replacing bearings,then the original shim will definately be the right one.14 different shims are availible in varying thickness',but repeated installs and teardowns are needed to get the right one if you dont have all the special tools needed......so if you have mulitple 3rd members lying around,be sure to keep the pinion shims together with the housings they came out of.
Place the shim on the pinion with the beveled end down and slide on a new big bearing.Youll need a piece of pipe to drive the bearing on.Be sure its clean inside before starting.A hammer will do it,or use a press.
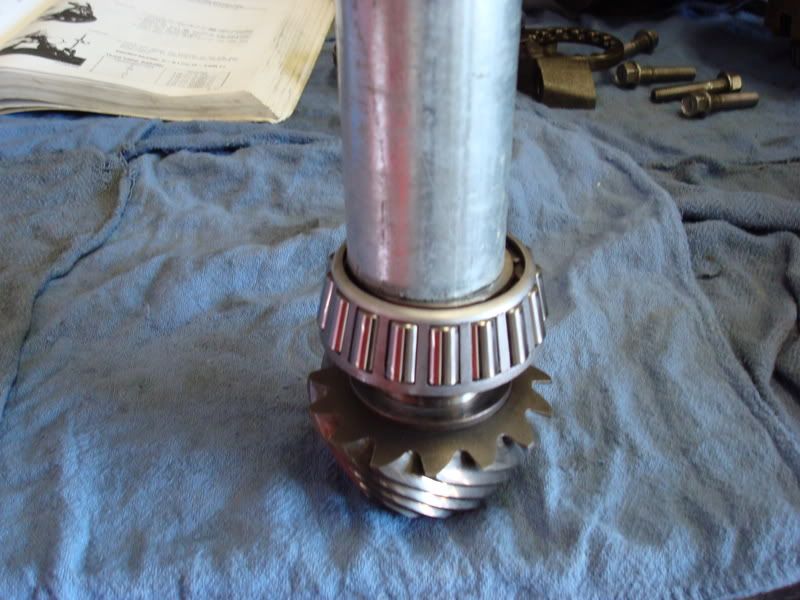
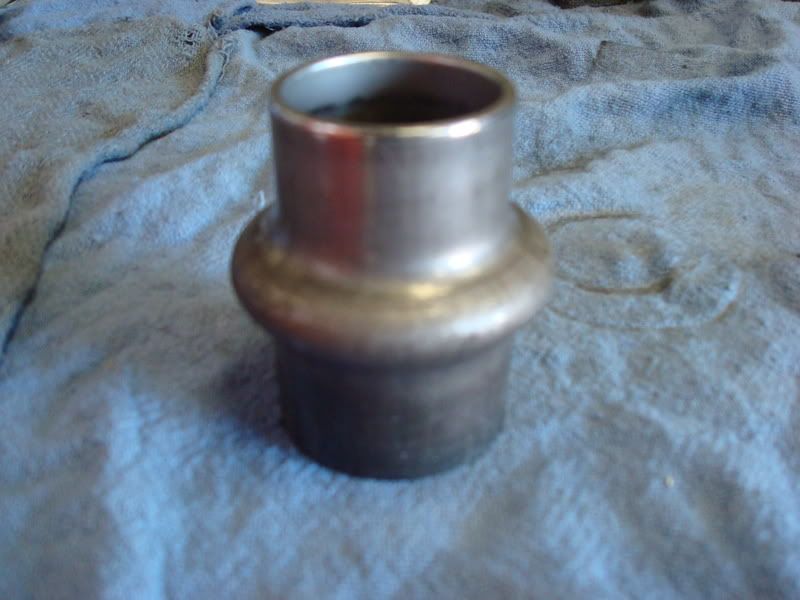
Now we have the crush sleeve.It helps you to get the pinion bearing preload correct by crushing down as you tighten the nut.
This makes things a lot easier since you dont have to install shims,measure and then install/replace shims again and again.Its a one-shot deal with these.
The FSM does not say you HAVE to use a new sleeve everytime,but its not a garuantee that the old one will work,so its best to use a new sleeve with a rebuild.Slide that onto the pinion after the bearing is pressed on,then slide the whole thing into the 3rd member.
Next, from the front of the 3rd member,install the small pinion bearing and tap it down into contact with the crush sleeve.
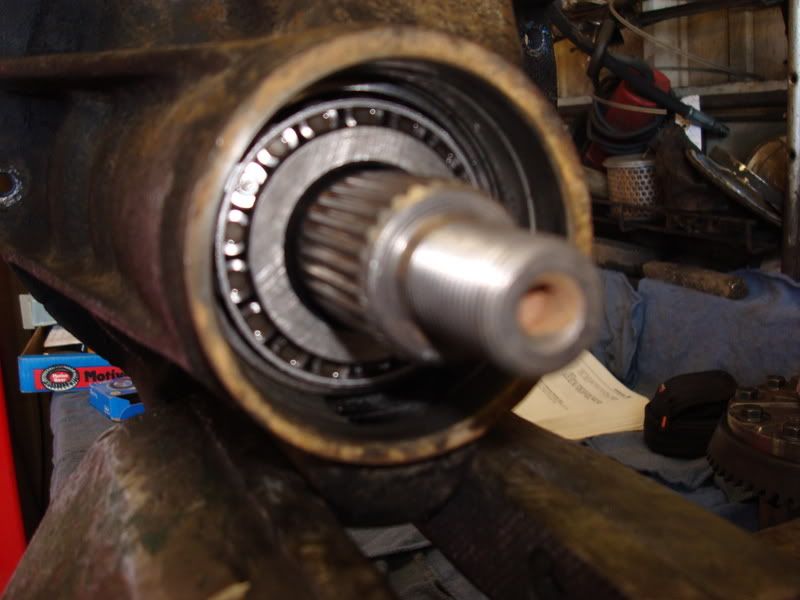
Install a new pinion oil seal and slide the companion flange into place.Dont worry that my seal and flange look different,Im running a modified TII flange with a special seal since I have a large custom driveline.Install the washer and nut on a pinion threads and dab a little locktite on the threads,especially if you reuse an old nut.Tighten the nut just snug.....Just until it bottoms on the washer,but dont torque it yet.
So,assuming you have the 3rd member out of the car already and have rebuilt your LSD,are adding an LSD to an open diff unit,or are changing gear ratios,here are the steps for rebuilding the entire unit.You WILL need a few special tools,a vice and a clean work space.You do not have to own a press,although one will make things easier.Also,nearly all the special tools needed can be bought on a child's allowance from Harbor Freight......not that I advocate shopping there,but some items they sell do work fine and are dirt cheap.Heres a list of tools needed.
Micrometer and magnetic stand. (cheaper than you might think)
Vernier calipers. (digitals are great and are getting cheaper)
Inch lb torque wrench. (must be dial or beam "bendy" type)
Foot lb torque wrench. (I preffer "clickers" for the bigger stuff).
Gear puller. (2 jaw,or bearing splitter type....or a small grinder and a steady hand)
First off,get the entire unit stripped down and clean.Lay out all the parts on a clean table and keep left and right stuff in place.The bearing caps for the differential MUST be kept in order,so mark or stamp them "R" and "L".Strip off all the old bearings using a puller,press or demolish them with a screwdriver and CAREFULLY grind a slit in the inner race until you can pop a crack in it with a hammer and chisel.They will pull right off after that,but I dont recommend this method because of the potential for damage and the grinding grit is thrown everywhere.....but it does work.
Here is the bare housing.A vice works well for holding it,just slip the fat rib at the bottom into the jaws and tighten.Be sure EVERYTHING is clean,especially where the bearings slip in.
Here are the 4 bearings youll need for the rebuild.They are NAPA parts and they are the same numbers as the stock Japanese bearings.These are German made,but Timkins will also work and are the same number.Much cheaper than the dealer or Mazdatrix,especially with my discount!
First,drive in the new pinion outer races with a hammer and punch.Be careful not to slip and gouge the running surface,but be sure to seat them well.Youll hear and feel the difference when they seat.
Next,we have the depth shim for the pinion,mine measured 3.11 MM.
These place the gears at the right position dependant on the housing you are using.Getting the right shim for a given housing requires a lot of special factory tools and measuring.If you use the shim that goes with the 3rd member housing you are using,then it should be close, regardless of what gears you install.If your just adding an LSD carrier or replacing bearings,then the original shim will definately be the right one.14 different shims are availible in varying thickness',but repeated installs and teardowns are needed to get the right one if you dont have all the special tools needed......so if you have mulitple 3rd members lying around,be sure to keep the pinion shims together with the housings they came out of.
Place the shim on the pinion with the beveled end down and slide on a new big bearing.Youll need a piece of pipe to drive the bearing on.Be sure its clean inside before starting.A hammer will do it,or use a press.
Now we have the crush sleeve.It helps you to get the pinion bearing preload correct by crushing down as you tighten the nut.
This makes things a lot easier since you dont have to install shims,measure and then install/replace shims again and again.Its a one-shot deal with these.
The FSM does not say you HAVE to use a new sleeve everytime,but its not a garuantee that the old one will work,so its best to use a new sleeve with a rebuild.Slide that onto the pinion after the bearing is pressed on,then slide the whole thing into the 3rd member.
Next, from the front of the 3rd member,install the small pinion bearing and tap it down into contact with the crush sleeve.
Install a new pinion oil seal and slide the companion flange into place.Dont worry that my seal and flange look different,Im running a modified TII flange with a special seal since I have a large custom driveline.Install the washer and nut on a pinion threads and dab a little locktite on the threads,especially if you reuse an old nut.Tighten the nut just snug.....Just until it bottoms on the washer,but dont torque it yet.
Thread Starter
FB+FC=F-ME
Joined: Jul 2004
Posts: 3,353
Likes: 5
From: Rohnert Park CA
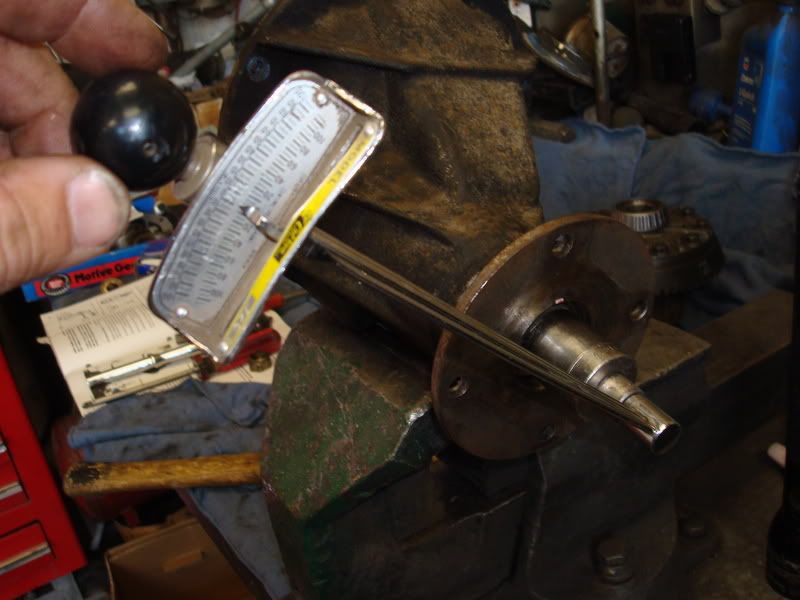
Now,we need to determine the oil seal drag so we can deduct that from the total bearing preload torque.Lightly oil both bearings first,then use an inch lb torque wrench and rotate the pinion,noting at what amount the pointer holds steady when turning.Do not take the reading that shows when the wrench starts to turn,it will be higher than the actual reading while in motion.This is the torque needed to overcome the drag of the oil seal,mine was between 1-2 inch/lbs.
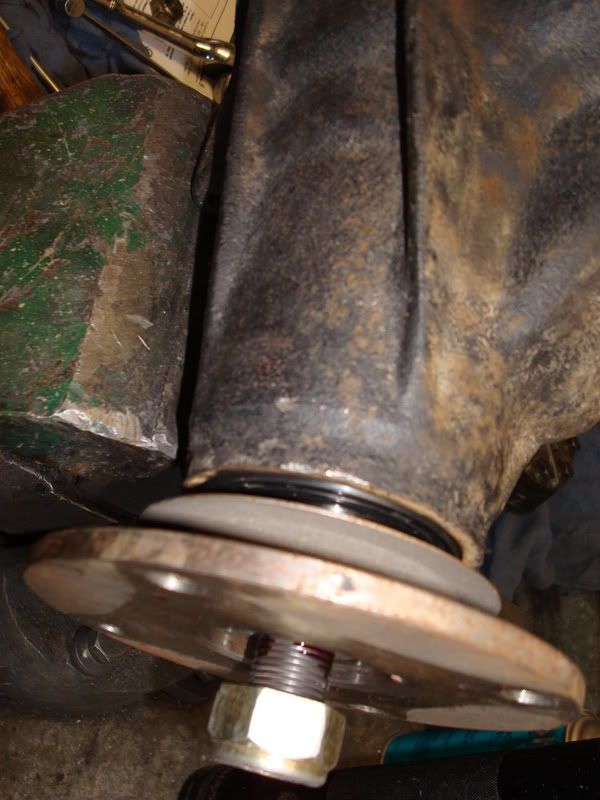
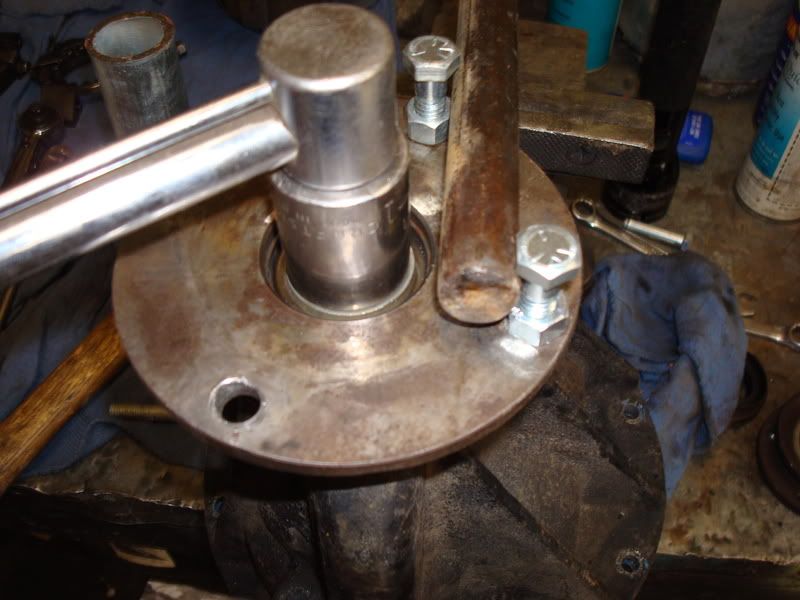
Now,we need to lock the pinion in place and torque the nut down to either crush the sleeve (if its new) or get some bearing preload into the pinions(if a used sleeve is installed).This is where you can get into trouble with an old sleeve,because you might bottom out the bearings before the races both contact the old,crushed sleeve.I used a couple short bolts and a long bar to hold the pinion.Dont be tempted to just jam a screw driver in the flange hole,it takes several hundred lbs of force to crush a new sleeve and you will distort the flange,trust me.
If you use an old sleeve,the pinion preload of 7.8-12.2 in/lbs....after deducting the oil seal drag..... must be reached before the nut reaches 130 lb/ft of torque.Also,if your preload exceeds 7.8-12.2 in/lbs BEFORE the nut reaches 94lb/ft,then you need a new sleeve.Its best to just get a new sleeve,its cheap.
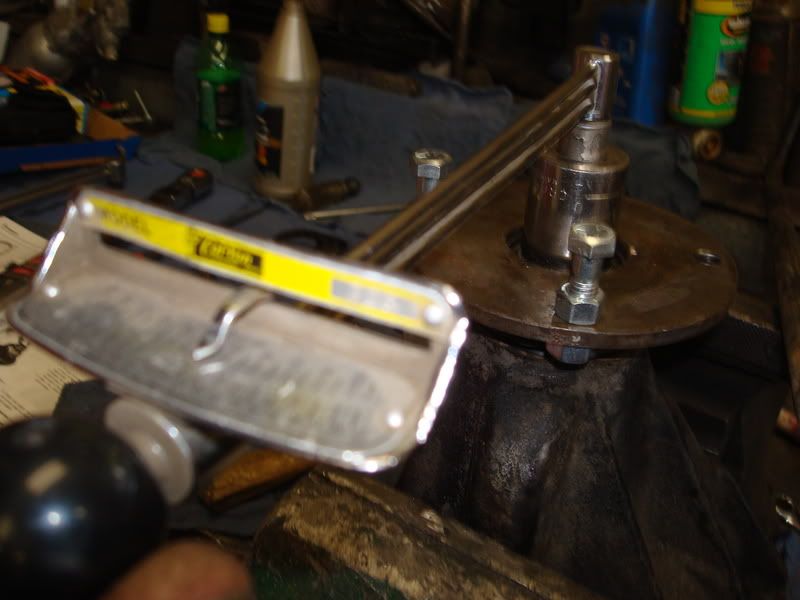
Run the nut down until the "in-out" slop of the pinion starts to get down to zero.Once it gets down to nothing,limit your tightening to little tiny increments.....maybe 1/8" at a time.The bearing preload will increase exponentially once the bearings make contact with their races,and you dont want to over-do it.Take your inch-lb torque wrench and keep checking the rotating preload of the pinion.It will take several nudges,but once it starts to get past 5 in/lbs,things will go fast so only tighten in SMALL amounts.You want a pinion preload of between 7.8 and 12.2, not including the tiny amount you determined was the oil seal drag.I stopped right about 12in/lbs,minus the 1-2 in/lbs of oil seal drag I got,and Im sitting pretty at 10 in/lbs of bearing preload.It feels tight,but its correct and will accomidate bearing wear as the diff gets used.
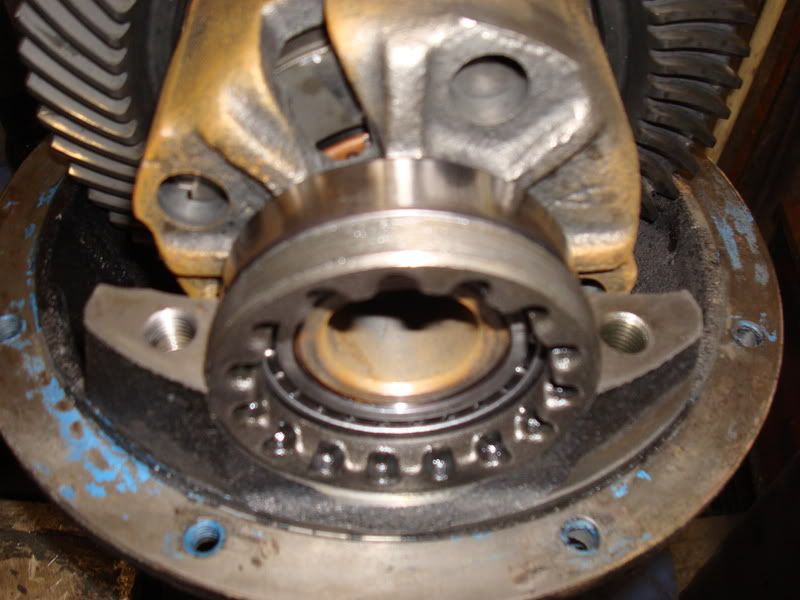
Now the pinion is fully installed,you can see why its not wise to change companion flanges or oil seals with the diff installed in the car.Its impossible to do all this setting up when the differential is fully assembled and its also pretty much a death sentence for the unit if the bearing preload is too tight/loose.
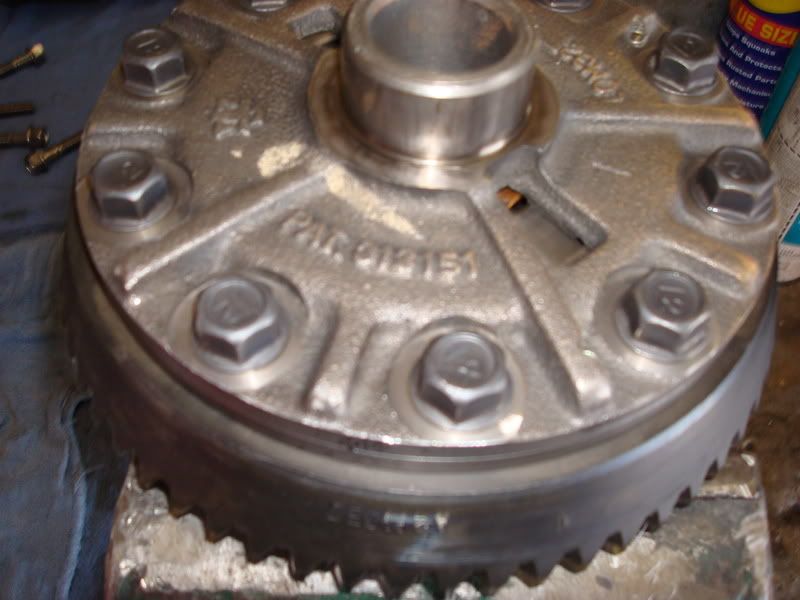
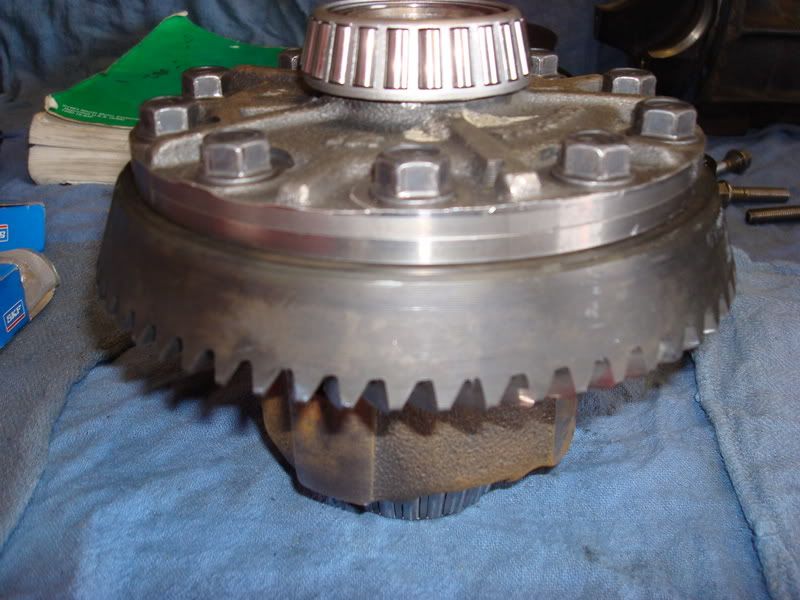
Now we need to install the carrier/lsd.First,make ABSOLUTELY sure the carrier is clean and flat where the ring gear slips on.Any dirt or dings in the carrier will mess things up and youll be pulling your hair out later when the backlash settings will not pan out.File any burrs and clean both surfaces well.Be sure to tap the gear on with the holes lined up.If you have to wrench the first few bolts into place,then start over,they should go in with your fingers.Pushing them in to align the gear and carrier will cause the threads of the bolt to peel and the shavings will get under the gear and mess everything up.Once the holes are perfectly aligned,dab some locktite on all the bolts and run them down in a criss-cross pattern,stopping at 51-61 lb/ft or torque.
Now,install the new carrier bearings onto the carrier.You can press them or hammer them on,but dont use a socket to do it.I know,it seems like the perfect tool for it,but in addition to messing up your tools,you can contaminate the new bearings with chrome flakes from the socket.Use a piece of pipe or at least a plain steel impact socket.No shims are needed,so pre-clearanced "setup" bearings are not needed.....thank God!
Now,we need to lock the pinion in place and torque the nut down to either crush the sleeve (if its new) or get some bearing preload into the pinions(if a used sleeve is installed).This is where you can get into trouble with an old sleeve,because you might bottom out the bearings before the races both contact the old,crushed sleeve.I used a couple short bolts and a long bar to hold the pinion.Dont be tempted to just jam a screw driver in the flange hole,it takes several hundred lbs of force to crush a new sleeve and you will distort the flange,trust me.
If you use an old sleeve,the pinion preload of 7.8-12.2 in/lbs....after deducting the oil seal drag..... must be reached before the nut reaches 130 lb/ft of torque.Also,if your preload exceeds 7.8-12.2 in/lbs BEFORE the nut reaches 94lb/ft,then you need a new sleeve.Its best to just get a new sleeve,its cheap.
Run the nut down until the "in-out" slop of the pinion starts to get down to zero.Once it gets down to nothing,limit your tightening to little tiny increments.....maybe 1/8" at a time.The bearing preload will increase exponentially once the bearings make contact with their races,and you dont want to over-do it.Take your inch-lb torque wrench and keep checking the rotating preload of the pinion.It will take several nudges,but once it starts to get past 5 in/lbs,things will go fast so only tighten in SMALL amounts.You want a pinion preload of between 7.8 and 12.2, not including the tiny amount you determined was the oil seal drag.I stopped right about 12in/lbs,minus the 1-2 in/lbs of oil seal drag I got,and Im sitting pretty at 10 in/lbs of bearing preload.It feels tight,but its correct and will accomidate bearing wear as the diff gets used.
Now the pinion is fully installed,you can see why its not wise to change companion flanges or oil seals with the diff installed in the car.Its impossible to do all this setting up when the differential is fully assembled and its also pretty much a death sentence for the unit if the bearing preload is too tight/loose.
Now we need to install the carrier/lsd.First,make ABSOLUTELY sure the carrier is clean and flat where the ring gear slips on.Any dirt or dings in the carrier will mess things up and youll be pulling your hair out later when the backlash settings will not pan out.File any burrs and clean both surfaces well.Be sure to tap the gear on with the holes lined up.If you have to wrench the first few bolts into place,then start over,they should go in with your fingers.Pushing them in to align the gear and carrier will cause the threads of the bolt to peel and the shavings will get under the gear and mess everything up.Once the holes are perfectly aligned,dab some locktite on all the bolts and run them down in a criss-cross pattern,stopping at 51-61 lb/ft or torque.
Now,install the new carrier bearings onto the carrier.You can press them or hammer them on,but dont use a socket to do it.I know,it seems like the perfect tool for it,but in addition to messing up your tools,you can contaminate the new bearings with chrome flakes from the socket.Use a piece of pipe or at least a plain steel impact socket.No shims are needed,so pre-clearanced "setup" bearings are not needed.....thank God!


Thread Starter
FB+FC=F-ME
Joined: Jul 2004
Posts: 3,353
Likes: 5
From: Rohnert Park CA
Also,I forgot to mention that once you get the pinion preload set,give both sides of the pinion a couple good taps with a hammer,then recheck the preload.The taps will ensure the bearings/races are fully seated and not cocked.I usually will have to go back and give her a little more torque after tapping the pinion and this time was no exception.....lost about 3-4 in/lbs on my preload setting after the first round of taps,after that she held steady.
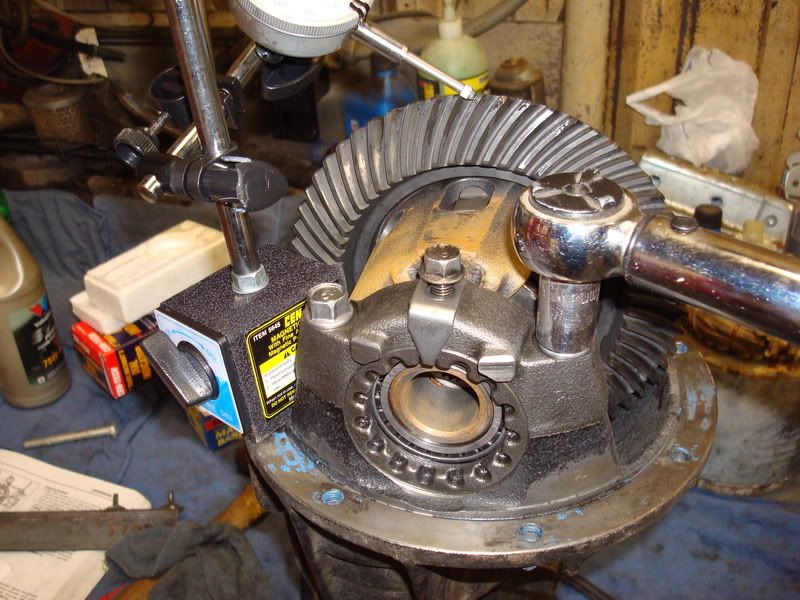
Now,set the carrier with its new bearings and outer races into the 3rd member and lightly oil the bearings.....were almost done!
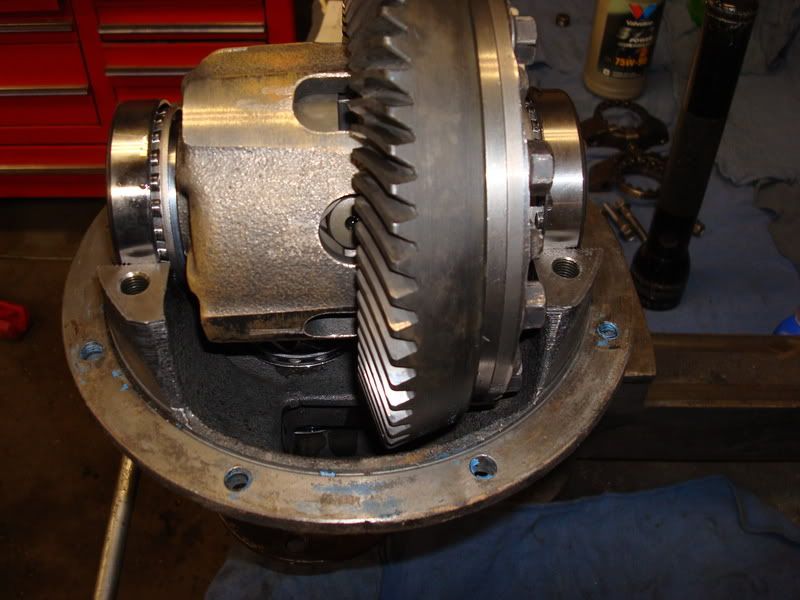
Slip the adjuster nuts into their grooves and spin them in against the bearing races until the bearing slop is gone.Youll want there to be a little tiny bit of gear backlash for now,but just do it by feel to get things close.Run the left adjuster out and the right adjuster in equal amounts to obtain more gear lash, and vise-versa to obtain less gear lash.
Now,install the bearing caps onto their saddles (you did mark them left and right earlier,correct?) and tighten the bolts just till they bottom,very loose for now.
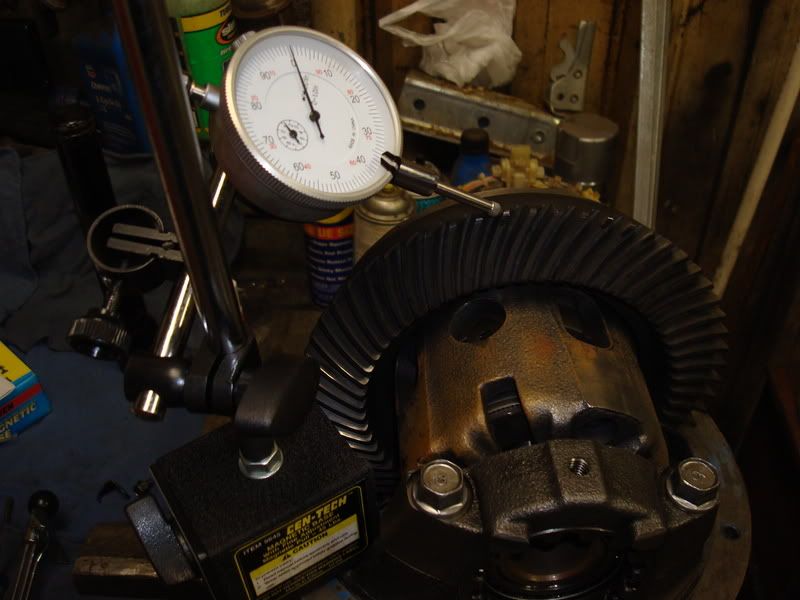
Set up your mag stand and dial indicator so that the pointer is touching the ring gear tooth at its very edge and so the pointer is in-line with the ring gear.Mark the ring gear at 4 points,at roughly 90* spaces around the gear.These are your measuring points.Rock the ring gear back and forth and measure the lash.Your final setting is going to be .0035in - .0043in.....very tight lash compared to the big 4x4 stuff Im used to,so be precise and certain as you check this setting.Turn the adjusters in or out in equal amounts until you get this reading at all 4 points along the ring gear.There can be variations,but the lowest reading must never be below .002in and the spread between the highest and lowest reading must not exceed .0028in......so theres very little room for error.This is why the ring gear MUST sit flat on the carrier when you install it. There are proponents for going higher or lower within the allowable backlash settings.Some say a tighter backlash will compensate for deflection when the pinion pushes ring gear away under power.Some say a looser backlash will allow more oil to find its way between the gear teeth,better protecting them.Both camps are correct,so its up to you to decide which end of the range to set things.I got a nice .004in setting all around the ring gear,so I left things at that,right in the middle of the allowable tolerances.
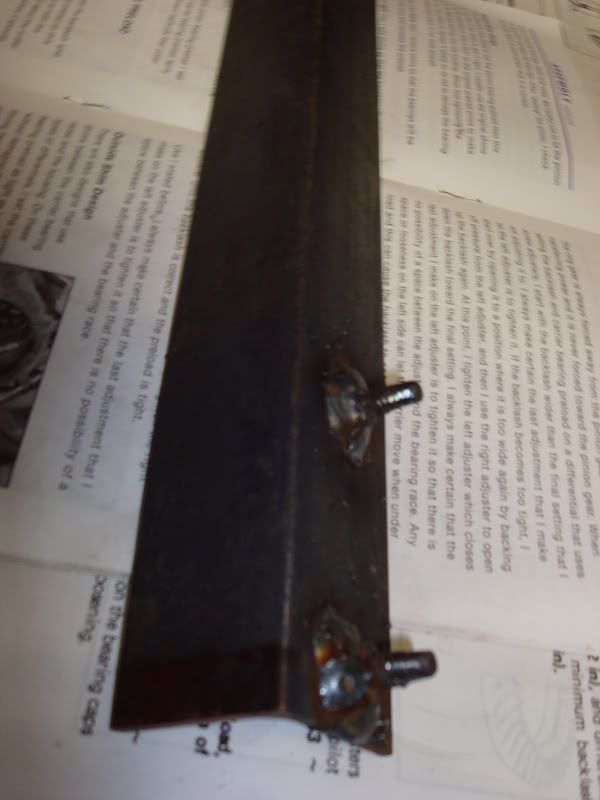
Now,tighten the two adjusters equally to set the carrier preload.Be sure to rotate each adjuster equally so the lash doesnt change.Its impossible to actually measure the carrier preload the way you check the pinion bearing preload since the diff unit is now assembled and the gear and pinion drag would mess things up.Yukon's gear guy says he's never had a failure due to excessive carrier bearing preload and it makes sense.The carrier bearings are turning at a leisurely pace,only 1/4 the speed of the pinion and they dont have to support any of the cars weight.Mazda has a spec for checking the value and it requires a large micrometer you use to take measurements at the little "nubs" on the bearings caps.Measure diagonally across the diff to those 4 points and tighten the adjusters until both measurements are between 7.3004in - 7.30033in.I took Yukons advice and tightened the adjusters with a 12" tool I made.Its pretty easy to put together,I welded 2 small bolts to a bar,but you could easily drill and fasten the bolts if you dont have a welder.Center spacing for the bolts is 57MM and they will fit into the adjuster slots perfectly.
"Tight as you can resonably get them with a 12" tool" is Yukon's recommendation.Be sure the last adjustment you make is to tighten the left side adjuster in.This will insure that there is no slack between the left bearing and the left adjuster.The left bearing takes ALL the load of the pinion when the power is on,so you dont want to have it loose.Once the carrier preload is set,tighten the bearing cap bolt to 27-38lb/ft of torque.
Install the locking tabs.You might have to alter the adjusters positions a tiny bit to get the slots lined up for the locks.The diff should feel pretty tight,but you should be able to turn it fairly easily with your hands.
Once the caps are tight,go back and re-check the backlash one last time to be sure you didnt alter it when running the carrier bearing adjusters down.
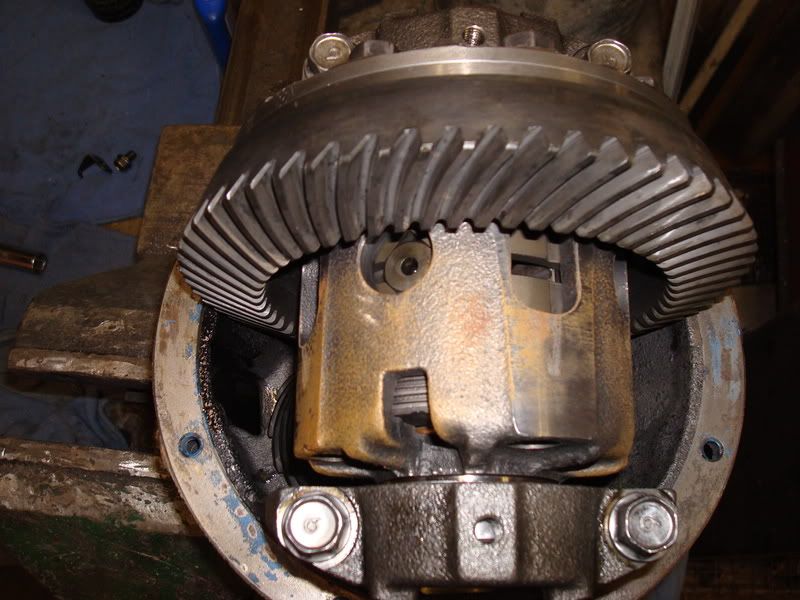
Now its time to check the pattern,which should be dead on if you kept the right pinion shim for your housing.This part normally sucks,because you have to do it several times when selecting pinion shims for Dana and other style diffs.This type of system makes pattern setup a one-shot deal most of the time,if you keep the parts together from a given housing.
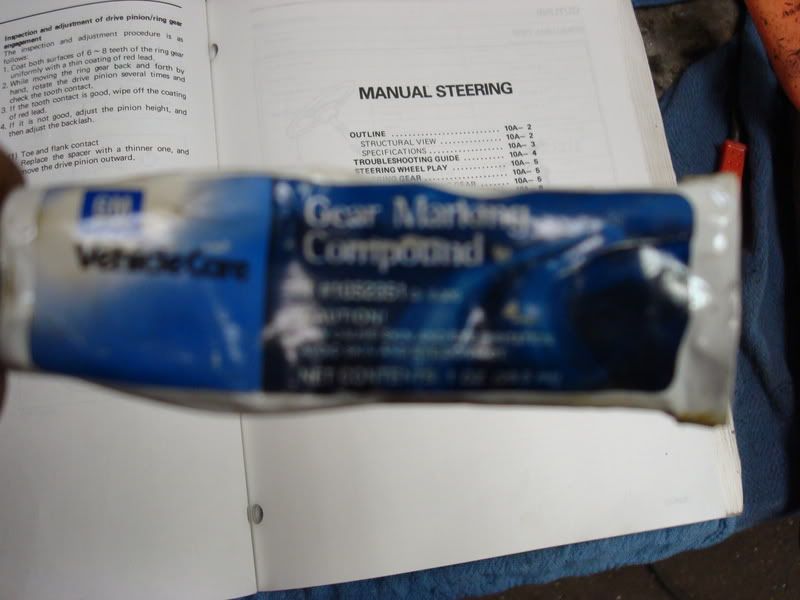
This is the only stuff to use.Forget about white grease,red lead or prussian blue.......GM gear marking compound is THE BEST for setting gears and a $5 tube will last you a lifetime.
Coat a few teeth on both sides and repeat this at 3 or 4 points along the ring gear.I use a 3" bolt, tightened up in the companion flange to use as a crank to spin the pinion.
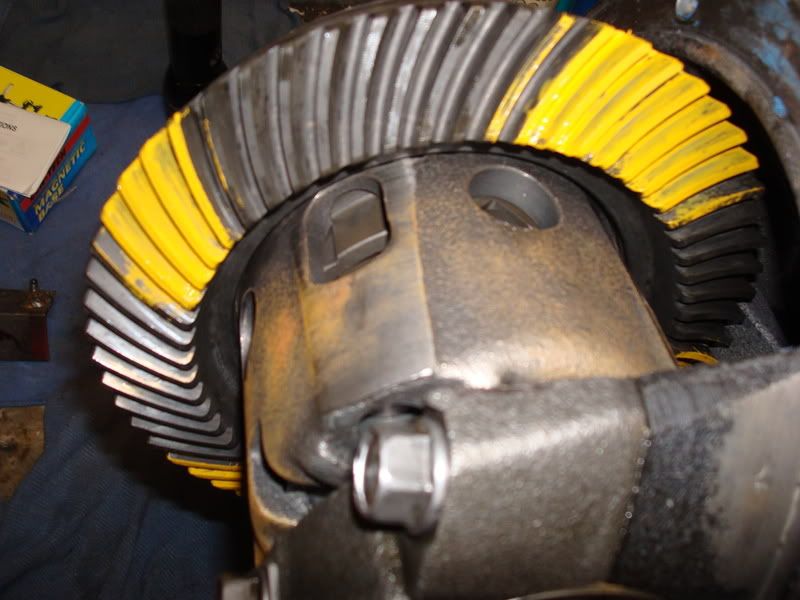
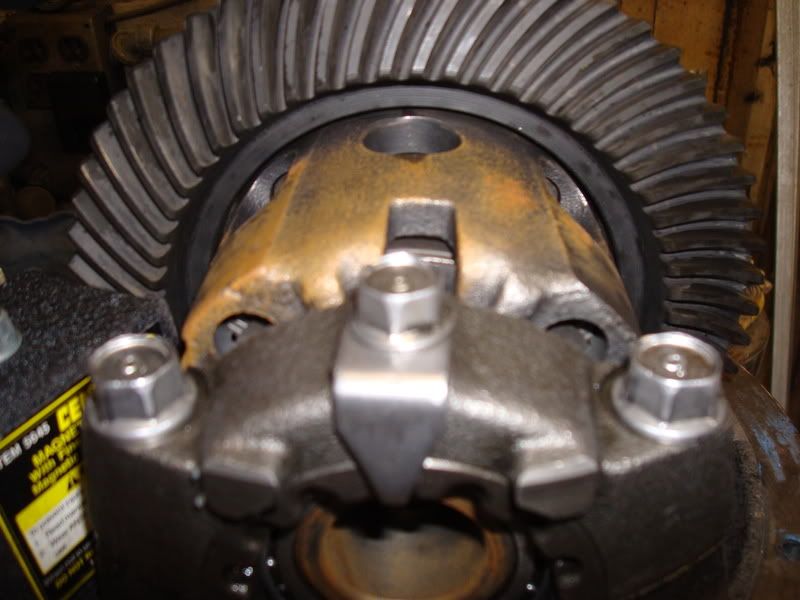
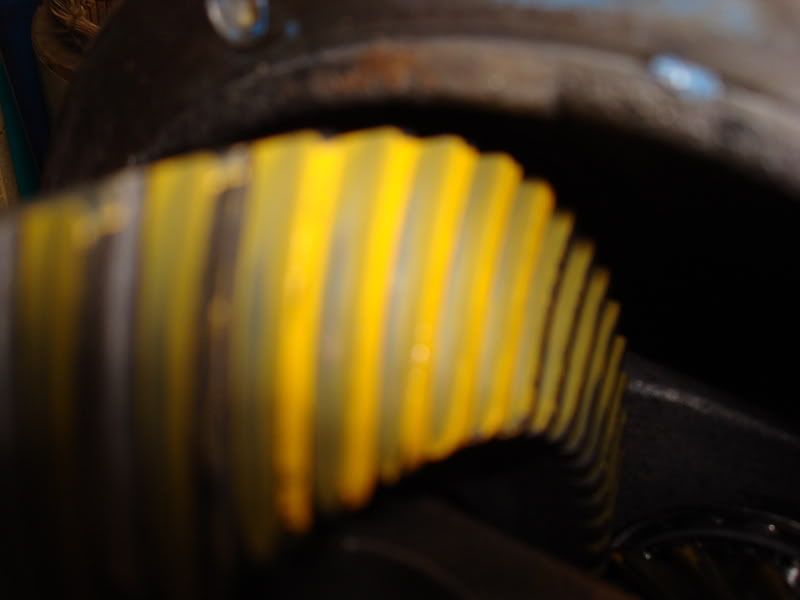
Use you right hand to crank the pinion and drag your left palm along the backside of the ring gear to provide some drag.Spin the pinion both directions many times to get a good pattern built up on the drive and coast sides of the teeth.You want the sliding action of the hypoid gears to rub away the compound where they mesh,allowing you to see where along the tooth the contact is being made.The bare spot should always be in the middle of the tooth,relative to the base(flank) and tip (face) of the tooth.There should always be some yellow left down at the bottom of each tooth and there should be at least a small line of yellow at the top.The pattern should be centered front to back(heal and toe) on the tooth as well,but this is not always possible, and not 100% required.I took several pics,but its a tough shot to get,so Ill only post the best ones.It was dead on perfect the first time,on both the drive and coast sides of the teeth.Sometimes its easier to see the pattern on the ring teeth you didnt coat with compound,since the stuff tends to get distributed on everything as the compound transfers to the pinion teeth and makes its way around the rest of the ring gear.

Its OK to leave the compound on the teeth,it will dissolve in the gear oil.Some say to wipe it off,but Id rather not risk getting towel or rag lint into my fresh rebuilt differential while trying to pick all the goop out of the teeth.....plus it gets everywhere,its like ultra-high pigment oilpaint.
Well,thats it!!!!
If you are done,you can officially call yourself a gear head!
Just install and enjoy.My new 3.90 gears dont feel much different than the old 4.07 gears,but its hard to tell when the redline buzzer is screeching and the tires are breaking loose.I'd hoped the taller gears would help quell the traction loss issues,but it didnt.At least my MPG on the highway might go up 1/2 of a percent!And I have the piece of mind knowing that all my bearings are fresh and the LSD is working the best it possibly can.If anyone has any questions or comments regarding this job,feel free to ask.
For quick refference,additional info and good pattern setting knowledge,heres the link to Yukon's install guide,which I always carry with me when doing gears.Theres no shame in using the manual,setting gears is a precise and critical job and only one who has been doing it a very long time, can say they can do it by "feel" or without instructuons.
http://www.pirate4x4.com/tech/billav...structions.pdf
Now,set the carrier with its new bearings and outer races into the 3rd member and lightly oil the bearings.....were almost done!
Slip the adjuster nuts into their grooves and spin them in against the bearing races until the bearing slop is gone.Youll want there to be a little tiny bit of gear backlash for now,but just do it by feel to get things close.Run the left adjuster out and the right adjuster in equal amounts to obtain more gear lash, and vise-versa to obtain less gear lash.
Now,install the bearing caps onto their saddles (you did mark them left and right earlier,correct?) and tighten the bolts just till they bottom,very loose for now.
Set up your mag stand and dial indicator so that the pointer is touching the ring gear tooth at its very edge and so the pointer is in-line with the ring gear.Mark the ring gear at 4 points,at roughly 90* spaces around the gear.These are your measuring points.Rock the ring gear back and forth and measure the lash.Your final setting is going to be .0035in - .0043in.....very tight lash compared to the big 4x4 stuff Im used to,so be precise and certain as you check this setting.Turn the adjusters in or out in equal amounts until you get this reading at all 4 points along the ring gear.There can be variations,but the lowest reading must never be below .002in and the spread between the highest and lowest reading must not exceed .0028in......so theres very little room for error.This is why the ring gear MUST sit flat on the carrier when you install it. There are proponents for going higher or lower within the allowable backlash settings.Some say a tighter backlash will compensate for deflection when the pinion pushes ring gear away under power.Some say a looser backlash will allow more oil to find its way between the gear teeth,better protecting them.Both camps are correct,so its up to you to decide which end of the range to set things.I got a nice .004in setting all around the ring gear,so I left things at that,right in the middle of the allowable tolerances.
Now,tighten the two adjusters equally to set the carrier preload.Be sure to rotate each adjuster equally so the lash doesnt change.Its impossible to actually measure the carrier preload the way you check the pinion bearing preload since the diff unit is now assembled and the gear and pinion drag would mess things up.Yukon's gear guy says he's never had a failure due to excessive carrier bearing preload and it makes sense.The carrier bearings are turning at a leisurely pace,only 1/4 the speed of the pinion and they dont have to support any of the cars weight.Mazda has a spec for checking the value and it requires a large micrometer you use to take measurements at the little "nubs" on the bearings caps.Measure diagonally across the diff to those 4 points and tighten the adjusters until both measurements are between 7.3004in - 7.30033in.I took Yukons advice and tightened the adjusters with a 12" tool I made.Its pretty easy to put together,I welded 2 small bolts to a bar,but you could easily drill and fasten the bolts if you dont have a welder.Center spacing for the bolts is 57MM and they will fit into the adjuster slots perfectly.
"Tight as you can resonably get them with a 12" tool" is Yukon's recommendation.Be sure the last adjustment you make is to tighten the left side adjuster in.This will insure that there is no slack between the left bearing and the left adjuster.The left bearing takes ALL the load of the pinion when the power is on,so you dont want to have it loose.Once the carrier preload is set,tighten the bearing cap bolt to 27-38lb/ft of torque.
Install the locking tabs.You might have to alter the adjusters positions a tiny bit to get the slots lined up for the locks.The diff should feel pretty tight,but you should be able to turn it fairly easily with your hands.
Once the caps are tight,go back and re-check the backlash one last time to be sure you didnt alter it when running the carrier bearing adjusters down.
Now its time to check the pattern,which should be dead on if you kept the right pinion shim for your housing.This part normally sucks,because you have to do it several times when selecting pinion shims for Dana and other style diffs.This type of system makes pattern setup a one-shot deal most of the time,if you keep the parts together from a given housing.
This is the only stuff to use.Forget about white grease,red lead or prussian blue.......GM gear marking compound is THE BEST for setting gears and a $5 tube will last you a lifetime.
Coat a few teeth on both sides and repeat this at 3 or 4 points along the ring gear.I use a 3" bolt, tightened up in the companion flange to use as a crank to spin the pinion.
Use you right hand to crank the pinion and drag your left palm along the backside of the ring gear to provide some drag.Spin the pinion both directions many times to get a good pattern built up on the drive and coast sides of the teeth.You want the sliding action of the hypoid gears to rub away the compound where they mesh,allowing you to see where along the tooth the contact is being made.The bare spot should always be in the middle of the tooth,relative to the base(flank) and tip (face) of the tooth.There should always be some yellow left down at the bottom of each tooth and there should be at least a small line of yellow at the top.The pattern should be centered front to back(heal and toe) on the tooth as well,but this is not always possible, and not 100% required.I took several pics,but its a tough shot to get,so Ill only post the best ones.It was dead on perfect the first time,on both the drive and coast sides of the teeth.Sometimes its easier to see the pattern on the ring teeth you didnt coat with compound,since the stuff tends to get distributed on everything as the compound transfers to the pinion teeth and makes its way around the rest of the ring gear.
Its OK to leave the compound on the teeth,it will dissolve in the gear oil.Some say to wipe it off,but Id rather not risk getting towel or rag lint into my fresh rebuilt differential while trying to pick all the goop out of the teeth.....plus it gets everywhere,its like ultra-high pigment oilpaint.
Well,thats it!!!!
If you are done,you can officially call yourself a gear head!
Just install and enjoy.My new 3.90 gears dont feel much different than the old 4.07 gears,but its hard to tell when the redline buzzer is screeching and the tires are breaking loose.I'd hoped the taller gears would help quell the traction loss issues,but it didnt.At least my MPG on the highway might go up 1/2 of a percent!And I have the piece of mind knowing that all my bearings are fresh and the LSD is working the best it possibly can.If anyone has any questions or comments regarding this job,feel free to ask.
For quick refference,additional info and good pattern setting knowledge,heres the link to Yukon's install guide,which I always carry with me when doing gears.Theres no shame in using the manual,setting gears is a precise and critical job and only one who has been doing it a very long time, can say they can do it by "feel" or without instructuons.
http://www.pirate4x4.com/tech/billav...structions.pdf
heres another good gear setup/diff. site.
http://www.gearinstalls.com/
http://www.gearinstalls.com/

Thread
Thread Starter
Forum
Replies
Last Post
Jeff20B
1st Generation Specific (1979-1985)
73
Sep 16, 2018 07:16 PM