
(COOLING) FC aluminum water pump housing on a FB

Thread Starter
Joined: Jul 2008
Posts: 1,671
Likes: 9
From: Chino Calif
(COOLING) FC aluminum water pump housing on a FB
Well I just started my water pump housing swap project.
I know this has been covered before, but it is such a simple swap to save a lot of weight of the front of the car where you need it!!
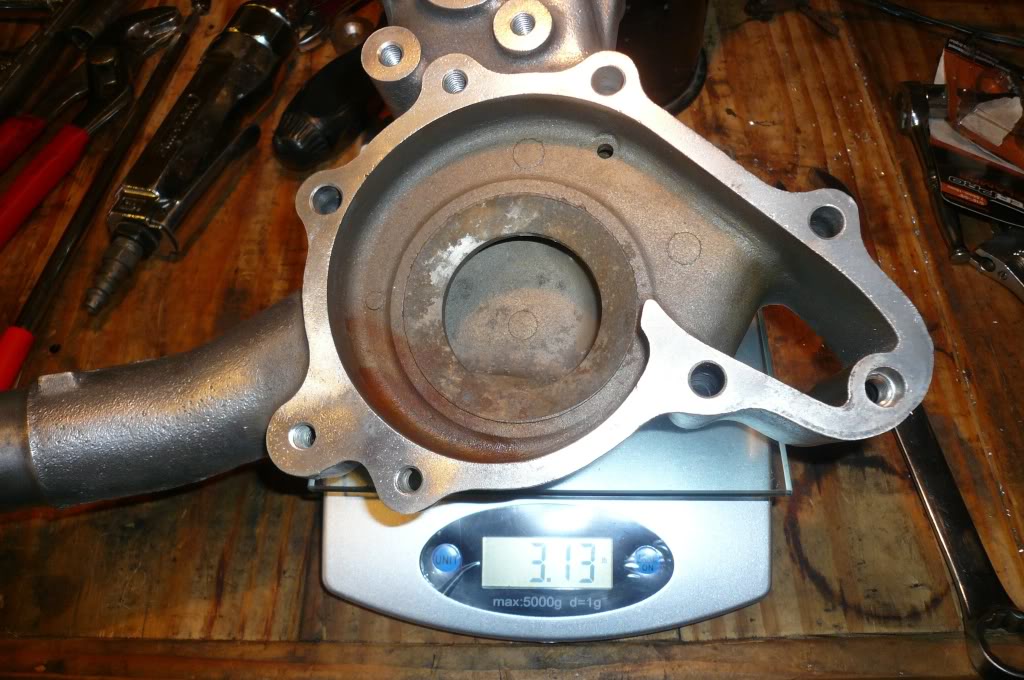
So here is the FC waterpump housing. Aluminum and in all of it's 3.13 pounds total!!
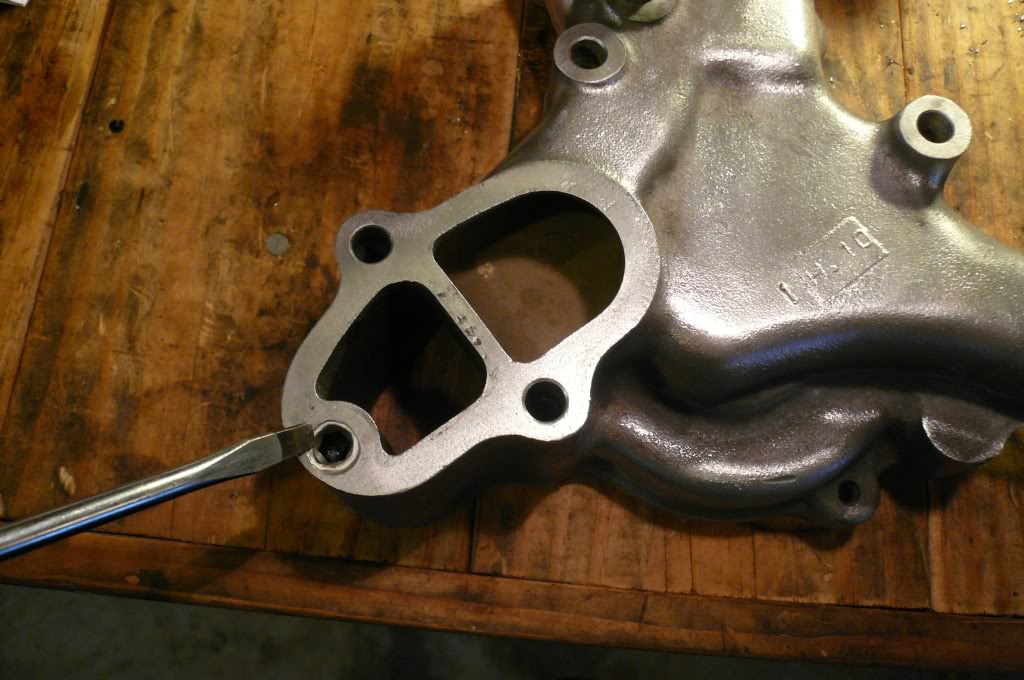
On this side, I tapped the "extra" FC hole with a 1/2 in 13 thread tap. Then I plugged this hole with a 1/2 set screw with pipe thread tape.
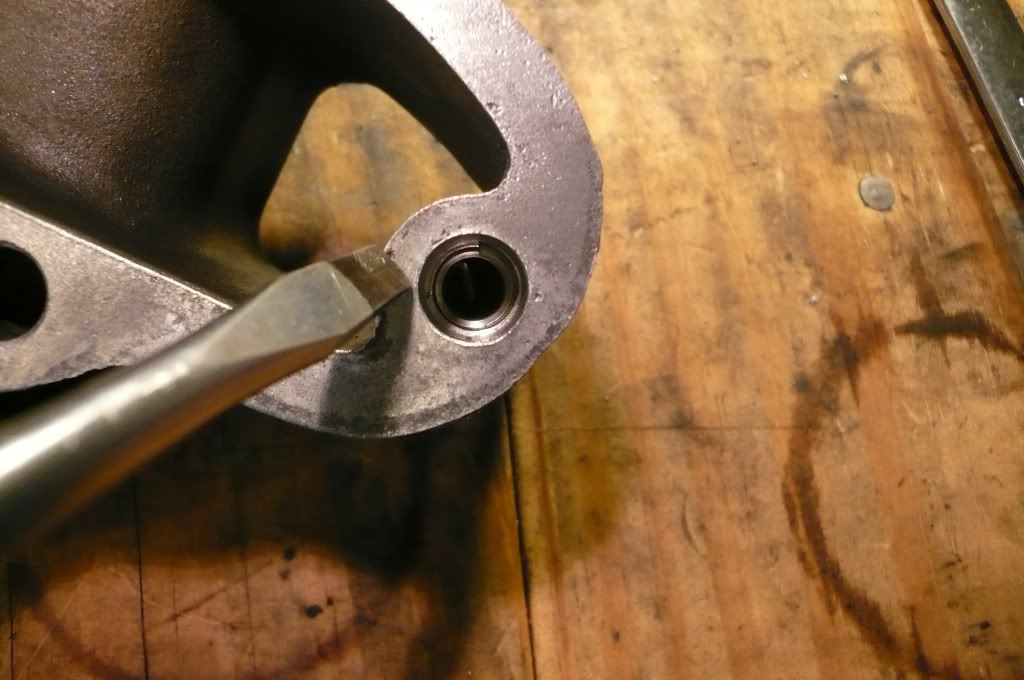
Then on this side I used a M8 X 1.25 helicoil so I can install the FC waterpump and still connect my alternator bracket.
More pictures to come. Do you guys know how much the cast iron FB waterpump housing weighs???
I know this has been covered before, but it is such a simple swap to save a lot of weight of the front of the car where you need it!!
So here is the FC waterpump housing. Aluminum and in all of it's 3.13 pounds total!!
On this side, I tapped the "extra" FC hole with a 1/2 in 13 thread tap. Then I plugged this hole with a 1/2 set screw with pipe thread tape.
Then on this side I used a M8 X 1.25 helicoil so I can install the FC waterpump and still connect my alternator bracket.
More pictures to come. Do you guys know how much the cast iron FB waterpump housing weighs???


Joined: Mar 2001
Posts: 31,849
Likes: 3,238
From: https://www2.mazda.com/en/100th/
sweet! i never knew the weight savings. on mine i used the 12A thermostat cover and painted it black, it really looks stock.
its also nice cause you can stick a temp sensor in the back too
its also nice cause you can stick a temp sensor in the back too
Sorry for my ignorance, but are all FC water pump housings aluminum? Is there a particular year or series to use?
I like the fact you can add another temp sensor....perhaps to trigger a 2 speed electric fan?
I like the fact you can add another temp sensor....perhaps to trigger a 2 speed electric fan?
Joined: Mar 2001
Posts: 31,849
Likes: 3,238
From: https://www2.mazda.com/en/100th/
S4 NA, probably the best candidate, uses the same 2 bolt thermostat flange as the 1st gens do. so it makes it the simplest. these should have one hole in the back of the pump housing thats tapped for a coolant temp sensor and another blank spot. there is also a hose barb for the efi systems water, i pulled the barb out and drilled and tapped that for a sensor.
the S4 turbo is the same, but its got an extra hose nipple in the lower hose extension for the turbo.
the S5's got a 3 bolt plastic thermostat neck, which is expensive and easily broken. the lower radiator hose pipe thing is further forward to clear the electric metering pump, i also think it might not fit on the early front cover without a little grinding. it has 2 spots for sensors, and depending on model 1 or both will be drilled and tapped. one was engine coolant temp for the engine, the other is a fan switch.
the S4 and S5 use different water pumps too. and the water pump pulley is slightly different, the S5 uses a bigger shaft, so the s5 pulley works on both pumps, but the s4 pulley only works on s4 pumps.
the S4 water pump setup will take the same alternator belt as the SA/FB.
Trending Topics
Lives on the Forum
Joined: Jun 2004
Posts: 11,359
Likes: 14
From: Grand Rapids Michigan
Nice project, and definitely worth the weight savings. I ended up using a fb water pump with my fc housing, and it fit fine. Only reason I used the fb pump was because it was new, and it was aluminum. 
.
.
intriguing. when my brother built his car, he went with pretty much a complete Gen II cooling system - water pump and radiator. i never gave it much thought for myself, but at only 3 pounds, i have to wonder now. maybe he was onto something. i mean it's negligible in the overall picture for me, but important enough to keep in mind. thanks.
As for the S5 WP housing, yes it will require a little bit of griding to fit over a FB front cover.
Good to know the weight of some of these parts, I might have to use my spare FC WP housing on my 12a now....
Thread Starter
Joined: Jul 2008
Posts: 1,671
Likes: 9
From: Chino Calif
I thought you had to use a FC water pump. It seems like the bolt holes of the FB pump is different from FC.
Choose an S4, not an S5. j9fd3s already covered the major reasons why. I'll discuss the more subtle reasons. Your stock radiator lower hose will fit an S4 with maybe a 1/4" difference in length, but not so much the S5. The S3 aluminum aftermarket GMB impeller will bolt to an S4 housing (as will the stock cast iron one, but let's use aluminum for weight savings). You just need to tap and S3 alt bracket hole with 10mm x 1.5 (coarse because it's going into aluminum). But don't use a clutch fan if doing aluminum on aluminmum as there's not as much strength there as there would be if one component were cast iron, either WP housing or imp housing.
I did an al on al for my rotary baja and will do another in my rotary MG Midget as both are small light weight vehicles with electric fans and both are staying NA.
Now that that's covered, here's what I've done with an S4 T2 housing on an S3 or older engine with fine results. They have two coolant nipples, obviously the lower one is for a turbo and the upper is for thermowax (cold running/warmup). Both nipples can be used on your water cooled turbo. There should be enough flow from one nipple to the other, I would think. You must grind some aluminum off the backside of the WP housing so it doesn't hit the front cover. I used masking tape to show me where it was contacting. It's also probably a good idea to stick with the stock cast iron S4 impeller on a turbo engine as they are more sturdy than an aluminum GMB, I'd think.
That brings us to how I've installed S4 NA and T2 waterpumps on S3 and older engines. I've drilled through the alt bracket hole on the cast iron impeller housing (one step up from 10mm, like 23/64 or whatever it is). Then I cut 10mm x 1.5 coarse threads in the WP housing because it's going into aluminum. I know above there is an example of a helicoil. Seems like too much work lol. I also know Aaron Cake does medium thread 10mm x 1.25 (same as bellhousing to rear plate bolts) which I don't thimk isd a good idea. Think about it; even the starter bolts are coarse on these cars - if you've ever done a clutch job or starter swap you'll have seen the coarse threaded bolts for the starter and beel able to compare with the medium pitch bellhousing bolts. Now for a fine pitch 10mm bolt, just look at a tension bolt; these are 10mm x 1.00. Sorry for the lecture, I just had to get that out there.
As for the backside, both examples above have tapped for a plug. I've done it the much easier/simpler way and just filled it in with RTV. Works fine, and easily reversable to go on an actual S4 engine in the future.
j9fd3s is also correct about the thermostat cover. From old school 74 aluminum with/without a tapered fitting all the way up to '85 steel 45� (12A) or straight (GSL-SE), these will work nicely on an S4 housing but not an S5. You also have a choice between thermostats. I like the brass '85 and older type. They seem to open sooner than the stainless '86 and later type which I suspect were designed to stay closed right up until they open for emissions purposes, to keep FCs at a higher temp or with a tighter hysterisis (might not be the right word here but you get my meaning) or in other words a narrower open/close window. I prefer the sooner opening '85 brass type.
I did an al on al for my rotary baja and will do another in my rotary MG Midget as both are small light weight vehicles with electric fans and both are staying NA.
Now that that's covered, here's what I've done with an S4 T2 housing on an S3 or older engine with fine results. They have two coolant nipples, obviously the lower one is for a turbo and the upper is for thermowax (cold running/warmup). Both nipples can be used on your water cooled turbo.
There should be enough flow from one nipple to the other, I would think. You must grind some aluminum off the backside of the WP housing so it doesn't hit the front cover. I used masking tape to show me where it was contacting. It's also probably a good idea to stick with the stock cast iron S4 impeller on a turbo engine as they are more sturdy than an aluminum GMB, I'd think.That brings us to how I've installed S4 NA and T2 waterpumps on S3 and older engines. I've drilled through the alt bracket hole on the cast iron impeller housing (one step up from 10mm, like 23/64 or whatever it is). Then I cut 10mm x 1.5 coarse threads in the WP housing because it's going into aluminum. I know above there is an example of a helicoil. Seems like too much work lol.
I also know Aaron Cake does medium thread 10mm x 1.25 (same as bellhousing to rear plate bolts) which I don't thimk isd a good idea. Think about it; even the starter bolts are coarse on these cars - if you've ever done a clutch job or starter swap you'll have seen the coarse threaded bolts for the starter and beel able to compare with the medium pitch bellhousing bolts. Now for a fine pitch 10mm bolt, just look at a tension bolt; these are 10mm x 1.00. Sorry for the lecture, I just had to get that out there.As for the backside, both examples above have tapped for a plug. I've done it the much easier/simpler way and just filled it in with RTV. Works fine, and easily reversable to go on an actual S4 engine in the future.
j9fd3s is also correct about the thermostat cover. From old school 74 aluminum with/without a tapered fitting all the way up to '85 steel 45� (12A) or straight (GSL-SE), these will work nicely on an S4 housing but not an S5. You also have a choice between thermostats. I like the brass '85 and older type. They seem to open sooner than the stainless '86 and later type which I suspect were designed to stay closed right up until they open for emissions purposes, to keep FCs at a higher temp or with a tighter hysterisis (might not be the right word here but you get my meaning) or in other words a narrower open/close window. I prefer the sooner opening '85 brass type.
Nope. Only the main housing is aluminum. The stock and aftermarket impellers are alwasy cast iron. The only way to get aluminum on aluminum is to use an 85 or older aftermarket GMB impeller and perform the mods I mentioned above. Then you have to be careful to not overstress the assembly by using a clutch fan, so I'd recommend electric fan only.
Lives on the Forum
Joined: Jun 2004
Posts: 11,359
Likes: 14
From: Grand Rapids Michigan
I got the aluminum water pump from Autozone. I think I just got lucky, and that's what they shipped me. Not sure if you could specify aluminum or not.
80's Oldschool: The fit was not exact, I think there was one bolt that could not be used. However, with enough RTV, anything is possible.
Also, for the extra coolant opening on the rear of the housing, I plugged that with a wheel lug bolt (perfect fit). lol.
And while removing 13 Lbs from a car might not seem like much, remember that this is 13 Lbs from a high point on the car, which makes it slightly more valuable...
sWEET! More cool, cheap mods.
I think I was about 46lbs heavy in the back from being true 50/50 weight distribution with me in it. If I put the battery in the trunk or storage bin, and do this mod I might just make it! Definitely would like the extra spot for a sensor for my e-fans.
I think I was about 46lbs heavy in the back from being true 50/50 weight distribution with me in it. If I put the battery in the trunk or storage bin, and do this mod I might just make it! Definitely would like the extra spot for a sensor for my e-fans.
Thread Starter
Joined: Jul 2008
Posts: 1,671
Likes: 9
From: Chino Calif
WHat do you think the weight difference between a cast iron and an aluminum pump??
I have not bought the pump yet, just modifying the housing. Guess I can do the mods and put an aluminum one on.
Kentetsu, do you just tap a hole in the FC housing for the 1st gen water pump??
Also, any other leads on how to get one of these GMB aluminum pumps??
I have not bought the pump yet, just modifying the housing. Guess I can do the mods and put an aluminum one on.
Kentetsu, do you just tap a hole in the FC housing for the 1st gen water pump??
Also, any other leads on how to get one of these GMB aluminum pumps??
Thread Starter
Joined: Jul 2008
Posts: 1,671
Likes: 9
From: Chino Calif
OK, I think I understand
Choose an S4, not an S5. j9fd3s already covered the major reasons why. I'll discuss the more subtle reasons. Your stock radiator lower hose will fit an S4 with maybe a 1/4" difference in length, but not so much the S5. The S3 aluminum aftermarket GMB impeller will bolt to an S4 housing (as will the stock cast iron one, but let's use aluminum for weight savings). You just need to tap and S3 alt bracket hole with 10mm x 1.5 (coarse because it's going into aluminum). But don't use a clutch fan if doing aluminum on aluminmum as there's not as much strength there as there would be if one component were cast iron, either WP housing or imp housing.
I did an al on al for my rotary baja and will do another in my rotary MG Midget as both are small light weight vehicles with electric fans and both are staying NA.
Now that that's covered, here's what I've done with an S4 T2 housing on an S3 or older engine with fine results. They have two coolant nipples, obviously the lower one is for a turbo and the upper is for thermowax (cold running/warmup). Both nipples can be used on your water cooled turbo. There should be enough flow from one nipple to the other, I would think. You must grind some aluminum off the backside of the WP housing so it doesn't hit the front cover. I used masking tape to show me where it was contacting. It's also probably a good idea to stick with the stock cast iron S4 impeller on a turbo engine as they are more sturdy than an aluminum GMB, I'd think.
That brings us to how I've installed S4 NA and T2 waterpumps on S3 and older engines. I've drilled through the alt bracket hole on the cast iron impeller housing (one step up from 10mm, like 23/64 or whatever it is). Then I cut 10mm x 1.5 coarse threads in the WP housing because it's going into aluminum. I know above there is an example of a helicoil. Seems like too much work lol. I also know Aaron Cake does medium thread 10mm x 1.25 (same as bellhousing to rear plate bolts) which I don't thimk isd a good idea. Think about it; even the starter bolts are coarse on these cars - if you've ever done a clutch job or starter swap you'll have seen the coarse threaded bolts for the starter and beel able to compare with the medium pitch bellhousing bolts. Now for a fine pitch 10mm bolt, just look at a tension bolt; these are 10mm x 1.00. Sorry for the lecture, I just had to get that out there.
As for the backside, both examples above have tapped for a plug. I've done it the much easier/simpler way and just filled it in with RTV. Works fine, and easily reversable to go on an actual S4 engine in the future.
j9fd3s is also correct about the thermostat cover. From old school 74 aluminum with/without a tapered fitting all the way up to '85 steel 45� (12A) or straight (GSL-SE), these will work nicely on an S4 housing but not an S5. You also have a choice between thermostats. I like the brass '85 and older type. They seem to open sooner than the stainless '86 and later type which I suspect were designed to stay closed right up until they open for emissions purposes, to keep FCs at a higher temp or with a tighter hysterisis (might not be the right word here but you get my meaning) or in other words a narrower open/close window. I prefer the sooner opening '85 brass type.
I did an al on al for my rotary baja and will do another in my rotary MG Midget as both are small light weight vehicles with electric fans and both are staying NA.
Now that that's covered, here's what I've done with an S4 T2 housing on an S3 or older engine with fine results. They have two coolant nipples, obviously the lower one is for a turbo and the upper is for thermowax (cold running/warmup). Both nipples can be used on your water cooled turbo.
There should be enough flow from one nipple to the other, I would think. You must grind some aluminum off the backside of the WP housing so it doesn't hit the front cover. I used masking tape to show me where it was contacting. It's also probably a good idea to stick with the stock cast iron S4 impeller on a turbo engine as they are more sturdy than an aluminum GMB, I'd think.That brings us to how I've installed S4 NA and T2 waterpumps on S3 and older engines. I've drilled through the alt bracket hole on the cast iron impeller housing (one step up from 10mm, like 23/64 or whatever it is). Then I cut 10mm x 1.5 coarse threads in the WP housing because it's going into aluminum. I know above there is an example of a helicoil. Seems like too much work lol.
I also know Aaron Cake does medium thread 10mm x 1.25 (same as bellhousing to rear plate bolts) which I don't thimk isd a good idea. Think about it; even the starter bolts are coarse on these cars - if you've ever done a clutch job or starter swap you'll have seen the coarse threaded bolts for the starter and beel able to compare with the medium pitch bellhousing bolts. Now for a fine pitch 10mm bolt, just look at a tension bolt; these are 10mm x 1.00. Sorry for the lecture, I just had to get that out there.As for the backside, both examples above have tapped for a plug. I've done it the much easier/simpler way and just filled it in with RTV. Works fine, and easily reversable to go on an actual S4 engine in the future.
j9fd3s is also correct about the thermostat cover. From old school 74 aluminum with/without a tapered fitting all the way up to '85 steel 45� (12A) or straight (GSL-SE), these will work nicely on an S4 housing but not an S5. You also have a choice between thermostats. I like the brass '85 and older type. They seem to open sooner than the stainless '86 and later type which I suspect were designed to stay closed right up until they open for emissions purposes, to keep FCs at a higher temp or with a tighter hysterisis (might not be the right word here but you get my meaning) or in other words a narrower open/close window. I prefer the sooner opening '85 brass type.
Am I right??
Thread Starter
Joined: Jul 2008
Posts: 1,671
Likes: 9
From: Chino Calif
OK, just ordered an Aluminum FB pump. Go here and scroll to the bottom! Good price too!!!
http://www.car-stuff.com/store/?N=1667+11064+2398+1014
http://www.car-stuff.com/store/?N=1667+11064+2398+1014
To install an S4 aluminum waterpump main housing with stock cast iron S4 impeller housing on an S3 or older engine, I find it easiest to drill through the impeller housing with a bit that is slightly larger than 10mm. Then I cut 10mm x 1.5 threads in the aluminum main housing. I fill the rest of the hole with RTV during installation.
When doing a custom aluminum on aluminum waterpump setup, I don't cut threads in the main waterpump housing. I also don't bother filling with RTV because it's not necessary. I also cut some 10mm x 1.5 threads in the GMB impeller alt bracket hole and use a stud. A stud here is a lot more stable than a bolt. The stud must be short and a have an unthreaded section to butt up against the GMB alt bracket hole (much like any stock stud you'll find on the engine like an exhaust stud and such - this is basic stuff). Then drill out your alt bracket so it slips on the stud and tighten a nut on the outside (could be a spare exhaust nut as it's the same thread pitch).
Keep track of your alt brackets. For the example above, you'll use an FC alt bracket, drilled out to slip over a 10mm x 1.5 bolt. For the al on al example below, use the FB bracket, again drilled out to fit over a 10mm x 1.5 stud.
Any of the above could also be accomplished with 3/8 NC hardware.
When I worked at Advance Auto, around 6 months ago, they carried GMB water pumps. If they are a supplier they can order them either way. They would also price match the above posted pump if you showed it to them.
This next part is for you oldschool rotorheads out there. Look at the bottom corner of the front plate of any 3B or possibly most R5 engines (intake/exhaust side of engine) and you'll see a short stud originally used either for the thermal reactor heat shield, or some such that is probably not in use any more. It's just stitting there. If you're skilled enough you can extract it without damaging it (use lots of heat and double nuts to protect the threads).
I've found these studs to be 100% perfect for the al on al mod as it tightens into the GMB at the perfect depth where the threaded section runs out of threads just as the unthreaded middle section reaches the aluminum, so it has something to tighten up against. The other side of the stud sticks out far enough to slip on the alt bracket and a nut. Looks very profesional and is very easy to do if you have the right stud.
If you don't have this stud, you can fake it with an exhaust stud, but being SS it's hard to cut, and the unthreaded section is a little short so you have to account for that in your measurements. Also the shorter threaded section (that goes into the rotor housing) might be a bit long to work with here. Not sure. Maybe leave it and cut off most of the longer threaded end so it has the right depth when threaded into the GMB. Play around with it. It might be worth it to you to have a nearly weightless waterpump.
Here you see an S4 WP main housing and a 79-85 GMB impeller. The gasket is an S4 and lines up perfectly on all but one hole; alt bracket hole location difference is clearly visible.

Differences in alt brackets themselves. Top is old school 3B/early R5 with external reg alt. Middle is typical FB with internal reg alt. Bottom is FC. Notice only the length increases for the FC as its bolt shifted lower in the WP.

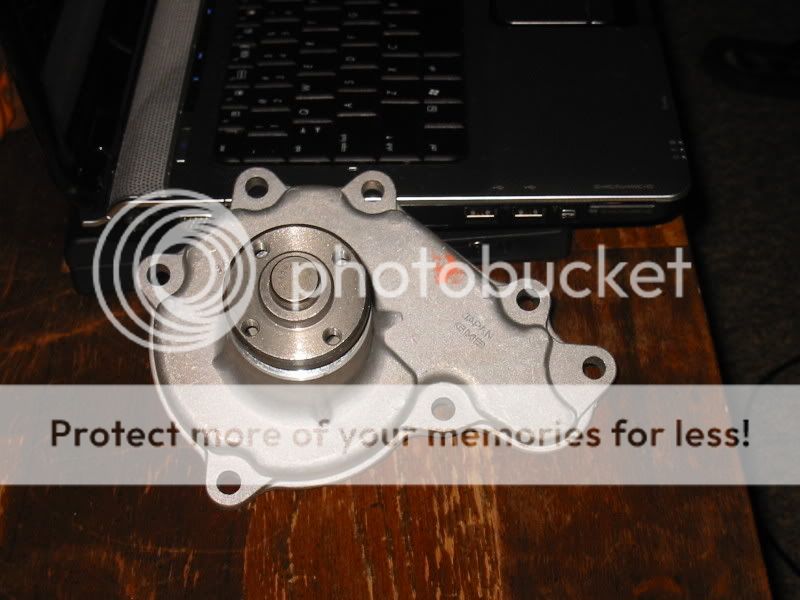
gearhead-42 posted this nice pic of a new GMB.
Here is my OEM 3B/R5 heat shield stud with an oddball oversized 15mm nut I had lying around. A regular 14mm exhaust nut would also work perfect here.

Sorry I don't have any more pics of the WP fully assembled or installed. Maybe later.
Differences in alt brackets themselves. Top is old school 3B/early R5 with external reg alt. Middle is typical FB with internal reg alt. Bottom is FC. Notice only the length increases for the FC as its bolt shifted lower in the WP.
gearhead-42 posted this nice pic of a new GMB.
Here is my OEM 3B/R5 heat shield stud with an oddball oversized 15mm nut I had lying around. A regular 14mm exhaust nut would also work perfect here.
Sorry I don't have any more pics of the WP fully assembled or installed. Maybe later.
Thread Starter
Joined: Jul 2008
Posts: 1,671
Likes: 9
From: Chino Calif
This next part is for you oldschool rotorheads out there. Look at the bottom corner of the front plate of any 3B or possibly most R5 engines (intake/exhaust side of engine) and you'll see a short stud originally used either for the thermal reactor heat shield, or some such that is probably not in use any more. It's just stitting there. If you're skilled enough you can extract it without damaging it (use lots of heat and double nuts to protect the threads).
I've found these studs to be 100% perfect for the al on al mod as it tightens into the GMB at the perfect depth where the threaded section runs out of threads just as the unthreaded middle section reaches the aluminum, so it has something to tighten up against. The other side of the stud sticks out far enough to slip on the alt bracket and a nut. Looks very profesional and is very easy to do if you have the right stud.
If you don't have this stud, you can fake it with an exhaust stud, but being SS it's hard to cut, and the unthreaded section is a little short so you have to account for that in your measurements. Also the shorter threaded section (that goes into the rotor housing) might be a bit long to work with here. Not sure. Maybe leave it and cut off most of the longer threaded end so it has the right depth when threaded into the GMB. Play around with it. It might be worth it to you to have a nearly weightless waterpump.
I've found these studs to be 100% perfect for the al on al mod as it tightens into the GMB at the perfect depth where the threaded section runs out of threads just as the unthreaded middle section reaches the aluminum, so it has something to tighten up against. The other side of the stud sticks out far enough to slip on the alt bracket and a nut. Looks very profesional and is very easy to do if you have the right stud.
If you don't have this stud, you can fake it with an exhaust stud, but being SS it's hard to cut, and the unthreaded section is a little short so you have to account for that in your measurements. Also the shorter threaded section (that goes into the rotor housing) might be a bit long to work with here. Not sure. Maybe leave it and cut off most of the longer threaded end so it has the right depth when threaded into the GMB. Play around with it. It might be worth it to you to have a nearly weightless waterpump.
Is this a 10mm X 1.5???? I will get a tap and cut threads on the new AL pump I just ordered!!!