Hydramat size/configuration in stock FD tank
 01-07-17, 12:41 PM
#1

Hydramat size/configuration in stock FD tank
Anyone tried any Holley Hydramat configurations yet in an FD tank specifically? Any one know what setup works the best?
I'm curious as I have tasted the notorious left sweeper starvation and I'm curious with this as a solution. If it works well, it is a very simple and elegant solution I think.
Does the stock baffling in the FD tank cause an issue?
I'm curious as I have tasted the notorious left sweeper starvation and I'm curious with this as a solution. If it works well, it is a very simple and elegant solution I think.
Does the stock baffling in the FD tank cause an issue?
 01-07-17, 07:20 PM
#3
"Works with 2-cycle oil blends as high as 20:1"
https://www.holley.com/products/fuel...s/parts/16-106
01-08-17, 08:29 AM
#4

I was considering putting one of the smallest straight ones in the bottom of the stock plastic tray that the fuel pump "sits" in currently. Then the return line would dump right on it. That's likely the least intrusive way to do it.
The big question will be how you connect it to a drop-in pump. Keep us posted
The big question will be how you connect it to a drop-in pump. Keep us posted
01-08-17, 02:11 PM
#6
I was considering putting one of the smallest straight ones in the bottom of the stock plastic tray that the fuel pump "sits" in currently. Then the return line would dump right on it. That's likely the least intrusive way to do it.
The big question will be how you connect it to a drop-in pump. Keep us posted
The big question will be how you connect it to a drop-in pump. Keep us posted
Any one have any pics of the tank interior or diagrams to get a better idea of how it is laid out? or maybe there is a thread someone has seen with useful info on the tank interior?
As far as connecting to the pump, my current setup uses AN fittings and a hose clamp to connect my normal sock to my Bosch 044 drop in pump. I plan to use the same type of fittings, maybe add here or there to do the same with the Hydramat and use it to simply replace my current sock.

Trending Topics
01-09-17, 09:00 AM
#8
you'll be fine connecting to that, so you're ahead of the game.
On having something connect all the way to the right side of the tank is a tough call. Yes it'd be ideal, but it'll also greatly increase cost and complexity. Unless you need to run to the absolute last drop to have complete minimum weight for some competition purpose, I'd say it's likely not worth it, but it's your car.
I'd think to do that effectively, you'd want to remove the plastic tray altogether and then run the biggest mat they have against the bottom of the tank. You may have to look in there to see what other baffles are in the tank blocking the way as I've never considered that option.
01-09-17, 09:24 AM
#9
Senior Member

I have some connections in Holley and have been running a HydraMat since before they were available to the public. I can get every bit of fuel out of our 16 gallon cell before we have to stop for fuel, it works just like they claim it does and it is no problem at all to run with premix. The one thing to watch out for is the hose inside the cell connecting the mat with the outlet. My first time I used proper SAE 30r10 submersible rated hose but it failed and a big chunk of the hose came out so it was like I didn't have the mat at all. Now I have -8 braided hose and it seems to be holding up fine, if I take the cell apart again I will probably redo it with stainless hard line. Hardline is definitely your best option since it will never fail and will help hold the mat in place better than even braided hose.


Last edited by mhr650; 01-09-17 at 09:27 AM.
01-28-17, 06:03 AM
#10
i run the 3"x8" in the oem baffled area.. ive run it down to 1/8 tank on track with no problems. I found a pickup with a longer neck, cut the fuel sock off, and hose clamped to what was left. not really robust, but hasnt failed yet after 4 track events
01-29-17, 02:47 AM
#11
So my plan is to go ahead and remove the stock plastic baffle tray and try to fit the 15x8 cross with the offset pick-up. The idea being that the pick up point would be close to the pump and the long end of the mat would lay towards the passenger side of the tank.
I did a little searching and it seems the stock plastic baffle tray is held in place by some tabs welded to the bottom of the tank. Hopefully these wont be a problem interfering with the mat if I leave them be and I'm hoping the mat style I have chosen helps with this. You can get a decent view of the baffle and tabs inside the tank here:
GENE FELBER ARCHIVE: RX-7 FUEL SYSTEM
Here is the mat I am thinking to use:
http://www.improvedracing.com/images...-102(2)_lg.jpg
I'll get the magnet kit to go with it as well.
The mat has a 3/8 NPT female fitting so I may be able to use a 3/8NPT to AN 90 degree fitting and connect to my banjo bolt with braided hose. I'm not sure my hose size yet. I'll figure it out when I get the pump back out.
The only thing im not too certain about is that there may be structural members inside the tank that are in the way?
https://www.rx7club.com/3rd-generati...k-swap-308038/
Id kill for a CAD model haha. I guess I will find out soon enough.
If all fails I guess I can always plumb an additional mat to the far end of my tank according to Holley.
 03-23-17, 07:02 PM
#13
Waiting on my last couple parts to arrive. I decided to go with a dual 15x3 mat setup to reach both far sides of the tank similar to the one shown in the holley video:
I am setting it up to use hard line as suggested. I will have an update when I get it put together. I feel like the hard part will be getting it in the tank and then knowing that it sits correctly as intended.
I am setting it up to use hard line as suggested. I will have an update when I get it put together. I feel like the hard part will be getting it in the tank and then knowing that it sits correctly as intended.
08-02-17, 11:35 PM
#14
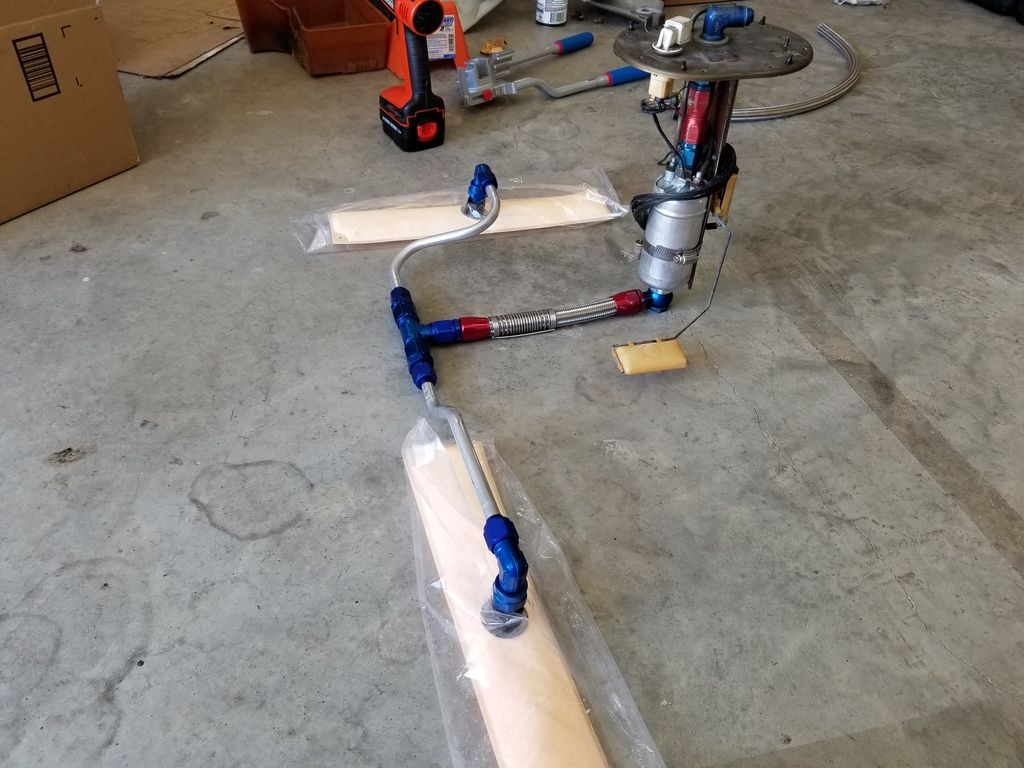
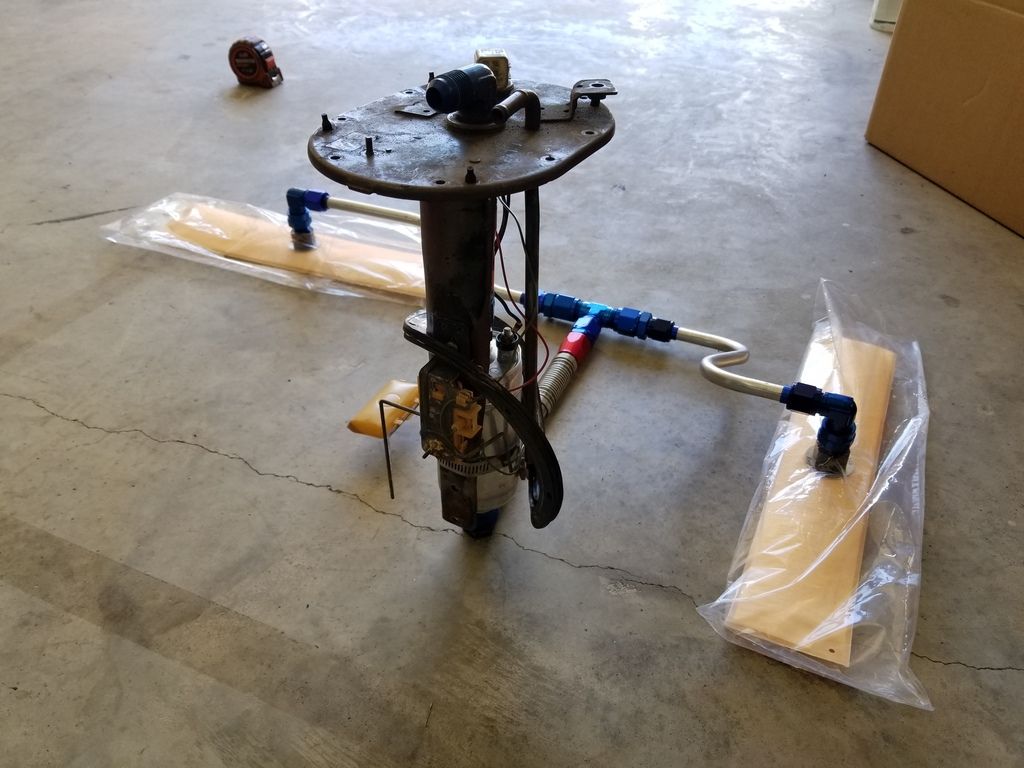
Update: Installed!
Ok I finally got this project done! It was a little intimidating at first because I'm not used to modding things that I havent seen done before in detail, and as you will see, the inside of the tank is not exactly ideal for ease of installation for this setup.
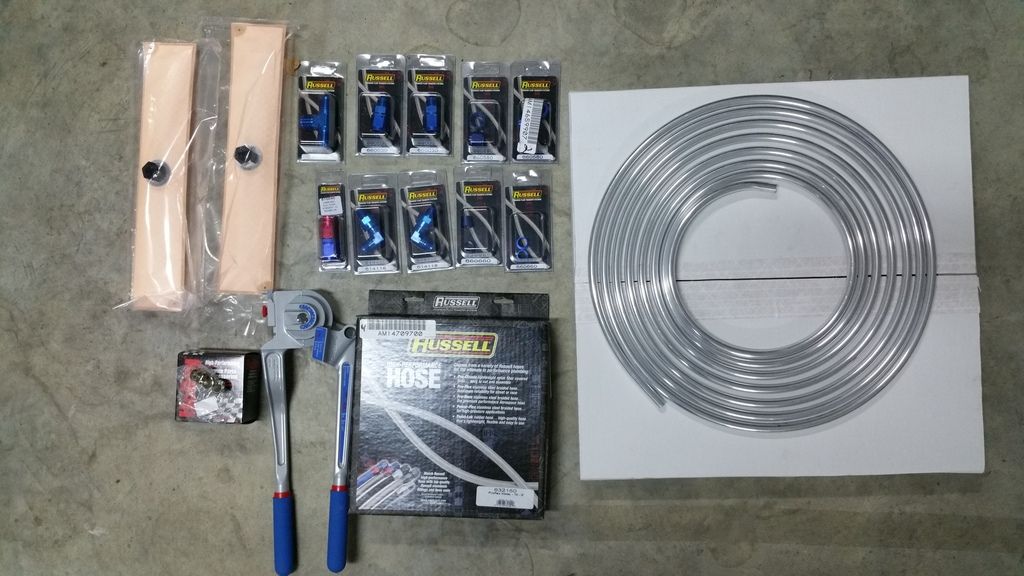
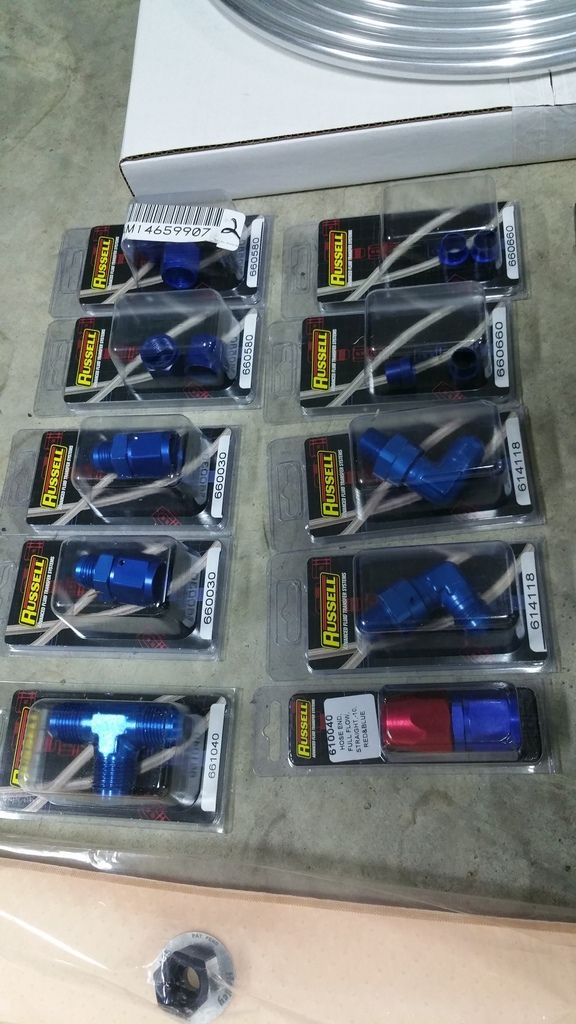
Tools & Parts:
15x3 Holley Hydramats with center pick-up Qty: 2
Hydramat Install Magnet kit Qty: 1
-8AN 90 male x 3/8 NPT male Qty: 2
-8AN Tube Nut Qty:4
-8AN tube sleeve Qty: 4
-10AN Male Tee Qty: 1
-10AN Male x -8AN female Adapter fitting Qty: 2
-10AN Hose end Qty: 1
-10AN Hose end Banjo Qty: 1
-10AN Hose Qty: 3ft
1/2" Fuel line, Alum Qty: 10 ft
1/2" E-Z Coil Tube Shaping coil Qty: 2
Size 10 Koul Tool
Tubing cutter
Tube Bender Imperial 370-FH
Long handle Hose Shear
Chamfer drill bit
37 Degree Flaring kit Mastercool 71098
Hydraulic Flaring tool Mastercool 71475
Here are some pics of the process. Sorry I didn't get exact step by step pics.
Car on stands and draining tank. I filled two 5 gal containers.
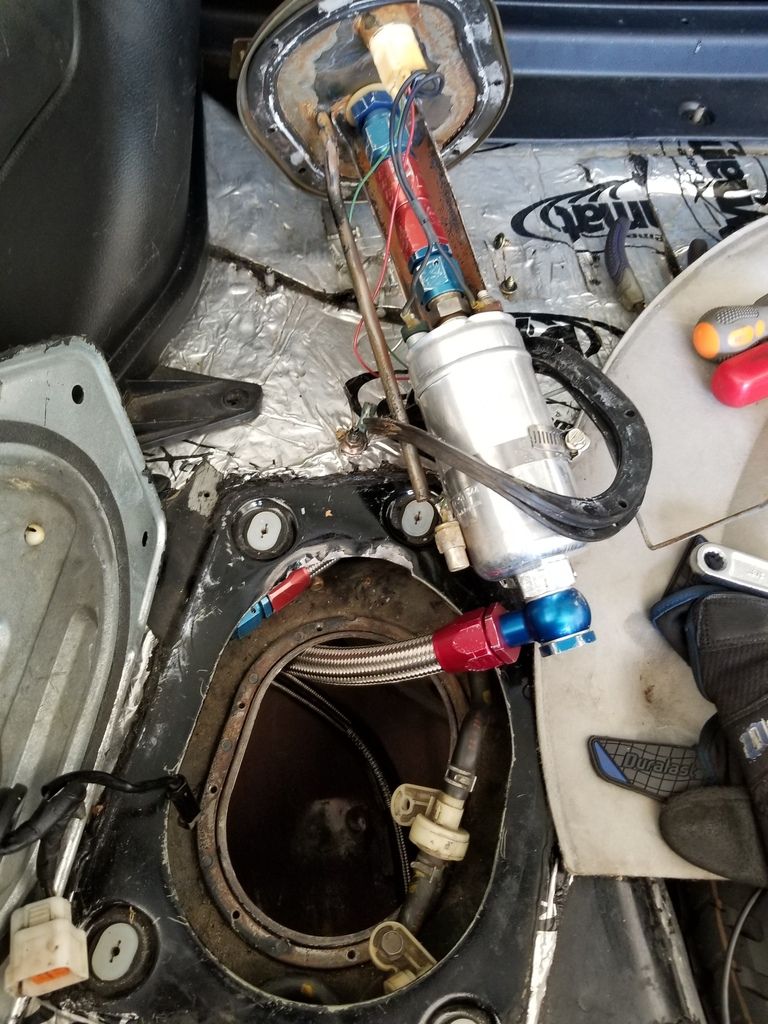
Pull out the pump. (This can be tricky with the fuel guage float attached I ended up damaging mine. Just got a new one so turns out I gotta go back in to replace it soon.) I waited several days until fully dry to then pry out the pump bucket held to the bottom of the tank with welded in clips.
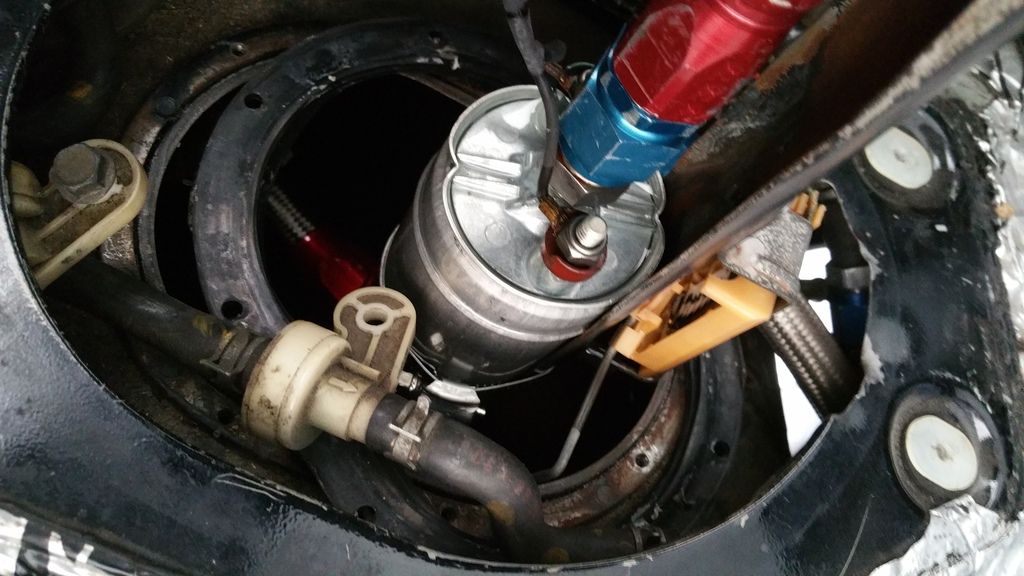
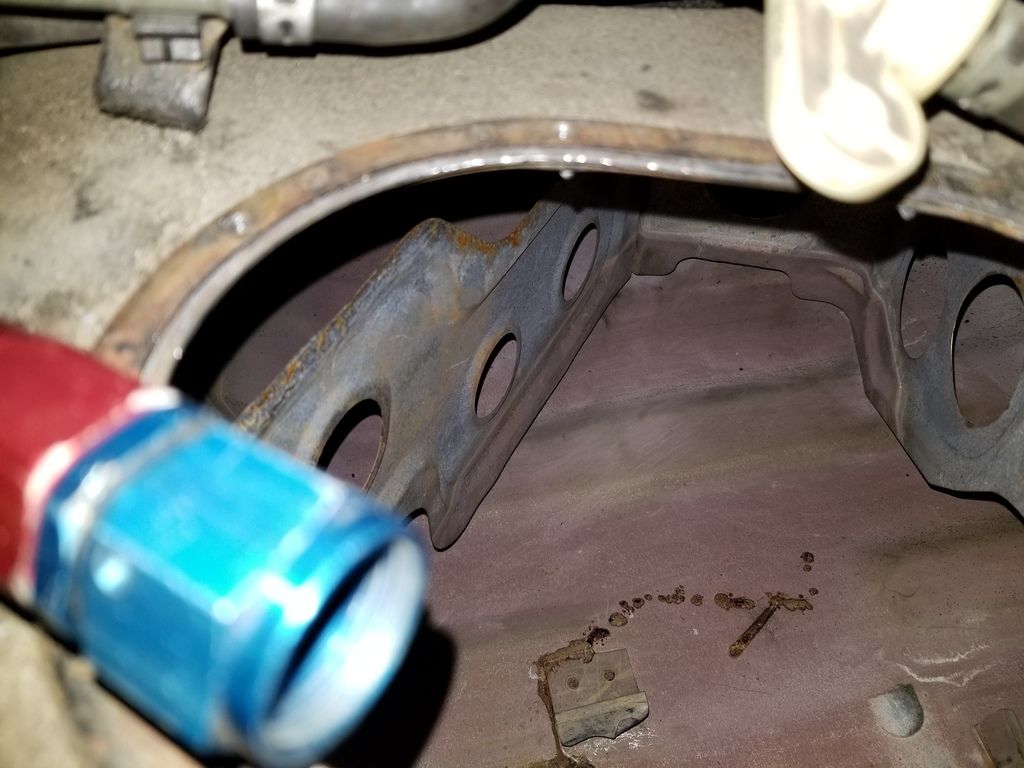
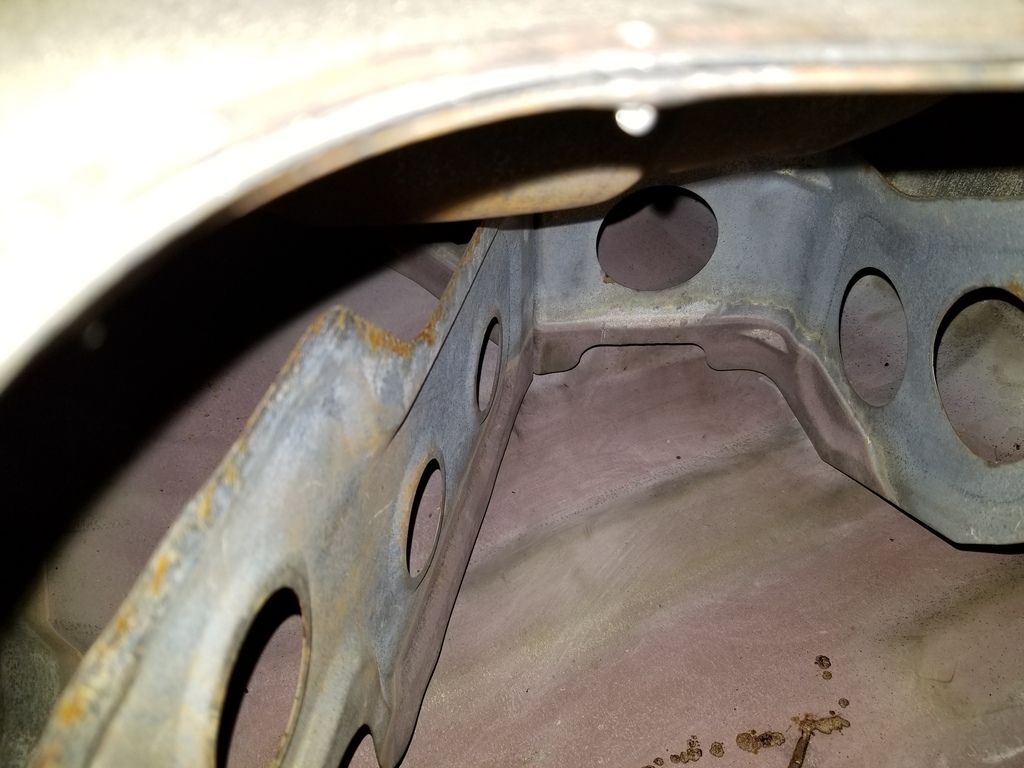
Inside the tank has baffles. They are thin and sharp! I got the sliced arms to prove it so be careful. The baffles are in the way to get to the far right side of the tank, so you gotta either cut them out or improvise. I chose to improvise because I still wanted them to help control slosh of the fuel.
Tools & Parts:
15x3 Holley Hydramats with center pick-up Qty: 2
Hydramat Install Magnet kit Qty: 1
-8AN 90 male x 3/8 NPT male Qty: 2
-8AN Tube Nut Qty:4
-8AN tube sleeve Qty: 4
-10AN Male Tee Qty: 1
-10AN Male x -8AN female Adapter fitting Qty: 2
-10AN Hose end Qty: 1
-10AN Hose end Banjo Qty: 1
-10AN Hose Qty: 3ft
1/2" Fuel line, Alum Qty: 10 ft
1/2" E-Z Coil Tube Shaping coil Qty: 2
Size 10 Koul Tool
Tubing cutter
Tube Bender Imperial 370-FH
Long handle Hose Shear
Chamfer drill bit
37 Degree Flaring kit Mastercool 71098
Hydraulic Flaring tool Mastercool 71475
Here are some pics of the process. Sorry I didn't get exact step by step pics.
Car on stands and draining tank. I filled two 5 gal containers.
Pull out the pump. (This can be tricky with the fuel guage float attached I ended up damaging mine. Just got a new one so turns out I gotta go back in to replace it soon.) I waited several days until fully dry to then pry out the pump bucket held to the bottom of the tank with welded in clips.
Inside the tank has baffles. They are thin and sharp! I got the sliced arms to prove it so be careful. The baffles are in the way to get to the far right side of the tank, so you gotta either cut them out or improvise. I chose to improvise because I still wanted them to help control slosh of the fuel.
Last edited by mazdaFD; 08-03-17 at 08:11 PM.
 08-02-17, 11:39 PM
#16
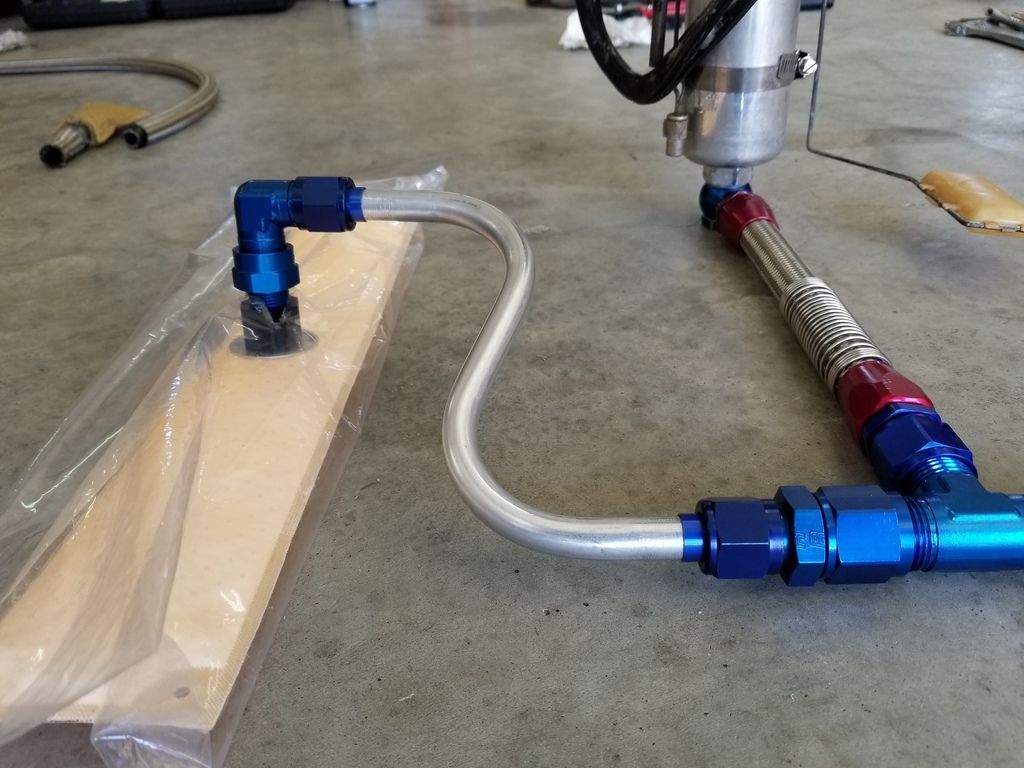
Here are some measurements
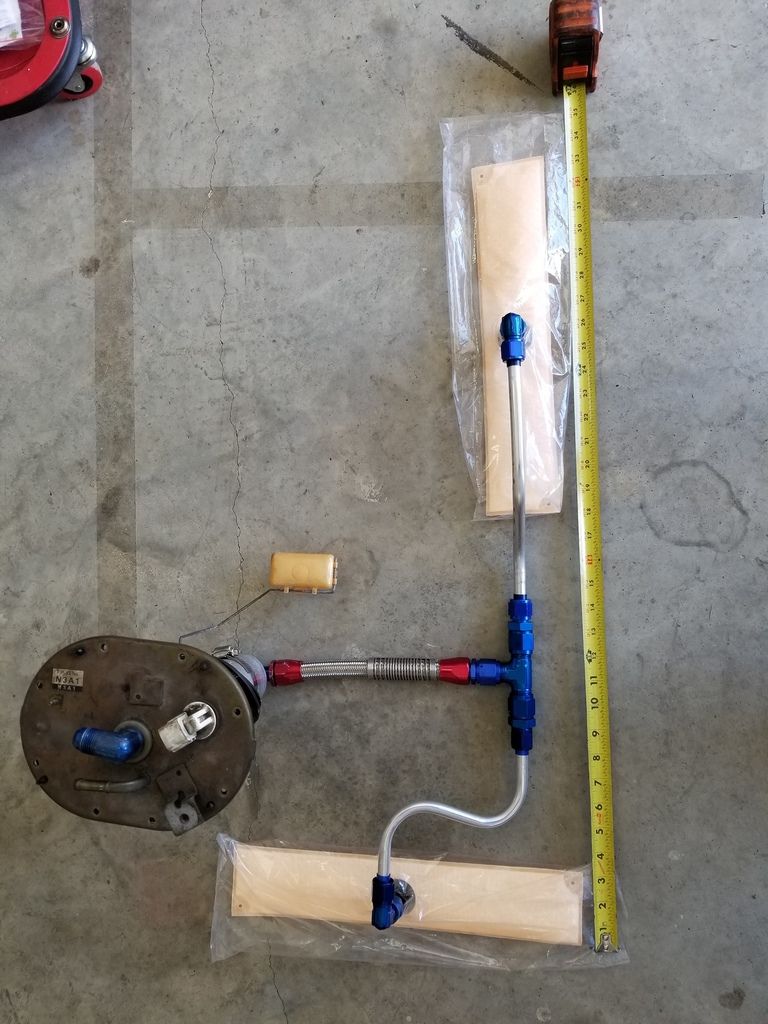
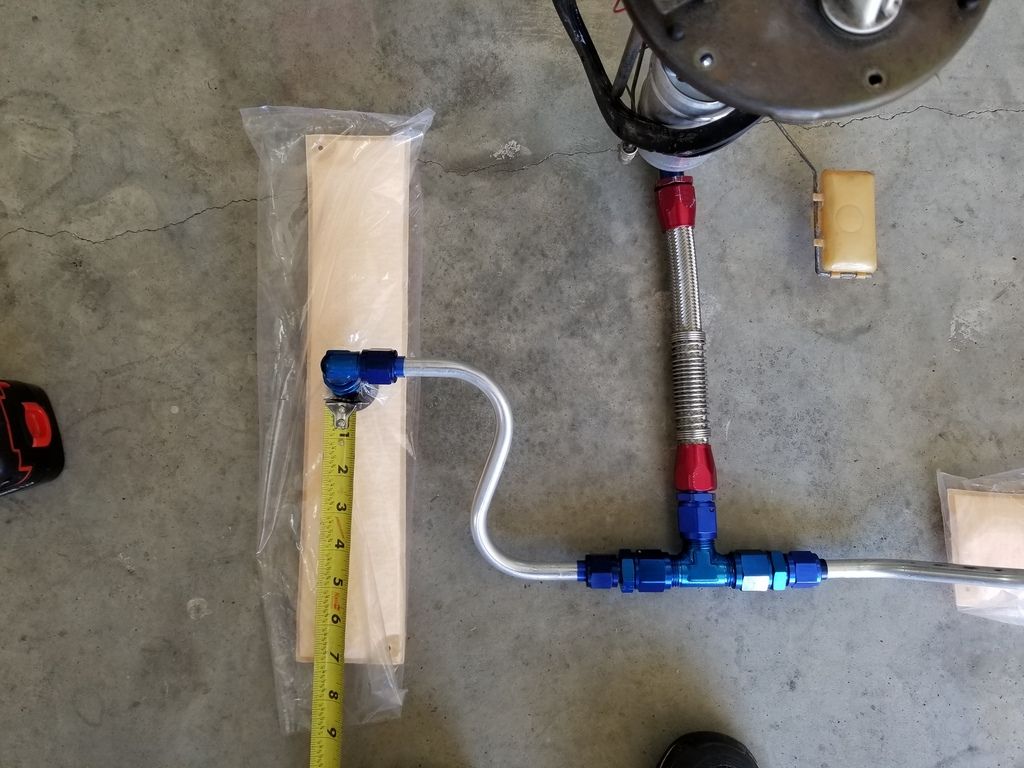
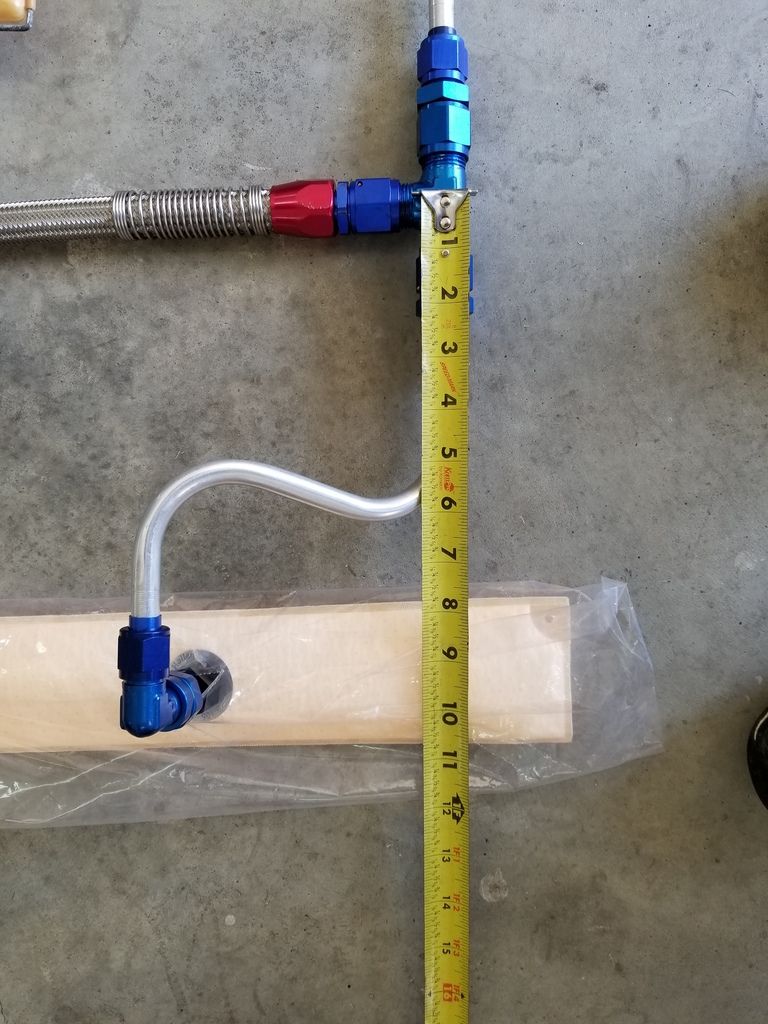
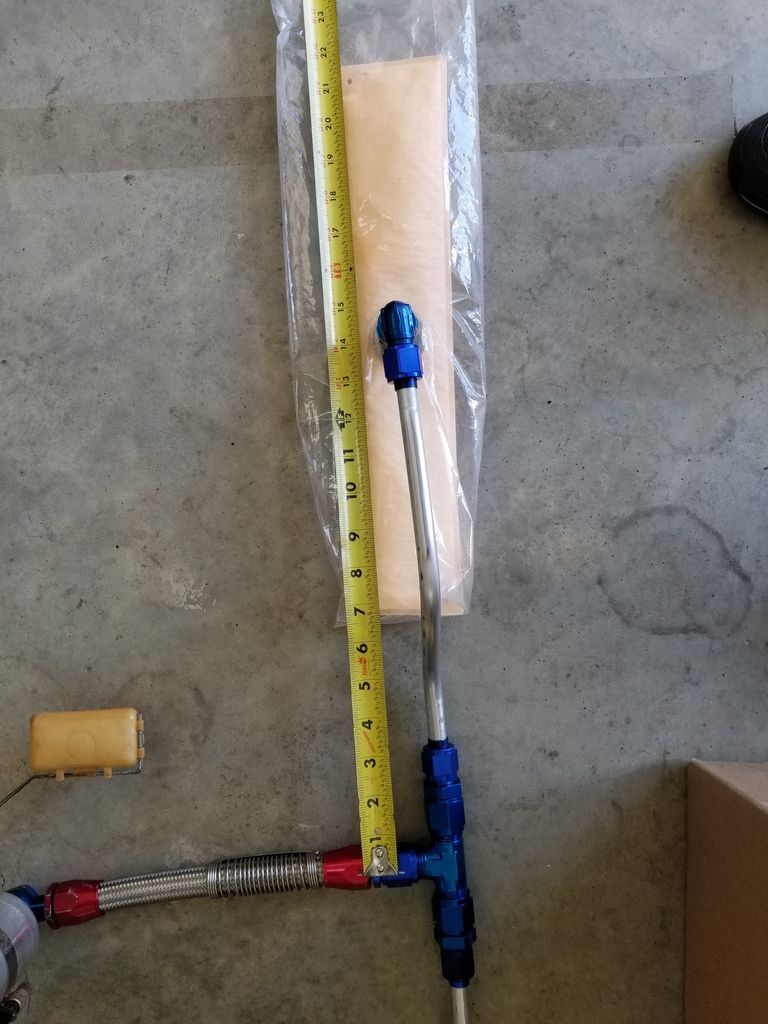
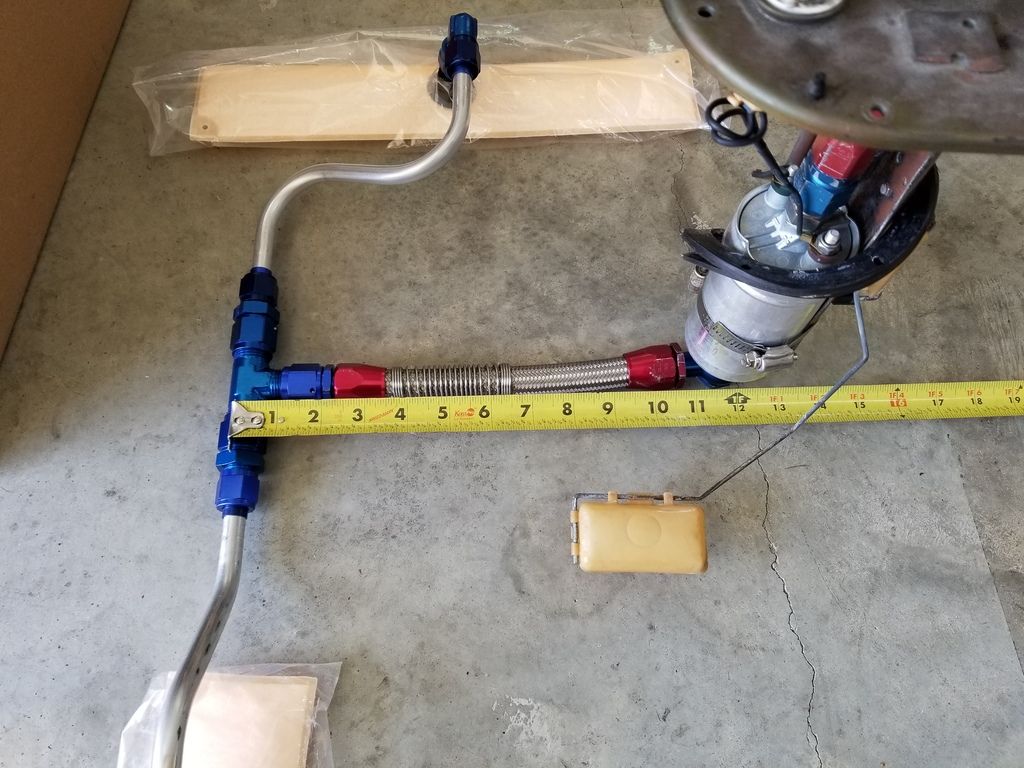
Note: Because the braided hose section was not long enough to reattach to the rest of the system as it sat in the tank, I made it a bit longer. After a couple of iterations this is the measurement that I came up with that works best for me.
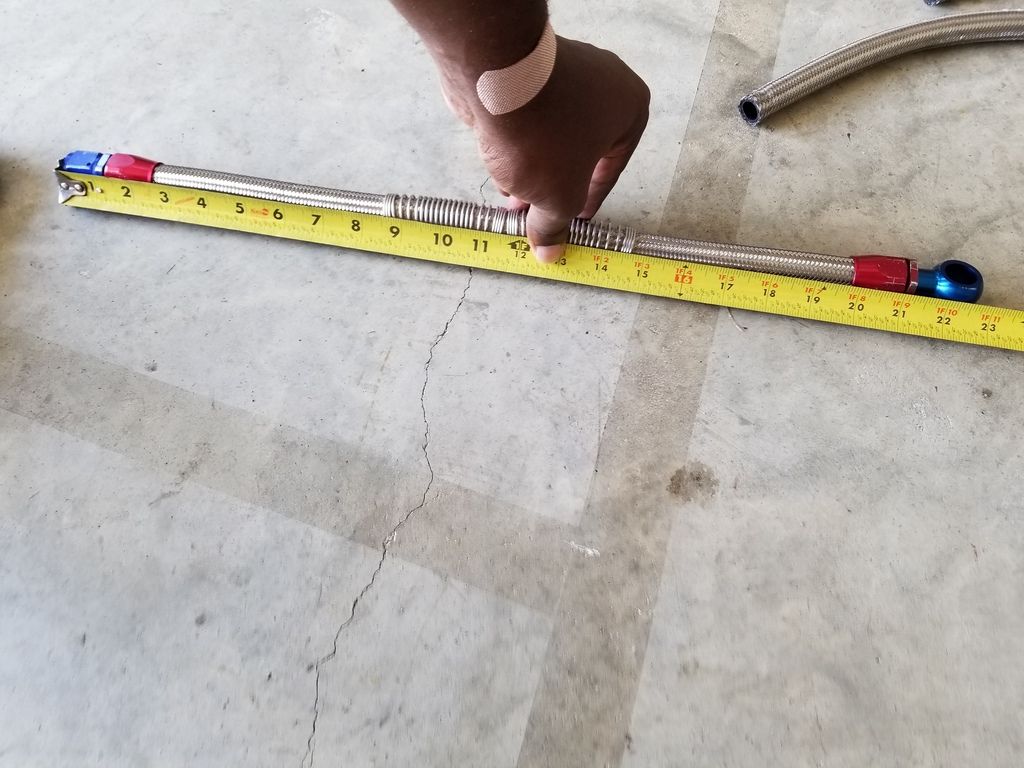
Note: Because the braided hose section was not long enough to reattach to the rest of the system as it sat in the tank, I made it a bit longer. After a couple of iterations this is the measurement that I came up with that works best for me.
Last edited by mazdaFD; 08-03-17 at 08:22 PM.
08-03-17, 12:23 AM
#17
Now lets talk about the tricky part: Installing
Ok save yourself the trouble and don't even bother trying to shove it all in in one go. smh. Don't even know what gave me the idea that that might work.
To get it in I had to break it into 3 sections:
The long end with the tee and braided hose/banjo, the short section, and the pump housing.
The long section goes in first. It was designed to just reach the far right end of the tank along the back side. Originally I wanted it to hug the entire far right side, but I decided that since I was keeping the baffles, and the baffales prevent me from ever really reaching to the far side, installing it like that would be neigh impossible. It was pretty hard just doing it the way I ended up doing it in the final design. The magnets are strong and they make maneuvering the hydromat inside the tank with one hand a difficult task. Once I got it in place I used a $20 boroscope attached to my phone to check my positioning.
The short section goes in next. Position the other hydromat to hug the left tank wall. Connect the tube fitting to the tee/adapter. Finagle 2 wrenches into position in the tank and using one hand, snug the fitting (kinda difficult so use patience.)
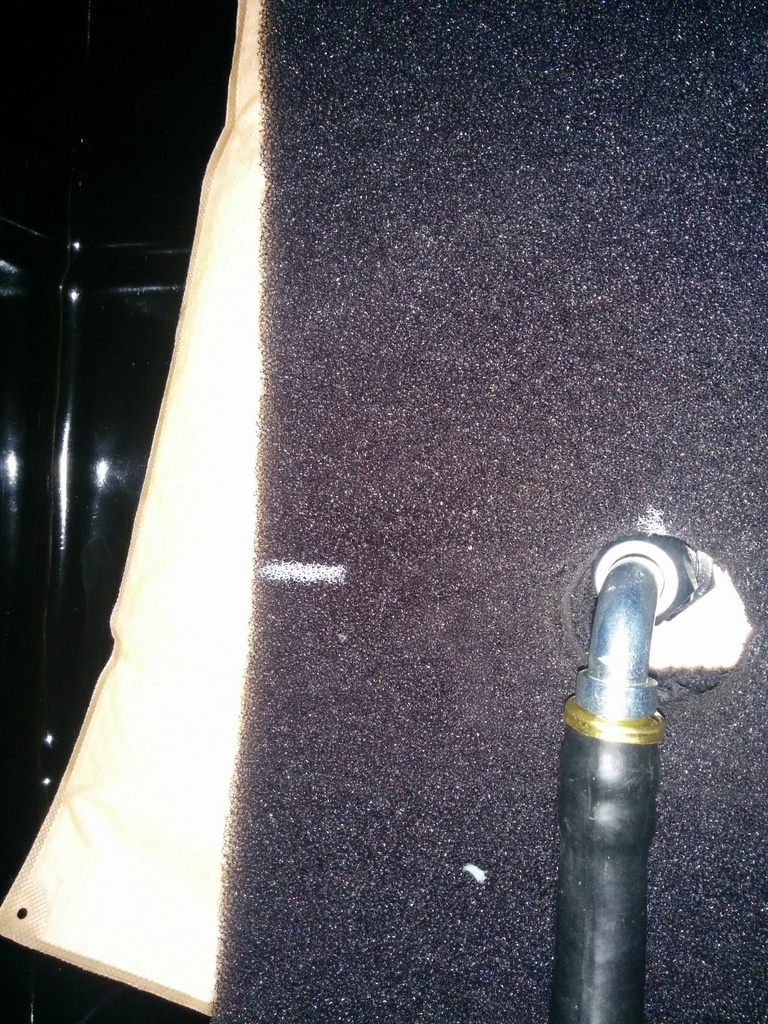
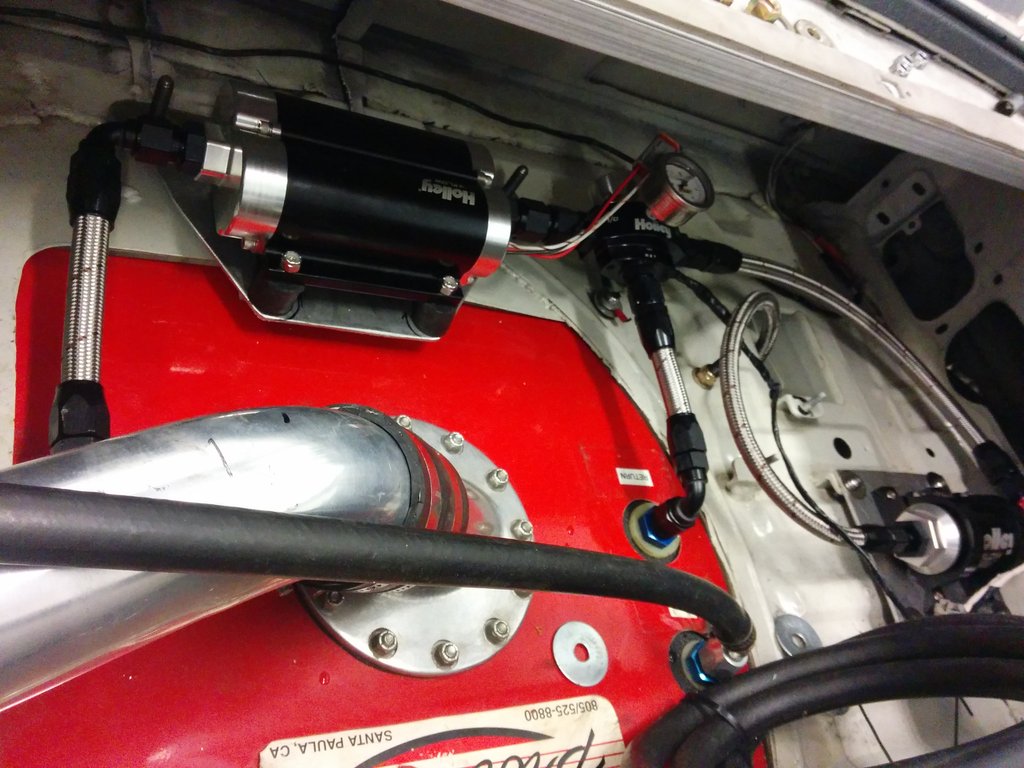
The pump is next. Pull the hose end out with the banjo. This should just reach the outside of the tank. Connect to the pump and clock the fitting so it doesnt kink the hose when inside. Use the hose bender coil to help, though in the end i dont think they work too well with stainless braided hose. To get the hose resting on the bottom pf the tank I had to bend a section of the baffle along the bottomto 90 degrees to make clearance for the -10AN thick hose. Check as you put it in that the hose isnt going to kink. Shove in the pump and bolt it down.
Hose in the tank. Note: this photo is from an iteration where my hose length was too long. I ended up shortening it to the 22.5 in length shown in the previous post.
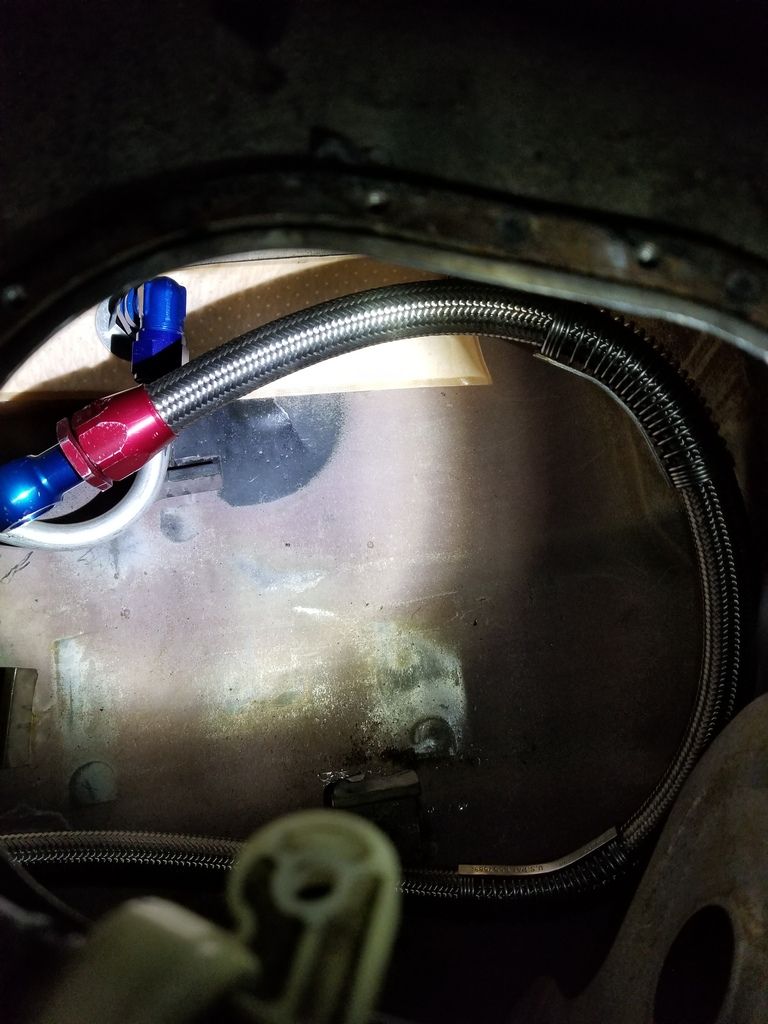
Connecting the banjo before drop in
Ok so after putting the car back together and filling with fuel, everything seems to be fine so far. I did take the car to do a track tour fun run day (no helmet) and tried to push it a bit. Seemed fine but I couldnt get the G's i needed to really test it I dont think. So now I am signing up for a real track day likely back at Summit Point Shenandoah to recreate when I first felt the starvation and see if the effort pays off. Wish me luck!
Ok save yourself the trouble and don't even bother trying to shove it all in in one go. smh. Don't even know what gave me the idea that that might work.
To get it in I had to break it into 3 sections:
The long end with the tee and braided hose/banjo, the short section, and the pump housing.
The long section goes in first. It was designed to just reach the far right end of the tank along the back side. Originally I wanted it to hug the entire far right side, but I decided that since I was keeping the baffles, and the baffales prevent me from ever really reaching to the far side, installing it like that would be neigh impossible. It was pretty hard just doing it the way I ended up doing it in the final design. The magnets are strong and they make maneuvering the hydromat inside the tank with one hand a difficult task. Once I got it in place I used a $20 boroscope attached to my phone to check my positioning.
The short section goes in next. Position the other hydromat to hug the left tank wall. Connect the tube fitting to the tee/adapter. Finagle 2 wrenches into position in the tank and using one hand, snug the fitting (kinda difficult so use patience.)
The pump is next. Pull the hose end out with the banjo. This should just reach the outside of the tank. Connect to the pump and clock the fitting so it doesnt kink the hose when inside. Use the hose bender coil to help, though in the end i dont think they work too well with stainless braided hose. To get the hose resting on the bottom pf the tank I had to bend a section of the baffle along the bottomto 90 degrees to make clearance for the -10AN thick hose. Check as you put it in that the hose isnt going to kink. Shove in the pump and bolt it down.
Hose in the tank. Note: this photo is from an iteration where my hose length was too long. I ended up shortening it to the 22.5 in length shown in the previous post.
Connecting the banjo before drop in
Ok so after putting the car back together and filling with fuel, everything seems to be fine so far. I did take the car to do a track tour fun run day (no helmet) and tried to push it a bit. Seemed fine but I couldnt get the G's i needed to really test it I dont think. So now I am signing up for a real track day likely back at Summit Point Shenandoah to recreate when I first felt the starvation and see if the effort pays off. Wish me luck!
Last edited by mazdaFD; 08-03-17 at 08:27 PM.
08-03-17, 07:16 AM
#18
Ok so after putting the car back together and filling with fuel, everything seems to be fine so far. I did take the car to do a track tour fun run day (no helmet) and tried to push it a bit. Seemed fine but I couldnt get the G's i needed to really test it I dont think. So now I am signing up for a real track day likely back at Summit Point Shenandoah to recreate when I first felt the starvation and see if the effort pays off. Wish me luck!
When you are hitting high Gs with a quarter tank or less, you will know how effective it is
Good luck

 08-03-17, 08:37 PM
#23
I treated that as more of a shakedown to make sure I didn't do anything catastrophically idiotic. Plus the fuel gauge sender was inoperable so I didn't run it down not knowing the fuel level. I'll put in the new one tomorrow and I'll have no problem gobbling down that tank on track. I think I'll bring a 5 gal with me to track in case I push too far.
08-05-17, 05:22 AM
#24
Banned. I got OWNED!!!

Bear in mind, this isn't a fix-all product. The lifespan is only 5yrs and the price is astronomical.
If you're not on a budget and can replace yours every 4-5yrs, you're going to enjoy a great setup.
Ohhh, and not e85 proven, yet. Lightly compatible, but not PROVEN.
If you're not on a budget and can replace yours every 4-5yrs, you're going to enjoy a great setup.
Ohhh, and not e85 proven, yet. Lightly compatible, but not PROVEN.
08-05-17, 05:05 PM
#25
Rotary Freak

^^Running hydramat with ethanol premix for quite a while now...no ill-effects.
I definitely wouldn't be running that shitty rusty tank he has with it though - that will kill it! Probably not a good idea to run that braided rubber hose submerged either, I'd be getting teflon for piece of mind.
I definitely wouldn't be running that shitty rusty tank he has with it though - that will kill it! Probably not a good idea to run that braided rubber hose submerged either, I'd be getting teflon for piece of mind.