When you click on links to various merchants on this site and make a purchase, this can result in this site earning a commission. Affiliate programs and affiliations include, but are not limited to, the eBay Partner Network.
I've stated a bunch of times that this build has no schedule because I don't have a budget, and that's true; however, I tapped into my entrepreneurial spirit and found a way to make a bit of money over the winter, so I've been saving up all winter. I finally had enough to buy a complete set of EnergySuspension bushings, all new steering parts, and I splurged and went all out on the sound dampening / heat protection and went with the Damplifier Pro from Second Skin.
Check it out!:
I went with the black bushings. This is the complete bushing set including both front and rear sway bar links, watts linkage, torsion bars, etc.
Got all the MOOG parts I could get. New idler arm, inner and outer tie rod ends, two new ball joints, two new strut bellows with bump stop, new clutch slave cylinder, new master cylinder:
And here's where I went hog wild. I had gone back and forth and back and forth and back again more than a few times on whether or not to go with Damplifier Pro or save some money and go with the Dynamat Extreme... Seems like there's two camps on this, but from what I can tell from research the Damplifier Pro is a bit higher quality and has thicker foil than Dynamat, but it's more expensive. For me, I decided to go with the Dampifier Pro for the technical reasons, but also because, well, at this point I had the money. And a 20% off coupon code, which paid for the shipping and still took a bit off the price as well. So, in for a penny in for a pound, right?
I also got the heat protection mat to install over the Damplifier Pro. Apparently this will make the car more comfortable. I don't think I bought enough of the Damplifier to do the whole car, but my calculations might be off. I wound up with 64 square feet. Might need just under another 32 square feet, but we'll see.
Nice, that car is going to be nice and quiet inside. Is that stuff real expensive. I was thinking of getting some kind of sound deadener, but they all seemed expensive
Nice, that car is going to be nice and quiet inside. Is that stuff real expensive. I was thinking of getting some kind of sound deadener, but they all seemed expensive
Thanks, I'm hoping it will be cool and quiet! I won't lie. I think I'd have paid about $100 less for the same amount of Dynamat Xtreme, but I'm hoping that this works out better. That heat reflective padding will be great to put on the floor and the ceiling. Here's a link to their website:
I researched and researched and researched but I never really saw any information from anyone that used either product in a 1st gen. Can't wait to get this in.
I still need to make a bit more money and I can get the air compressor I want and the paint. I'm thinking of one of these two compressors:
The 30 gallon Kobalt is $50 cheaper, but I like the fact that the smaller North Star has the 100% duty cycle. Both have reviews that said a user painted a car with an HVLP gun with no problem. So, it comes down to price, and duty cycle, and other things like the North Star has solid tires, yadda yadda yadda... Haven't made up my mind yet on this one. Need a few more bucks either way.
I have the damplifier pro in my car. I can't say anything about the sound dampening yet, but it lays down very nicely. I bought the B-Spec stuff a couple years ago. My car is at about the same level as yours, but i was impressed with the adhesive and the shapability of it.
Nonetheless, I have made slow progress, which is kinda like none, but a notch above none. Been really, REALLY busy at work, and spring sports have kept my kids busy and me busy running around.
I finally settled on the air compressor I want, ordered it, and waited.... Took about a week but I got a great deal on it:
I had a small problem with it when I got it. Broke it in for 30 minutes after assembling it and then changed the oil. Nothing unusual happened, but after that I closed the drain valve and let it pump up. It's really nice and quiet and took only about 2 minutes to get up to pressure and clicked off at 135 psi on the nose. Left it like that for a day and noticed that the pressure dropped. Another day and it was down to 115 psi. I had a leak at the threaded port on the side of the tank. No worries. Got a long bar and a pipe wrench, removed the plug and reinstalled with Teflon tape. Problem solved.
I outfitted it with V-type high flow connections and I've been playing around with it and getting my stuff together to paint. Got a couple of hoses, a drier and a water collector that I borrowed. I plan on running a 50 foot hose from the compressor to the drier/water filter. I'll use a cooler with ice in it to cool the hose just upstream of the water filter and get the hot air to condense out. Then from the drier/water filter I'll run a 25 foot hose to the gun with an inline filter for good measure. I was able to practice with the gun (not filled) and get 40 psi at the gun for a good 10 minutes or so, and the compressor kept on running! It says that it has a 75% duty cycle, and a reviewer said he'd painted a car and it kept running and kept up with the CFM and pressure he needed. Someone else mentioned that it's the same as the one made by PUMA, and that one has a 100% duty cycle. I believe this will work out just fine!
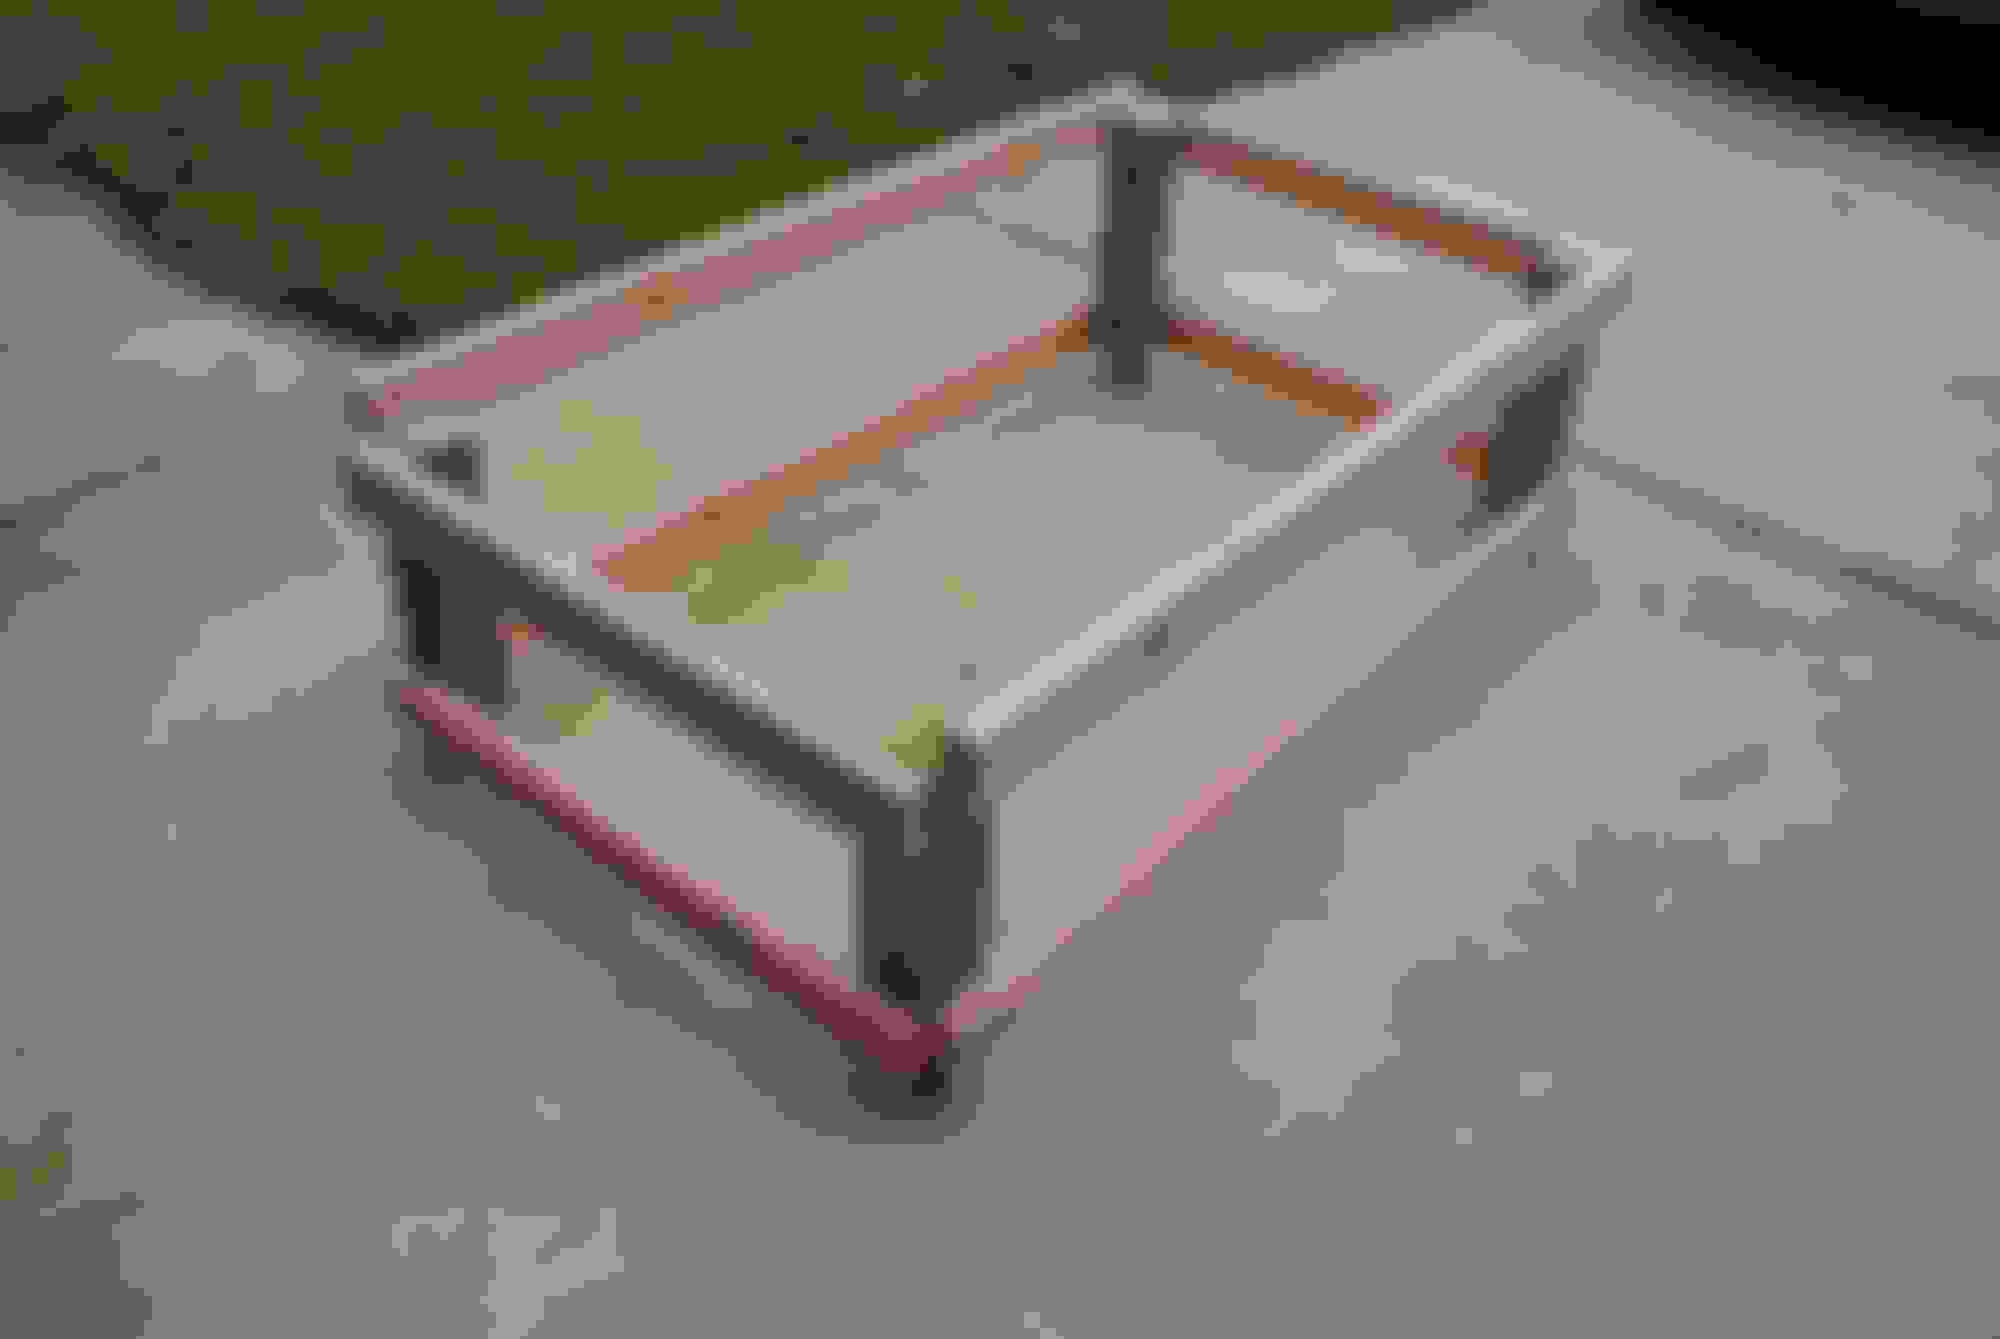
Haven't had a lot of time to do much of anything else, but I did make myself a cart to put the body on. I've since replaced the puny little wheels on the cart with some bigger 4 inch wheels and reinforced it a bit as it was undersized on the stiffness and bracing. But it was nice to wheel her out into the sunshine for the first time in about two years!
Itty bitty wheels!
I made the cart so that the frame rails fit just inside the top of the cart. No bolting the body to the cart necessary as it's a pretty good friction fit. My two oldest sons and I lifted the body and my wife slid the cart under the car for us. It was a good example of family teamwork!
OH! And one weekend recently was taken up with replacing the rear end in my oldest boy's car. Took me all weekend, but I got a used rear end out of the local PnP on their Memorial Day half off sale. His had been trashed by the PO and was grinding itself to a pulp.
That took one good weekend I had planned to work on old rusty, but it needed to be done. The replacement had 10,000 less miles and was girl driven (could tell by the ... ummm... feminine products and lipstick in the car that it was a girl's car, smacked in the front right).
Hopefully I can get to sanding and finish bondo work soon. I decided I liked the look of the original lower valence and valence pans that were on the car although the passenger side one is really rather roached with rust. I put them in an electrolysis bath for a week and there's more than a few holes in it. Went to WM and got some fiberglass patch that I'll work onto it from the back side. I just didn't like the look of the one piece aftermarket piece I'd gotten from BD.
that's a nice looking compressor. wish i had the room for something that big but my little compressor will do for me cause i don't actually use it much. painting is something i can't do unfortunately with it.
that's a nice looking compressor. wish i had the room for something that big but my little compressor will do for me cause i don't actually use it much. painting is something i can't do unfortunately with it.
did u pick a color yet or keeping it stock?
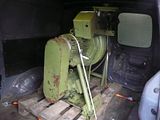
That's small, got a hydrovane 45 compressor (+-1000l/min) but I need to find what's wrong with it. Jep it's a old one (1977) but hey if its working I got a high flow @ 8bar compressor
The one on the right
And mine, the original electric motor is broken so they put a other motor under it.
that's a nice looking compressor. wish i had the room for something that big but my little compressor will do for me cause i don't actually use it much. painting is something i can't do unfortunately with it.
did u pick a color yet or keeping it stock?
Thanks craaaazzy! Yep, I still have a lot of cleaning to do in my garage. Not enough space to move around. Too many tires - need to move them to the shed. I have to get that old rear end from my sons car back to the junkyard and get my core charge back. And, my other projects are getting in the way!
I plan to keep it stock original color - K3 Silver Sunbeam Metallic.
Originally Posted by damic
That's small, got a hydrovane 45 compressor (+-1000l/min) but I need to find what's wrong with it. Jep it's a old one (1977) but hey if its working I got a high flow @ 8bar compressor
The one on the right
And mine, the original electric motor is broken so they put a other motor under it.
Anyway I like the wooden cart, nice idea
Thanks damic! I saw the idea on a hot rod website. They used carriage bolts, but I used 3 inch screws I used to build my deck. It's a cheap alternative to buying a metal frame one, or building one.
Your compressor IS old! On this side of the water, you can find older 20 gallon compressors that run off 220V, but the problem is they're sometimes rusty on the inside and of questionable integrity. That AND I don't have a source for 220 in my garage without routing a beefy extension cord from the garage to the laundry room and "sharing" the 220V outlet with the clothes drier. My boss wouldn't be too happy with that arrangement...
That is putty coat, you use that to go over the bondo or body filler, it is used to fill the rough sand scratches from the coarse sand paper. You can use it to fill minor dents. That kind works pretty good and sands fairly easy, I get it on my hands all the time, it don't give me any kind of irritation.If you need body filler, ask them if they have evercoat z- grip, that works really well, and is fairly cheap
I tried this out today and followed the instructions with respect to small amount, add hardener from one side of the pile of putty to the other, mix well, etc. Didn't realize that would give me about 90 seconds of working time! Kept playing with the amount of hardener and was able to get at least a first coat of this stuff on the entire body. It's pretty cool stuff - smooth and workable - for a couple minutes anyway!
As I said before I decided to try and save my lower valence panels and spoiler. The drivers side was a replacement and not in bad shape, but the passenger side was WHOA! REALLY bad. Very badly pitted and eaten away with rust. So I tried my hand at fiberglass today also. I'll sand this down on the front side, treat it, work the body filler in it and hopefully it will end up somewhat presentable.
After electrolysis bath, POR-15, and fiberglass on the back side.
Treated with POR-15 an
Rather deep pitting.. Booo!
The rusted through section.
I've got the lower spoiler in the bath at the moment. I has a really thick layer of lacquer on it. Been soaking now for 5 days and it hardly looks done.
Here's a tip for using the putty coat, if it's hot use a lot less hardener,the hotter it is ,the faster it dries,you should only be using about 15%hardener,I can't stand using that or body filler in the summer, sometimes at work when we use it ,its dry before we get back to the car.looks great,Your doing one he'll of a job,if you were local to me and needed a job,I would hire you at my shop
Tip get it out, clean it put it back in. So the chemicals can do a better job.
Excellent tip, thanks Damic! Makes perfect sense.
Originally Posted by erick31876
Here's a tip for using the putty coat, if it's hot use a lot less hardener,the hotter it is ,the faster it dries,you should only be using about 15%hardener,I can't stand using that or body filler in the summer, sometimes at work when we use it ,its dry before we get back to the car.looks great,Your doing one he'll of a job,if you were local to me and needed a job,I would hire you at my shop
Yeah, that stuff hardens quick, fast, and in a hurry! The first batch I mixed up I was like "whatthe"....
Thanks too for the sentiment! I doubt, however, that you or your boss would tolerate my one-car-ever-three-years pace!...
I did learn that less hardener is better, but that no hardener doesn't work either. Had to scrape that stuff off and sand it out with 80 grit letting it booger up on the sandpaper to get it all off the three spots I tried it with. The car looks MUCH better in pictures than it does in person, but again, thank for the compliments!
You might have to get medieval with the lower front spoiler. On my old gold car it was COATED with some kind of thick paint like substance. I took it to the wire wheel for a few hours and finally got it all off.
Hey its not all about looks, you don't have to worry a bit about rust for the next few decades and that's worth it.
EXACTLY! I took it out today and went to town with a wire brush and then put it back in. Lots of pitting but it will be nice to have the original restored and back in place.
I wheeled old rusty out today and tried to get somewhere with the bondo work. Got a good bit done. Just need to finish up a bit of work on the right rear tail light area, the replaced rockers, and get the replacement hood prepped and I think I'll be ready for PAINT!!!
I had a lot of work to level out the dents from storage. I think they stored ladders on top of the car while it was in the barn.
Covered up some not so great welding here.
No one will ever know that this early 79 has an 84 door....
I have to sand down the orange peel from the epoxy primer all over the car and then get the thing primed, sealed, and then painted. Can't wait. I did notice today that the clear coat on the engine bay has a bunch of small cracks in it... I may have to sand all that down and repaint the entire engine bay, but I hope not.
Looking good, I really like the dolly you made,it definitely beats the bricks that mine is sitting on
Thanks Eric! I saw the idea on a hot rod website when looking up cheap alternatives. I have $40 in the casters, $20 in the hardware, and about $20 in the lumber. Funny thing tho is that the version you see in these pictures is the third attempt at it! It sure makes it easy to move the car around.
How high does it sit off the ground on the dolly, was it hard to jack it up high enough to get the car on it.I'm thinking about making one myself, I really like how it works for you. If you don't mind, could you tell me the dimensions please
How high does it sit off the ground on the dolly, was it hard to jack it up high enough to get the car on it.I'm thinking about making one myself, I really like how it works for you. If you don't mind, could you tell me the dimensions please
Absolutely! It works really great. The basic dimensions of the dolly are 60" long x 34" wide x 16" high including the 4" casters (which are 5" high). The width is 34" from face to face of the 2x4s so that the frame of the car fits just inside of them creating a friction fit. I set them up 1" in the back and 1-1/2" in the front above the top of the dolly frame so that the car could sit inside of it (if that makes sense - you can see in the first picture what I mean). I made it 60" long so that it would sit from just behind the triangular sections behind the torque boxes and run just past the end of the frame at the rear wheels.
To mount the casters, I cut an 8 foot 4x4 in half, and then used 5/16" x 8" long through bolts to bolt the 48" long 4x4 to the 11 inch high 4x4 sections. I used 5/16" x 4-1/2" long through bolts to secure the casters to the 48" long 4x4.
I debated making it short enough to spray the top or high enough to spray the bottom without practically laying on the floor and went with a little higher so I can get at the bottom at a good angle. I have to stand on a bucket to reach the center of the top.
To get it on the dolly I used good ole American muscle power. Me, my 16 year old and my 18 year old sons lifted it off the jack stands and my wife slid the dolly underneath. I ended up using a 6" long scrap of 4x4 on my 3 ton floor jack to get it up in the air high enough when it was just me and my 16 year old when I had to get the car off it to modify the dolly.
As you can see in the latest pictures I need to lift it again and slide the dolly further up towards the front.
Lessons learned:
1) The car weighs about 1200 lbs. or so as it sits. Have plenty of muscle or a car lift.
2) 1-1/2 inch roofing nails are NOT adequate to secure the 4" casters to the bottom of the 4x4s. Seriously.
3) I could probably use one more section of 2x4s from front to back just to make sure it doesn't rack and collapse. It's ok as it is now, but I wouldn't run a gumball rally with it without at least doing that.
 04-04-16, 07:26 PM


 Kept playing with the amount of hardener and was able to get at least a first coat of this stuff on the entire body. It's pretty cool stuff - smooth and workable - for a couple minutes anyway!


