
3 gauge center speaker pod review

Thread Starter
Joined: Jun 2008
Posts: 5,859
Likes: 8
From: Los Angeles CA
3 gauge center speaker pod review
Hey guys,
I'm here to review the forums 2 favorite 3 gauge center pods. I'd like to give a special thanks to Abdul at Polak Graphics who helped me take the nicer pictures you see in the review and for donating his car for the fitment tests. Feel free to visit his site and see what he's got. He has a new line of shirts coming out that look awesome. Keep checking his site for updates.
http://www.polakgraphics.com
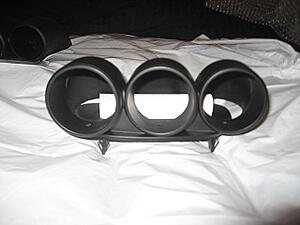
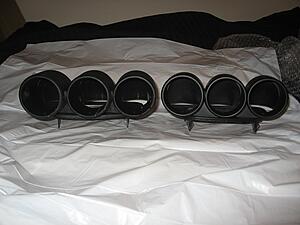
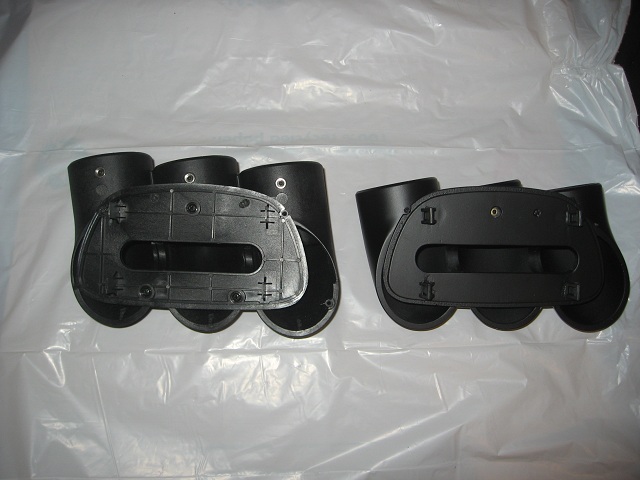
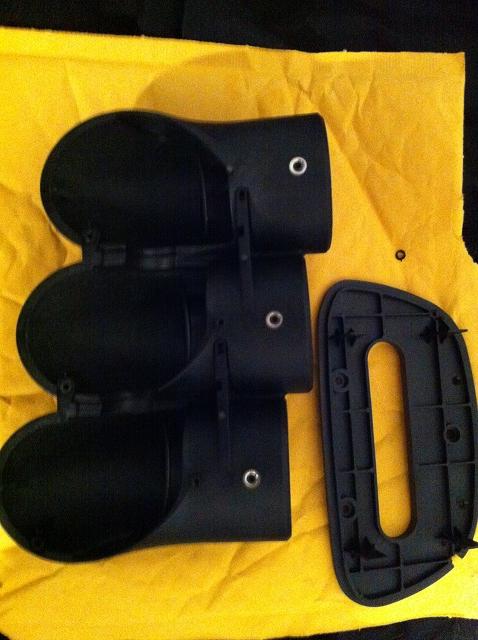
Now on to the pods. On the left we have a 52mm 3 gauge pod from the good people at Prosport. On the right we have a 52mm 3 guage pod from flyrx7.
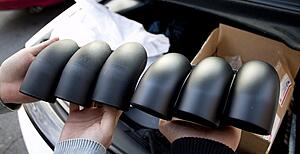
Flyrx7 has been making pods for us for a long time. His pods continue to be one of the most desired items you see in the FS section and it really is no surprise why. If you ever get a chance to see the pods in your hands, it's very easy to see how well thought out, mature and polished his design is.
Prosport has been making gauges and automotive products for a long time so it's no surprise that their entry into this sector has made a pretty big splash. Many of the Prosport pods have found their ways into users hands and from what I've heard from people. they've been very happy with their purchase.
Now on to the review!
-Packaging
Flyrx7
There really isn't much you need to install these pods. It is pretty much push and play but I really have to applaud the effort of flyrx7 here. His pods comes with instructions, an allen key for adjusting the set screws and the OEM clips to install in the center speaker area.
Prosport
The prosport gauges just came with the pod itself. Unfortanately, no clips were included. I could do without instructions or allen keys but it would be nice to have an extra set of clips included. Not a deal breaker by any means though.
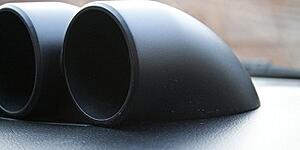
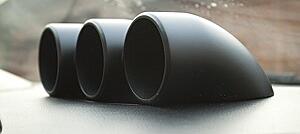
-Look and feel
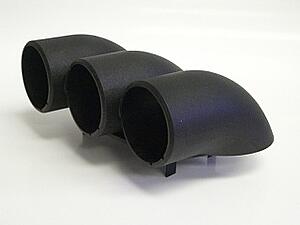
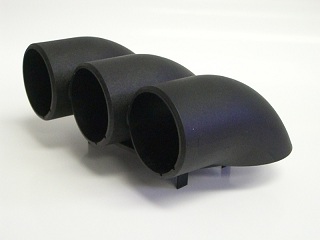
Flyrx7
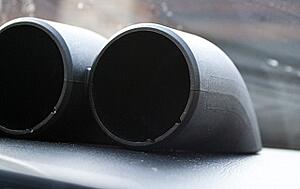
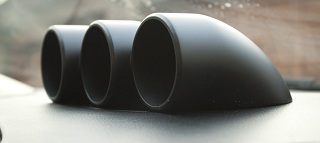
Judging from the pictures, it's pretty easy to tell how amazing and smooth the finish on the flyrx7 pods are. The paint looks flawless and you can even see a little watermark on the bottom of the pods so that you can determine if your pod is authentic. Nice touch.
Here is a front view of the pods also displaying where the instructions and the allen key is stored (allen key is taped to the instructions)
These pods look pretty much perfect. If you're looking for a pod with a smooth finish and has some shine to the surface, you should take a look at the flyrx7s.
Prosport
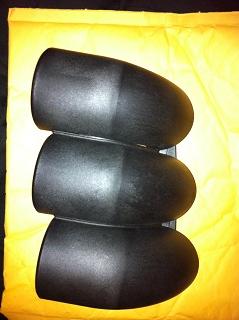
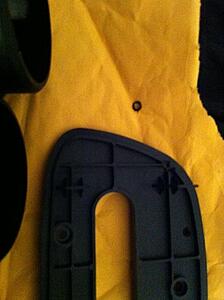
I hope the guys in prosport don't mind but in the interested of trying to present an unbiased picture (due to my poor photography skills and my poor camera) I included a stock image of the pods from their website. I don't know what it is but these pods do not liked to be photographed close up with a flash with my camera.
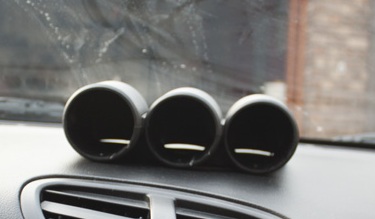
I seemed to have better results from my iphone so here they are. I actually left a picture with the flash on to help illustrate the texture on the pod itself.
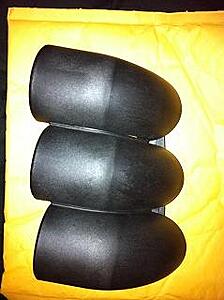
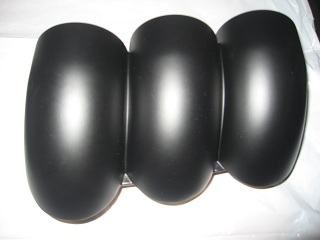
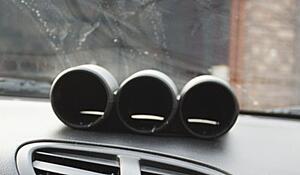
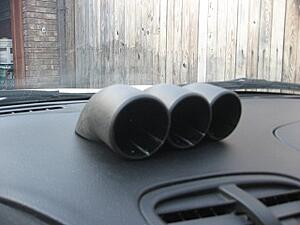
As you can see in the picture, the surface of the pod has a rough finish on it and has a sort of a cool matte quality to it. The texture isn't uniform and you can see seams on the pods themselves which I wasn't to pleased with. At first I thought the pods came this way because they were prepped for painting but they came this way to match the texture of the dash itself.
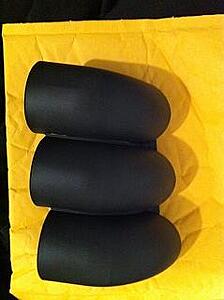
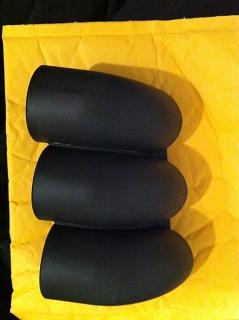
Here is a front view of the pods.
Not the most flattering view of the pods (you won't be able to see the seams on the bottom with the pods installed).
From up close, the Prosport pods left me pretty unimpressed but to be honest, they look good from far away when they are installed on the dash. I can get pretty picky about what goes in my car as some of you may know and I've got to be honest, I think these pods would bother me a bit. I could forgive the non-uniform finish but the seams that are present on the outside would probably bug me. I think most people would hardly notice the seams at all though and wouldn't really care if they never took a very close look.
-Durability
I guess I could start bashing objects with the pods and see which one holds up the longest but I doubt that type of testing would be productive and I don't think the guys at Prosport would appreciate it if I shipped the pods back broken or with marks all over the pods (damaged in shipping!!). It's hard to measure durability without long-term testing but based on what I've heard from people that have had these pods, durability is not an issue. I've heard of no cases of any of the pods melting (unlike other companies). The pods have a nice weight to them and feel very durable in my hands. I think I can confidently say that any of these pods were made to last. Unfortunately, this will have to do for now. If any of you guys have had any problems with the pods, SOUND OFF on the thread!
I'm here to review the forums 2 favorite 3 gauge center pods. I'd like to give a special thanks to Abdul at Polak Graphics who helped me take the nicer pictures you see in the review and for donating his car for the fitment tests. Feel free to visit his site and see what he's got. He has a new line of shirts coming out that look awesome. Keep checking his site for updates.
http://www.polakgraphics.com
Now on to the pods. On the left we have a 52mm 3 gauge pod from the good people at Prosport. On the right we have a 52mm 3 guage pod from flyrx7.

Flyrx7 has been making pods for us for a long time. His pods continue to be one of the most desired items you see in the FS section and it really is no surprise why. If you ever get a chance to see the pods in your hands, it's very easy to see how well thought out, mature and polished his design is.
Prosport has been making gauges and automotive products for a long time so it's no surprise that their entry into this sector has made a pretty big splash. Many of the Prosport pods have found their ways into users hands and from what I've heard from people. they've been very happy with their purchase.
Now on to the review!
-Packaging
Flyrx7
There really isn't much you need to install these pods. It is pretty much push and play but I really have to applaud the effort of flyrx7 here. His pods comes with instructions, an allen key for adjusting the set screws and the OEM clips to install in the center speaker area.
Prosport
The prosport gauges just came with the pod itself. Unfortanately, no clips were included. I could do without instructions or allen keys but it would be nice to have an extra set of clips included. Not a deal breaker by any means though.
-Look and feel
Flyrx7
Judging from the pictures, it's pretty easy to tell how amazing and smooth the finish on the flyrx7 pods are. The paint looks flawless and you can even see a little watermark on the bottom of the pods so that you can determine if your pod is authentic. Nice touch.
Here is a front view of the pods also displaying where the instructions and the allen key is stored (allen key is taped to the instructions)
These pods look pretty much perfect. If you're looking for a pod with a smooth finish and has some shine to the surface, you should take a look at the flyrx7s.
Prosport
I hope the guys in prosport don't mind but in the interested of trying to present an unbiased picture (due to my poor photography skills and my poor camera) I included a stock image of the pods from their website. I don't know what it is but these pods do not liked to be photographed close up with a flash with my camera.
I seemed to have better results from my iphone so here they are. I actually left a picture with the flash on to help illustrate the texture on the pod itself.
As you can see in the picture, the surface of the pod has a rough finish on it and has a sort of a cool matte quality to it. The texture isn't uniform and you can see seams on the pods themselves which I wasn't to pleased with. At first I thought the pods came this way because they were prepped for painting but they came this way to match the texture of the dash itself.
Here is a front view of the pods.
Not the most flattering view of the pods (you won't be able to see the seams on the bottom with the pods installed).
From up close, the Prosport pods left me pretty unimpressed but to be honest, they look good from far away when they are installed on the dash. I can get pretty picky about what goes in my car as some of you may know and I've got to be honest, I think these pods would bother me a bit. I could forgive the non-uniform finish but the seams that are present on the outside would probably bug me. I think most people would hardly notice the seams at all though and wouldn't really care if they never took a very close look.
-Durability
I guess I could start bashing objects with the pods and see which one holds up the longest but I doubt that type of testing would be productive and I don't think the guys at Prosport would appreciate it if I shipped the pods back broken or with marks all over the pods (damaged in shipping!!). It's hard to measure durability without long-term testing but based on what I've heard from people that have had these pods, durability is not an issue. I've heard of no cases of any of the pods melting (unlike other companies). The pods have a nice weight to them and feel very durable in my hands. I think I can confidently say that any of these pods were made to last. Unfortunately, this will have to do for now. If any of you guys have had any problems with the pods, SOUND OFF on the thread!
Thread Starter
Joined: Jun 2008
Posts: 5,859
Likes: 8
From: Los Angeles CA
-Fitment
Flyrx7
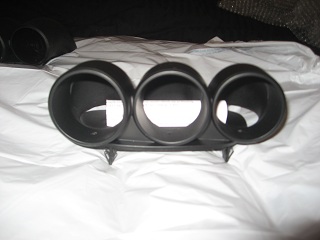
The experience that went into the flyrx7s pods really shows here. The fitment is near perfect. No fidgeting with the clips was necessary. The pods just clipped in perfectly. I've heard from some people that clip adjustment may be necessary but either way, they all got their pods to fit perfectly as well.
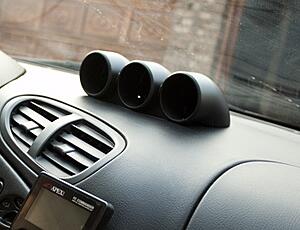
The front and rear of the pods have very little gap to them. The center section of the pods melds into the dash well (not perfectly but close).
The light coming from the rear of the pods is barely visible at all here. The rear of the pods sit pretty flush with the dash.
Prosport
Fitment was hard to describe with the prosports. When placing the pod in the center speaker section of the dash, it never sort of rested in place correctly. There was a sort of wobble from front to back. If I pushed the back of the pods to the dash, the front would lift up. If I left the front just sit at rest, a huge gap became evident in the back.
At rest when the pods leaned forward, the gaps looked ok. I think the pod leaned a bit to forward though.
At rest, the pod seemed to just follow the dash down and it sorta looked like it drooped.
In the interest of practicality, this should be resolvable by playing with the clips. The clip mechanism for the center speaker pod is surprisingly resiliant and should hold under the most adverse conditions. I don't think any of the issues I mentioned should make the pod unusable but the Prosports do look like they need to be adjusted and in the process, they will leave small gaps in either the front or the back but I don't think this will be noticable or a real hindrance at all.
Flyrx7
The experience that went into the flyrx7s pods really shows here. The fitment is near perfect. No fidgeting with the clips was necessary. The pods just clipped in perfectly. I've heard from some people that clip adjustment may be necessary but either way, they all got their pods to fit perfectly as well.


The front and rear of the pods have very little gap to them. The center section of the pods melds into the dash well (not perfectly but close).
The light coming from the rear of the pods is barely visible at all here. The rear of the pods sit pretty flush with the dash.
Prosport
Fitment was hard to describe with the prosports. When placing the pod in the center speaker section of the dash, it never sort of rested in place correctly. There was a sort of wobble from front to back. If I pushed the back of the pods to the dash, the front would lift up. If I left the front just sit at rest, a huge gap became evident in the back.
At rest when the pods leaned forward, the gaps looked ok. I think the pod leaned a bit to forward though.
At rest, the pod seemed to just follow the dash down and it sorta looked like it drooped.

In the interest of practicality, this should be resolvable by playing with the clips. The clip mechanism for the center speaker pod is surprisingly resiliant and should hold under the most adverse conditions. I don't think any of the issues I mentioned should make the pod unusable but the Prosports do look like they need to be adjusted and in the process, they will leave small gaps in either the front or the back but I don't think this will be noticable or a real hindrance at all.
Thread Starter
Joined: Jun 2008
Posts: 5,859
Likes: 8
From: Los Angeles CA
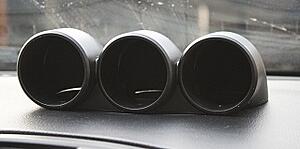
-Function
Now to the meat and potatoes...
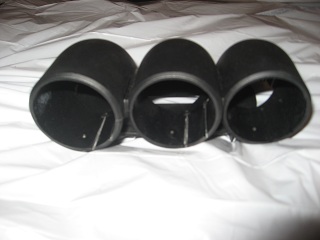
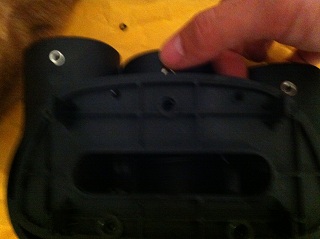
Both of the pods have set screws to adjust the tightness for the gauges.
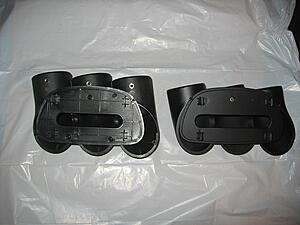
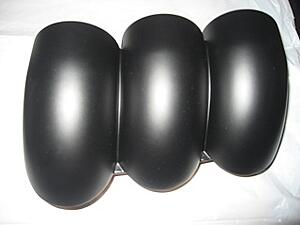
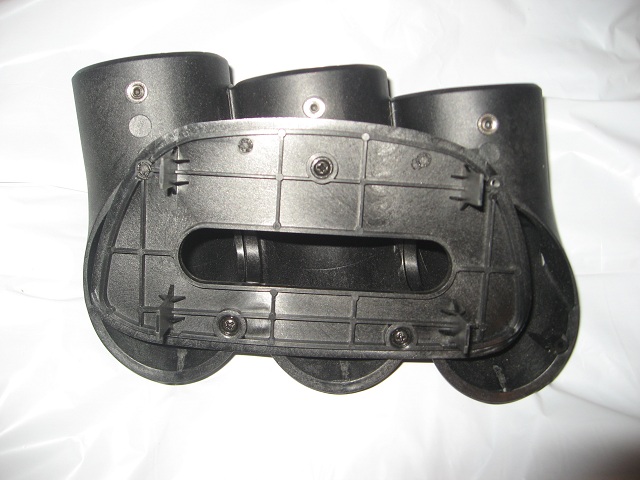
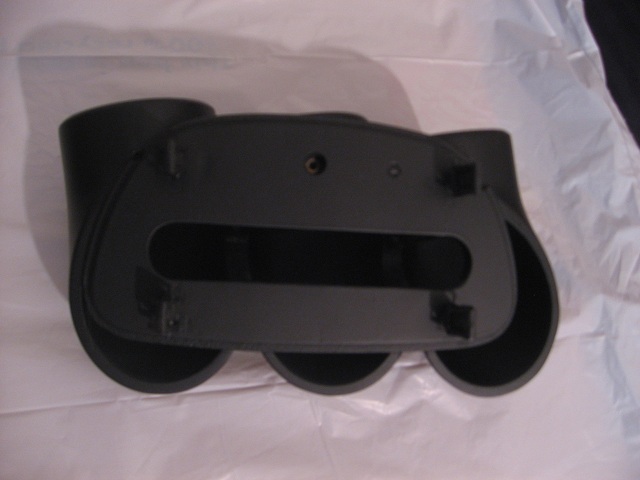
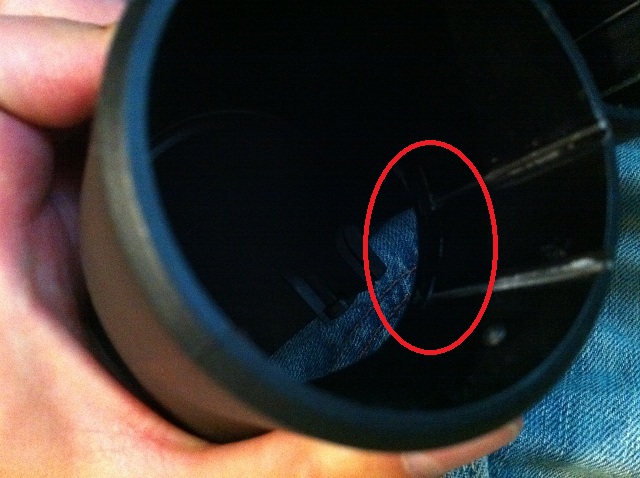
It should seem pretty evident in this picture that there is more to the Prosport pods than we have been lead to believe. I'll be talking a bit more about that later on.
The Prosport pods seem to be longer and more accomodating.
Top view
https://i.imgur.com/fs8S9.jpg
Side view
https://i.imgur.com/RPBZZ.jpg
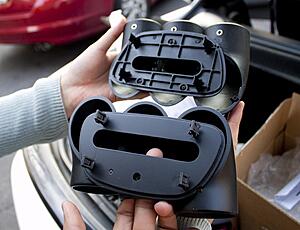
Prosport
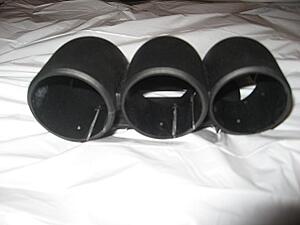
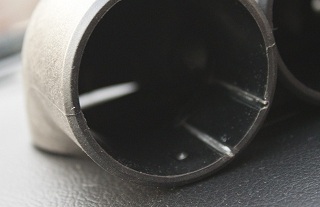
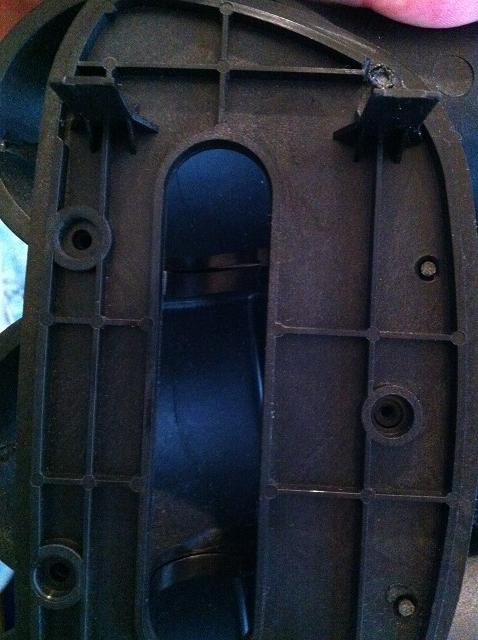
The prosport gauges measure a little more than 4.5in from front to back and the hole in the center measures 4.75in x 3/4in.
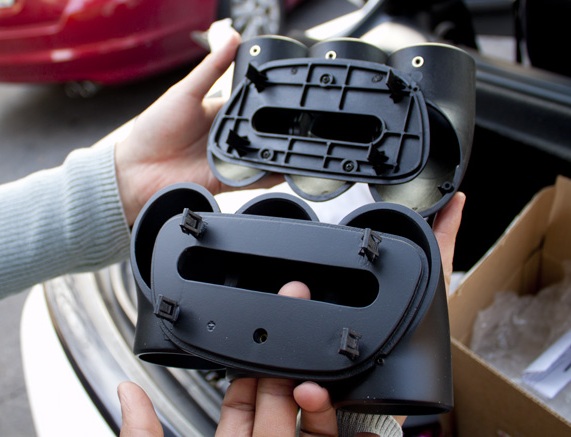
What SORCERY IT THIS!!

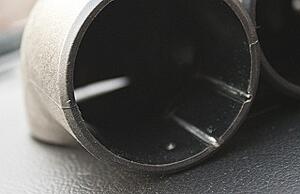
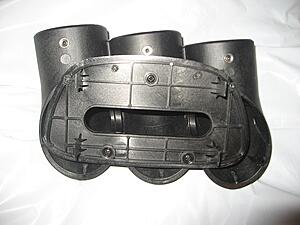
What we see here is the bottom of the gauge pod along with the gauge pod itself.
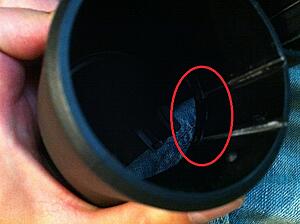
The small circle you see is some glue of some sort from one of the tabs that holds the non-screwed down part of the bottom.
It took a bit of coaxing to get the parts off. The posts here appear to be fragile.

I managed to get the pod apart by push on the bottom of the gauge pod and pulling on the actually flat bottom piece with my pointer finger with both hands at once. Due to my limited to hands (I only have 2) I had to use the other hand to take the picture. Just imagine my other hand doing the same thing on the other side of the center gauge pod. When the bottom of the piece finally came off, a little circlular piece of glue was born!
This can be incredibly useful for installations. I remember when my PLX gauges were being installed at IRP. I actually had the IRP center 3 gauge pod at the time (which are awesome) and they were similar to the flyrx7 in terms of overall gauge installation. Due to the PLX multi display gauge plugs being enormous, the gap had to be expanded a little to accomodate the plug. With the Proposrt gauges, this wouldn't be necesary. Kudos to Prosport on a really cool and unique feature.
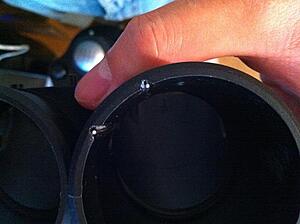
Here is a final pic of the bottom piece reassembled. A new circular piece of glue was found! Huzzah! The pieces went back together perfectly leads me to ask, why even bother with the glue?
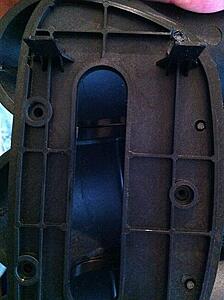
Now the tabs and the respective holes look like Darfur.
Flyrx7
The flyrx7 gauges measure a little more than 4in from front to back. The hole measures 4.5in x 3/4. Unlike the Proports, the bottom of the pod does not come off.
Now to the meat and potatoes...

Both of the pods have set screws to adjust the tightness for the gauges.
It should seem pretty evident in this picture that there is more to the Prosport pods than we have been lead to believe. I'll be talking a bit more about that later on.
The Prosport pods seem to be longer and more accomodating.
Top view
https://i.imgur.com/fs8S9.jpg
Side view
https://i.imgur.com/RPBZZ.jpg
Prosport
The prosport gauges measure a little more than 4.5in from front to back and the hole in the center measures 4.75in x 3/4in.
What SORCERY IT THIS!!
What we see here is the bottom of the gauge pod along with the gauge pod itself.

The small circle you see is some glue of some sort from one of the tabs that holds the non-screwed down part of the bottom.
It took a bit of coaxing to get the parts off. The posts here appear to be fragile.
I managed to get the pod apart by push on the bottom of the gauge pod and pulling on the actually flat bottom piece with my pointer finger with both hands at once. Due to my limited to hands (I only have 2) I had to use the other hand to take the picture. Just imagine my other hand doing the same thing on the other side of the center gauge pod. When the bottom of the piece finally came off, a little circlular piece of glue was born!
This can be incredibly useful for installations. I remember when my PLX gauges were being installed at IRP. I actually had the IRP center 3 gauge pod at the time (which are awesome) and they were similar to the flyrx7 in terms of overall gauge installation. Due to the PLX multi display gauge plugs being enormous, the gap had to be expanded a little to accomodate the plug. With the Proposrt gauges, this wouldn't be necesary. Kudos to Prosport on a really cool and unique feature.
Here is a final pic of the bottom piece reassembled. A new circular piece of glue was found! Huzzah! The pieces went back together perfectly leads me to ask, why even bother with the glue?
Now the tabs and the respective holes look like Darfur.
Flyrx7
The flyrx7 gauges measure a little more than 4in from front to back. The hole measures 4.5in x 3/4. Unlike the Proports, the bottom of the pod does not come off.
Thread Starter
Joined: Jun 2008
Posts: 5,859
Likes: 8
From: Los Angeles CA
-Extras
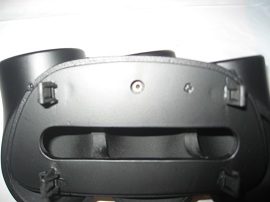
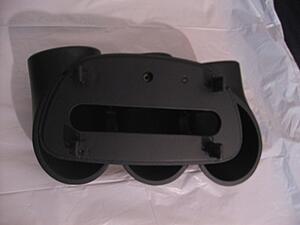
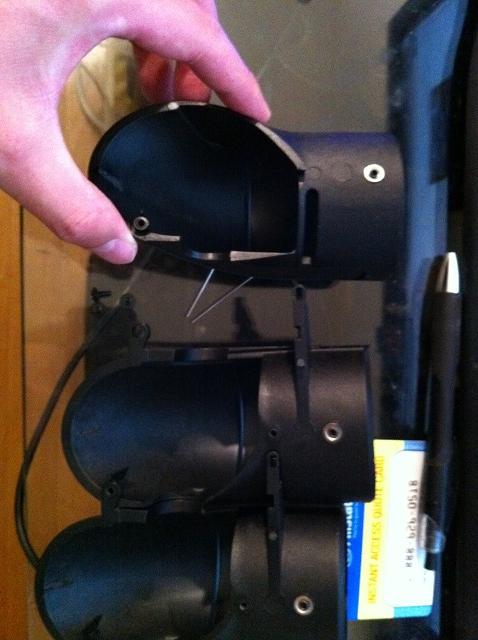
Well since the flyrx7 pods don't really have any out of the ordinary features like the Prosports, this section of the review will be dedicated to the Prosports ability to be disassembled. Not only does the bottom portion of the pod come apart. The pods themselves come apart as well! From what I've heard, Prosport recommends that you send the pod in if the pods need to be taken apart. I believe this is due to the tab on the left that looked like it could break.

If you aren't very careful the first time I can see this being a problem. Removing the pods actually isn't difficult as long as you get the order of removal correct...
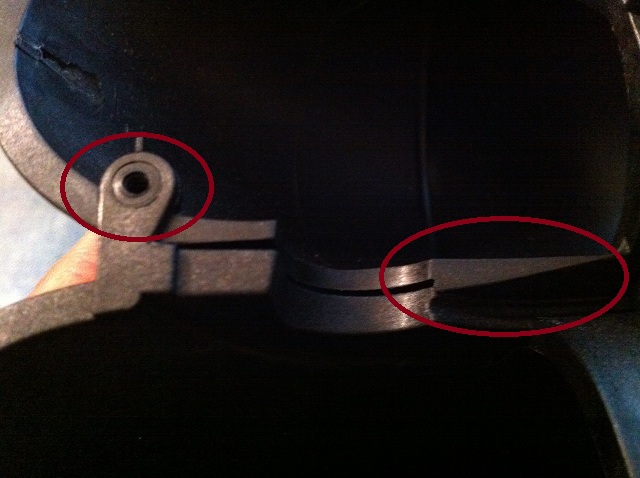
-Remove the two pins located inside the pods. These are glued on. You can carefully pry the pins off the glue a little bit until you can grab and carefully pull them off. Try not to bend the pins.
-Carefully twist the pod on the left counter-clockwise using the tab and post on the left as a pivot. This should separate the interlocking pieces on the right.
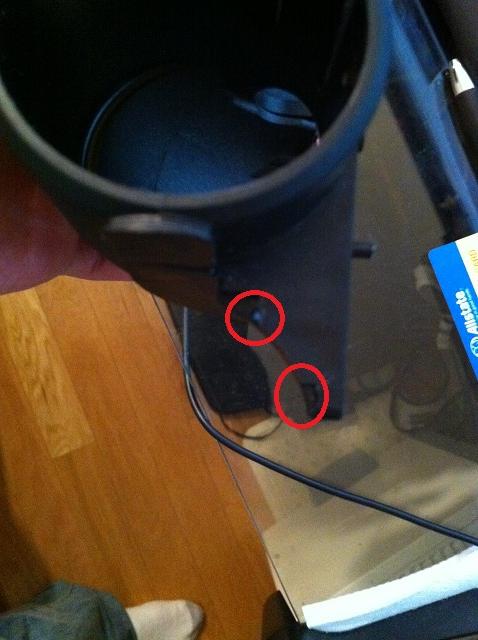
Here we see the pods separated

These are the pinholes

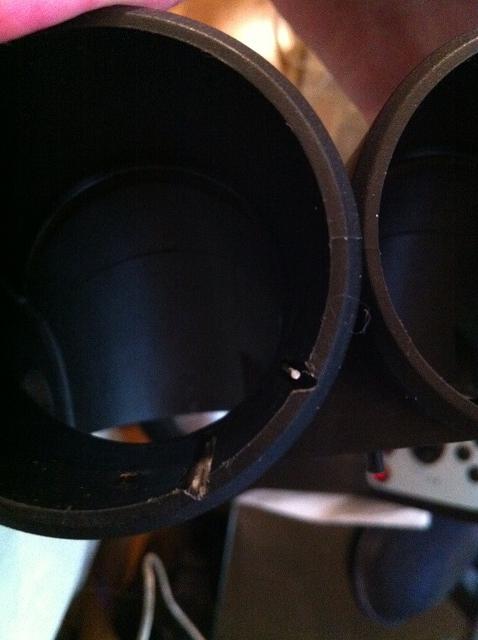
Reassembly was actually pretty easy. I also noticed something along the way that probably would have helped with the disassembly in the future.
Here we see that after reassembly, the pins sort of float in the air. This could probably be due to me bending the pins slightly. I don't think I bent them to much so I'm guessing that maybe this is why the pins were glued down in the first place. Either way, this shouldn't cause a problem for installation.
Instead of prying the pins with my nails, it looks like if you twist the pods a certain way, one will naturally just lift off.

This pin didn't have much glue on it much like one of the pins in the previous pod. I'm pretty sure if I twisted the first pod like I did this one, a pin would have lifted as easily as this one.
Very cool. Now what? What does this mean and who should care about it? Well, the modular nature of the pods allows for easy replacements in case only one of the pods gets damaged. There is also the possibility of increasing or decreasing the number of pods being used! I don't think the fitment would be very good on the 4th pod since there will be an extra set of posts on the left most pod. Who knows what else could cause fitment issues. Decreasing the number of pods would be fine if we removed the middle piece then the posts and screws that attach the base to the pods itself would no longer fit. I'll leave the utility of modular pods up to you guys. I personally don't see much use for it outside of quick RMAs. Unless some universal base was made to accomodate 2 - 4+ pods and retain at least decent fitment, I don't see this feature being useful even though it has the potential to be awesome. I'd love to see a pic of a 6 gauge pod. HAAAA.
Well since the flyrx7 pods don't really have any out of the ordinary features like the Prosports, this section of the review will be dedicated to the Prosports ability to be disassembled. Not only does the bottom portion of the pod come apart. The pods themselves come apart as well! From what I've heard, Prosport recommends that you send the pod in if the pods need to be taken apart. I believe this is due to the tab on the left that looked like it could break.
If you aren't very careful the first time I can see this being a problem. Removing the pods actually isn't difficult as long as you get the order of removal correct...
-Remove the two pins located inside the pods. These are glued on. You can carefully pry the pins off the glue a little bit until you can grab and carefully pull them off. Try not to bend the pins.
-Carefully twist the pod on the left counter-clockwise using the tab and post on the left as a pivot. This should separate the interlocking pieces on the right.
Here we see the pods separated
These are the pinholes
Reassembly was actually pretty easy. I also noticed something along the way that probably would have helped with the disassembly in the future.
Here we see that after reassembly, the pins sort of float in the air. This could probably be due to me bending the pins slightly. I don't think I bent them to much so I'm guessing that maybe this is why the pins were glued down in the first place. Either way, this shouldn't cause a problem for installation.

Instead of prying the pins with my nails, it looks like if you twist the pods a certain way, one will naturally just lift off.
This pin didn't have much glue on it much like one of the pins in the previous pod. I'm pretty sure if I twisted the first pod like I did this one, a pin would have lifted as easily as this one.
Very cool. Now what? What does this mean and who should care about it? Well, the modular nature of the pods allows for easy replacements in case only one of the pods gets damaged. There is also the possibility of increasing or decreasing the number of pods being used! I don't think the fitment would be very good on the 4th pod since there will be an extra set of posts on the left most pod. Who knows what else could cause fitment issues. Decreasing the number of pods would be fine if we removed the middle piece then the posts and screws that attach the base to the pods itself would no longer fit. I'll leave the utility of modular pods up to you guys. I personally don't see much use for it outside of quick RMAs. Unless some universal base was made to accomodate 2 - 4+ pods and retain at least decent fitment, I don't see this feature being useful even though it has the potential to be awesome. I'd love to see a pic of a 6 gauge pod. HAAAA.

Thread
Thread Starter
Forum
Replies
Last Post
ppritchard
Interior / Exterior / Audio
2
Sep 2, 2015 07:44 PM
josef 91 vert
2nd Generation Specific (1986-1992)
1
Aug 29, 2015 12:22 AM