
HOW TO: Remove/Replace Suspension Bushings


FEED, RE, R-Magic,Orginal Box, and KSP Eng all have them, I do not recall Knightsports caring them. I believe that R-Magic and KSPs are made in house.
Pricing is about:
FEED, Orgianl Box $1250 (18 bushings)
RE $1600 (20 bushings)
KSP and R-Magic $1500 (not sure on the number of bushings, and I believe KSP no longer makes them)
Pricing is about:
FEED, Orgianl Box $1250 (18 bushings)
RE $1600 (20 bushings)
KSP and R-Magic $1500 (not sure on the number of bushings, and I believe KSP no longer makes them)
Junior Member
Joined: Oct 2004
Posts: 6
Likes: 0
From: closer
Originally Posted by jimlab
Both of the hydraulic presses are still available from Harbor Freight, although you won't find them by searching unless you have the part numbers.
The 12-ton press is part #1667 - now only $99 and free shipping
http://www.harborfreight.com/cpi/cta...temnumber=1667
The 20-ton press is part #37999 - $199 and free shipping
http://www.harborfreight.com/cpi/cta...emnumber=37999
The 12-ton press is part #1667 - now only $99 and free shipping
http://www.harborfreight.com/cpi/cta...temnumber=1667
The 20-ton press is part #37999 - $199 and free shipping
http://www.harborfreight.com/cpi/cta...emnumber=37999
Lives on the Forum
Joined: Feb 2001
Posts: 9,617
Likes: 8
From: Dallas
Originally Posted by the ancient words
if I want to just do this job piece meal as I have time on the weekends, for example do the rear control arms and trailing arms on one side, will my alignment be all jacked up?
All that said if I did an entire car I would still have it aligned afterwards. You can keep it very close to spec if you're careful but you wouldn't be sure without having it checked. Unless it's been aligned recently you won't even be sure it's right to start with anyway.
Thread Starter
Super Snuggles
Joined: Feb 2001
Posts: 10,091
Likes: 34
From: Redmond, WA
Originally Posted by the ancient words
the differential bushings sound like a major PITA....not looking forward to that

Lives on the Forum
Joined: Feb 2001
Posts: 9,617
Likes: 8
From: Dallas
If I recall jim's description correctly you put the rear of the car on stands and drop the catback. Then remove the two bolts from the diff mount and drop the diff down until the axles rest on the subframe. There is now enough room on top to get a wrench on the 4 nuts which hold the diff mount casting to the diff. Remove the nuts and the mount and have your bushings pressed. Installation is the reverse of removal 
If I don't get to mine today I'll be doing it next weekend. I don't expect any problems after having looked at it closely.
If I don't get to mine today I'll be doing it next weekend. I don't expect any problems after having looked at it closely.
Thread Starter
Super Snuggles
Joined: Feb 2001
Posts: 10,091
Likes: 34
From: Redmond, WA
Yep.
1. Jack up and support the car.
2. Remove the two belly pans (one plastic, one aluminum) under the rear subframe.
3. Unbolt your catback from your cat/midpipe and let it hang.
4. Support the differential with a jack and remove the two cross bolts holding the differential mount to the rear subframe.
5. Lower the differential until the axles are sitting on the bump stops. The differential can't go anywhere with the axles installed and the PPF connected, so you don't need to keep a jack under it.
6. You should now have all the access you need to the four 17mm nuts on the top of the differential which hold the mount on.
7. Use a long 17mm wrench and a small mallet to tap the nuts loose so you can remove them. They may have thread sealer on them, so getting them started is the tough part, but not that difficult.
7a. As an alternative, you can use the "two wrench trick" by using two open end/box end wrenches. Put a 17mm wrench on the nut, then put the box end of the second wrench over the open end of that wrench to get more leverage. If you've never done this before, it should be pretty obvious how it works.
8. Press out the differential bushings and replace with the nylon bushings.
9. Reverse the process.
There is NO need to disconnect the PPF from the differential, as some people have stated. You can get enough access from both sides without removing the cat-back or disconnecting the PPF just by dropping the differential down until the axles rest on the bump stops of the rear subframe.
Thread Starter
Super Snuggles
Joined: Feb 2001
Posts: 10,091
Likes: 34
From: Redmond, WA
Originally Posted by the ancient words
thanks Jim....zerks are still a good idea for the diff bushings or unecessary? would you even be able to get to them?
Lives on the Forum
Joined: Feb 2001
Posts: 9,617
Likes: 8
From: Dallas
Originally Posted by the ancient words
the differential bushings sound like a major PITA....not looking forward to that
Putting it back together was easy as pie but I used stock rubber mounts that will move slightly so aligning the bolts may have been easier for me than those who install nylon bushings. I spent about an hour and a half removing the old, installing the new and poking around under the car inspecting the PPF and stuff.

Lives on the Forum
Joined: Feb 2001
Posts: 9,617
Likes: 8
From: Dallas
I did another set of diff bushings this weekend on my 12 ton press. These popped out with no trouble so the set that fought me the first time was certainly due to the used mount I had on hand being heavily corroded.


Thread Starter
Super Snuggles
Joined: Feb 2001
Posts: 10,091
Likes: 34
From: Redmond, WA
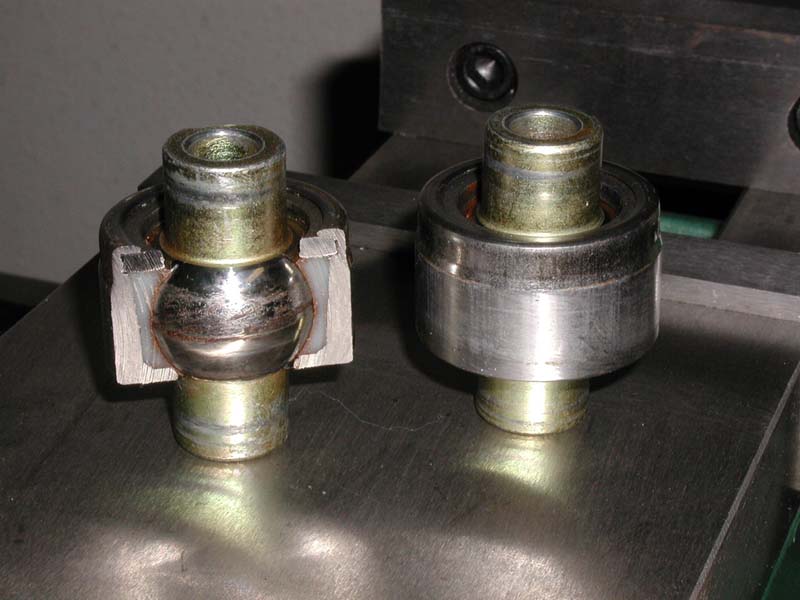
BTW, anyone interested in knowing what the major cause of clunking noise in the rear suspension is should take a look at the picture below. The (white) Nylon insert in the pillow bushings wears out over time (note the scoring on the bearing surface of this bushing that would likely have accelerated wear), allowing the center shaft to move forward and backward. The clunking is caused by the spherical bearing hitting the outer metal casing of the bushing once the Nylon allows enough range of movement.
Lives on the Forum
Joined: Feb 2001
Posts: 9,617
Likes: 8
From: Dallas
Originally Posted by Scrub
Whats the advantage of the A-frame press over the H frame press?
Thread Starter
Super Snuggles
Joined: Feb 2001
Posts: 10,091
Likes: 34
From: Redmond, WA
Originally Posted by DamonB
Either will work fine for bushings. The A-frame tends to be a little cheaper from what I've seen though (got mine on sale for $100 and free delivery).
The A-frame press is wider than the H-frame press and has more room for maneuvering parts between the uprights.

Junior Member
Joined: Oct 2004
Posts: 25
Likes: 0
From: Southampton, England
The pillow bushings seem to be spherical bearings sat in rubber. If that is the case, and Jim's custom ones are so difficult to get, is it possible to use normal spherical bearings which you can buy off the shelf?