My 6 port Turbo update
 03-06-07, 11:11 AM
#1
Taste great, more filling
Thread Starter
iTrader: (1)
Join Date: Feb 2005
Location: Dallas, TX
Posts: 2,012
Likes: 0
Received 0 Likes
on
0 Posts
My 6 port Turbo update
I'm getting so close I can taste it - unfortunately one little delay after another - last night my front cover gasket broke so I had to order a new one from Mazda today, but I needed some other gaskets too. front endplay looks like it's right where I want it though. Got a set of turbo plumbing coming in - so plus a handful of bits and bolts from Home Depot I should have everything I need for the mockup as soon as my stock injectors come back from Witchhunter. 
One small electrical problem on the BMW (no power at the brand new pump) and I should be able to get it down so I can put the RX7 up in the air and drop the subframe and steering rack so I can clean and paint the engine bay.
I'll take more pictures as I put everything together.
You TII people - is there anything that holds up the throttlebody/UIM, or is it just the bolts that go from the UIM to the LIM and the LIM to the engine? The NA has two little support rods, but it had a lot more intake, too. :P
 03-06-07, 01:26 PM
#2
Yes its slow
iTrader: (7)
Join Date: Jan 2002
Location: usa
Posts: 2,455
Likes: 0
Received 0 Likes
on
0 Posts
Well for one, you really need a front cover gasket, Right Stuff Silicone sealer will work, probably better. Also there is no support for the UIM just the 4 nut and 1 long bolt.
03-06-07, 01:39 PM
#3
Taste great, more filling
Thread Starter
iTrader: (1)
Join Date: Feb 2005
Location: Dallas, TX
Posts: 2,012
Likes: 0
Received 0 Likes
on
0 Posts
Awesome - now just general engine building speaking - do you use silicone on the intake manifold gaskets, or just the gasket by itself?
03-06-07, 03:52 PM
#5
Taste great, more filling
Thread Starter
iTrader: (1)
Join Date: Feb 2005
Location: Dallas, TX
Posts: 2,012
Likes: 0
Received 0 Likes
on
0 Posts
Even from the LIM to the engine? Sweet - if the gasket alone will hold fine at the kind of horsepower you're making - it oughta be fine for me.
03-07-07, 03:53 PM
#6
Taste great, more filling
Thread Starter
iTrader: (1)
Join Date: Feb 2005
Location: Dallas, TX
Posts: 2,012
Likes: 0
Received 0 Likes
on
0 Posts
Well - looks like my car may make it to the next official Rx7club meet. The Town of Flower Mound has given me a deadline of March 24th to either get it registered and inspected or have it gone. So, hope all my little parts vendors out there shipped everything like they said they would.
The Town of Flower Mound has given me a deadline of March 24th to either get it registered and inspected or have it gone. So, hope all my little parts vendors out there shipped everything like they said they would.
 This guy!
Trending Topics
03-14-07, 09:31 PM
#8
Taste great, more filling
Thread Starter
iTrader: (1)
Join Date: Feb 2005
Location: Dallas, TX
Posts: 2,012
Likes: 0
Received 0 Likes
on
0 Posts
Ok, I feel like a moron anyway, but now when I do a search for s5 turbo on s4 engine, the wonderful search engine drops s4 and s5 (and on) because they're too short. Which leaves me searching for "turbo engine" in the 2nd Gen forums.
What I need to know is - is there any advantage to going with the s5 turbo over the s4? I've obviously got to get either an s5 manifold or an s4 turbo, quick and cheap. Also, is the piping and plumbing from the intercooler and engine to the turbo the same? Because that may make my decision for me. :P
What I need to know is - is there any advantage to going with the s5 turbo over the s4? I've obviously got to get either an s5 manifold or an s4 turbo, quick and cheap. Also, is the piping and plumbing from the intercooler and engine to the turbo the same? Because that may make my decision for me. :P
03-15-07, 09:49 PM
#9
Full Member

Join Date: Mar 2006
Location: Wylie, Texas
Posts: 73
Likes: 0
Received 0 Likes
on
0 Posts
Hey dude, I just finished my s5 turbo swap on my 87 t2 just before the Feb. DFW meet. The swap was pretty straight forward with a few exceptions. The s5 turbo and exhaust manifold bolt up to the engine (if your swaping out the s4) as a direct bolt on. Down pipes are the same and I used my s4 stock intercooler with the s5 turbo. The problems are with the oil and coolant feed and return lines. You need the complete set from either the s4 or s5. The hook up points are the same but they are different lengths and shapes .
What I noticed with the swap was a much quicker spooling turbo with the s5, and there was an increase in boost as well. If you are going to run a free flowing exhaust make sure you port the waste gate on either turbo. The s5 has two ports for the waste gate which makes it easier to control boost creep. The s4 can do the job but it takes a lot more work (see BNR's site).
Hope this helps
Woody
03-16-07, 03:23 PM
#10
Taste great, more filling
Thread Starter
iTrader: (1)
Join Date: Feb 2005
Location: Dallas, TX
Posts: 2,012
Likes: 0
Received 0 Likes
on
0 Posts
I'm going to end up going with the S4 turbo because all the lines and everything I had were for the s4, and finding an s4 turbo was easier and cheaper than trying to find an s5 turbo manifold, lines, etc. I just ordered the s4 turbo and an FD fuel pump about 20 minutes ago. Once it comes in, I should have everything I need except I'll have to make a downpipe to get it into my exhaust - with 3" through a highflow cat/test pipe (swap out section) split to 2 1/2" duals, I'll probably need to port the **** out of the wastegate. :P
You wouldn't happen to have a link to his site handy, would you?
You wouldn't happen to have a link to his site handy, would you?
03-16-07, 10:05 PM
#11
Taste great, more filling
Thread Starter
iTrader: (1)
Join Date: Feb 2005
Location: Dallas, TX
Posts: 2,012
Likes: 0
Received 0 Likes
on
0 Posts
Working on partial emissions removal now (well, technically since everything's already removed, I guess I'm just plugging leaks and trying to figure out what I have to have to make the car work. )
Also, finally got the damn subframe off - for reference, don't try this with anything less than a 6 pointed 19mm deep socket on a breaker bar. There's enough torque on that monster that a 12 point socket wants to round it, and then the bumhumping commences.
Also, finished priming the engine bay in time for my air compressor to blast it's pressure-switch seal to hell. :P If my friend's pressure-switch just happens to fit mine, then I should have it painted tomorrow and then I can start working on reassembling it. If it doesn't work, maybe I'll tie his compressor to a skateboard and drag it behind the Capri with a rope, just to be finished at long last. FYI, I'd sand and paint the exterior of a car any day of the week before I'd sand and paint an engine bay, this SUCKS.
Also got the cylinder head off the Neon, of course there was water in the cylinders, which I expected, but it looks like the bottom end is fubar. The estimate came back for an engine swap from my buddy the mechanic - If you subtracted his number from $6000, you MIGHT have enough to buy lunch.
Alright, after 30 minutes and 40 pages of the Pics that made me lol - I can't find the Mechanic Kittah picture that says "Ur fuxxored, the Honda threw a rod and I've got your shoes" so I can't change it to say Neon.
)Also, finally got the damn subframe off - for reference, don't try this with anything less than a 6 pointed 19mm deep socket on a breaker bar. There's enough torque on that monster that a 12 point socket wants to round it, and then the bumhumping commences.
Also, finished priming the engine bay in time for my air compressor to blast it's pressure-switch seal to hell. :P If my friend's pressure-switch just happens to fit mine, then I should have it painted tomorrow and then I can start working on reassembling it. If it doesn't work, maybe I'll tie his compressor to a skateboard and drag it behind the Capri with a rope, just to be finished at long last. FYI, I'd sand and paint the exterior of a car any day of the week before I'd sand and paint an engine bay, this SUCKS.
Also got the cylinder head off the Neon, of course there was water in the cylinders, which I expected, but it looks like the bottom end is fubar. The estimate came back for an engine swap from my buddy the mechanic - If you subtracted his number from $6000, you MIGHT have enough to buy lunch.
Alright, after 30 minutes and 40 pages of the Pics that made me lol - I can't find the Mechanic Kittah picture that says "Ur fuxxored, the Honda threw a rod and I've got your shoes" so I can't change it to say Neon.
03-16-07, 10:58 PM
#12
Taste great, more filling
Thread Starter
iTrader: (1)
Join Date: Feb 2005
Location: Dallas, TX
Posts: 2,012
Likes: 0
Received 0 Likes
on
0 Posts
Son of a bitch - I went through all 85 pages, start to finish, and it's not in there. Yeah, I know, what a waste of time, but after working all day, then cleaning and sanding and painting and building, I looked through those 40 pages, then I thought "Well, just a few more" then I was over halfway and then I thought "I know it's in here."
It's not. :P
Yeah, I know, what a waste of time, but after working all day, then cleaning and sanding and painting and building, I looked through those 40 pages, then I thought "Well, just a few more" then I was over halfway and then I thought "I know it's in here."It's not. :P
03-17-07, 07:17 PM
#13
Taste great, more filling
Thread Starter
iTrader: (1)
Join Date: Feb 2005
Location: Dallas, TX
Posts: 2,012
Likes: 0
Received 0 Likes
on
0 Posts
Borrowed the piece from a friend's compressor, and it didn't fix the problem. :P So I had to sit Ummyeahok (or kittyfairy, if you prefer) in a chair next to it, with the sole job of turning the compressor on when the pressure got to 90, and turning it off when it got to 120.
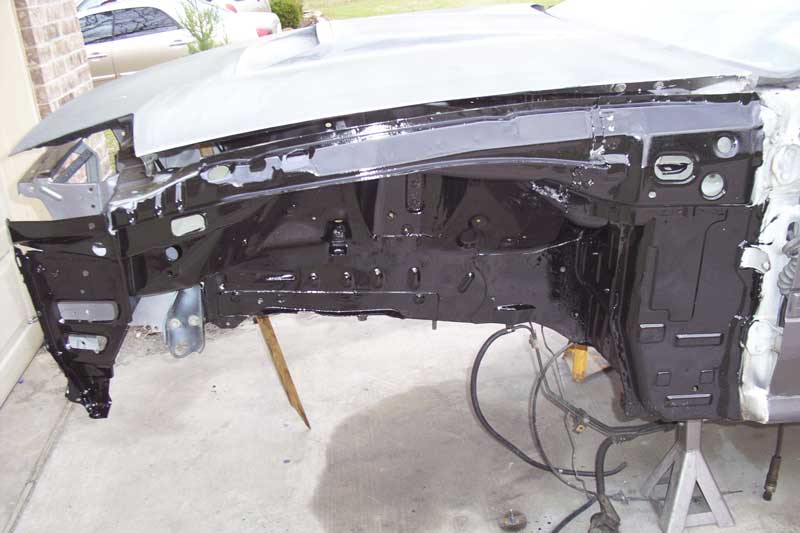
Here's the view from the front:
and a view of the side:
It turned out pretty good, but I realized later forgot to throttle down the regulator on the tank and my gun's regulator was seeing way too of pressure, so it went on real dry, but I got awesome paint conservation - only used 6 oz of color to do the whole engine bay, then 4 oz of clear.
Neon update: Filed my claim with the Town Secretary of Flower Mound today, so we'll see what happens. They said they give it to the Town Treasurer who will make a copy and then send it on to the insurance. I'm not holding my breath, but it would be nice if they paid to fix it. :P
Also, for those of you who just love to see the carnage, I took pictures of what I found -
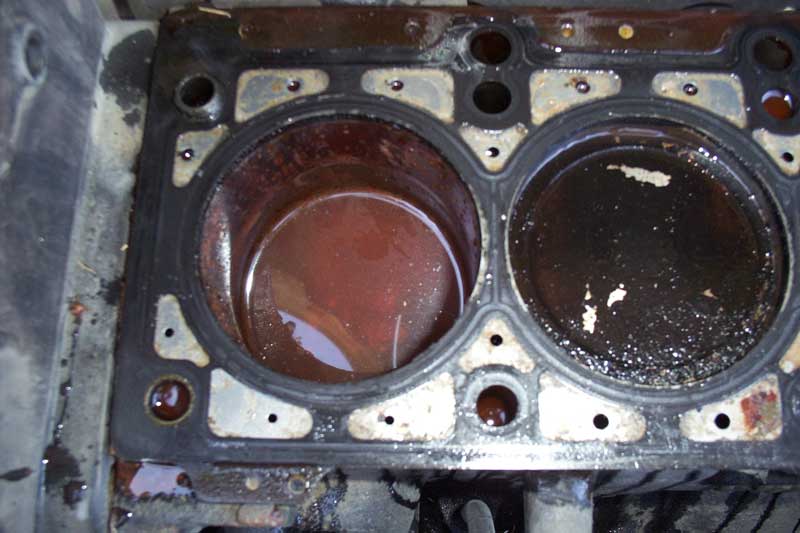
Here's the whole engine - I haven't had a lot of them apart, but I was pretty sure the pistons in two and three were supposed to be at the same height, and the same for 1 and 4. That's obviously not the case here, which may be why the engine won't turn.

And here's a closeup of the muddy water in the cylinder. :P
Unfortunately, I didn't get any video of me pouring about a cup and a half of water out of the intake. :P Not sure I would have posted it anyway - for some reason, whenever an econobox bites the dust, a lot of people just start fapstermating wildly.
in a chair next to it, with the sole job of turning the compressor on when the pressure got to 90, and turning it off when it got to 120. Here's the view from the front:
and a view of the side:
It turned out pretty good, but I realized later forgot to throttle down the regulator on the tank and my gun's regulator was seeing way too of pressure, so it went on real dry, but I got awesome paint conservation - only used 6 oz of color to do the whole engine bay, then 4 oz of clear.
Neon update: Filed my claim with the Town Secretary of Flower Mound today, so we'll see what happens. They said they give it to the Town Treasurer who will make a copy and then send it on to the insurance. I'm not holding my breath, but it would be nice if they paid to fix it. :P
Also, for those of you who just love to see the carnage, I took pictures of what I found -
Here's the whole engine - I haven't had a lot of them apart, but I was pretty sure the pistons in two and three were supposed to be at the same height, and the same for 1 and 4. That's obviously not the case here, which may be why the engine won't turn.
And here's a closeup of the muddy water in the cylinder. :P
Unfortunately, I didn't get any video of me pouring about a cup and a half of water out of the intake. :P Not sure I would have posted it anyway - for some reason, whenever an econobox bites the dust, a lot of people just start fapstermating wildly.
03-17-07, 08:14 PM
#15
Taste great, more filling
Thread Starter
iTrader: (1)
Join Date: Feb 2005
Location: Dallas, TX
Posts: 2,012
Likes: 0
Received 0 Likes
on
0 Posts
To answer your original reply - it's hard to tell in the picture, but 2 is about 1 cm lower than 3. I could be wrong, because I haven't been into many engines this deep, but I thought they were supposed to be at the same height, only one was on the compression stroke while the other was on the exhaust stroke.
I gotta admit though, I was impressed with the head setup in this - they only used one cam, but it's still 16 valves like a DOHC. I was NOT impressed with getting the timing cover off. :P
- it's hard to tell in the picture, but 2 is about 1 cm lower than 3. I could be wrong, because I haven't been into many engines this deep, but I thought they were supposed to be at the same height, only one was on the compression stroke while the other was on the exhaust stroke. I gotta admit though, I was impressed with the head setup in this - they only used one cam, but it's still 16 valves like a DOHC. I was NOT impressed with getting the timing cover off. :P
03-19-07, 07:10 PM
#18
Taste great, more filling
Thread Starter
iTrader: (1)
Join Date: Feb 2005
Location: Dallas, TX
Posts: 2,012
Likes: 0
Received 0 Likes
on
0 Posts
Tonight - cleaned, stripped, and sealed the driver's wheelwell.
Before:
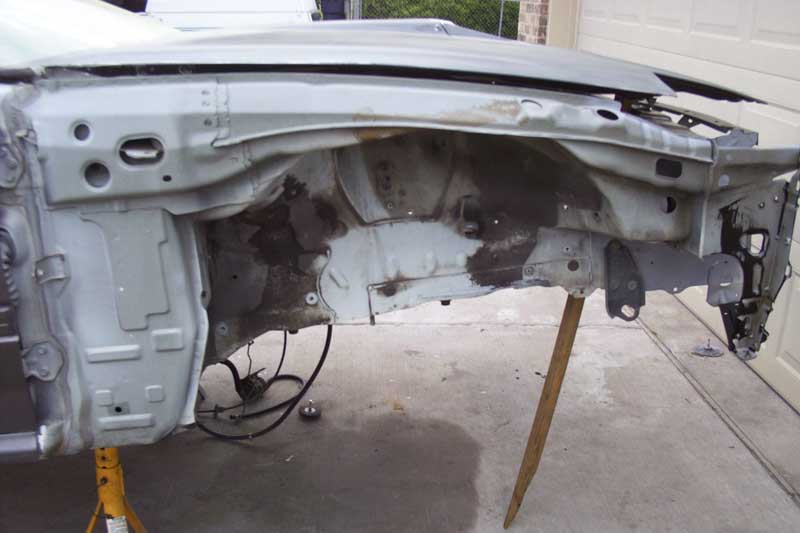
After:
Also, just for fun - random attachment picture from changing the id number!!

Before:
After:
Also, just for fun - random attachment picture from changing the id number!!
03-20-07, 11:37 AM
#21
Taste great, more filling
Thread Starter
iTrader: (1)
Join Date: Feb 2005
Location: Dallas, TX
Posts: 2,012
Likes: 0
Received 0 Likes
on
0 Posts
Yup it is - in Gloss black. We used it on my buddy's '68 Camaro and I kept thinking "I wonder what this would look like on a nice car like my RX7."
03-20-07, 02:47 PM
#23
Taste great, more filling
Thread Starter
iTrader: (1)
Join Date: Feb 2005
Location: Dallas, TX
Posts: 2,012
Likes: 0
Received 0 Likes
on
0 Posts
Thank you! I should probably start moving the pictures over from the other thread, so they're all in one place instead of scattered amongst the many.
03-20-07, 04:16 PM
#25
Taste great, more filling
Thread Starter
iTrader: (1)
Join Date: Feb 2005
Location: Dallas, TX
Posts: 2,012
Likes: 0
Received 0 Likes
on
0 Posts
That's okay, I just saved all my pictures over to my website - that way they ought to last longer than they would as attachments anyway. I appreciate the thought though.
Here's the car before disassembly just after it was tinted -

at the October 2006 autocross, before I lost the intermediate iron -

Here's the engine after painting, before assembly -

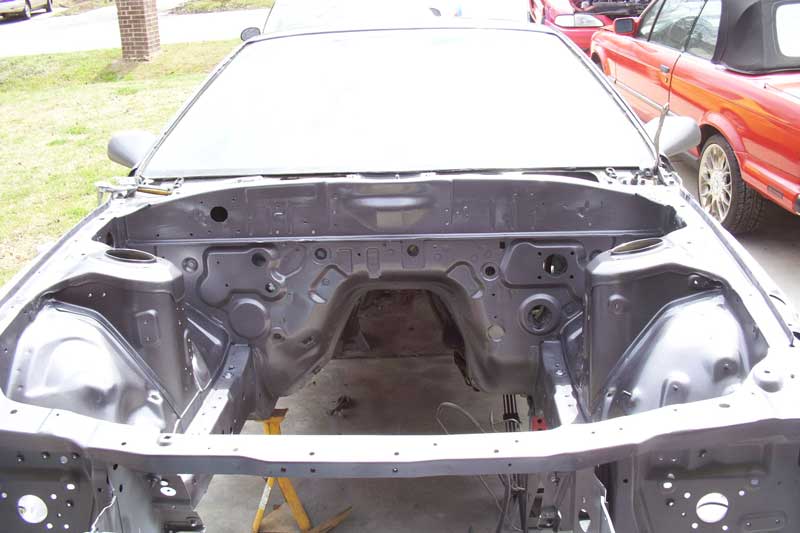
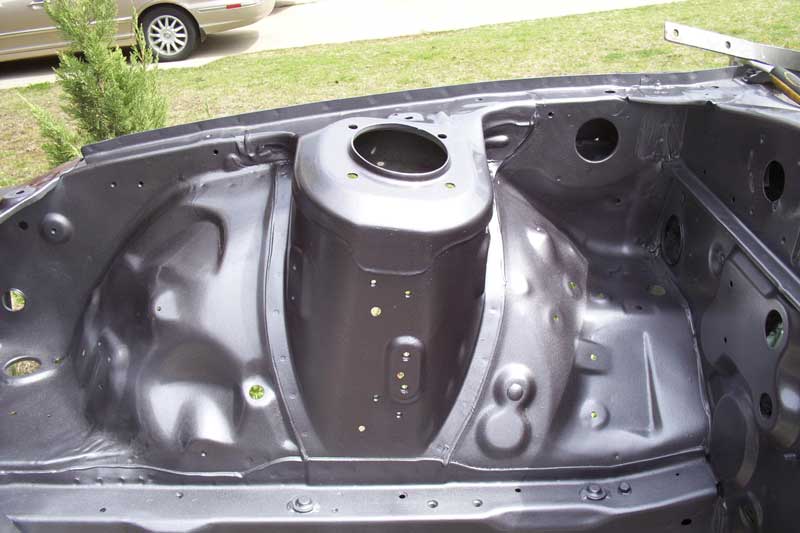
Before pictures of the engine bay - these pictures don't show how bad it really is - it was painted with the "Hammered Rustoleum". Don't ever do that, it's a pain in the *** to get off. :P Took me 4 days to sand it all down with 60 grit sandpaper.

Interior removed for easy painting and install of new carpet/seats

Painted coilpacks - I'm proud of these, they look great!

New leather seats to go in -

New carpet -

That should keep for a little while.
Here's the car before disassembly just after it was tinted -
at the October 2006 autocross, before I lost the intermediate iron -
Here's the engine after painting, before assembly -
Before pictures of the engine bay - these pictures don't show how bad it really is - it was painted with the "Hammered Rustoleum". Don't ever do that, it's a pain in the *** to get off. :P Took me 4 days to sand it all down with 60 grit sandpaper.
Interior removed for easy painting and install of new carpet/seats
Painted coilpacks - I'm proud of these, they look great!
New leather seats to go in -
New carpet -
That should keep for a little while.