New Door Lock Dust Shutter Kits

For Sale

Old 08-04-21, 11:53 AM
  #26  
Boilermakers!

iTrader: (158)
 
ZE Power MX6's Avatar
 
Join Date: Nov 2002
Location: Chicago, IL
Posts: 3,699
Received 359 Likes on 263 Posts
Originally Posted by FC3S
I have got a pair a couple years ago and haven’t installed them yet. Do you have any installation instructions?
I also got a set few years ago and just installed them last year, the door handle look much nice with a new plate and dust cover. You have to remove the lock cylinder to gain access to the dust cover, this is a good time to lube everything, add stopper bolt and do the LED mod.


Old 08-04-21, 02:47 PM
  #27  
Full Member

iTrader: (24)
 
SpeedCrazie's Avatar
 
Join Date: Nov 2004
Location: somewhere
Posts: 207
Received 14 Likes on 12 Posts
Turned out nice!!!

what is this stopper Bolt you are referring too?
Old 08-04-21, 02:50 PM
  #28  
Built Not Bought

iTrader: (14)
 
TwinCharged RX7's Avatar
 
Join Date: May 2008
Location: Stamford, CT
Posts: 4,280
Likes: 0
Received 866 Likes on 545 Posts
+1. And which LED?
Old 08-04-21, 03:18 PM
  #29  
Boilermakers!

iTrader: (158)
 
ZE Power MX6's Avatar
 
Join Date: Nov 2002
Location: Chicago, IL
Posts: 3,699
Received 359 Likes on 263 Posts
Originally Posted by SpeedCrazie
Turned out nice!!!

what is this stopper Bolt you are referring too?
This guy, help relief a lot of stiffness on the hinges as it is no longer traveling further than it is supposed to. Main reason why the plastic handle break.


Originally Posted by TwinCharged RX7
+1. And which LED?
The key cylinder light.


Or you are wondering which LED I used?
Old 08-04-21, 04:04 PM
  #30  
Rotary Enthusiast

iTrader: (1)
 
Zepticon's Avatar
 
Join Date: Jul 2012
Location: Norway
Posts: 923
Received 600 Likes on 337 Posts
Got any how-tos on both those mods? both look nice to do when opening the lock mechanism.

Last edited by Zepticon; 08-05-21 at 12:50 AM.
Old 08-05-21, 09:50 AM
  #31  
Rotary Enthusiast

Thread Starter
iTrader: (32)
 
jza80's Avatar
 
Join Date: Nov 2011
Location: South Orange County, CA
Posts: 753
Received 87 Likes on 70 Posts
Originally Posted by FC3S
I have got a pair a couple years ago and haven’t installed them yet. Do you have any installation instructions?
Here's something I wrote up awhile back, it is very intuitive however.

1. Disconnect the car battery. The circuit to the driver side door lock illumination lamp becomes live when either door is opened, and remains live for about 10-15 sec after the door is closed. If the lamp wires are shorted to ground you might damage CPU #2, and you don't want to do that!

2. Remove the inside door triangle to expose the key lock and door handle assembly bolts

3. Unclip the rods attaching the latch and lock mechanisms to the door handle assembly (be gentle with the plastic clips)

4. Remove the 6mm nuts attaching the door handle assembly

5. Remove the spring clip that fastens the door lock barrel to the door handle assembly. Remove the barrel.

6. Gently prise the fascia ring/escutcheon off the barrel with a small head screwdriver or other tool - you just work the tool around to lift off the ring

7. Remove the old finisher plate and whatever dust shutter hardware still exists, clean out broken plastic bits, etc. and replace with new, also be sure to install the plastic shutter with the smooth side facing out.

8. Refit the fascia ring/escutcheon over the new parts. You will have to hold down the new finisher plate in position while doing this as there is slight spring tension

9. Refit the barrel and other components. This is also a great time to replace the driver side door lock bulb if it is burned out. I replaced mine with a "grain of wheat" incandescent bulb from radio shack online but there are lots of options and probably better ones than the radio shack bulb.

10. Reconnect battery.

11. Glory in the great improvement in looks and function.
Old 08-05-21, 12:25 PM
  #32  
Rotary Enthusiast

Thread Starter
iTrader: (32)
 
jza80's Avatar
 
Join Date: Nov 2011
Location: South Orange County, CA
Posts: 753
Received 87 Likes on 70 Posts
Originally Posted by ZE Power MX6
This guy, help relief a lot of stiffness on the hinges as it is no longer traveling further than it is supposed to. Main reason why the plastic handle break.


The key cylinder light.


Or you are wondering which LED I used?

Can you highlight what was changed for the stopper bolt mod? I’d like to do that myself.

Edit: I think I see the change, you added an allen head cap screw?

Last edited by jza80; 08-05-21 at 12:28 PM.
Old 08-05-21, 12:57 PM
  #33  
Boilermakers!

iTrader: (158)
 
ZE Power MX6's Avatar
 
Join Date: Nov 2002
Location: Chicago, IL
Posts: 3,699
Received 359 Likes on 263 Posts
Originally Posted by jza80
Can you highlight what was changed for the stopper bolt mod? I’d like to do that myself.

Edit: I think I see the change, you added an allen head cap screw?
Sure thing, I didn't want to keep posting other stuff in your FS thread haha.

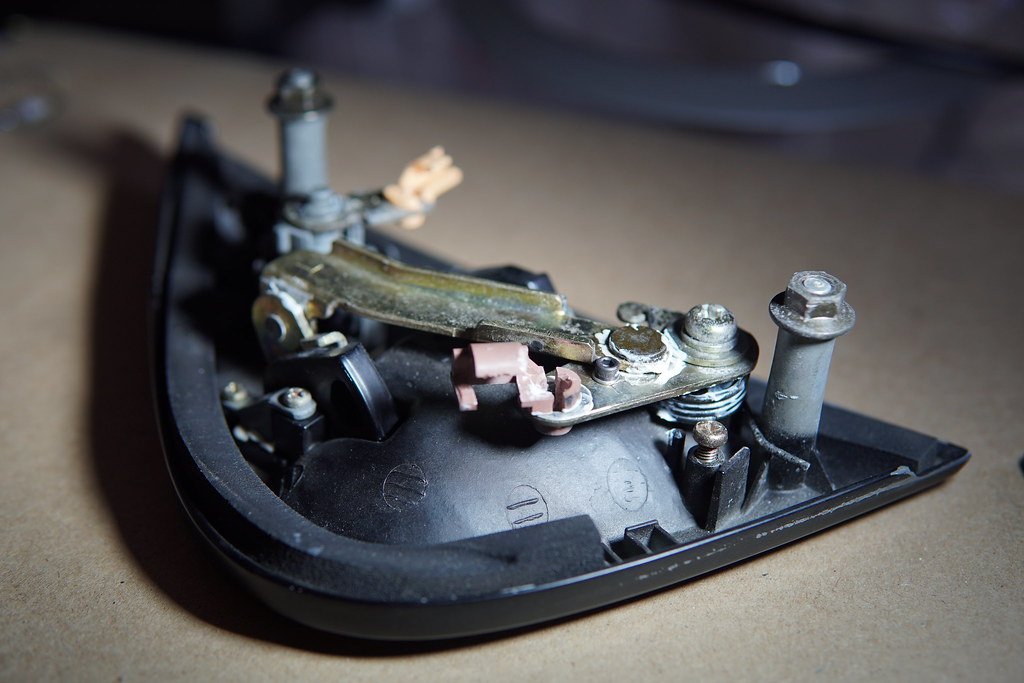
Here's the instruction I follow for the stopper bolt, I think he tap the hinges, but I just use a through bolt then use lock ring and thread lock on the other end.
https://www.rx7club.com/3rd-generati...ow-fix-982678/

Before and after picture, you can see the hinges resting position is different. The after position is more reassemble a new hinges position, and no longer putting pressure on the plastic rod holder.


Old 08-05-21, 05:48 PM
  #34  
Auto Delight Founder

iTrader: (7)
 
Mazdaspeed RX8 ver2's Avatar
 
Join Date: Feb 2006
Location: Hayward, CA
Posts: 802
Received 297 Likes on 206 Posts
Do you have a set still available? Need one for the FD
Old 08-23-21, 12:55 PM
  #35  
Rotary Enthusiast

Thread Starter
iTrader: (32)
 
jza80's Avatar
 
Join Date: Nov 2011
Location: South Orange County, CA
Posts: 753
Received 87 Likes on 70 Posts
Still have a few sets left folks, don't miss out. When they are all sold that is it for these parts.
Old 09-01-21, 04:04 PM
  #36  
Rotary Enthusiast

Thread Starter
iTrader: (32)
 
jza80's Avatar
 
Join Date: Nov 2011
Location: South Orange County, CA
Posts: 753
Received 87 Likes on 70 Posts
Still have a few of these left, don't miss out! When they are gone, they are gone!
Old 09-07-21, 11:42 AM
  #37  
Rotary Enthusiast

Thread Starter
iTrader: (32)
 
jza80's Avatar
 
Join Date: Nov 2011
Location: South Orange County, CA
Posts: 753
Received 87 Likes on 70 Posts
Bump!
Old 10-10-21, 07:46 PM
  #38  
Full Member
iTrader: (2)
 
tgaffner's Avatar
 
Join Date: Jul 2018
Location: WI
Posts: 66
Received 10 Likes on 7 Posts
Message sent
Old 10-11-21, 10:54 AM
  #39  
Rotary Enthusiast

Thread Starter
iTrader: (32)
 
jza80's Avatar
 
Join Date: Nov 2011
Location: South Orange County, CA
Posts: 753
Received 87 Likes on 70 Posts
Originally Posted by tgaffner
Message sent
Your kits will go out today, thanks.

Old 10-15-21, 10:44 AM
  #40  
Rotary Enthusiast

Thread Starter
iTrader: (32)
 
jza80's Avatar
 
Join Date: Nov 2011
Location: South Orange County, CA
Posts: 753
Received 87 Likes on 70 Posts
Have a few sets still available, if you need them this is the time to do it!
Old 10-16-21, 02:16 PM
  #41  
Full Member

iTrader: (4)
 
Join Date: Sep 2002
Location: Anchorage, AK
Posts: 100
Received 4 Likes on 4 Posts
PM sent for two kits - thanks!
Old 11-11-21, 12:24 PM
  #42  
Rotary Enthusiast

Thread Starter
iTrader: (32)
 
jza80's Avatar
 
Join Date: Nov 2011
Location: South Orange County, CA
Posts: 753
Received 87 Likes on 70 Posts
BUMP!

I was able to scour enough parts to assemble 7 extra sets of dust shutters - all new black facias, shutters, springs. etc. These are the last available for ever, folks. Take a look at your door locks, if you think you will want to repair now or at some point in the future, this is the time to do it.
Old 11-11-21, 01:23 PM
  #43  
Full Member

iTrader: (4)
 
Join Date: Sep 2002
Location: Anchorage, AK
Posts: 100
Received 4 Likes on 4 Posts
PM sent for another kit. Thanks!
Old 11-11-21, 03:38 PM
  #44  
Rotary Enthusiast

Thread Starter
iTrader: (32)
 
jza80's Avatar
 
Join Date: Nov 2011
Location: South Orange County, CA
Posts: 753
Received 87 Likes on 70 Posts
Tracking sent, thanks!
Old 11-21-21, 06:15 PM
  #45  
Rotary Enthusiast

Thread Starter
iTrader: (32)
 
jza80's Avatar
 
Join Date: Nov 2011
Location: South Orange County, CA
Posts: 753
Received 87 Likes on 70 Posts
Bump! 6 sets of kits remaining.
Old 11-21-21, 09:36 PM
  #46  
Junior Member

 
IvVaum's Avatar
 
Join Date: Sep 2014
Location: St. Paul, MN
Posts: 13
Likes: 0
Received 0 Likes on 0 Posts
How do I purchase a set?
Old 11-22-21, 11:42 AM
  #47  
Rotary Enthusiast

Thread Starter
iTrader: (32)
 
jza80's Avatar
 
Join Date: Nov 2011
Location: South Orange County, CA
Posts: 753
Received 87 Likes on 70 Posts
Originally Posted by IvVaum
How do I purchase a set?
pm responded, and parts shipped. 5 sets remaining.
Old 11-26-21, 08:32 PM
  #48  
Senior Member

iTrader: (7)
 
Nemo128's Avatar
 
Join Date: Feb 2015
Location: NJ
Posts: 262
Received 15 Likes on 12 Posts
PMing you for 2.
Old 11-28-21, 02:53 PM
  #49  
Rotary Enthusiast

Thread Starter
iTrader: (32)
 
jza80's Avatar
 
Join Date: Nov 2011
Location: South Orange County, CA
Posts: 753
Received 87 Likes on 70 Posts
Pm's responded. One paid order shipped, one pending payment.
Old 12-05-21, 12:59 AM
  #50  
Make an assessment...


iTrader: (3)
 
speedjunkie's Avatar
 
Join Date: Aug 2004
Location: Colorado Springs, CO
Posts: 4,609
Received 117 Likes on 82 Posts
I'll buy a set.


All times are GMT -5. The time now is 11:05 PM.