Interior / Exterior / Audio Talk about interior and exterior mods including audio.

Started my A/C relocation...

Thread Tools
 
Search this Thread
 
Old 02-09-04, 11:49 PM
  #1  
The Spirit of FLUFF!

Thread Starter
iTrader: (1)
 
RX7SpiritR's Avatar
 
Join Date: Oct 2002
Location: East Highland, CA
Posts: 1,350
Likes: 0
Received 0 Likes on 0 Posts
Started my A/C relocation...

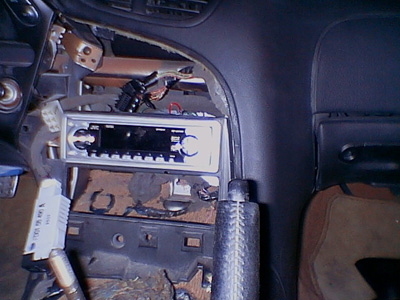
I decided that since my car was going to be sitting in the garage for a while that I should do all of the things I wanted to the car finally. So I stared my A/C relocation project. I finished all the wiring today and got all of my supplies for this project. I took pictures of the wiring and everything, tomorrow I will be cutting and doing the panel work and then paint it. I should have everything done by the end of tomorrow. Here's the pics:

Old 02-09-04, 11:52 PM
  #2  
The Spirit of FLUFF!

Thread Starter
iTrader: (1)
 
RX7SpiritR's Avatar
 
Join Date: Oct 2002
Location: East Highland, CA
Posts: 1,350
Likes: 0
Received 0 Likes on 0 Posts
Here's the Main board for the dial's, and all associated buttons on the top center console:

Old 02-09-04, 11:56 PM
  #3  
The Spirit of FLUFF!

Thread Starter
iTrader: (1)
 
RX7SpiritR's Avatar
 
Join Date: Oct 2002
Location: East Highland, CA
Posts: 1,350
Likes: 0
Received 0 Likes on 0 Posts
Here's everything I had to lengthen for them to reach lower center console:

Old 02-09-04, 11:56 PM
  #4  
2 FD's since '98

iTrader: (11)
 
rajeevx7's Avatar
 
Join Date: Jun 2002
Location: West Palm Beach
Posts: 1,598
Received 7 Likes on 5 Posts
Do you have to lengthen each wire?

Raj
Old 02-09-04, 11:56 PM
  #5  
2 FD's since '98

iTrader: (11)
 
rajeevx7's Avatar
 
Join Date: Jun 2002
Location: West Palm Beach
Posts: 1,598
Received 7 Likes on 5 Posts
Do you have to lengthen each wire?

Raj
Old 02-09-04, 11:58 PM
  #6  
Rotor DEMON !

 
bigmack000's Avatar
 
Join Date: Nov 2002
Location: alberta canada/soon to be cape coral FL:D
Posts: 1,074
Likes: 0
Received 0 Likes on 0 Posts
looks like a **** load of fun. did you just crimp the wire or solder(SP?) them and put shrink wrap on?
joel
Old 02-10-04, 12:01 AM
  #7  
The Spirit of FLUFF!

Thread Starter
iTrader: (1)
 
RX7SpiritR's Avatar
 
Join Date: Oct 2002
Location: East Highland, CA
Posts: 1,350
Likes: 0
Received 0 Likes on 0 Posts
I soldered them and then used shrink wrap. I ran out for the last few wires so I used electrical tape. I would never use butt connectors or crimp them, that's the half assed way, plus not very reliable. I already tested everything also and it all works great!
Old 02-10-04, 12:01 AM
  #8  
The Spirit of FLUFF!

Thread Starter
iTrader: (1)
 
RX7SpiritR's Avatar
 
Join Date: Oct 2002
Location: East Highland, CA
Posts: 1,350
Likes: 0
Received 0 Likes on 0 Posts
I'm not done! Yes you do. Here's a picture of the A/C speed dial:

Old 02-10-04, 12:03 AM
  #9  
Rotor DEMON !

 
bigmack000's Avatar
 
Join Date: Nov 2002
Location: alberta canada/soon to be cape coral FL:D
Posts: 1,074
Likes: 0
Received 0 Likes on 0 Posts
haha. so you puttign then controles on then middle console. are you removign anythign from that area?

joel
Old 02-10-04, 12:04 AM
  #10  
The Spirit of FLUFF!

Thread Starter
iTrader: (1)
 
RX7SpiritR's Avatar
 
Join Date: Oct 2002
Location: East Highland, CA
Posts: 1,350
Likes: 0
Received 0 Likes on 0 Posts
Here's all the buttons:

Old 02-10-04, 12:08 AM
  #11  
The Spirit of FLUFF!

Thread Starter
iTrader: (1)
 
RX7SpiritR's Avatar
 
Join Date: Oct 2002
Location: East Highland, CA
Posts: 1,350
Likes: 0
Received 0 Likes on 0 Posts
Originally posted by bigmack000
haha. so you puttign then controles on then middle console. are you removign anythign from that area?

joel
Yeah, just the ash tray thing. That's about it though. Still trying to figure out what I'm gonna put up top though, I'm thinking a possible A/F ratio gauge or something and my turbo timer.
Old 02-10-04, 12:08 AM
  #12  
Rotor DEMON !

 
bigmack000's Avatar
 
Join Date: Nov 2002
Location: alberta canada/soon to be cape coral FL:D
Posts: 1,074
Likes: 0
Received 0 Likes on 0 Posts
looks good go on aim so we can talk more about it more
i might want to do this soon also. or when i am gettign the autobody all done.
joel
Old 02-10-04, 12:57 AM
  #13  
The Spirit of FLUFF!

Thread Starter
iTrader: (1)
 
RX7SpiritR's Avatar
 
Join Date: Oct 2002
Location: East Highland, CA
Posts: 1,350
Likes: 0
Received 0 Likes on 0 Posts
Cool, maybe you should come down here and I'll help ya out with it.... I will post all the new stuff I do tomorrow.....well.....tomorrow.
Old 02-11-04, 12:26 AM
  #14  
The Spirit of FLUFF!

Thread Starter
iTrader: (1)
 
RX7SpiritR's Avatar
 
Join Date: Oct 2002
Location: East Highland, CA
Posts: 1,350
Likes: 0
Received 0 Likes on 0 Posts
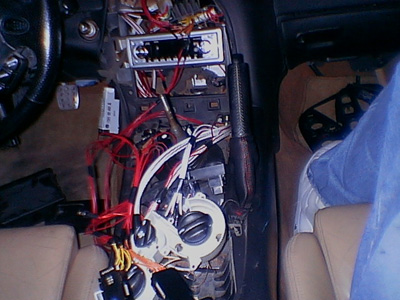
Ok I didn't get to do what I wantewd today because of some unwanted things happened, but I was able to tape all the wires together and install everything in its place so its ready for panels once I finish the panels up. Here's the pics of the wire mess that's in the dash now.

Old 02-11-04, 12:32 AM
  #15  
The Spirit of FLUFF!

Thread Starter
iTrader: (1)
 
RX7SpiritR's Avatar
 
Join Date: Oct 2002
Location: East Highland, CA
Posts: 1,350
Likes: 0
Received 0 Likes on 0 Posts
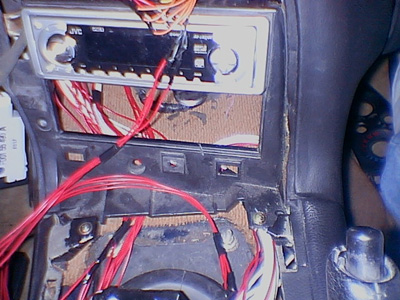
Here's another pic showing the top portion where the main circuit board is going to sit. I cut the part that held the board off of the entire A/C control case so it would still protect the board without that giant thing in there.


Last edited by RX7SpiritR; 02-11-04 at 12:35 AM.
Old 02-11-04, 12:43 AM
  #16  
The Spirit of FLUFF!

Thread Starter
iTrader: (1)
 
RX7SpiritR's Avatar
 
Join Date: Oct 2002
Location: East Highland, CA
Posts: 1,350
Likes: 0
Received 0 Likes on 0 Posts
Last pic for the night guys! Hopefully I can have the panel work done tomorrow. I want this done so I dont have to worry about anything. This one is just of where I ran the wires through.

Old 02-11-04, 05:39 PM
  #17  
thats not paint....

 
7-sins's Avatar
 
Join Date: May 2001
Location: Manassas, VA
Posts: 2,231
Likes: 0
Received 2 Likes on 1 Post
Nice I think I am trying to do that soon as well. My car is currently down for a while too. I just need to get my hands on a 2nd A/C panel. Let us know how it finishes up.
Old 02-11-04, 05:50 PM
  #18  
NA2 Pilot

 
JSpecRZ's Avatar
 
Join Date: Feb 2001
Location: NY
Posts: 712
Likes: 0
Received 0 Likes on 0 Posts
whoa... dejevu!!!

looking great!!
Old 02-12-04, 12:36 AM
  #19  
The Spirit of FLUFF!

Thread Starter
iTrader: (1)
 
RX7SpiritR's Avatar
 
Join Date: Oct 2002
Location: East Highland, CA
Posts: 1,350
Likes: 0
Received 0 Likes on 0 Posts
Thanks guys. I still haven't been able to do the panel work yet as I ran into a problem with my dremel tool. One of the holder pieces is missing, so I'm gonna have to go out and buy one tomorrow. I'll get pics of the final work sometime over the weekend or Monday.
Old 02-16-04, 03:48 AM
  #20  
The Spirit of FLUFF!

Thread Starter
iTrader: (1)
 
RX7SpiritR's Avatar
 
Join Date: Oct 2002
Location: East Highland, CA
Posts: 1,350
Likes: 0
Received 0 Likes on 0 Posts
Ok I got everything cut out nice with my dremel. I sanded it all down and got all the paint off and started to bondo it all. I will get some pictures up tomorrow. The paint is a bitch to sand off because it is so thick. Took me forever since I did it by hand. Dremel woulda beat my panels up. But anyways I should have the lower center console done by tomorrow and painted. I have to figure out how I'm gonna set the layout on my upper center console up. I want to possibly put my turbo timer up there, maybe move my boost gauge up there, and then possibly put in a A/F gauge (kinda want a wideband, anyone know how much they are?).
Old 02-16-04, 12:45 PM
  #21  
Banned. I got OWNED!!!
 
Godzilla-T78's Avatar
 
Join Date: Jun 2003
Location: Central Florida
Posts: 1,619
Likes: 0
Received 0 Likes on 0 Posts
not sure if this will be any help to you or not...

Old 02-16-04, 04:01 PM
  #22  
The Spirit of FLUFF!

Thread Starter
iTrader: (1)
 
RX7SpiritR's Avatar
 
Join Date: Oct 2002
Location: East Highland, CA
Posts: 1,350
Likes: 0
Received 0 Likes on 0 Posts
Yeah it does a little. Thanks. I'm gonna make a tray for my turbo timer to be in there too.
Old 02-18-04, 12:11 AM
  #23  
The Spirit of FLUFF!

Thread Starter
iTrader: (1)
 
RX7SpiritR's Avatar
 
Join Date: Oct 2002
Location: East Highland, CA
Posts: 1,350
Likes: 0
Received 0 Likes on 0 Posts
I feel damned good! I finished the lower center console and its waiting to dry right now with its second coat of paint already. I will get pictures once I do a few more coats, I'm thinking about 5 coats. I will then start working on the upper center console and placements of gauges. It looks really good, looks great for my first time working with bondo and panel work IMO. Hope everything turns out good with no sudden "pit stops".
Old 02-18-04, 12:19 AM
  #24  
Rotor DEMON !

 
bigmack000's Avatar
 
Join Date: Nov 2002
Location: alberta canada/soon to be cape coral FL:D
Posts: 1,074
Likes: 0
Received 0 Likes on 0 Posts
get it doen already whats the hold up. can't wait for pics man.
joel
Old 02-18-04, 01:07 AM
  #25  
Rotary Freak

iTrader: (2)
 
iceman4357's Avatar
 
Join Date: Jan 2004
Location: St.Louis
Posts: 1,879
Received 129 Likes on 73 Posts
that **** will look tight!! good work, wanna do mine?


Quick Reply: Started my A/C relocation...


All times are GMT -5. The time now is 08:26 PM.