
Painting/Priming/Prepping: Tips?

Thread Starter
Meesto Spakaro
Joined: May 2001
Posts: 489
Likes: 0
From: Redondo Beach, CA
My FC restoration project (86 GXL) finally arrived at my door, and one of the first things I want to get started on is paint/body work.
From what I understand, painting and prepping a car isn't hard...just time consuming and requires patience.
Stripping:
Should I use a chemical solvent to strip the paint, which brands do you suggest, and prices?
If I go with sanding, what grit paper should i use? start with thick like a 40 grit and progress to something higher?
Priming:
What's a good brand spray on primer to use? How many coats, and what kind of spraying technique.
Painting:
Good aerosol paints (I'm going with white), how to correctly apply coats, and finally what brand of spray on clear coat should I use?
If anyone can give any insight on any of these questions, it would be greatly apreciated

Senior Member
Joined: Sep 2002
Posts: 422
Likes: 0
From: Washington
I dont know much about the painting and all but im learning. Im going to be painting my engine bay.
I think that 40 grit is kinda course. I would think at least 100.
http://www.paintucation.com/
They have videos that will tell you everything about painting.
I think that 40 grit is kinda course. I would think at least 100.
http://www.paintucation.com/
They have videos that will tell you everything about painting.

Senior Member
Joined: Oct 2002
Posts: 290
Likes: 0
From: NM
I painted my car and have seen it done a couple of times so i will share with you what I have learned. Keep in mind i am NOT a proffesional so I may have missed a step or too... make sure you talk with a paint pro first.
The prepping is relatively simple yet extremely time consuming. If your painting it the original color or something close and your original base coat is in decent shape you can just use 400 grit sandpaper and wetsand ALL the clear coat off. Use circular motions and make sure you keep water on it and DON'T let your fingers rub the sandpaper or else you will have some very painfull sandpaper burns on your hands.... no fun. Don't forget to get all of the edges really well because if you do not, that is where the new paint will start to peel. Make sure that if you have any existing chips or dings the edges are feathered as smooth as possible... so much so that you should not be able to feel any edge at all. If its too deep you may need to use a tiny bit of filler and sand it smooth.
Also, you will want to do the sanding or at least do a once over when the car is actually at the place to be painted. You want to do this to make sure there is absolutely no dirt or contaminants on the surface which will leave "fish eyes" in your paint . Once the final sanding is complete make sure you don't touch the car as the oil on your hands will mess everything up. At this point you will want to mask everything off and pull the car into the paint booth. All thats left now is to run sticky clotch over the whole surface to pick up any dust or anything that might have made an attempt to ruin things. Now you should be ready to spray.
I don't know if your thinking about actually spraying the car yourself, but if you've never done it before I would reccomend finding someone with some experience to do it or at least watch a pro a few times. There is alot involved such as hardeners, reducers, pressures, and such. Also, if your going to use pearl or kandy DO NOT make the same mistake i did.... go get your car proffesionally painted. Both pearls and kandy's are very hard to spray without getting streaks, and only someone with specific experience with those types of paint jobs will make it look good. If you've done all this right than there should be no reason to prime the whole car. The paint actually tends to stick better to the factory base coat than to primer.
As for what primer and clearcoat to use, get the data sheets for the paint you are going to use and that should tell you if there are any types you should avoid. I know with some types of paint you can't use red oxide primer.
All in all its a very rewarding experience and after you've put all that blood and sweat into making it look good you will have a newfound love and bond for your baby. Good luck and if you have any questions feel free to ask.
-Dan-
(edit) I just realized your car may not even have clearcoat so most of this may not even apply to you. If not sorry for wasting your time. heh. Hope I helped. Peace
Last edited by Kaotic Dan; Oct 28, 2002 at 02:00 AM.
Senior Member
Joined: Mar 2002
Posts: 251
Likes: 0
From: bel air maryland
are you going to use an actual spray gun? I know u mentioned aerosol, I "spraypainted" my first car( don't worry, not a 7) and on top of the fact that it was a giant bitch to get the paint even, I realized afterwards that for the $ I spent on paint and the materials to do the project, I could've gone to maaco and gotten a paint job that, while not the best quality, would've looked good for a while. Consider that option, even if you do the prep/sanding work yourself so it's to your satisfaction, they really don't do that bad a job, and if you've never done this before, that might be your best option, unless you don't really care how it turns out( no offense to you at all, just advice from someone who knows, I do airbrush graphic work for a paint shop)
My FSP Fiesta eats Jettas
Joined: Aug 2002
Posts: 1,616
Likes: 3
Places like Maaco do a pretty good job as far as the actual spraying goes, their weak point is prep. If you do the prep yourself and then have Maaco spray it, you can get an excellent paint job. The guys who work for Maaco typically are paid by the job, so the less time they have to spend on prep the more $ they make. They spray enough cars to get pretty good at it. Sometimes you can work a side deal with one of the guys to just spray your prepped car and save quite a bit.
Mod Powers...gone!
Joined: Apr 2001
Posts: 1,522
Likes: 1
From: SoCal
Hey Mike, check out this link.
http://www.paintucation.com/index2.html
There is a forum where you can ask questions. Definitely helpful.
http://www.paintucation.com/index2.html
There is a forum where you can ask questions. Definitely helpful.
Trending Topics
John
Joined: Mar 2001
Posts: 1,393
Likes: 0
From: Oregon
Originally posted by Kaotic Dan
The prepping is relatively simple yet extremely time consuming.
The prepping is relatively simple yet extremely time consuming.
Originally posted by Kaotic Dan
If your painting it the original color or something close and your original base coat is in decent shape you can just use 400 grit sandpaper and wetsand ALL the clear coat off.
If your painting it the original color or something close and your original base coat is in decent shape you can just use 400 grit sandpaper and wetsand ALL the clear coat off.
Originally posted by Kaotic Dan
Use circular motions and make sure you keep water on it and DON'T let your fingers rub the sandpaper or else you will have some very painfull sandpaper burns on your hands.... no fun.
Use circular motions and make sure you keep water on it and DON'T let your fingers rub the sandpaper or else you will have some very painfull sandpaper burns on your hands.... no fun.
Originally posted by Kaotic Dan
Make sure that if you have any existing chips or dings the edges are feathered as smooth as possible... so much so that you should not be able to feel any edge at all. If its too deep you may need to use a tiny bit of filler and sand it smooth.
Make sure that if you have any existing chips or dings the edges are feathered as smooth as possible... so much so that you should not be able to feel any edge at all. If its too deep you may need to use a tiny bit of filler and sand it smooth.
Originally posted by Kaotic Dan
Also, you will want to do the sanding or at least do a once over when the car is actually at the place to be painted. You want to do this to make sure there is absolutely no dirt or contaminants on the surface which will leave "fish eyes" in your paint . Once the final sanding is complete make sure you don't touch the car as the oil on your hands will mess everything up.
Also, you will want to do the sanding or at least do a once over when the car is actually at the place to be painted. You want to do this to make sure there is absolutely no dirt or contaminants on the surface which will leave "fish eyes" in your paint . Once the final sanding is complete make sure you don't touch the car as the oil on your hands will mess everything up.
Originally posted by Kaotic Dan
All thats left now is to run sticky clotch over the whole surface to pick up any dust or anything that might have made an attempt to ruin things.
All thats left now is to run sticky clotch over the whole surface to pick up any dust or anything that might have made an attempt to ruin things.

Are you going to paint with a real paint gun or spary paint. Believe it or not, I have seen some very nice paint jobs by spray paint. The most important part is preping before each coat. I would spray base coat, sand it with 800grit, more base caot until it is all even. Then wetsand with 800grit and clear coat. Wetsand and clear again. Let dry and wetsand with 1200-1500grit with polishing compound
Thread Starter
Meesto Spakaro
Joined: May 2001
Posts: 489
Likes: 0
From: Redondo Beach, CA
awesome, thanks for the tips... I think im ready. I'm debating on getting a $50 spray gun...or buying rattle cans. All thats left for me to do now is sand and primer the body filler spots, base coat, wetsand, coat, sand, coat, sand, clear, sand, clear, sand, polish & buff, wash and wax 
lol very time consuming indeed. It's been a pretty fun project so far
I think I'm going to use Omni paints, not sure which brand clearcoat i will use though.
lol very time consuming indeed. It's been a pretty fun project so far
I think I'm going to use Omni paints, not sure which brand clearcoat i will use though.
Lurking..................
Joined: Mar 2001
Posts: 2,220
Likes: 0
From: PA
If you want to prep it yourself, and then spray it yourself with a spray gun you might see if there is any place local that will rent you their spray both for the weekend or for a day or two. I know there are several places that do this locally that are privately owned shops and I've heard of shops all over doing this. I think it's around $100.00 around here but I'm not sure how much time that buys you and what the rules of use are. I am sure there are some that won't but you might stumble upon one which will do that for you. I would imagine you'd have to bring your own spray gun(as the ones they have probably belong to the individual paint guys) but they might let you use their compressor.
And I agree if done right a rattle can paint job can be made to look decent.
And I agree if done right a rattle can paint job can be made to look decent.
Last edited by black99; Nov 1, 2002 at 12:38 AM.
John
Joined: Mar 2001
Posts: 1,393
Likes: 0
From: Oregon
Originally posted by Rs4Racer
I have a real spray gun but I have no clue how to set it up is there any tutorials on how to do this?
I have a real spray gun but I have no clue how to set it up is there any tutorials on how to do this?
an HVLP gun is allot easier to paint with. HVLP stands for high volume low pressure and it sprays exactly how it sounds. I'm not sure exactly how it works but I do know it sprays way less paint than the conventional guns. Lower pressure means way less overspray. When my friend painted my engine bay, he used an HVLP gun and I stood by him, behind him, in front of him the whole time and never got any overspray on me
Thread Starter
Meesto Spakaro
Joined: May 2001
Posts: 489
Likes: 0
From: Redondo Beach, CA
I'm using rattle can primer... today I went over the whole car with degreaser and primered it ( dont wanna touch the engine bay...not yet at least) I'm going to go over the sprayed primer and sand off some of the runs and even it out with a 400 grit wet sand. I dont think I needed to reprimer the whole car, as the old base coat and primer was still fairly healthy...i'm trying to be as detailed as possible
I'm going to test out a rattle can white paint on one of the headlight covers to see how it turns out. Spray on one base coat of white, wetsand with 800 grit, respray, resand, clearcoat + buff.
the car's looking pretty nice now as it is uniform flat gray.
I gotta find my digicam
I'm going to test out a rattle can white paint on one of the headlight covers to see how it turns out. Spray on one base coat of white, wetsand with 800 grit, respray, resand, clearcoat + buff.
the car's looking pretty nice now as it is uniform flat gray.
I gotta find my digicam
John
Joined: Mar 2001
Posts: 1,393
Likes: 0
From: Oregon
another thing I forgot to mention is to wetsand until you have no orange peel. If you look at your paint at an angle, you will most likely see an orange peel type surface. It will be easier to see when you wetsand. You need to wetsand all of it so you get a nice flat surface. If you don't wetsand that out, you will just build on it and then end up with a paint job that looks just like an oragne peel. You will notice the more coats you put on, the more drastic your orange peel will get. That's why you need to wetsand before you apply anymore coats that way you don'e have to wetsand the hell out of it when you're on your last coat.

Rotary Enthusiast
Joined: Oct 2002
Posts: 806
Likes: 0
From: fly over state
Originally posted by Rs4Racer
I have a real spray gun but I have no clue how to set it up is there any tutorials on how to do this?
I have a real spray gun but I have no clue how to set it up is there any tutorials on how to do this?
Hey man, I'm not trying to say you CAN'T, but I am trying to say that I've been painting cars for years (professional for 4 years and on the side for the last 6), and I still occasionally have a problem. I wouldn't even try to tell you how to do it over the net. Your best bet is to find a painter that just wants to do the spraying, and let him assess the car, and tell you what to do. Just don't **** him off. Shop owners stay on painter's asses, and pressure them to death (that's why I quit painting professionally). Most painters don't like the prep work anyway.
Don.
Don.
Im new here, I do this for a living. The prep is VERY important to a paint job, I would never paint a car that I myself didnt prep. Maybe some guys only care about taking your money figuring the end results are your problem, but someone like myself who takes pride in thier work would never just spray a car without first going over every panel on it.
You are probably too far along for any of my advice, but if the paint on the car is in good condition, there is no reason to strip it, by good I mean that there is no adhesion problems or cracking paint, that kind of stuff.
What grit you sand the car for primer then paint with depends on the type of paint and primer you use. I have primer I can sand with 100 grit paper with, then there are primers I cant sand with anything courser then 320 with. Same goes for the paint, some paints are 220, or 320, 400,600, you get the idea.
Full Member
Joined: Jun 2002
Posts: 90
Likes: 0
From: Effingham, IL
why waste money on spray cans
and no it wont look as good
if you are going to do something do it right the first time and you will save money in the long run.
prepping the car now will be a bitch but with several coats of crappy primer and paint it will be hell.
buy yourself
1 cheaper spray gun for primer
2 hvlp spray gun for paint
3 disposable gloves of some type( so you dont mess up your hands with the sand paper)
take everything apart that you can
sand and clean everything (the better your prep the better the paint job)
if paint is ok not cracked then start around 150-200 grit
if paint is cracked then strip the whole panel(featheredging shows up after pain cures it not done right)
sand everything and then prime with a surfacer primer
since your new let dry
wet sand with 300-400 grit
make sure everything is smooth not scratches, runs, orange peel if not keep sanding if you go through the primer spray more on.
let car dry good
prime car with an epoxy sealer(depends on paint you are useing)do a good job cover evenly but no runs
wait aloted time then paint
base coat clear coat may be more forgiving
single stage is easier but you only get one chance
no runs light even coats
any paint store will have data sheets on their paint get these and read so you will know how to use the paint
try painting some else first that doesn't matter as pratice and keep painting it till you get it right.
depending on what color you use parts need may need to be together when painted (ie fender on doors on ) so that you get an even color distribution.
needless to say no one can tell you how to do this but if you use patience and don't get in a rush you can do it
also alot of painter will let you to the prep work and they will shoot it but again they don't have to worry about what it looks like because they didn't do the whole thing.
painting is an art form and take practice, practice, practice use and old hood or fender or something untill you get good because it sucks when you have to repaint the car 2,3,or more times because you did something wrong.
good luck and dont rush it
Thread Starter
Meesto Spakaro
Joined: May 2001
Posts: 489
Likes: 0
From: Redondo Beach, CA
the paint was overall in a good condition. It was that light silver/blue color. I sanded all the clearcoat off with a 220 grit. The car is pretty much a uniform grey right now.
I used Evercoat Kitty Hair long strand fibreglass to fill in and flush the antennae and any dents that were too difficult to bang out, and used Evercoat finishing glaze over the fibreglass to cover any bubbles. Sanded those down with 220 grit and got them nicely flushed. Used SEM spray can self etching primer on parts that needed it.
Right now the body is straight, primered where it needs it. Doors are removed, all trim removed, fenders removed, hood, etc etc. I'm going to wetsand all the pieces once more with a 400 grit. After that go over the car and all the pieces with degreaser/cleaner.
I think the car should be ready for paint if the whole thing is evenly wetsanded with 400 grit?
I took my time with it. The final part is the spraying.
What grit should I use in between paint coats, and which grit for clear coats/before buffing?
I'm painting the car white
John
Joined: Mar 2001
Posts: 1,393
Likes: 0
From: Oregon
OK, you're getting there buddy. My only objective is that you used fiberglass on your body. If you used it on metal, it will crack someday. It all depends on your climate and material you use.
If you are using spray paint, use 600-800grit between coats. Make sure you wetsand out all the orange peel or you'll be stuck with a Macco paint job. Don't be fustrated if your paint doesn't turn out shinny. Clear coat will drop your jaws. Wetsand at 1500grit before buffing. 1500grit is very safe since you are a beginner. After you polish, people could swear you had it professionally painted (if you did it right).
BTW, white is a very nice color for a beginner. It doesn't show all the defects, and particles in the paint. Silver is even better. Black I think is the worst
Show some pics when you geta chance
Thread Starter
Meesto Spakaro
Joined: May 2001
Posts: 489
Likes: 0
From: Redondo Beach, CA
front shot. The front bumper is totally fucked. Somehow I was able to repair it 
benji is a ghey (dude standing there like a goof)
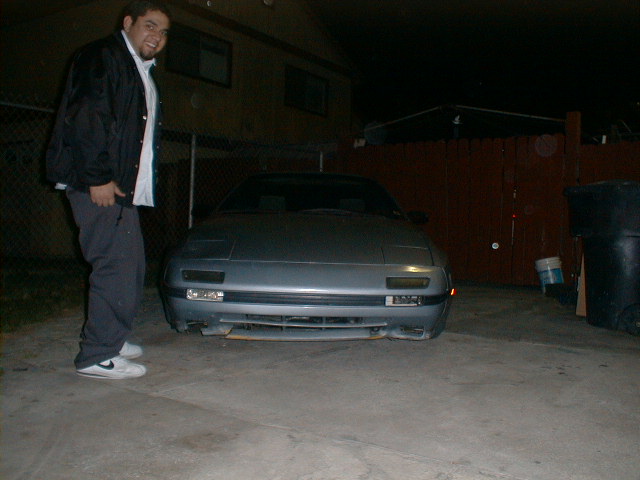
benji is a ghey (dude standing there like a goof)
Last edited by BlackR1; Nov 7, 2002 at 09:45 PM.
Thread Starter
Meesto Spakaro
Joined: May 2001
Posts: 489
Likes: 0
From: Redondo Beach, CA
the garage is a tad bit messy...we're retiling the kitchen =P
I was able to repair the front bumper. Im gonna cut out a hold on the front a la feed style
still needs some finessing and sanding, but it looks a lot better than before...

I was able to repair the front bumper. Im gonna cut out a hold on the front a la feed style
still needs some finessing and sanding, but it looks a lot better than before...
Last edited by BlackR1; Nov 10, 2002 at 07:28 PM.