
DIY HID retrofit!


some of you may notice that the one pictured is different, i used the stock housing's polished the lenses on them and used a different shroud. this version is a little more simple as you only need to cut the shroud instead of the housing.


Full Member
Joined: Oct 2008
Posts: 83
Likes: 1
From: BC, Canada
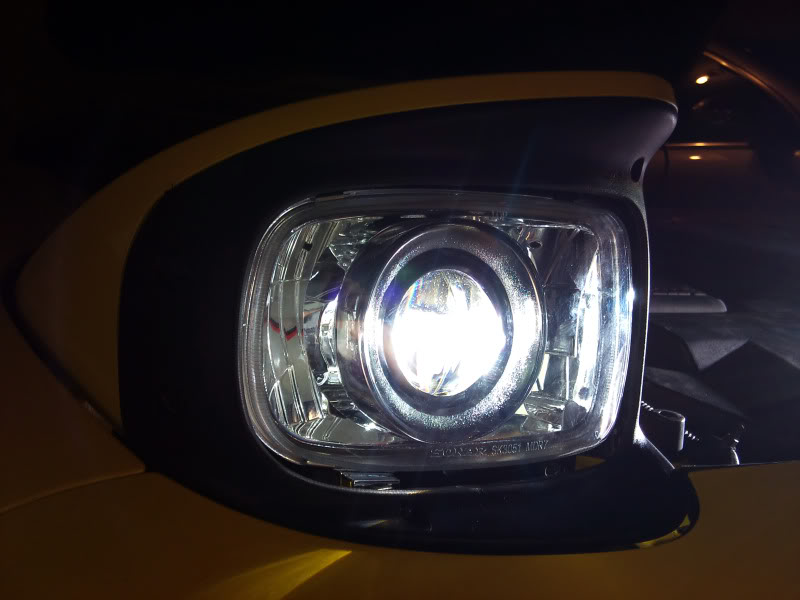
the light goes directly through the projector but there is some light that reflects back into the housing. it looks the same as any car with a hid projector setup. here is a picture i tried to take.
some of you may notice that the one pictured is different, i used the stock housing's polished the lenses on them and used a different shroud. this version is a little more simple as you only need to cut the shroud instead of the housing.
some of you may notice that the one pictured is different, i used the stock housing's polished the lenses on them and used a different shroud. this version is a little more simple as you only need to cut the shroud instead of the housing.
since you mentioned shrouds, ive always had a question that needed answering. what exactly does a projector shroud do? there are so many styles i wonder if different models affect light output, or the shape of the light source from a third person view?
The shroud is really just for looks it doesn't change light output in any way. Some projectors are not fully enclosed so the shroud keeps stray light from escaping.


the light goes directly through the projector but there is some light that reflects back into the housing. it looks the same as any car with a hid projector setup. here is a picture i tried to take.
some of you may notice that the one pictured is different, i used the stock housing's polished the lenses on them and used a different shroud. this version is a little more simple as you only need to cut the shroud instead of the housing.
some of you may notice that the one pictured is different, i used the stock housing's polished the lenses on them and used a different shroud. this version is a little more simple as you only need to cut the shroud instead of the housing.
Did you just sand the lens down by hand?
^^^^
i used a die grinder with a 2 inch sander attachment i got from harbor freight, then i found a thing at walmart to polish headlights and used that to finish it off. make sure to move the sander around or the plastic will start melting.
i used a die grinder with a 2 inch sander attachment i got from harbor freight, then i found a thing at walmart to polish headlights and used that to finish it off. make sure to move the sander around or the plastic will start melting.
here is a couple things i found comparing the mini h1 vs oem fx with clear lens.

The mini h1 is pretty much the same as the mini d2s but is a half inch longer and uses a h1 bulb. It should fit into the housing if you decide to go with the mini h1 instead, but i can't gaurantee it will fit as i haven't tried it yet. There is also a fxr (replica of the fx35) projector which has the same intesity but the light is more evenly dispersed.
The mini h1 is pretty much the same as the mini d2s but is a half inch longer and uses a h1 bulb. It should fit into the housing if you decide to go with the mini h1 instead, but i can't gaurantee it will fit as i haven't tried it yet. There is also a fxr (replica of the fx35) projector which has the same intesity but the light is more evenly dispersed.
I just noticed I don't have my headlight adjuster screws. Anyone know where I can find some?
Just finished mine. I had to place my ballasts in an interesting spot because of how short the cables were. I placed mine on the outside of the bucket so it would sit between the painted cover and the bucket. Took me a couple of hours to figure that I could place it there.
I also noticed that light seems to leak on the reflectors. I may have to go back in and paint them black.
I also noticed that light seems to leak on the reflectors. I may have to go back in and paint them black.


Yes stock housings and I had to grind, sand, and polish the plastic lens down.
I went back into them and painted the reflector flat black.
Anyway here they are:

Man I wish I could have got them as clear as the new plastic ones above mine, but I spent about 10 hours sanding and polished them with a die grinder with a polish pad.
Also I need some stock headlight adjusters, I don't know where to get them. I'm using something else, and it works, but I would be nice to have the real thing.
I went back into them and painted the reflector flat black.
Anyway here they are:
Man I wish I could have got them as clear as the new plastic ones above mine, but I spent about 10 hours sanding and polished them with a die grinder with a polish pad.
Also I need some stock headlight adjusters, I don't know where to get them. I'm using something else, and it works, but I would be nice to have the real thing.
Last edited by Aeka GSR; Dec 22, 2010 at 02:48 AM.
Scratch the above offer, I'm gonna try and sell that headlight bucket.
I also tried sanding the stock lens and yes theyre a pita to get them clear, I might go back and re do it. (gave up on the first lens lol).
You should contact Ray Crowe (888-533-3400 ), if anyone can get you discounted oem parts its him.
Below is a chart with part numbers, looks like you will need parts 9-13
I ended up using the stock housing with the aftermarket clear lens, I didn't like the squared pattern the aftermarket had, and I think the stock housing has a better flow.
@got hp: Are you talking to the op or me? I think he had a set for sale a while back, not sure if he still has them. I would be happy to get them done but I still need to get my car painted first and get the lights adjusted properly as they are out of the car and see if I need to adjust something on them.
They really aren't that hard to mod. I just used a heatgun and a flathead to get them open.
Last edited by Sephek; Jan 3, 2011 at 11:26 PM.
The issue with the mini d2s is the output.... obviously I'm biased as we make and sell conversions using the FXR, but I'd like to relay my experiences as I own and have tested nearly all of the of the bi-xenon projectors used for retrofitting.
The projector in the mini-d2s is shorter and smaller... smaller bowl to allow it to bolt in directly without hitting the back of the housing, and shorter to allow it to fit inside most stock headlight housings. Without a doubt it is the easiest projector to retrofit... you literally open up the housing, grind a few notches, slide this thing in, and tighten down a fitting to lock it in. Easy as pie.... 15 minute job with a hand tied behind your back . The problem is with the resulting beam pattern from the short focal distance of the lens and tiny footprint of the mini-d2s reflector bowl.
As you can see in the first photo of the beam against a wall, the beam patterm for the d2s-mini is pretty much completely even (I've got a set of the minis sitting in front of me on the work bench now, and have done a lot of comparison testing with them). Initially you may think that a completely even beam pattern is a good thing (and you'd be right if the lamp was only used to illuminate over a single distance such as a wall), but take that even beam pattern and shine it down the road, and what you are left with is a dim center, little light down the road, and bright sides and foreground.
To end up with a completely even beam pattern in the real world (shining down a road), you've got to proportionately increase the light intensity the further down the road you want to shine it. If the light pattern starts out even on a flat wall, when you add the 3rd dimension (depth) to the equation you end up with decreasing intensity the further down the road you look (exactly the opposite of what we all want). To fix this problem we need to add proprtionately more intensity in the middle of the beam, where it will have to shine further down the road. If the intensity increases towards the center and top of the beam pattern, you can engineer in an evenly lit visual field in three dimensions. That's the huge flaw in the d2s design. Yes its cheap and easy, but there are huge drawbacks that no one has mentioned yet
Food for thought,
Heath
The projector in the mini-d2s is shorter and smaller... smaller bowl to allow it to bolt in directly without hitting the back of the housing, and shorter to allow it to fit inside most stock headlight housings. Without a doubt it is the easiest projector to retrofit... you literally open up the housing, grind a few notches, slide this thing in, and tighten down a fitting to lock it in. Easy as pie.... 15 minute job with a hand tied behind your back
. The problem is with the resulting beam pattern from the short focal distance of the lens and tiny footprint of the mini-d2s reflector bowl. As you can see in the first photo of the beam against a wall, the beam patterm for the d2s-mini is pretty much completely even (I've got a set of the minis sitting in front of me on the work bench now, and have done a lot of comparison testing with them). Initially you may think that a completely even beam pattern is a good thing (and you'd be right if the lamp was only used to illuminate over a single distance such as a wall), but take that even beam pattern and shine it down the road, and what you are left with is a dim center, little light down the road, and bright sides and foreground.
To end up with a completely even beam pattern in the real world (shining down a road), you've got to proportionately increase the light intensity the further down the road you want to shine it. If the light pattern starts out even on a flat wall, when you add the 3rd dimension (depth) to the equation you end up with decreasing intensity the further down the road you look (exactly the opposite of what we all want). To fix this problem we need to add proprtionately more intensity in the middle of the beam, where it will have to shine further down the road. If the intensity increases towards the center and top of the beam pattern, you can engineer in an evenly lit visual field in three dimensions. That's the huge flaw in the d2s design. Yes its cheap and easy, but there are huge drawbacks that no one has mentioned yet
Food for thought,
Heath
Yeah I've noticed it is a bit bright near the front of the car, which will close your eyes down, killing the ability to see further. However distance viewing is better than stock and the Hella lights even with the stated problems.
If I got FX-R's how much cutting is involved? Will my current ballasts and bulbs work?
If I got FX-R's how much cutting is involved? Will my current ballasts and bulbs work?
I'm not sure why the mini doesn't have one yet i'm sure it will change in future production of them. This is what one looks like it blocks the foreground light so your pupils don't close up which lets you see further into the distance.

Last edited by turboIIrotary; Jun 23, 2011 at 10:30 PM.
its got to do with engineering constraints because of the size and shape. but limiting foreground light is not gonna redirect the light out into the distance... the bowl needs to be redesigned to do that, but it would end up with a much larger form factor and no longer be a "drop in" projector, hence the problem with it.