Dim Evo-R headlights

 02-28-13, 12:58 PM
#27
Yes, the fxr 3 inch lense. I thought about other projectors, but I wanted the best bang for my buck especially since I planned to do it only once (that and I wanted to fill the housing up as much as possible). Plus I wanted the sharp cutoff with the pretty color flicker from the projector and I heard that this was the best besides the acura TL projector which is even bigger.

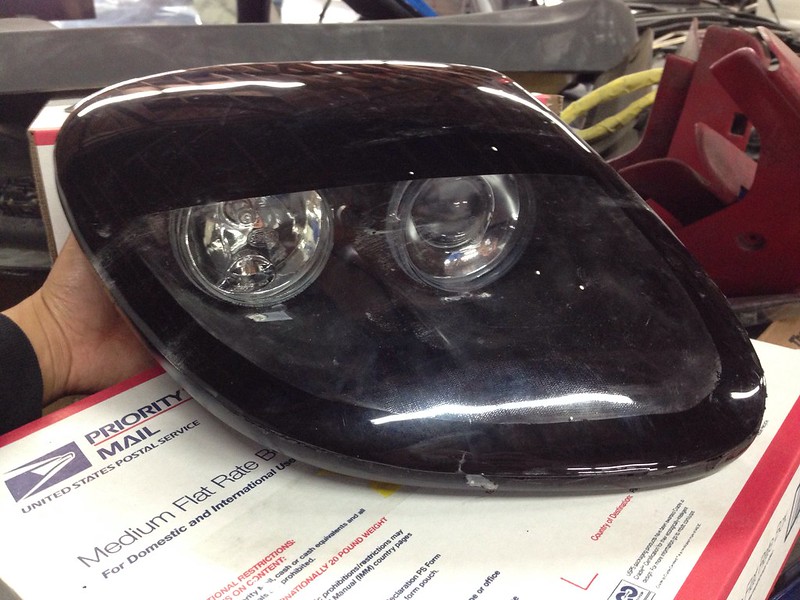
Cutoff of my RX350BX with polished OEM lens.
http://i133.photobucket.com/albums/q...psb04db5f6.jpg
Either way, good work on the retro
02-28-13, 01:11 PM
#28
Best beside TL is probably RX350BX with either polished/STi-R lens, it's smaller than the FXR and nothing beats OEM quality, but that's personal preference
Cutoff of my RX350BX with polished OEM lens.
http://i133.photobucket.com/albums/q...psb04db5f6.jpg
Either way, good work on the retro Did you seal up other open spaces around the E46R shroud?
Cutoff of my RX350BX with polished OEM lens.
http://i133.photobucket.com/albums/q...psb04db5f6.jpg
Either way, good work on the retro
03-01-13, 07:16 AM
#33
Full Member
Thread Starter

Join Date: Dec 2006
Location: Vermont
Posts: 117
Likes: 0
Received 0 Likes
on
0 Posts
Would only one of the bi-halogen units be sufficient? Or perhaps one of the bi-halogen units for low beams and paired with an additional high beam of the less expensive option?
The least expensive and DOT legal option is to go with the Hella 60mm halogen projector units:
Susquehanna MotorSports - Auto Performance Product
They are available in both low and high beams so you would install the low beams on the outside and the highs on the inside. They are projector units that are a world of difference from the less than acceptable EVO-R units. They've also got great cutoff and are only $50 per unit. Put these on and you will love them.
Hella also makes a bi-halogen 60mm unit that is awesome:
Susquehanna MotorSports - Auto Performance Product
This is both low and a high beam unit so you can use the same unit for all beams. FYI, it's illegal to run all four lights at the same time for the low beams, so only two at any one time. You can keep the lows on though when you activate the highs and that works out well. I do this for my setup. I've got the Hella 50mm HID projectors for my lows and the add in the 90mm units for the highs. The lows are so good I almost never need the highs.
Susquehanna MotorSports - Auto Performance Product
They are available in both low and high beams so you would install the low beams on the outside and the highs on the inside. They are projector units that are a world of difference from the less than acceptable EVO-R units. They've also got great cutoff and are only $50 per unit. Put these on and you will love them.
Hella also makes a bi-halogen 60mm unit that is awesome:
Susquehanna MotorSports - Auto Performance Product
This is both low and a high beam unit so you can use the same unit for all beams. FYI, it's illegal to run all four lights at the same time for the low beams, so only two at any one time. You can keep the lows on though when you activate the highs and that works out well. I do this for my setup. I've got the Hella 50mm HID projectors for my lows and the add in the 90mm units for the highs. The lows are so good I almost never need the highs.
03-01-13, 09:03 AM
#34
^ Most certainly yes. If it wasn't for the design and having two lights on each side, you could use just one bi-halogen unit on each side as it would work great for both low and high beams. And, yes, you could use one of the bi-hologen units for the lows paired with an inexpensive high beam option. The bi-halogen unit will be the workhorse with the other high unit contributing mostly for looks.
If you want to go with one single unit like dabigesii did, then consider using this 90mm unit:
Susquehanna MotorSports - Auto Performance Product
In general the larger the diameter of the light, the better the output, if all things are equal regarding quality. So, the 90mm unit would work great as a single source unit and it's reasonably priced at around $150 per light.
Regarding mounting it and then adjusting, Hella makes brackets that you could modify into the housing:
Susquehanna MotorSports - Auto Performance Product
The advantage of using this is it is OEM adjustable with a three-point system.
03-01-13, 11:42 AM
#35
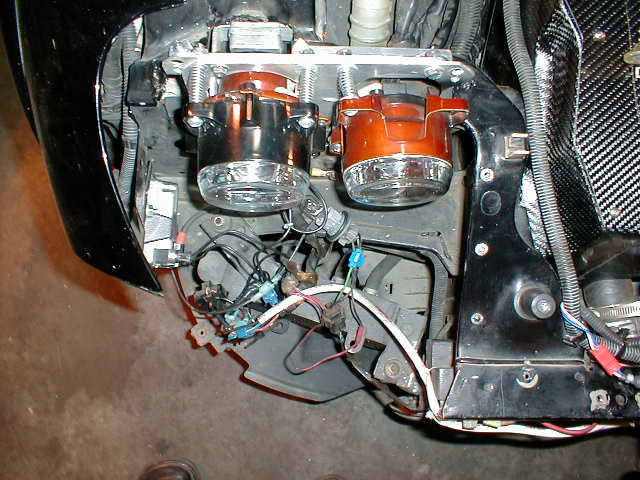
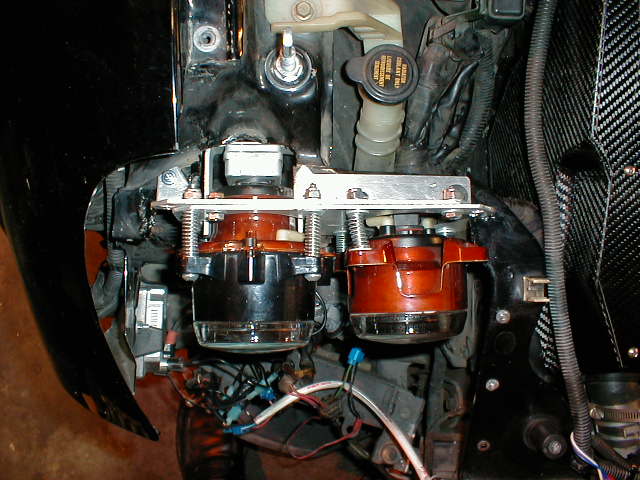
bezel painted black and test fit back on the projector


 03-03-13, 09:06 PM
#39
^ Look at the brackets I posted up that Rally Lights sells. You need a three-way adjustment mechanism to properly align the headlights. Yours is pretty ingenious but won't fully work. I'd bet you could take one of the Hella brackets and use with your lights.
 03-15-13, 02:05 PM
#41
Senior Member
iTrader: (5)

Join Date: Apr 2012
Location: USA
Posts: 278
Likes: 0
Received 0 Likes
on
0 Posts
i just placed an order for
(2) hella 90mm classic projector low beams (h9 bulb)
(2) hella 90mm classic high beams (h9 bulb)
(2) hella mounting brackets
my plans are to fiberglass some metal tabs into the bucket, and use those as a mounting point for the brackets/light housings, i'll repaint the buckets matte black
the only thing i'll need to figure out is the angle/adjustment, and what shrouds to use to make this look all pretty
anybody have some tips on how to get this soft rubber glue off of the bucket + headlight covers? it's pretty annoying to peel by hand and i'm afraid to use anything to scrape it off since i don't want to damage the covers
04-18-13, 09:27 AM
#42
i just placed an order for
(2) hella 90mm classic projector low beams (h9 bulb)
(2) hella 90mm classic high beams (h9 bulb)
(2) hella mounting brackets
my plans are to fiberglass some metal tabs into the bucket, and use those as a mounting point for the brackets/light housings, i'll repaint the buckets matte black
the only thing i'll need to figure out is the angle/adjustment, and what shrouds to use to make this look all pretty
anybody have some tips on how to get this soft rubber glue off of the bucket + headlight covers? it's pretty annoying to peel by hand and i'm afraid to use anything to scrape it off since i don't want to damage the covers
(2) hella 90mm classic projector low beams (h9 bulb)
(2) hella 90mm classic high beams (h9 bulb)
(2) hella mounting brackets
my plans are to fiberglass some metal tabs into the bucket, and use those as a mounting point for the brackets/light housings, i'll repaint the buckets matte black
the only thing i'll need to figure out is the angle/adjustment, and what shrouds to use to make this look all pretty
anybody have some tips on how to get this soft rubber glue off of the bucket + headlight covers? it's pretty annoying to peel by hand and i'm afraid to use anything to scrape it off since i don't want to damage the covers
05-08-13, 09:19 PM
#43
Senior Member
iTrader: (5)
Join Date: Apr 2012
Location: USA
Posts: 278
Likes: 0
Received 0 Likes
on
0 Posts
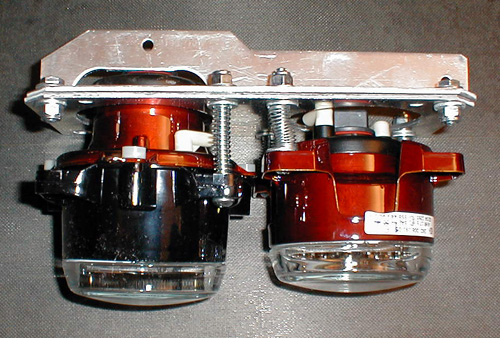
I finally tried to see how I would mount the hella 90mm classic lights in the housings, there is no way these are fitting unless they're directly behind the housing, almost completely outside
05-10-13, 11:22 AM
#45
Senior Member
iTrader: (5)
Join Date: Apr 2012
Location: USA
Posts: 278
Likes: 0
Received 0 Likes
on
0 Posts
after playing with it for a while, i did get them to fit inside 90%, the little brackets are preventing it to go in as far as i want, so i will be shaving parts of the headlight bucket away to make it mount straight instead of clocked

05-18-13, 12:10 PM
#46
Senior Member
iTrader: (5)
Join Date: Apr 2012
Location: USA
Posts: 278
Likes: 0
Received 0 Likes
on
0 Posts
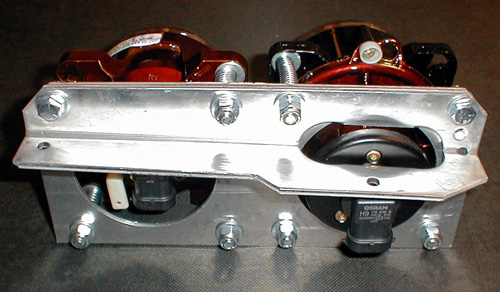
i looked at the rotary extreme kit, which includes the hella 90mm lights, and the only way they installed these required a section of the headlight frame to be cut away, i don't have a problem doing this
does anybody have a rotary extreme sleek headlight kit, that they can pull the metal mounting frame off, and trace it onto a piece of cardboard, and mail it to me, i will pay you for your time, i need both driver and passenger side to be traced
or if you have a set for sale, i would buy those also!!!
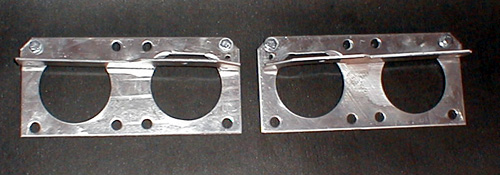
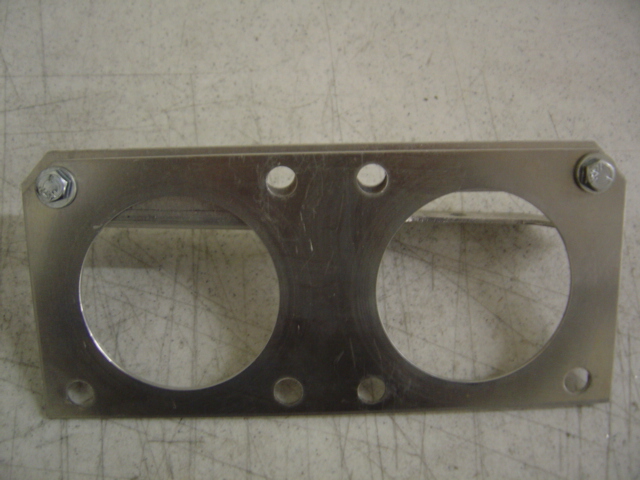
these are the brackets i'm talking about
does anybody have a rotary extreme sleek headlight kit, that they can pull the metal mounting frame off, and trace it onto a piece of cardboard, and mail it to me, i will pay you for your time, i need both driver and passenger side to be traced
or if you have a set for sale, i would buy those also!!!
these are the brackets i'm talking about

Thread
Thread Starter
Forum
Replies
Last Post
renjiv2
3rd Generation Specific (1993-2002)
57
01-25-24 03:34 AM
FC3S Timmy
2nd Generation Specific (1986-1992)
16
10-03-15 01:08 AM