GB: FD Aluminum Passenger Door Handle - SakeBomb Garage


 email must be marking you as spam for some reason


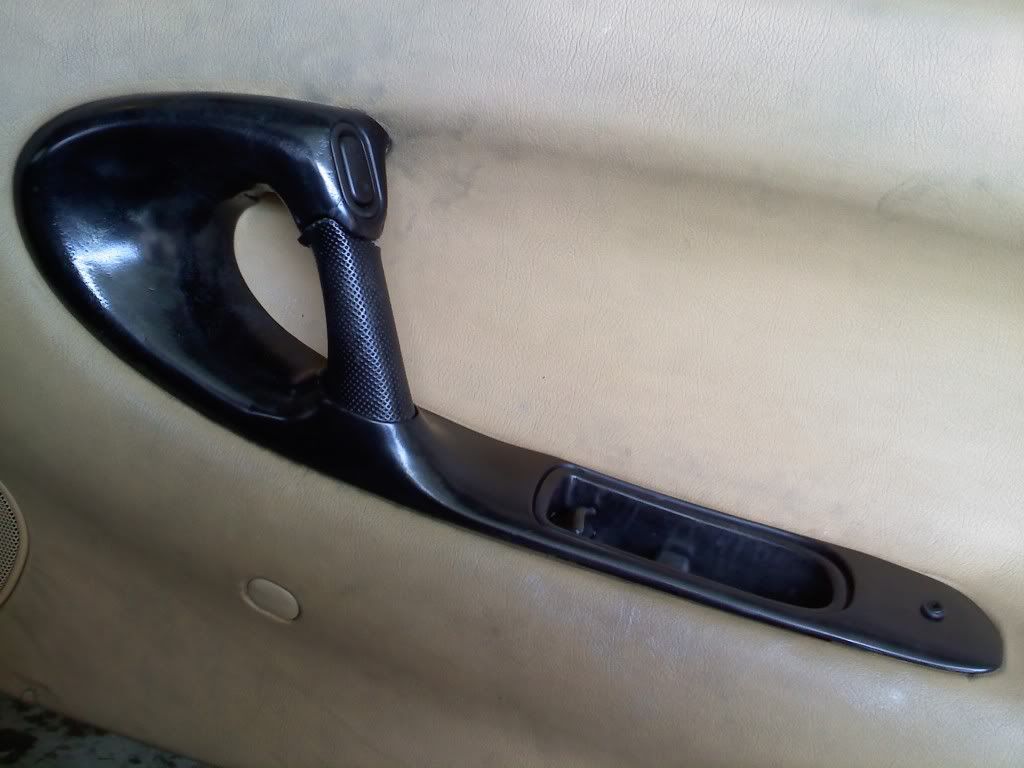
1. Remove plastic handle from car interior plastic (you may have to separate a section of fused plastic as mazda adds a dab of hot plastic to lock the plastic to the handle in... if so use a razor blade to score and then pull the handle away from the plastic to crack it off).
2. Use a razor blade to neatly cut down the length of the handle cover on the back (at the smooth seam).
3. Mask off the top and bottom of the handle (anyplace you dont want to get spray adhesive) as well as the front of the handle cover.
4. Use 3m Super 77 (or similar) spray adhesive to coat the handle and the back of the cover (careful not to use too much).
5. (this step will take a few trys) apply the cover to the handle starting at one side and working around toward the other, so that the seam lines up exactly on the back side. It took us 4 attempts to get it to line up perfect. At that point put some tape around the cover at the top and the bottom leaving the center section open.
6. Use Krazy Glue Gel / Super Glue Gel to fuse the seam at the center (you may want to hold it together for a couple minutes while it drys). Next remove the upper and lower tape, and add more glue at the top and bottom... again hold while it drys. Now your handle is spot glued at three points, run a neat bead down the seam to finish it off and seal it.
7. Slightly enlarge the hole in the metal door handle bracket using a drill bit (I'll look up the size for the install guide).
8. Attach handle to door plastic, and door plastic to panel. Reinstall panel.
The installation guide will be more detailed to show what screws to take out of the door in what order (if you haven't done it before) with pictures of each step, as well as pictures of the process for installing the grip/cover. After you are done your door will look identical to stock, but you'll be able to slam the crap out of it as hard as you want
 . I'm confident you could leave the door open, attach a rope to it, and use it for towing
 <input id="gwProxy" type="hidden"><!--Session data--><input onclick="jsCall();" id="jsProxy" type="hidden">

Hey I received mine today but I think I received the wrong one. I think I got a '94 version of the handle. I ordered a '93. The box says 94 on it and when I looked at handle it has textured black instead of smooth. Can you guys please look into this. Thanks!
I was very happy to see mine when I got home from work. Now, since my handle is intact (it never broke) it's time to replace my broken map lid . This way I can replace both of them while installing some speakers.
. This way I can replace both of them while installing some speakers.
 Thanks!
Does anybody know how to install the 2 small screws on the upper section of the aluminum door handle to the door panel? I tried like 10,000,000 ways and in the end, I ended up not screwing those in, and just screwing in the actually (two) door handle bolts because I dont see how its possible to install those screws, and then also install the upper door handle bolt afterwards because the upper handle bolt is hidden. It works very nice and im happy, but if possible id like to figure out how to install those bolts as well.
The reason why I didnt have this problem when I removed everything, is because the upper door handle bolt was already broken, but now that its install and tight, its physically impossible to install the 2 rear upper door handle bolts without turning into sludge, and creeping inside the door panel with it already installed, and screw them in from the inside of the panel lol. If anybody knows what im talking about, please chime in, thanks!
The reason why I didnt have this problem when I removed everything, is because the upper door handle bolt was already broken, but now that its install and tight, its physically impossible to install the 2 rear upper door handle bolts without turning into sludge, and creeping inside the door panel with it already installed, and screw them in from the inside of the panel lol. If anybody knows what im talking about, please chime in, thanks!
post some pics if you need help
__________________
SAKEBOMB GARAGE LLC
www.SAKEBOMBGARAGE.com
Specialty aftermarket parts & service // Fremont, California
Contact: info@sakebombgarage.com
SAKEBOMB GARAGE LLC
www.SAKEBOMBGARAGE.com
Specialty aftermarket parts & service // Fremont, California
Contact: info@sakebombgarage.com
Ok this is what im talking about... The areas where I circled in red represent the 2 screws I was unable to install, because I cannot figure out how to instal, because once the door handle is tightened down, I cannot move anything around anymore. I tried installing these screw first, but then I was unable to install the upper door handle screw because again nothing moves around anymore.
I ended up installing the upper door handle screw by pulling the plastic panel back far enough too stick a screw driver in there but I know thats wrong. Let me ask a crazy question...Can the Large upper door handle screw be properly accessed by removing the power window switch?
I ended up installing the upper door handle screw by pulling the plastic panel back far enough too stick a screw driver in there but I know thats wrong. Let me ask a crazy question...Can the Large upper door handle screw be properly accessed by removing the power window switch?
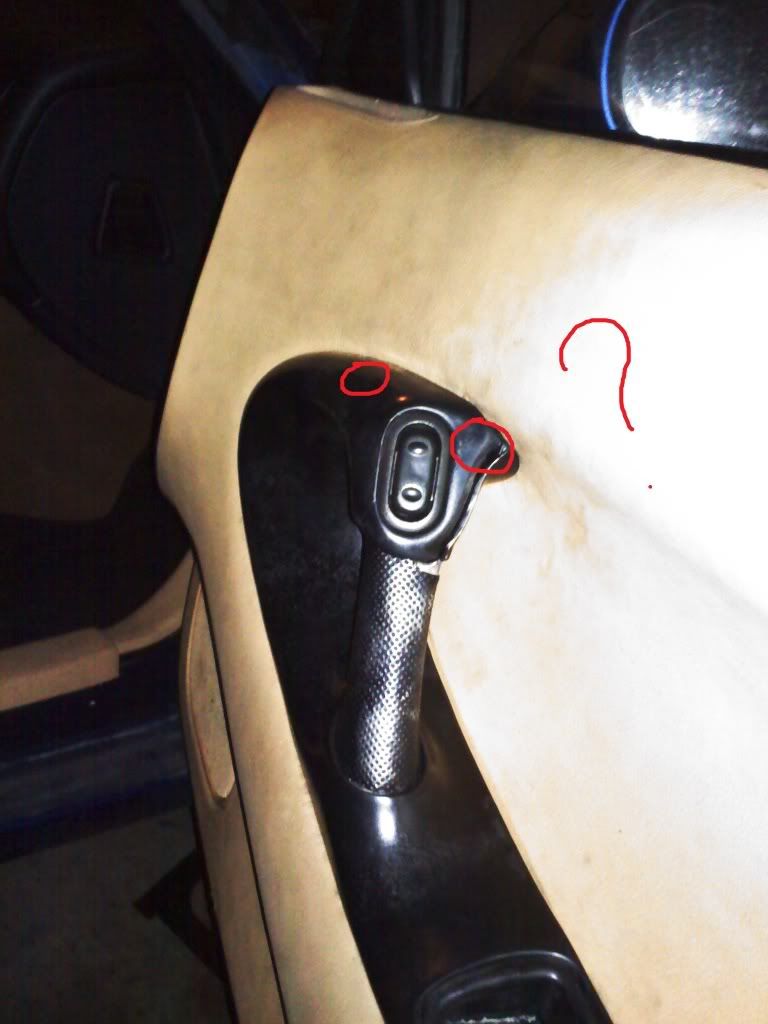
I believe the easiest way is to use a small flat head screw driver, go for the top of the switch and get it behind their and work it out. The switch feels like it�s too big to be pulled out this way but it does fit, it just takes a little work.

Junior Member
Joined: Jan 2011
Posts: 4
Likes: 0
From: Mississauga
I would suggest to all what i plan on doing. i am going to take a sledge hammer and molotov cocktail to my RX7 all because of this website. it is set up so terribly that i am going to destroy my car and set it on fire with me inside
Anyway on a different note, got the aluminum door handle together perfectly, it deosnt look perfect because im an amature in paint, but it is very glossy just some defects in the paint ill take a pic it does look 100% stock, but I tried pulling on it as hard as I could several times just now, and im confident that I will strip out the screws hold the door handle together before the handle itself actually breaks! haha great product guys keep up the good work
Looks stock but doesnt feel stock lol Paint could have beet better looking but I used Duplicolor engine paint about 10 coats. Its dry now but it may take weeks or even months to cure 100% haha