LOG IN
REGISTER
Forums
New Member Section
How to use this Site
Introduce yourself
New Member RX-7 Technical
Website-related Comments, Suggestions and Issues
Vendors Forums
Private Vendor Forums
Vendor Classifieds
Generation Specific
3rd Generation Specific (1993-2002)
2nd Generation Specific (1986-1992)
1st Generation Specific (1979-1985)
Old School and Other Rotary
Tech and Performance
General Rotary Tech Support
Race Car Tech
Single Turbo RX-7's
Rotary Car Performance
V-8 Powered RX-7's
Suspension/Wheels/Tires/Brakes
Engine Management Forum
Interior / Exterior / Audio
Classifieds
The NEW RX7 Marketplace
New/Old Products Review - Non Vendor parts
Regional Forums / Upcoming Events
Rotary Owner Events
NE RX-7 Forum
SE RX-7 Forum
Midwest RX-7 Forum
Mountain RX-7 Forum
South RX-7 Forum
NW RX-7 Forum
West RX-7 Forum
Canadian Forum
European Forum
Australia and New Zealand Forum
Far East Forum
Latin America Forum
General Topics
Racing Kills Lounge
RX-7 Audio/Visual Lounge
Test Area 51
Rotary Archives
Marketplace
Vendor Directory
Become a Vendor
Member Marketplace
Vendor Marketplace
New Posts
Tools
Car Payment Calculator
Tire Rim Calculator
Vin Decoder
Recalls
Technical Service Bulletins (TSBs)
Members List
Live Feed
Gallery
View Dark Mode
Please register or login to enable Dark Mode.
Log In
Register
Threads
Google
Threads
Posts
Advanced
Dark Mode
Please register or login to enable Dark Mode.
Log In
Forgot your Password?
By logging into your account, you agree to our
Terms of Use
and
Privacy Policy
, and to the use of cookies as described therein.
or
Login with Google
Login with Facebook
Recent
Commented
Albums
My Pictures
My Post Pictures
Gen2n3
April 12, 2016
197
0
Sort:
Most Recent
Default
Most Recent
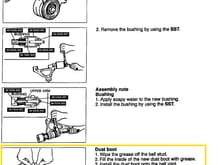
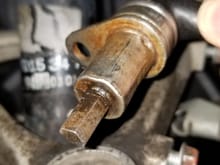
Ball Joint Dust Boot Clip installation procedure.
0
2022/03/13 18:33:33
Gen2n3
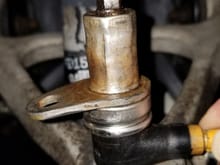
Special Tools required for Ball Joint Dust Boot Clip installation.
0
2022/03/13 18:32:58
Gen2n3
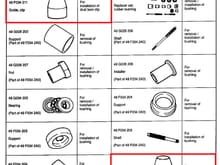
Replaces 3rd photo from Post #xx
0
2022/03/06 18:16:47
Gen2n3
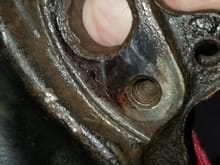
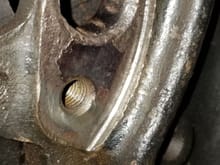
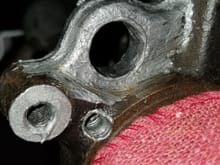
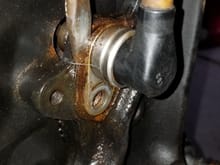
Front Right (Passenger) Side, from behind the steering knuckle. Anti-seize applied to area including the screw holes.
0
2022/03/06 18:05:29
Gen2n3
Front Right (Passenger) Side, looking from wheel hub at dust shield and bore. Nearly the same photo as before but with anti-seize compound applied.
0
2022/03/06 18:05:24
Gen2n3
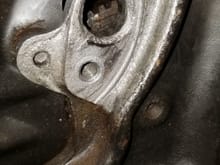
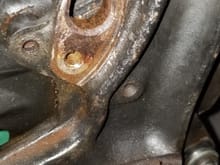
Front Right (Passenger) Side, from behind the steering knuckle. Couldn't get it as clean as the driver side because of poor angles with the dremel tool.
0
2022/03/06 18:04:12
Gen2n3
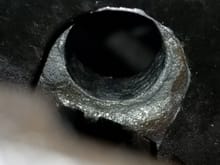
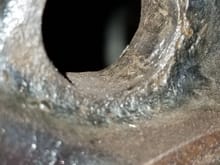
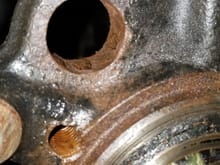
Front Right (Passenger) Side, looking from wheel hub at dust shield and bore. You can clearly see the tines in this bore.
0
2022/03/06 18:02:45
Gen2n3
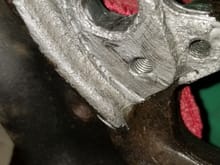
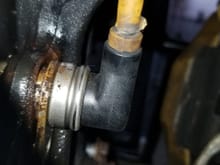
Front Left (Driver) side, from behind the steering knuckle. It looks like an excessive amount and that was after wiping most of it away.
0
2022/03/06 18:00:19
Gen2n3
Front Left (Driver) side, looking from wheel spindle (covered by rag). This is the nickel based anti-seize compound.
0
2022/03/06 18:00:15
Gen2n3
Front Left (Driver) side, from behind the steering knuckle. Cleaned up as much corrosion as possible. There were some tough spots in the corners but I got them!
0
2022/03/06 17:57:56
Gen2n3
Front Left (Driver) Side bore after cleaning with a dremel wire wheel. View is looking from the steering spindle. Rag covers spindle.
0
2022/03/06 17:55:29
Gen2n3
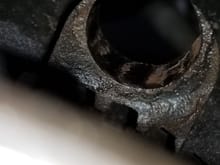
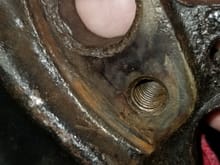
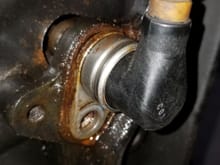
Backside of steering knuckle and ABS Wheel Speed Sensor bore. Corrosion is very evident here! The centering nubs/tines are barely visible.
0
2022/03/05 20:07:00
Gen2n3
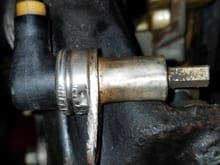
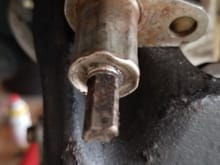
Different angle of front right ABS Speed Sensor housing. The hexagonal deformations are very apparent here.
0
2022/03/05 20:05:56
Gen2n3
Here is the same hexagonal impressions left on the sensor housing as a result of the extraction.
0
2022/03/05 20:04:48
Gen2n3
Screwdriver wedge. Be VERY careful not to pierce the housing! Work with narrow & thin screwdrivers up to wider & thicker ones.
0
2022/03/05 20:03:38
Gen2n3
Better angle at the gap at the top. This is where I inserted a screwdriver to act as a wedge.
0
2022/03/05 20:02:46
Gen2n3
Front Right ABS Wheel Speed Sensor. There is a gap at the top but hard to see.
0
2022/03/05 20:01:45
Gen2n3
I tired to get a better shot of the nubs/tines. Look at all that corrosion!
0
2022/03/05 19:23:27
Gen2n3
You should be able to see the centering nubs.tines through the ABS Wheel Sensor bore. This causes the hexagonal shape on the case when trying to remove it.
0
2022/03/05 19:21:24
Gen2n3
From this angle, you can see bite marks. The gouge came from a screwdriver. It pierced the case.
0
2022/03/05 19:18:25
Gen2n3
You can clearly see the uniform impressions on the metal case.
0
2022/03/05 19:17:00
Gen2n3
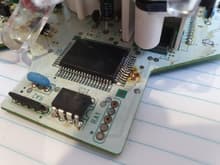
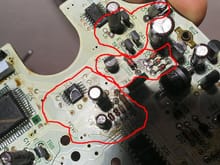
Zoom in on the legs of IC5.
0
2021/12/04 00:07:22
Gen2n3
New Canadian Forces veteran banner.
0
2021/04/14 14:38:09
Gen2n3
Reserve and National Guard Banner additions
0
2020/11/21 12:42:36
Gen2n3
Updated Veteran Banners, effective 20 Nov 2020.
0
2020/11/21 12:35:05
Gen2n3
0
2020/11/16 16:45:36
Gen2n3
0
2020/11/16 16:45:32
Gen2n3
0
2020/09/23 12:51:02
Gen2n3
0
2020/09/23 12:49:43
Gen2n3
0
2020/09/23 12:48:26
Gen2n3
0
2020/06/02 10:07:27
Gen2n3
New Tenure Badges
0
2020/05/13 11:15:43
Gen2n3
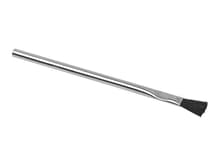
Example of acid brush.
0
2020/05/03 10:59:04
Gen2n3
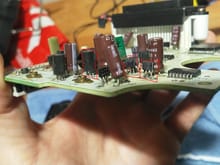
Please take zoom-in photos of these components.
0
2020/05/02 20:46:09
Gen2n3
Clean these areas again with isopropyl alcohol and a soft tooth brush.
0
2020/05/02 20:41:25
Gen2n3
Sample photo.
0
2020/04/29 08:35:47
Gen2n3
Widget C not for sale. Test only.
0
2020/04/29 08:35:07
Gen2n3
This is only a test.
0
2020/04/29 08:33:30
Gen2n3
Widget A (not for sale)
0
2020/04/29 08:32:19
Gen2n3
Test Thingamabobber (Not for sale)
0
2020/04/29 08:25:41
Gen2n3
First
Page
1 of 5
Last
Go To
Page
1
2
3
4
5
1 of 5
Go To
GO
Go to page
of 5
pages
1
2
3
4
5