RX7Club.com - Mazda RX7 Forum
  • LOG IN
  • REGISTER
  • Forums
    • New Member Section
      • How to use this Site
      • Introduce yourself
      • New Member RX-7 Technical
      • Website-related Comments, Suggestions and Issues
    • Vendors Forums
      • Private Vendor Forums
      • Vendor Classifieds
    • Generation Specific
      • 3rd Generation Specific (1993-2002)
      • 2nd Generation Specific (1986-1992)
      • 1st Generation Specific (1979-1985)
      • Old School and Other Rotary
    • Tech and Performance
      • General Rotary Tech Support
      • Race Car Tech
      • Single Turbo RX-7's
      • Rotary Car Performance
      • V-8 Powered RX-7's
      • Suspension/Wheels/Tires/Brakes
      • Engine Management Forum
      • Interior / Exterior / Audio
    • Classifieds
      • The NEW RX7 Marketplace
      • New/Old Products Review - Non Vendor parts
    • Regional Forums / Upcoming Events
      • Rotary Owner Events
      • NE RX-7 Forum
      • SE RX-7 Forum
      • Midwest RX-7 Forum
      • Mountain RX-7 Forum
      • South RX-7 Forum
      • NW RX-7 Forum
      • West RX-7 Forum
      • Canadian Forum
      • European Forum
      • Australia and New Zealand Forum
      • Far East Forum
      • Latin America Forum
    • General Topics
      • Racing Kills Lounge
      • RX-7 Audio/Visual Lounge
      • Test Area 51
    • Rotary Archives
  • Marketplace
    • Vendor Directory
    • Become a Vendor
    • Member Marketplace
    • Vendor Marketplace
  • New Posts
  • Tools
    • Car Payment Calculator
    • Tire Rim Calculator
    • Vin Decoder
    • Recalls
    • Technical Service Bulletins (TSBs)
    • Members List
    • Live Feed
  • Gallery
  • View Dark Mode
    • Please register or login to enable Dark Mode.
  • Log In
  • Register
RX7Club.com - Mazda RX7 Forum
    • Threads
      • Advanced
Dark Mode

Please register or login to enable Dark Mode.

Log In

Forgot your Password?

By logging into your account, you agree to our Terms of Use and Privacy Policy, and to the use of cookies as described therein.
or
 
  • Recent
  • Commented
  • Albums
  • My Pictures

My Post Pictures

Mrmatt3465
May 22, 2015
 626
 2
Sort:
Default
  • Default
  • Most Recent
I got the condenser in! There are obvious discrepancies between the MANA AC package and the Nippondenso. I had to cut off a condenser bracket on the passenger side and the GReddy brackets don't work 100%. But with a little finesse, they work
0 2017/04/02 20:44:33 Mrmatt3465
I used some advice from the GReddy V mount thread and moved the AC lines under the support rail and secured them with adel clamps. Plenty of clearance now. I flipped the "S" pipe for the hose on the right so I can hide the unused nipple for the AST and I plugged it with a hose and bolt.
0 2017/04/02 20:44:44 Mrmatt3465
This part was the most time consuming for sure. My friend brought over his tubing bender and we bent the AC line straight and after several bends, unbends, and re bends, we finally got these things to work. I'm getting a spacer to move the drier inboard about 1/2" for more clearance between the sight glass and the wiring harness. Still have plenty of room with the intercooler mocked up as well.
0 2017/04/02 20:44:53 Mrmatt3465
The GReddy radiator is a beautiful piece.
0 2017/04/02 20:52:24 Mrmatt3465
Got the power steering cooler line in. I need to get some universal hose that's a bit longer to make the loop work. The stock hose is just a bit too short for it.
0 2017/04/02 20:52:30 Mrmatt3465
I deleted the AST by installing an 86 fill neck and plugging the nipple on the front. I plugged the nipple by drilling it out and installing a 1/2" plug. I broke the wire sheath on the low coolant sensor so a new one is on its way in.
0 2017/04/02 20:52:37 Mrmatt3465
Got the condenser mounted. There are obvious differences between the MANA and Nippondenso. I had to cut a bracket off of both the drier and the condenser and I could only use some mounting holes for the brackets. It's still securely mounted, just not using ALL the intended holes.
0 2017/04/02 20:52:44 Mrmatt3465
Using some advice from the install thread, I moved and secured the AC lines under the support beam with adel clamps. Now there is plenty of room for the radiator lines. I also flipped the "S" tube to hide the unused nipple I pluuged with a hose and bolt.
0 2017/04/02 20:52:55 Mrmatt3465
This part took the most time. Using my buddies tubing bender, we straightened, bent, unbent, and rebent this line several times until we got to the finished product. A little sketchy with how soft the metal is. But nonetheless it's good! Just need a spacer to move the drier inboard a bit.
0 2017/04/02 20:53:03 Mrmatt3465
0 2017/04/02 20:58:07 Mrmatt3465
0 2017/04/02 20:58:16 Mrmatt3465
0 2017/04/02 20:58:22 Mrmatt3465
0 2017/04/02 20:58:30 Mrmatt3465
0 2017/04/02 20:58:38 Mrmatt3465
0 2017/04/02 20:58:46 Mrmatt3465
0 2017/04/05 17:12:35 Mrmatt3465
The gaskets for the AWS and AWS tube are NLA from Mazda so I had to cut my own from some gasket materiel.
0 2017/04/05 17:17:15 Mrmatt3465
I had a pretty epic battle with my cat stud.
0 2017/04/05 17:18:18 Mrmatt3465
All blocked off and ready to go!
0 2017/04/05 17:18:22 Mrmatt3465
Finalized the AC drier mounting. Because I scooted it inboard a little bit, I used one of the radiator rubber mount bushings as a spacer between the wall and the bracket. This shimmed it inboard and gave it a little play.
0 2017/04/05 17:18:28 Mrmatt3465
I chose to cut, extend, solder, and shrink my fan harness.
0 2017/04/05 17:18:34 Mrmatt3465
After I finished the extension, I wrapped the harnesses in self fusing silicone tape. Then I used Adel Clamps to route it along the radiator mount.
0 2017/04/05 17:20:24 Mrmatt3465
Nice, clamped, secure, and neat.
0 2017/04/05 17:20:29 Mrmatt3465
0 2017/04/05 17:20:35 Mrmatt3465
My rear stationary gear O ring was definitely leaking. It was square, hard as a rock, and snapped in two removing it.
0 2017/04/05 17:25:48 Mrmatt3465
My rear stationary gear removed. Someone described it as trying to disarm a bomb removing and installing this. I can agree to it.
0 2017/04/05 17:25:54 Mrmatt3465
The V mount ducting is all installed!
0 2017/04/05 17:26:02 Mrmatt3465
Its finally coming together.
0 2017/04/05 17:26:08 Mrmatt3465
Nice shot of the intakes.
0 2017/04/05 17:26:13 Mrmatt3465
0 2017/04/06 09:28:01 Mrmatt3465
0 2017/04/06 09:28:48 Mrmatt3465
Got the stock flywheel resurfaced. I opted to keep the stock flywheel because we installed a lightweight flywheel on my buddy's RX8 and it was a bear to drive that thing. I wanted maximum streetability seeing as this is still my daily.
0 2017/04/08 07:53:39 Mrmatt3465
New rear main seal installed, pilot bearing, pilot bearing seal, and rear stationary gear o ring.
0 2017/04/08 07:53:44 Mrmatt3465
ACT HD SS clutch installed with a Monoloc collar. Engaging that monoloc collar was a BEAST. I don't think I was doing it wrong I think there is just not enough leverage through the tiny access hole to really pop that throwout bearing on there.
0 2017/04/08 07:53:49 Mrmatt3465
I got my gaskets in and completed the install.
0 2017/04/08 07:53:54 Mrmatt3465
Peak a boo
Peak a boo
0 2017/04/08 07:53:58 Mrmatt3465
Pulled a vacuum on the system and converted it to r134a. Was blowing so cold I had to turn it down.
0 2017/04/08 23:13:51 Mrmatt3465
I ran my power wire for my battery relocation through the factory channel. 4AWG is a PERFECT fit.
0 2017/04/08 23:13:56 Mrmatt3465
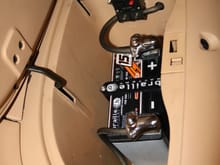
I used the Braille mount and drilled holes in the bottom of the bin. I then went through the chassis and using shim spacers, 2.5-3" bolts, self locking nylon nuts, and bonded sealing washers, I bolted her to the chassis. The circuit breaker is super convenient for disconnecting the battery.
0 2017/04/08 23:14:01 Mrmatt3465
All done!
All done!
0 2017/04/08 23:14:06 Mrmatt3465
First
Page
8 of 16
Last
Go To
Page
  • 1
  • ...
  • 6
  • 7
  • 8
  • 9
  • 10
  • ...
  • 16
8 of 16
Go To GO
Go to page of 16 pages
  • 1
  • ...
  • 6
  • 7
  • 8
  • 9
  • 10
  • ...
  • 16

Top
RX7Club.com - Mazda RX7 Forum
  • Contact Us
  • FAQ
  • Archive
  • Advertising
  • Cookie Policy
  • Privacy Statement
  • Terms of Service
  • Your Privacy Choices
  • Manage Preferences

© 2026 MH Sub I, LLC dba Internet Brands

Follow Us        


When you click on links to various merchants on this site and make a purchase, this can result in this site earning a commission. Affiliate programs and affiliations include, but are not limited to, the eBay Partner Network.