RX7Club.com - Mazda RX7 Forum
  • LOG IN
  • REGISTER
  • Forums
    • New Member Section
      • How to use this Site
      • Introduce yourself
      • New Member RX-7 Technical
      • Website-related Comments, Suggestions and Issues
    • Vendors Forums
      • Private Vendor Forums
      • Vendor Classifieds
    • Generation Specific
      • 3rd Generation Specific (1993-2002)
      • 2nd Generation Specific (1986-1992)
      • 1st Generation Specific (1979-1985)
      • Old School and Other Rotary
    • Tech and Performance
      • General Rotary Tech Support
      • Race Car Tech
      • Single Turbo RX-7's
      • Rotary Car Performance
      • V-8 Powered RX-7's
      • Suspension/Wheels/Tires/Brakes
      • Engine Management Forum
      • Interior / Exterior / Audio
    • Classifieds
      • The NEW RX7 Marketplace
      • New/Old Products Review - Non Vendor parts
    • Regional Forums / Upcoming Events
      • Rotary Owner Events
      • NE RX-7 Forum
      • SE RX-7 Forum
      • Midwest RX-7 Forum
      • Mountain RX-7 Forum
      • South RX-7 Forum
      • NW RX-7 Forum
      • West RX-7 Forum
      • Canadian Forum
      • European Forum
      • Australia and New Zealand Forum
      • Far East Forum
      • Latin America Forum
    • General Topics
      • Racing Kills Lounge
      • RX-7 Audio/Visual Lounge
      • Test Area 51
    • Rotary Archives
  • Marketplace
    • Vendor Directory
    • Become a Vendor
    • Member Marketplace
    • Vendor Marketplace
  • New Posts
  • Tools
    • Car Payment Calculator
    • Tire Rim Calculator
    • Vin Decoder
    • Recalls
    • Technical Service Bulletins (TSBs)
    • Members List
    • Live Feed
  • Gallery
  • View Dark Mode
    • Please register or login to enable Dark Mode.
  • Log In
  • Register
RX7Club.com - Mazda RX7 Forum
    • Threads
      • Advanced
Dark Mode

Please register or login to enable Dark Mode.

Log In

Forgot your Password?

By logging into your account, you agree to our Terms of Use and Privacy Policy, and to the use of cookies as described therein.
or
 
  • Recent
  • Commented
  • Albums
  • My Pictures

My Post Pictures

cluosborne
February 24, 2020
 154
 0
Sort:
Most Recent
  • Default
  • Most Recent
0 2022/12/24 20:52:34 cluosborne
Prototype bracket in PLA.
0 2022/12/24 20:51:49 cluosborne
This is what I had in mind.  The clip on the left serves as a reinforce snap-in and snap-out while the one on the right is simply a hook that holds panel in place at the other end.
This is what I had in mind. The clip on the left serves as a reinforce snap-in and snap-out while the one on the right is simply a hook that holds panel in place at the other end.
0 2022/11/14 12:37:05 cluosborne
0 2022/07/23 17:10:39 cluosborne
0 2022/07/23 17:10:32 cluosborne
0 2022/07/23 17:10:23 cluosborne
The printed custom horn button.  Using an existing Momo empty horn button, Mazda text and a little horn symbol converted from an SVG image.  I suggest double-checking the diameter of the horn button against the original part.  I checked mine with a digital caliper and had to scale it down in Prusa Slicer.
The printed custom horn button. Using an existing Momo empty horn button, Mazda text and a little horn symbol converted from an SVG image. I suggest double-checking the diameter of the horn button against the original part. I checked mine with a digital caliper and had to scale it down in Prusa Slicer.
0 2022/06/16 20:45:33 cluosborne
The horn button fitted in the car.  For the horn button, you'll need to make the back conductive.  I used a layer of aluminum tape and two M6 flat washers taped in place.
The horn button fitted in the car. For the horn button, you'll need to make the back conductive. I used a layer of aluminum tape and two M6 flat washers taped in place.
0 2022/06/16 20:45:29 cluosborne
The bushing on the sun visor.  This is also a good time to wash the fabric while it's out.  Soap, water and scrubbing is also you need.
The bushing on the sun visor. This is also a good time to wash the fabric while it's out. Soap, water and scrubbing is also you need.
0 2022/06/16 20:45:25 cluosborne
The sun visor bushing I made snaps in and out of the clip easily.
0 2022/06/16 20:45:23 cluosborne
You'll need six of them.  I painted mine using some mist coats of black and grey.  It's nowhere near a match for the originals but they don't stick out either.
You'll need six of them. I painted mine using some mist coats of black and grey. It's nowhere near a match for the originals but they don't stick out either.
0 2022/06/16 20:45:14 cluosborne
Believe it or not, I only ended up going through two prototypes.  The third one fit on the screw head perfectly.
Believe it or not, I only ended up going through two prototypes. The third one fit on the screw head perfectly.
0 2022/06/16 20:45:09 cluosborne
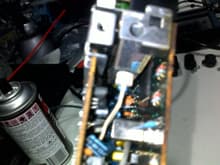
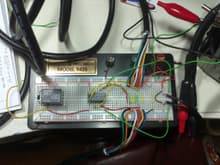
Switched it and here's the hum-free circuit. This is why I used a breadboard to mock things up. Using the same DIN8 cable assemblies from Digikey, the orange wire is audio signal ground and the brown wire is +12V. When either the cassette player or radio is on, either component supplies power to the preamp section and EQ via the DIN8 cable. One more thing, the power antenna is controlled via the on-off push-button volume control, even if a tape is playing. The cassette player will still run whet
0 2020/10/13 09:10:20 cluosborne
0 2020/10/13 09:06:02 cluosborne
0 2020/10/13 09:06:00 cluosborne
0 2020/10/13 09:05:58 cluosborne
0 2020/10/13 09:05:56 cluosborne
0 2020/10/13 09:05:53 cluosborne
0 2020/10/13 09:05:51 cluosborne
0 2020/10/13 09:05:48 cluosborne
0 2020/10/13 09:05:46 cluosborne
0 2020/10/13 09:05:44 cluosborne
0 2020/10/13 09:05:42 cluosborne
0 2020/10/13 09:05:40 cluosborne
0 2020/10/13 09:05:38 cluosborne
0 2020/10/13 09:05:36 cluosborne
0 2020/10/13 09:05:33 cluosborne
0 2020/10/13 09:05:31 cluosborne
0 2020/10/13 09:05:29 cluosborne
0 2020/10/13 09:05:26 cluosborne
0 2020/10/13 09:05:24 cluosborne
0 2020/10/13 09:05:22 cluosborne
0 2020/10/13 09:05:19 cluosborne
0 2020/10/13 09:05:16 cluosborne
0 2020/10/13 09:05:14 cluosborne
Tape mechanism from full-logic deck showing belt routing.
0 2020/10/13 09:05:12 cluosborne
0 2020/10/13 09:05:10 cluosborne
0 2020/10/13 09:05:08 cluosborne
Aux-in breadboard
Aux-in breadboard
0 2020/10/13 09:05:05 cluosborne
0 2020/10/13 09:05:03 cluosborne
First
Page
3 of 4
Last
Go To
Page
  • 1
  • 2
  • 3
  • 4
3 of 4
Go To GO
Go to page of 4 pages
  • 1
  • 2
  • 3
  • 4

Top
RX7Club.com - Mazda RX7 Forum
  • Contact Us
  • FAQ
  • Archive
  • Advertising
  • Cookie Policy
  • Privacy Statement
  • Terms of Service
  • Your Privacy Choices
  • Manage Preferences

© 2026 MH Sub I, LLC dba Internet Brands

Follow Us        


When you click on links to various merchants on this site and make a purchase, this can result in this site earning a commission. Affiliate programs and affiliations include, but are not limited to, the eBay Partner Network.