
RANT: Damn fuel pump screws

Thread Starter
Joined: Feb 2001
Posts: 29,798
Likes: 128
From: London, Ontario, Canada
I sometimes look at the 2nd gen, and think to myself "for all this engineering, those damned Mazda people messed up on the simplest things". My latest annoyance are the scews that hold the fuel pump assembly onto the tank. For those that don't know, there are 8 (6?) phillips screws that hold the pump flange to the top of the tank. The problem is that after a few years, the scews become permanently attached to the top of the flange by rust. Worse still, the screw heads corrode to the point that it is unlikely a screw driver will be effective! Son of a ! So I've been soaking everything in WD40 for the past few days, and hopefully will be able to remove those screws with Easy Outs to avoid having to drill the heads off....But I doubt it. 

Lives on the Forum
Joined: Feb 2001
Posts: 26,664
Likes: 22
From: n
Sears Craftsman just came out with a screw extractor MADE to remove fasteners just like this.  I recommended this to someone who had the exact same problem, and they said it worked great.  The set goes for $20 - "cheap" insurance for problems like this.  The hardest part is replacing the old screws!
Sears Craftsman part number:  52154
http://www.sears.com/craftsman
-Ted
Sears Craftsman part number:  52154
http://www.sears.com/craftsman
-Ted
Last edited by RETed; May 12, 2002 at 04:36 AM.

 mmm west coast cars
Trending Topics
Senior Member
Joined: Mar 2001
Posts: 287
Likes: 0
From: Marion, AR 72364
Having removed thousands of boogered Phillips screws on aircraft I have long used a diagonal wire cutter plier to remove them. As long as there is enough screw head to grip (hold the pliers vertically, clamp down on each side of the screw head) you can quite easily break them loose.
The Sears tool seems like a good investment. I will purchase one myself ASAP. The dykes will work in a pinch though.
The Sears tool seems like a good investment. I will purchase one myself ASAP. The dykes will work in a pinch though.


Lives on the Forum
Joined: Feb 2001
Posts: 26,664
Likes: 22
From: n
Originally posted by ka8legend
Ted I think you mean part # 52154.
Ted I think you mean part # 52154.
I've edited my original post and change the numbers to the correct one.  Thanx!
-Ted
Thread Starter
Joined: Feb 2001
Posts: 29,798
Likes: 128
From: London, Ontario, Canada
Don't think pliers will do it...The original heads are too compromised by rust and may just crush. I'll give the heads a few wacks with a chisel, then try those Sears screw removers...
Originally posted by Aaron Cake
Don't think pliers will do it...The original heads are too compromised by rust and may just crush. I'll give the heads a few wacks with a chisel, then try those Sears screw removers...
Don't think pliers will do it...The original heads are too compromised by rust and may just crush. I'll give the heads a few wacks with a chisel, then try those Sears screw removers...

Refined Valley Dude
Joined: Oct 2001
Posts: 2,283
Likes: 2
From: Kitchener, Ontario (Hamilton's armpit)
And here's another 7 owner with the same prob. My level sending unit is toast, but I haven't been able to get it out of the tank cuz the screws are bitched. 
I guess everyone here has a problem with the fuel level sender with these cars! I mean It didn't leave the factory that way. I guess they lose their accuracy after a while.
Thread Starter
Joined: Feb 2001
Posts: 29,798
Likes: 128
From: London, Ontario, Canada
Yep, I got the screws out. I soaked with WD40 and then used a wire brush and knife blade to clean the heads of the screws. I then found a large Phillips screw driver, set it on each head then gave it a few good wacks with a hammer. I then found it possible to remove all but three screws. The remaining three came out with a little more trouble. Two were removed with the damaged screw removers (go VERY SLOWLY and put A LOT of pressure on the drill), the third was drilled out. I then removed the pump, and using a set of vice grips, grabbed the shaft of the remaining one and was able to twist it out.
The new screws I installed were made of stainless, and covered with anti-seize.
Have fun.
The new screws I installed were made of stainless, and covered with anti-seize.
Have fun.
Refined Valley Dude
Joined: Oct 2001
Posts: 2,283
Likes: 2
From: Kitchener, Ontario (Hamilton's armpit)
I've been avoiding whacking the heads off of the screws cuz I wasn't sure if I'd be able to get the shafts out... So enough of the shaft sticks up? Good. Did you drain your tank b4 doing this? When I go after it I don't want debris falling into the gas...
Rotary Enthusiast
Joined: May 2001
Posts: 903
Likes: 1
From: Conyngham, PA
I can't believe this was worthy of a thread! LOL! A quality pair of Vice-Grips is all I've ever needed. Even in the scrap yards when it looks hopeless:
A shot of PB-Blaster and 10 seconds with the Vice-Grips.
I guess I've been living in the snow for too long.
A shot of PB-Blaster and 10 seconds with the Vice-Grips.
I guess I've been living in the snow for too long.
Round&Round not Up&Down
Joined: Aug 2001
Posts: 2,805
Likes: 0
From: West Bloomfield, MI
I have had the screws on my AE soaking on PB Blaster for well over a month now, I can't even tell what the heads of the screws look like. I've got a big phillips and whacked it a few times with a hammer, and got nothing. I wasn't sure how to get the remaining shafts out if I broke the heads off, so I quit beating on it and drenched it with some more PB Blaster.
This looks brand new compared to mine:
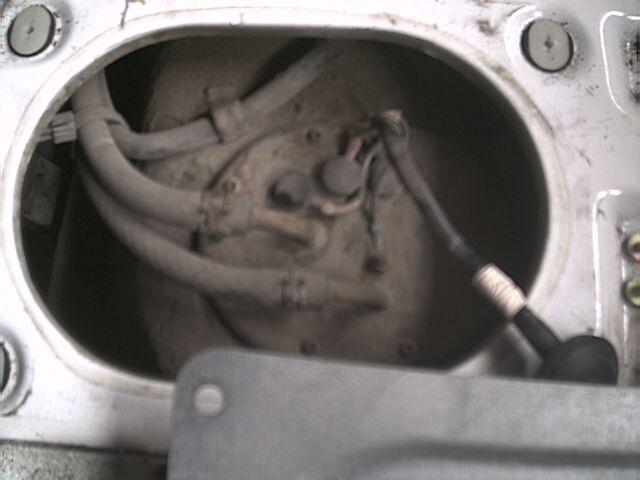
I guess I'll get the wire wheel out, grind away some of the **** and see what I've got under there...
I recently went to Sears and got this:

It's an impact driver, each hammer blow develops 200 ft. lb. of torque.
This might do the job...I guess we shall see.
This looks brand new compared to mine:
I guess I'll get the wire wheel out, grind away some of the **** and see what I've got under there...
I recently went to Sears and got this:
It's an impact driver, each hammer blow develops 200 ft. lb. of torque.
This might do the job...I guess we shall see.
Round&Round not Up&Down
Joined: Aug 2001
Posts: 2,805
Likes: 0
From: West Bloomfield, MI
Originally posted by Icemark
Don't know if I want to be hitting a hammer near a gas tank
Don't know if I want to be hitting a hammer near a gas tank
If the hammering doesn' t work, I'll drain & drop the tank and take the grinder to it.