
My New Engine Rebuild/Porting Thread with Piccys, 56 k warning


Thread Starter
Full Member
Joined: Oct 2005
Posts: 157
Likes: 0
From: England
My New Engine Rebuild/Porting Thread with Piccys, 56 k warning
I�m stuck in Cyprus on holiday visiting the parents at the moment so things have gone hold with my project. So I thought I would do the write up. I haven�t taken as many photos as I would have liked but it�s difficult to stop what you are doing with dirty hands and start taking photos.
The car has had its current engine for over 2 years now, I rebuilt it when I bought the car as it had water seal failure. I rebuilt it using the existing housings and series 4 rotors. I initially had a TD08 turbo on it but soon changed it to a GT35/40 which is much better. I gave it a mild street port and sorted a few other things as the car was completely stock when I bought it. I fitted a large intercooler, electric power steering, water injection, fuel swirl pot bigger injectors and grafted an FD upper inlet manifold on with a Greddy Elbow. It had 350 rwbhp at 1 bar but was mapped to 385 at 1.2 bar but I have never run it at more than 1 bar as I wanted it to last.
The engine has done 6000 miles of abuse without fault, shame I can�t say the same for the gearbox and clutch. Here it is at the moment


As usual I wanted a little more power so I started to look for alternatives. I seriously considered doing a V8 conversion but the money and a whole new learning curve put me off. I also considered going for a 13b RE engine from a Cosmo as people have been getting good results. I only use the car on the street and track days so decided that 400 hp at the wheels at 1 bar was my goal but with more revs to play with. My existing turbo has a smallish 0.96 exhaust housing so power tops out at about 7k rpm. I wanted to keep power until 8 k rpm.
So my goal was on 50 hp, 1k extra rpm, the same little lag and the same 330 rwftlbs. As I only did a little porting to the original engine which also has series 4 low comp rotors I felt that I could still achieve my goal with a turbo II block.
I purchased a good TII block with excellent condition housing and rotors. It had chipped a seal but hadn�t done any damage to the rotors or housings, it had been dismantled but had been rebuilt recently before it failed so I ended up with a box of bits.
To help with the higher revs I decided to use an FD eccentric shaft, stationary gears and bearings which have better oil ways although I have had mixed opinions about any differences in the E shaft. I also wanted higher oil pressure so got a set of FD oil pressure regulators. These all came from a 1996 car.
Once I had all the bits I began porting��
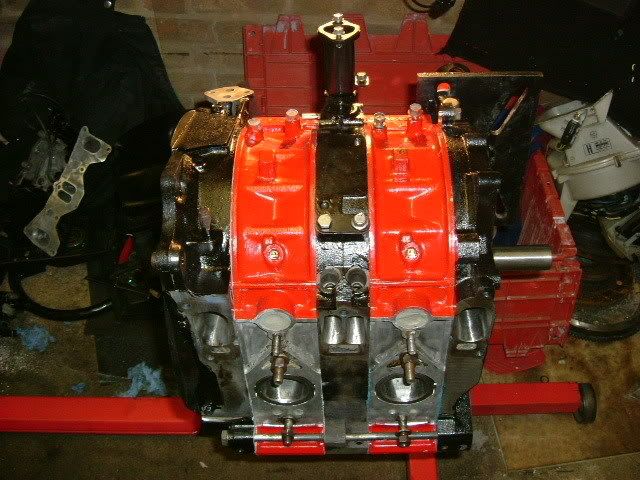
The rotor housings were first, I used a die grinder to enlarge the ports a much as I could retaining the sleeve, due to the size of the sleeve there is only a fairly small amount you can remove from the housing without creating a step between the larger ports in the housing and the smaller opening in the sleeve�.. So�� I heated the sleeve until red hot and pliable and then splayed the end to open it and shaped it to match my new much larger exhaust port thus not creating a step but enlarging the port as much as I dare.


The car has had its current engine for over 2 years now, I rebuilt it when I bought the car as it had water seal failure. I rebuilt it using the existing housings and series 4 rotors. I initially had a TD08 turbo on it but soon changed it to a GT35/40 which is much better. I gave it a mild street port and sorted a few other things as the car was completely stock when I bought it. I fitted a large intercooler, electric power steering, water injection, fuel swirl pot bigger injectors and grafted an FD upper inlet manifold on with a Greddy Elbow. It had 350 rwbhp at 1 bar but was mapped to 385 at 1.2 bar but I have never run it at more than 1 bar as I wanted it to last.
The engine has done 6000 miles of abuse without fault, shame I can�t say the same for the gearbox and clutch. Here it is at the moment
As usual I wanted a little more power so I started to look for alternatives. I seriously considered doing a V8 conversion but the money and a whole new learning curve put me off. I also considered going for a 13b RE engine from a Cosmo as people have been getting good results. I only use the car on the street and track days so decided that 400 hp at the wheels at 1 bar was my goal but with more revs to play with. My existing turbo has a smallish 0.96 exhaust housing so power tops out at about 7k rpm. I wanted to keep power until 8 k rpm.
So my goal was on 50 hp, 1k extra rpm, the same little lag and the same 330 rwftlbs. As I only did a little porting to the original engine which also has series 4 low comp rotors I felt that I could still achieve my goal with a turbo II block.
I purchased a good TII block with excellent condition housing and rotors. It had chipped a seal but hadn�t done any damage to the rotors or housings, it had been dismantled but had been rebuilt recently before it failed so I ended up with a box of bits.
To help with the higher revs I decided to use an FD eccentric shaft, stationary gears and bearings which have better oil ways although I have had mixed opinions about any differences in the E shaft. I also wanted higher oil pressure so got a set of FD oil pressure regulators. These all came from a 1996 car.
Once I had all the bits I began porting��
The rotor housings were first, I used a die grinder to enlarge the ports a much as I could retaining the sleeve, due to the size of the sleeve there is only a fairly small amount you can remove from the housing without creating a step between the larger ports in the housing and the smaller opening in the sleeve�.. So�� I heated the sleeve until red hot and pliable and then splayed the end to open it and shaped it to match my new much larger exhaust port thus not creating a step but enlarging the port as much as I dare.
Last edited by antnicuk; Apr 26, 2007 at 12:08 PM.
Thread Starter
Full Member
Joined: Oct 2005
Posts: 157
Likes: 0
From: England
I also filled all the holes that I didn�t need with chemical metal. Then I went on to port the plates, I had seriously considered doing a half bridge but felt that I could reach my desired power by just street porting but it would have to be BIG. I have spent a lot of time and effort making the car civilised so the last thing I wanted was to do make a new engine that was lumpy.
I did the secondaries as big as I dare but also made the runner into the port much much bigger, TII are the smaller runners of the 13b 13bRE and 13bREW so I had a lot of work to do to get them anywhere near as big as needed. The port bowl is already quite deep on the turbo II but I still had a long way to go, I used a die grinder to remove the meat and then a dremmel tool to finish off.


To take the higher rpm and the power I decided to clearance the rotors. Some of the FD rotors are clearenced as standard but apart from that TII rotors and FD rotors are the same. It was a quick job on my cousins milling machine. I removed a very small amount from the tips of the rotors at a slight angle so more was taken off the tip of the rotor going to nothing just past the corner seal hole. You can�t really see it in the pictures but the light bit is machined.


I did the secondaries as big as I dare but also made the runner into the port much much bigger, TII are the smaller runners of the 13b 13bRE and 13bREW so I had a lot of work to do to get them anywhere near as big as needed. The port bowl is already quite deep on the turbo II but I still had a long way to go, I used a die grinder to remove the meat and then a dremmel tool to finish off.
To take the higher rpm and the power I decided to clearance the rotors. Some of the FD rotors are clearenced as standard but apart from that TII rotors and FD rotors are the same. It was a quick job on my cousins milling machine. I removed a very small amount from the tips of the rotors at a slight angle so more was taken off the tip of the rotor going to nothing just past the corner seal hole. You can�t really see it in the pictures but the light bit is machined.
Thread Starter
Full Member
Joined: Oct 2005
Posts: 157
Likes: 0
From: England
Once all the porting was complete I cleaned everything thoroughly using diesel and various other potent chemicals like carb cleaner. Everything was checked for various tolerances and clearances again to double check.
My experience from recent events made me realise that I need a sump baffle which after some persuasion I decided to make myself (thanks Mike) as I had it make it I thought I would copy Kev York�s idea of a sump plate that would add some strength to the block to help prevent twisting as an alternative to doweling. I wouldn�t have bothered except that I was making the baffle plate anyway so it had two purposes. I cut this out of 6mm plate and made the holes as per the racing beat picture.

As you can see it looks like I chewed the holes out with my teeth but I tried with a jig saw and the blades wouldn�t touch it, I didn�t want to use oxy acetylene as heat will warp the plate so I drilled holes and made the rest of the hole with a small grinder. Not the neatest but it was done in my garage with the tools I have.
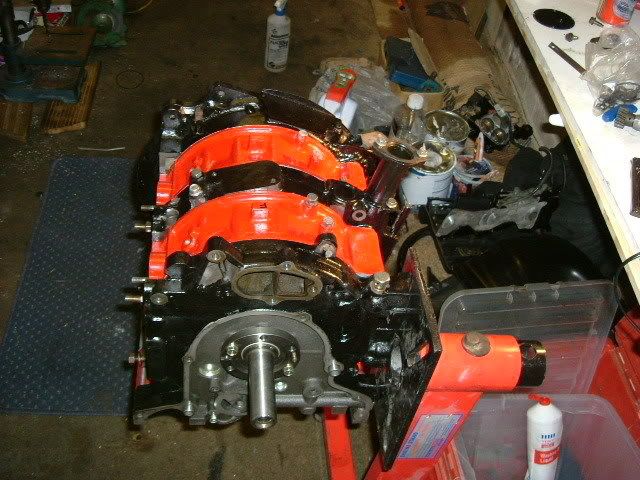
I then painted all the housings and started the build as per Bruce Turrentines video. I used new Mazda tips, springs, corner seals, O rings and gaskets. I have always used Mazda Stuff and found it the best.


My experience from recent events made me realise that I need a sump baffle which after some persuasion I decided to make myself (thanks Mike) as I had it make it I thought I would copy Kev York�s idea of a sump plate that would add some strength to the block to help prevent twisting as an alternative to doweling. I wouldn�t have bothered except that I was making the baffle plate anyway so it had two purposes. I cut this out of 6mm plate and made the holes as per the racing beat picture.
As you can see it looks like I chewed the holes out with my teeth but I tried with a jig saw and the blades wouldn�t touch it, I didn�t want to use oxy acetylene as heat will warp the plate so I drilled holes and made the rest of the hole with a small grinder. Not the neatest but it was done in my garage with the tools I have.
I then painted all the housings and started the build as per Bruce Turrentines video. I used new Mazda tips, springs, corner seals, O rings and gaskets. I have always used Mazda Stuff and found it the best.
Thread Starter
Full Member
Joined: Oct 2005
Posts: 157
Likes: 0
From: England
I also matched the lower inlet manifold to the new ports and enlarged the runners as much as possible. I did port the primaries but I forgot to take pictures. Again the runners in the centre plate were enlarged as much as I could.

The Turbo II blocks are known to have a weak spot on the rear plate just by the oil filter which is the top dowel. There is less metal around the dowel which means it cracks under high power and boost applications. I decided to address this so I made a piece of plate that was shaped to fit around the dowel point just in front of the oil filter pedestal and welded it on all the way round to stop it cracking�����. Hopefully. Sorry but I forgot to take any pictures of this.
I then had to wait for some parts so after the North Weald Activity day last week I decided to pull my old engine


Once the old one was out I started to remove, clean and refit the parts that were being reused on the new engine:
Light weight flywheel
Fuel rails and injectors
FD Upper inlet manifold (although I will be trying an FC UIM to see any differences)
Turbo
Manifold
Waste gate
To flow more I purchased a bigger exhaust housing for the turbo, the new one is a 1.15.


The Turbo II blocks are known to have a weak spot on the rear plate just by the oil filter which is the top dowel. There is less metal around the dowel which means it cracks under high power and boost applications. I decided to address this so I made a piece of plate that was shaped to fit around the dowel point just in front of the oil filter pedestal and welded it on all the way round to stop it cracking�����. Hopefully. Sorry but I forgot to take any pictures of this.
I then had to wait for some parts so after the North Weald Activity day last week I decided to pull my old engine
Once the old one was out I started to remove, clean and refit the parts that were being reused on the new engine:
Light weight flywheel
Fuel rails and injectors
FD Upper inlet manifold (although I will be trying an FC UIM to see any differences)
Turbo
Manifold
Waste gate
To flow more I purchased a bigger exhaust housing for the turbo, the new one is a 1.15.
Thread Starter
Full Member
Joined: Oct 2005
Posts: 157
Likes: 0
From: England
I also decided to fabricate a new down pipe and go for a 3.5 inch instead of the current 3 inch. So the new exhaust will be 3.5 straight through to the rear axel where it splits to two 3 inch rear silencers.
The fuelling system is a Bosch 044 from a swirl pot and 1680 secondary injectors which are more than capable for the power I want. The inlet is all 3 inch and the intercooler is huge. With the w/I the air temps are great. A few people have asked for pictures of the set up as it�s a little unusual so here they are.


The oil cooler bolts to the round bar above the intercooler and the rad is then not blocked by a FMIC. Water temps are great even on the track in 33 degree heat. That�s using the stock rad and fan.
I then continued the build, as I was using an FD E shaft I needed FD Needle bearings and front counter weight. The front cover went on and the water pump, I then decided to attack the wiring loom and remove as much unwanted stuff as possible.
The stock loom looked like this

I thinned it down and removed all the plugs a didn�t need as I�m using an apexi ECU, this is what I removed

This is it after I taped it all up and fitted it. Only 10 plugs now, that�s all that�s need to make it run.

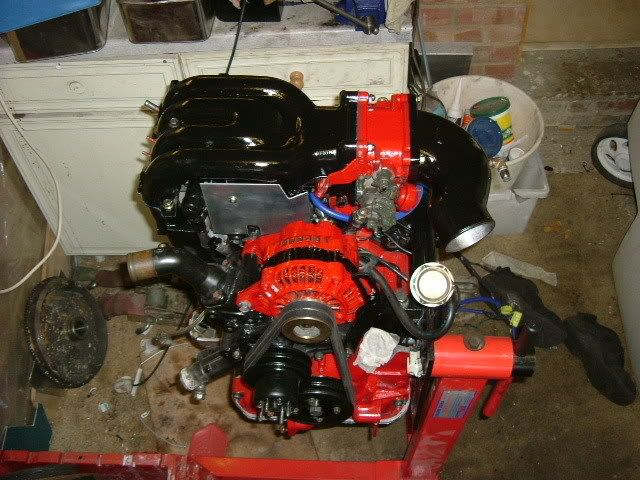
Then the upper inlet manifold went on and the engine is currently sitting there complete waiting for my counter weight for the lightweight flywheel as it�s different to my old engine as the rotors are a different weight.
This is how things stand at the moment. Once my pipe work for the exhaust arrives and my counter weight I will weld a v band to the exhaust housing, fit the turbo, fit the flywheel and drop the engine in. I will then fab the down pipe and mid section.
All that I will need then is to be run in and remapped��� Fingers crossed
The fuelling system is a Bosch 044 from a swirl pot and 1680 secondary injectors which are more than capable for the power I want. The inlet is all 3 inch and the intercooler is huge. With the w/I the air temps are great. A few people have asked for pictures of the set up as it�s a little unusual so here they are.
The oil cooler bolts to the round bar above the intercooler and the rad is then not blocked by a FMIC. Water temps are great even on the track in 33 degree heat. That�s using the stock rad and fan.
I then continued the build, as I was using an FD E shaft I needed FD Needle bearings and front counter weight. The front cover went on and the water pump, I then decided to attack the wiring loom and remove as much unwanted stuff as possible.
The stock loom looked like this
I thinned it down and removed all the plugs a didn�t need as I�m using an apexi ECU, this is what I removed
This is it after I taped it all up and fitted it. Only 10 plugs now, that�s all that�s need to make it run.
Then the upper inlet manifold went on and the engine is currently sitting there complete waiting for my counter weight for the lightweight flywheel as it�s different to my old engine as the rotors are a different weight.
This is how things stand at the moment. Once my pipe work for the exhaust arrives and my counter weight I will weld a v band to the exhaust housing, fit the turbo, fit the flywheel and drop the engine in. I will then fab the down pipe and mid section.
All that I will need then is to be run in and remapped��� Fingers crossed


Thread Starter
Full Member
Joined: Oct 2005
Posts: 157
Likes: 0
From: England
It is currently as per the last picture, when i get back to England from Cyprus i really hope my counter weight and pipe work has arrived, i can then fit the engine and make a new downpipe. I dont have any videos yet but i will take some when its running. I am waiting for someone to send me a video from an event i did last week with the old engine where i was practising drifting. If i get i will post it on here
Trending Topics


Got overlap! Going to be a completely different car with the new setup...

very nice car dude  i like the electric power steering you have how did you get that to work? i got a manual rack on but already have the the regular ps waiting to be put on but i always wondered about an electric seeing how the rx8 have them.
i like the electric power steering you have how did you get that to work? i got a manual rack on but already have the the regular ps waiting to be put on but i always wondered about an electric seeing how the rx8 have them.

Thread Starter
Full Member
Joined: Oct 2005
Posts: 157
Likes: 0
From: England
Hi,
i suppose i should update, i did 500 miles and then to it to the dyno for some tuning, there are some other threads with the graph on as i seem to be encoutering some kind of restriction somewhere.
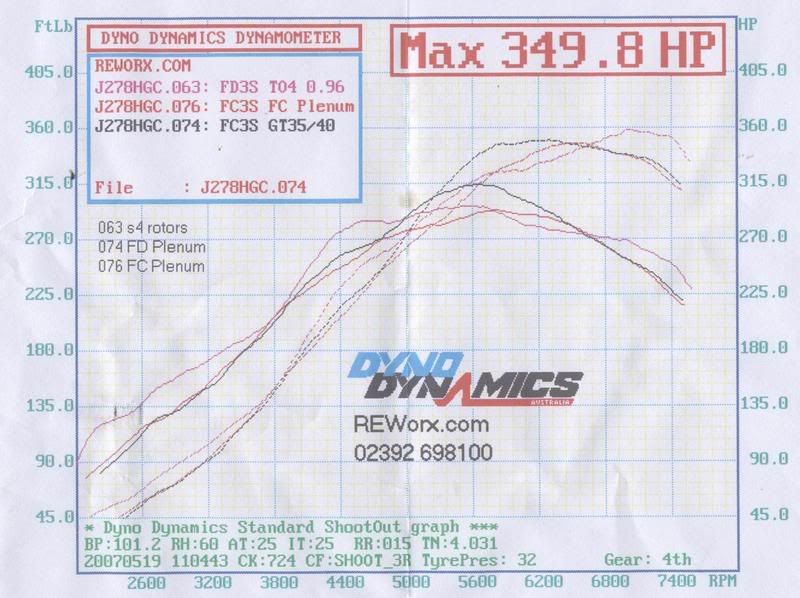
With the new engine (much bigger porting) bigger exhaust housing and larger exhaust i only made a little more power, although much earlier. At 5500 i am making 350 rwhp, but then the power goes flat. The boost hold strong at 1 bar all the way to 7500 rpm but power is dropping off before then. The only thing that hasnt changed is the intercooler which is an xs power 4 inch thick one. The guys at the dyno did a car while mine was there that removed the same intercooler and fitted a greddy one and made an extra 40 rwhp more just through the i/c swap.
It sem that i get to the 350 at 1 bar and it dont want to make anymore but everything is pointing towards it being strong. Comp test was good.
I am very happy with the new set up as its a lot more responsive with the normal compression rotors compared to the old low comp ones i had before.
I am going to the Nurburg ring on friday for 4 days and when i come back i will have another look as it will definately be run in by then and i will play with swapping the i/c around.
Black run is the new engine and the pink one is with the old engine but at slightly more boost
i suppose i should update, i did 500 miles and then to it to the dyno for some tuning, there are some other threads with the graph on as i seem to be encoutering some kind of restriction somewhere.
With the new engine (much bigger porting) bigger exhaust housing and larger exhaust i only made a little more power, although much earlier. At 5500 i am making 350 rwhp, but then the power goes flat. The boost hold strong at 1 bar all the way to 7500 rpm but power is dropping off before then. The only thing that hasnt changed is the intercooler which is an xs power 4 inch thick one. The guys at the dyno did a car while mine was there that removed the same intercooler and fitted a greddy one and made an extra 40 rwhp more just through the i/c swap.
It sem that i get to the 350 at 1 bar and it dont want to make anymore but everything is pointing towards it being strong. Comp test was good.
I am very happy with the new set up as its a lot more responsive with the normal compression rotors compared to the old low comp ones i had before.
I am going to the Nurburg ring on friday for 4 days and when i come back i will have another look as it will definately be run in by then and i will play with swapping the i/c around.
Black run is the new engine and the pink one is with the old engine but at slightly more boost
Last edited by antnicuk; Jun 11, 2007 at 10:35 AM.

Full Member
Joined: Feb 2007
Posts: 69
Likes: 0
From: Nova
Nice build - what AFR is it pulling or did you check that during the dyno pull?
The intercooler COULD be an issue in the dyno itself if the dyno is not in a cell. With your IC setup it relies on the aerodynamics of the car as well as it's placement...if there isnt much airflow going through it.. you could be suffering some loss.
Did you use the w/i at all? What are your air temps?
Thread Starter
Full Member
Joined: Oct 2005
Posts: 157
Likes: 0
From: England
i use w/i so even with the lower air flow going through the i/c i was still maxing 28 degrees.
It was mapped on the rollers so a/fs were adjusted until right, although the tuner admits he always tunes on the conservative side for obvious reasons. I cant remember what they were though. But even though it was mapped conservatively, it should keep climbing and i cant see where else there is a restriction in the system. As i said everything but the i/c has changed
3 inch pipe work from the turbo to FD Greddy elbow
3.5 inch down pipe and exhaust with no mid box.
1.15 exhuast housing on a p trim GT 35/40 ( boost solid all the way up the revs)

Thread
Thread Starter
Forum
Replies
Last Post