
My 1987 FC build


Car was bought a couple weeks ago, 87, GXL fully equipped. Just broke part the 100k miles. I'd like a S5 T2 but, just can't find one locally that would make a good base.
I'll start with pictures from the day I bought her.
Only modifications done to the car were a after-market radio/amp/sub and a after-market wheel. Other than that a few cosmetic mods, or damage if you want to call it that.

Damage.

The L front fender has been repaired prior (poorly) so when it got smacked in the front again it didn't do too well. This fender will be replaced. The front bumper is also gone. Ripped straight to the ground, wasn't much of an issue as I had my eyes on a s5 conversion from the get-go. No frame damage at all so that is good. The headlight was a bit jambed but, upon pulling out the inner structure a bit, it has been fixed.

The ***-end isn't much better than the front.
The motor runs well, just need some general maintenance/tune up. This will be left alone until the body/suspension is finished first. Will be going with a street built T2, I'd love to 20B swap it but, have nowhere near enough wallet to touch it.
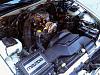
Until I get to that point I did buy a mazdatrix short shifter, spring and boots for the NA transmission (5 speed) As it sits right now it is a bit sloppy and loose feeling. No clue on when it will get in though as I haven't heard from them since my order confirmation last Thursday.
First challenge will be removing the 2 broken off bolts... bottom of the fender where it meets the rocker (kill me now!)
I'll start with pictures from the day I bought her.
Only modifications done to the car were a after-market radio/amp/sub and a after-market wheel. Other than that a few cosmetic mods, or damage if you want to call it that.
Damage.
The L front fender has been repaired prior (poorly) so when it got smacked in the front again it didn't do too well. This fender will be replaced. The front bumper is also gone. Ripped straight to the ground, wasn't much of an issue as I had my eyes on a s5 conversion from the get-go. No frame damage at all so that is good. The headlight was a bit jambed but, upon pulling out the inner structure a bit, it has been fixed.
The ***-end isn't much better than the front.
The motor runs well, just need some general maintenance/tune up. This will be left alone until the body/suspension is finished first. Will be going with a street built T2, I'd love to 20B swap it but, have nowhere near enough wallet to touch it.

Until I get to that point I did buy a mazdatrix short shifter, spring and boots for the NA transmission (5 speed) As it sits right now it is a bit sloppy and loose feeling. No clue on when it will get in though as I haven't heard from them since my order confirmation last Thursday.
First challenge will be removing the 2 broken off bolts... bottom of the fender where it meets the rocker (kill me now!)
Last edited by pontiackid; Apr 9, 2012 at 10:11 PM.

Sorry I do not, 
Here is my pain.
The 2 bolts snapped upon removal of the render. I knew they would as some dumbass who owned this car prior decided to jack the car up there caving it in. Will try to drill/easy-out it this weekend maybe. Not fun!

A lot of little nicks in the passenger side of the vehicle. Nothing a little hammering, finessing and glaze won't take care of though. Marked with sharpe so they don't get left behind.

The passenger side looks pretty good except for a crease in the qtr, centered above the wheel opening.

I was able to pull off the left fender and straighten the inner support brackets with a little work.

Remember when I said the fender had been repaired before where it was hit again? Well here is that guy's spectacularly shitty work!

And the backside!

This gentlemen is why we don't fill holes with bodyfiller! I'm betting the prevoius person who repaired the fender used a stud (welding) gun and pulled out most of the damage. Instead of cutting and grinding the tips of the studs off, he ripped them out putting holes in the metal, then just filled them with duraglass fiberglass reinforced filler and bondo!

5 seconds with a grinder and 10 with a hammer and I was able to beat it rather close back into its original shape... I may weld the holes shut and re-fix the fender. I'll keep the $400 and spend it elsewhere on the project...
I've picked a color (I think) the mix is white with only a few drops of purple and black to tint it. I wanted to avoid the yellow tint most whites have. A bit har to capture the differences but here is a bit sprayed on my hood. (look directly above the light's reflection.)

I decided on a pure white instead of a pearly just upon finishing a vehicle in the pearl I was wanting. I looks good in the light but when it is cloudy the white just looks dirty due to the gold pearls... Oh well.

Finished off the day be removing the sunroof and breaking down the rear of the car... I hope to have the body fixed and in primer by this weekend.

Here is my pain.
The 2 bolts snapped upon removal of the render. I knew they would as some dumbass who owned this car prior decided to jack the car up there caving it in. Will try to drill/easy-out it this weekend maybe. Not fun!
A lot of little nicks in the passenger side of the vehicle. Nothing a little hammering, finessing and glaze won't take care of though. Marked with sharpe so they don't get left behind.
The passenger side looks pretty good except for a crease in the qtr, centered above the wheel opening.
I was able to pull off the left fender and straighten the inner support brackets with a little work.
Remember when I said the fender had been repaired before where it was hit again? Well here is that guy's spectacularly shitty work!
And the backside!
This gentlemen is why we don't fill holes with bodyfiller! I'm betting the prevoius person who repaired the fender used a stud (welding) gun and pulled out most of the damage. Instead of cutting and grinding the tips of the studs off, he ripped them out putting holes in the metal, then just filled them with duraglass fiberglass reinforced filler and bondo!
5 seconds with a grinder and 10 with a hammer and I was able to beat it rather close back into its original shape... I may weld the holes shut and re-fix the fender. I'll keep the $400 and spend it elsewhere on the project...
I've picked a color (I think) the mix is white with only a few drops of purple and black to tint it. I wanted to avoid the yellow tint most whites have. A bit har to capture the differences but here is a bit sprayed on my hood. (look directly above the light's reflection.)
I decided on a pure white instead of a pearly just upon finishing a vehicle in the pearl I was wanting. I looks good in the light but when it is cloudy the white just looks dirty due to the gold pearls... Oh well.
Finished off the day be removing the sunroof and breaking down the rear of the car... I hope to have the body fixed and in primer by this weekend.
Welded up the 3 holes and shaved the Mazda emblem. I may put on back on it, I just hate how companies like Mazda and Ford use alignment holes in the metal. Welded, smoothed, primed. The back side was roughed up with 150grit, self-etch primed and then a mist of undercoating to ensure a rust free backside.


That crease in the left qtr... gone!


Almost got the right-side qtr finished. One more dent I overlooked, to fix. I started running low on primer (priming 3 vehicles at the same time,) so sadly I didn't get as many coats of primer on the RX7 as I would have liked to. Thankfully this is only the first prime.

The chip guard lower parts of the qtr, rockers and front fender don't have any damage. I will sand them smooth and paint as is without much though, they will be covered by the aero parts that are on the way anyways.
It didn't click in my mind that I didn't need to mask the sunroof until I already started. I'm working way to many hours :P It is essentially just sitting there to prevent dust and overspray from coating the interior. It will later be removed, fully stripped and de-dented.

Cheers. I'm going to bed./
That crease in the left qtr... gone!
Almost got the right-side qtr finished. One more dent I overlooked, to fix. I started running low on primer (priming 3 vehicles at the same time,) so sadly I didn't get as many coats of primer on the RX7 as I would have liked to. Thankfully this is only the first prime.
The chip guard lower parts of the qtr, rockers and front fender don't have any damage. I will sand them smooth and paint as is without much though, they will be covered by the aero parts that are on the way anyways.
It didn't click in my mind that I didn't need to mask the sunroof until I already started. I'm working way to many hours :P It is essentially just sitting there to prevent dust and overspray from coating the interior. It will later be removed, fully stripped and de-dented.
Cheers. I'm going to bed./

good work. that car will be sexxii in no time..
i dont really kno **** about body work the qtr on my gxl was smashed in and there was im assuming bullet holes or something anyway i drill and slide hammered it and just covered the holes in bondo since to me the holes were small.
my question is was i supposed to weld and grind them down?
i dont really kno **** about body work the qtr on my gxl was smashed in and there was im assuming bullet holes or something anyway i drill and slide hammered it and just covered the holes in bondo since to me the holes were small.
my question is was i supposed to weld and grind them down?
Basicly yes. Bodyfiller is polyester based... or a plastic. The metal will flex, contract and expand with climate/elevation changes and when in motion. They plastic and metal will be doing this at different rates due to their properties. It could be tomorrow, it could be 20 years when it breaks loose. At least todays fillers are much, much better than the bad wrap they got back in the days.
Grind
Weld
Grind
Fiberglass Filler (duraglass/dynamat/kitty hair) -to seal the weld from moisture-
Sand
Bodyfiller
Sand
Primer
Grind
Weld
Grind
Fiberglass Filler (duraglass/dynamat/kitty hair) -to seal the weld from moisture-
Sand
Bodyfiller
Sand
Primer
Trending Topics
Very nice work. While a little rough around the edges, it sounds like it was a good base to start with. Was the interior fairly clean? To me, I'd take a car with a great interior that needs bodywork any day over a car with a shoddy interior but great paint and body. Paint and body work can get expensive, but finding interior parts in great condition these days is getting harder and harder. It will only continue to do so as the OEM Mazda parts supply dries up and combine with the fact that nobody makes reproductions.
^^^
All the above?

Blocked with 150 and buzzed over it with 220 later to remove the heavy scratches. Everything blocked out good, I did find another bad spot in the wheel well though. (Below) Just a bit of rust, grabbed the welder and patched it up like new.

Removed the sunroof and then used a strip n' clean disc to strip the edges. Quite a bit of surface rust from moisture that went into the seal and sat there. Removed most of it and converted the rest. Bodywork followed...

Bit of a dent in the rocker, stud gunned and pulled out. Will do a bit of bodywork over it but, nothing much as the door sills and the side skirts will cover it.

Remasked and 2 heavy coats of urethane primer. The car will next be blocked with 320 dry followed by 400 wet (if everything looks good) and prepped for paint.


Also first primed the front R fender. Though I noticed a crown I completely overlooked. It may block out ok but I have a feeling I'll- Sand. Fix. Try Again...

Paint hopefully Monday night!
All the above?
Blocked with 150 and buzzed over it with 220 later to remove the heavy scratches. Everything blocked out good, I did find another bad spot in the wheel well though. (Below) Just a bit of rust, grabbed the welder and patched it up like new.
Removed the sunroof and then used a strip n' clean disc to strip the edges. Quite a bit of surface rust from moisture that went into the seal and sat there. Removed most of it and converted the rest. Bodywork followed...
Bit of a dent in the rocker, stud gunned and pulled out. Will do a bit of bodywork over it but, nothing much as the door sills and the side skirts will cover it.
Remasked and 2 heavy coats of urethane primer. The car will next be blocked with 320 dry followed by 400 wet (if everything looks good) and prepped for paint.
Also first primed the front R fender. Though I noticed a crown I completely overlooked. It may block out ok but I have a feeling I'll- Sand. Fix. Try Again...
Paint hopefully Monday night!
Very nice work. While a little rough around the edges, it sounds like it was a good base to start with. Was the interior fairly clean? To me, I'd take a car with a great interior that needs bodywork any day over a car with a shoddy interior but great paint and body. Paint and body work can get expensive, but finding interior parts in great condition these days is getting harder and harder. It will only continue to do so as the OEM Mazda parts supply dries up and combine with the fact that nobody makes reproductions.
Snow White.  Ended up getting the last coat of clear on at 3:21am Monday.


I was pretty worthless/tired Tuesday, though to keep moving forward I began reassembling the back end and cleaning up as I went along. I do need to do a bit more work, some reason the "hatch" idiot light is on, though it was also prior to me owning the car. Called it an early night for obvious reasons.

Tonight I began working on the doors. Got the drivers door fixed and primed but hit a snag on the passenger side. I disconnected all the wiring and have both doors off. I need to put both doors on so I can roll down the passenger side (power) window... I'm guessing it has to do with the window lock on the driver side door not being plugged in... IDK didn't feel like messing with it and risk smudging/printing the fresh primer on the other door.

Still in limbo on the aero. I'm too nervous/afraid about ordering a shitty after-market GP Sports kit so I haven't done so yet. Sadly the only ones I can find seem to be typical Ebay "duraflex" remakes...
Also still trying to find a turbo II hood locally.

Also got my Mazdatrix short shifter, and rebuild parts. Very happy with them, a special thanks to Ash for being patient when I was having bank issues. (put money in the bank and they have to process it for a few days before it is avaliable typical bs.)

Ended up getting the last coat of clear on at 3:21am Monday. I was pretty worthless/tired Tuesday, though to keep moving forward I began reassembling the back end and cleaning up as I went along. I do need to do a bit more work, some reason the "hatch" idiot light is on, though it was also prior to me owning the car. Called it an early night for obvious reasons.
Tonight I began working on the doors. Got the drivers door fixed and primed but hit a snag on the passenger side. I disconnected all the wiring and have both doors off. I need to put both doors on so I can roll down the passenger side (power) window... I'm guessing it has to do with the window lock on the driver side door not being plugged in... IDK didn't feel like messing with it and risk smudging/printing the fresh primer on the other door.
Still in limbo on the aero. I'm too nervous/afraid about ordering a shitty after-market GP Sports kit so I haven't done so yet. Sadly the only ones I can find seem to be typical Ebay "duraflex" remakes...
Also still trying to find a turbo II hood locally.
Also got my Mazdatrix short shifter, and rebuild parts. Very happy with them, a special thanks to Ash for being patient when I was having bank issues. (put money in the bank and they have to process it for a few days before it is avaliable typical bs.)

Got the backside of the doors done. Also painted the S4 mirrors up. Kinda wish I could get some R-Magic ones... but I'm also happy with these. I painted the door handles but may end up re-doing the clear as it is a bit sub-par when I paint the moldings...


Parts wise... today I got my S5 door moldings. Special thanks to member aicrotary2! Good member!
Also bit the bullet and called Ken. Ordered the complete shine auto parts set. I hope to process the order and get it on its way by Monday! Shine Auto FRP front full bumper type 1, and the R-Magic skirts and rear half bumper.
Parts wise... today I got my S5 door moldings. Special thanks to member aicrotary2!
Also bit the bullet and called Ken. Ordered the complete shine auto parts set. I hope to process the order and get it on its way by Monday! Shine Auto FRP front full bumper type 1, and the R-Magic skirts and rear half bumper.
I like their rear half bumper. I've been considering it to hide some body damage I may not be able to effectively fix myself on my right rear quarter. That and their front lip. The Mazda OEM lip is nice, but extremely pricey. Combined with the stock TII sideskirts, I think it's a really nice subtle, yet mildly aggressive look.


Alright, my parts are on the way!... kinda. Ken called and said it will be about a week before they ship as they are 'made to order' due to low demand. Very harsh critiqued review will follow when they eventually arrive. I guess until then I'll work on the rear bumper and be extracting broken bolts...
You can use an eraser wheel attachment for a drill. Warning lots of messy shavings. Video: (http://www.youtube.com/watch?v=HHKN5_UfDik)
I do this after razorblading the majority of it off. For the goop afterwards form lacquer thinner or 3m adhesive remover does the trick. Works on the moldings too, just make sure if your using the wheel you have a buddy hold the moldings as they will fly! As for the slips on the s5 moldings just crab a pear of pliers and yank/break them off and make sure they are flush/flat.
I do this after razorblading the majority of it off. For the goop afterwards form lacquer thinner or 3m adhesive remover does the trick. Works on the moldings too, just make sure if your using the wheel you have a buddy hold the moldings as they will fly! As for the slips on the s5 moldings just crab a pear of pliers and yank/break them off and make sure they are flush/flat.
^^ Thanks
This week as KICKED my *** hard.
Monday. Nail in tire of my DD mustang.
Tuesday. Stranded out of state. New battery and alternator in my DD.
Thursday. Transmission went in my DD. Throw-out bearing shattered, breaking everything else... hellow $1500 transmission +labor
Thursday.Deal fell through on my S5 lights... Got a call stating the turbo hood I ordered was already sold to someone else. Refund pending...
Friday. Computer Virus. Get a call that the used fender I ordered last week is arbage and am awaiting a credit. Funny how they can charge me 5 second after giving them my number but It will take a week to get the money back...
Saturday. Can't work on my car as well I'm waiting on parts and am without a ride. So the weekend is virtually wasted. My car seems to have an oil leak now, hasn't been driven in about 2 week too. No spots prior to Friday (it's just been sitting.)
-
-
In short the fund for this project and the rest of parts... are now on hold. T2 motor funds just went to my DD's new transmission. About all I can do while waiting in drill out broken bolts next week and hope the parts still on their way will soon arrive.
I did repaint the Gas lid door though around Monday... Single spec of dirt in the paint BE GONE!

This week as KICKED my *** hard.
Monday. Nail in tire of my DD mustang.
Tuesday. Stranded out of state. New battery and alternator in my DD.
Thursday. Transmission went in my DD. Throw-out bearing shattered, breaking everything else... hellow $1500 transmission +labor
Thursday.Deal fell through on my S5 lights...
Got a call stating the turbo hood I ordered was already sold to someone else. Refund pending...Friday. Computer Virus. Get a call that the used fender I ordered last week is arbage and am awaiting a credit. Funny how they can charge me 5 second after giving them my number but It will take a week to get the money back...
Saturday. Can't work on my car as well I'm waiting on parts and am without a ride. So the weekend is virtually wasted. My car seems to have an oil leak now, hasn't been driven in about 2 week too. No spots prior to Friday (it's just been sitting.)
-
-
In short the fund for this project and the rest of parts... are now on hold. T2 motor funds just went to my DD's new transmission.
About all I can do while waiting in drill out broken bolts next week and hope the parts still on their way will soon arrive.I did repaint the Gas lid door though around Monday... Single spec of dirt in the paint BE GONE!
After a bit of a break I've got the stuff to continue. Parts from shine arrived today and they are better than any other fiberglass part I've ever gotten. Bit of fit issues. But, the quality is good and the fact they are flexible, strong, thin and durable is fantastic. The skirts fit first try. The only down-side I'm seeing is that I cannot use my factory S4 bumper mounting parts, I tried to modify them and to get the brackets to fit but it seems a no go. Other than that I'm a bit disappointed I had to remove all the factory inner structure to get it to fit. Since I don't have a fmic I'd preferred it to stay... oh well. Also seems I got the fenders very close and with another 1/2 days work they should be golden.
Pictures Tomorrow. (sry)
Parts ordered, MADE and shipped in 7 business days. Rep Shine Auto. +1 (Plus I got them a 'bit' cheaper than the list price for ordering everything at once.)
Pictures Tomorrow. (sry)
Parts ordered, MADE and shipped in 7 business days. Rep Shine Auto. +1 (Plus I got them a 'bit' cheaper than the list price for ordering everything at once.)