
Long, Drawn Out FC Build Story Book Style (Lots of Pictures)

I wrote a ton about what I did, but then the site didn't submit that and cleared everything, so here's the short side.
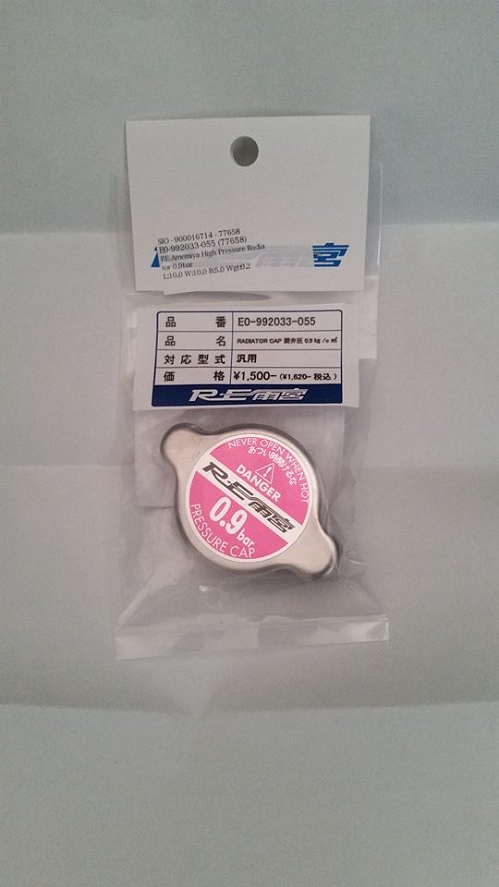
Ordered RE Radiator Cap to test shipping from RHDJapan.
Built shelf.
Coming soon: Kirkey seat and a lot of cage prep work.
Ordered RE Radiator Cap to test shipping from RHDJapan.
Built shelf.
Coming soon: Kirkey seat and a lot of cage prep work.

Rotary Enthusiast
Joined: Feb 2005
Posts: 984
Likes: 0
From: Bossier City, LA
Are you selling the wiring harness or would you be willing to cut a couple of connectors off with several inches of wire remaining?
I have my project I'm working on and several connectors have been cut out and I'd like to get it back to stock so I can add the proper switches back in.
Let me know!
Thanks!

I have my project I'm working on and several connectors have been cut out and I'd like to get it back to stock so I can add the proper switches back in.
Let me know!
Thanks!
I'm not 100% sure yet. I want it to be solid and save though so likely a 10 point. I've got to find a fabricated trusted enough to build a safe cage for me still. I want some solid door intrusion and roll over protection.
I'm hoping whoever build the cage will let me get some decent pictures of the process so I can document it some, but I'll have to wait and see when I do more research on it.
I'm hoping whoever build the cage will let me get some decent pictures of the process so I can document it some, but I'll have to wait and see when I do more research on it.
I slowly have started organizing parts I went to untangle the wire harness I pulled out, but it went straight back in the box it was in. That harness is a lot of wires and a lot of weight.
Current plans are to order a seat either the end of this month, or mid next month. Currently seeing if I can sub it into my Miata as well. It would serve me well through this race season in that car while I save up for cage fabrication.
Current plans are to order a seat either the end of this month, or mid next month. Currently seeing if I can sub it into my Miata as well. It would serve me well through this race season in that car while I save up for cage fabrication.
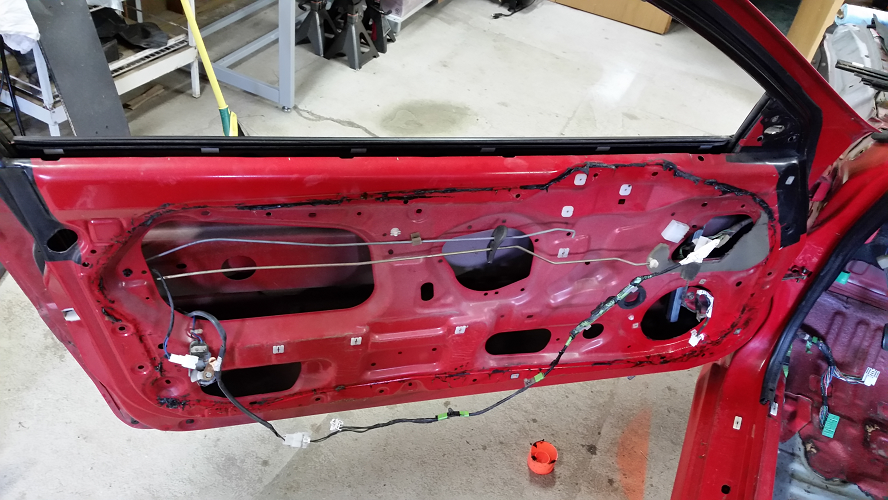
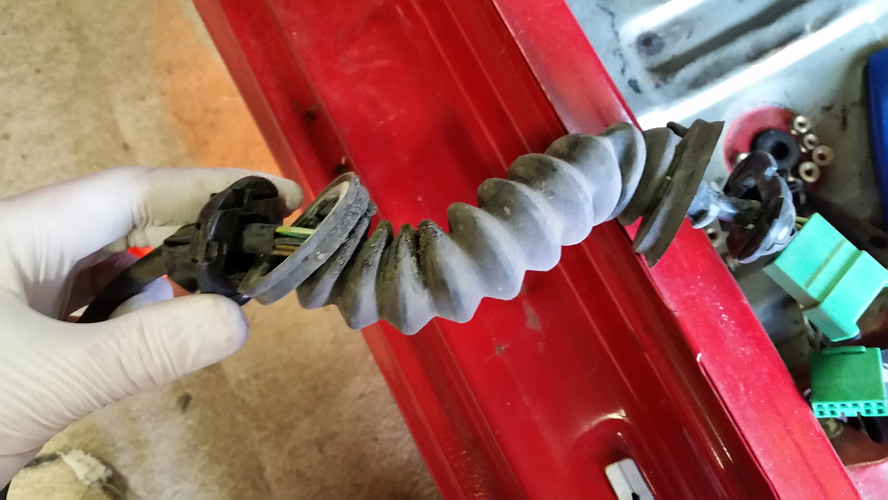
Finally had a chance to work on the 7 some today. I went out with the thought of removing the weird tar stuff from my drivers door at least, but I ended up removing the door wire harness. It took a bit longer than I would have liked it to, but I couldn't find any tutorials online so I had to wing it.
I started with no door panels, handles, window glass, mirrors, or locks, so that made it all a bit easier. I just popped out some of the plastic clips holding everything in.

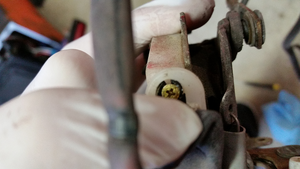
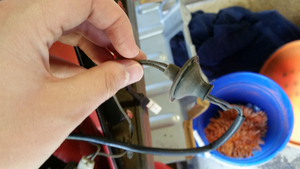
I ran into my first issue when I found out that there was a wire running to this latch inside the door that was not removable while it was mounted in the door.

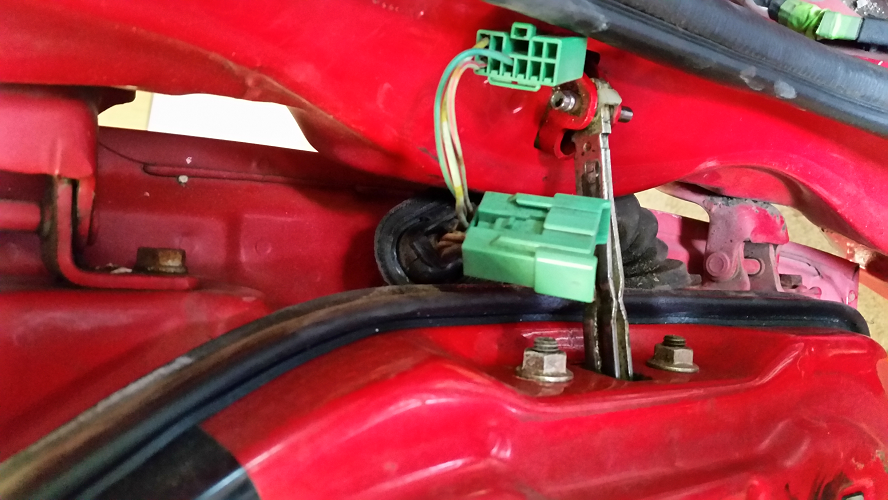
Removing it was pretty easy. The 3 phillips head screws are short and came right out and the bolt is 10mm and holds in the piece of track for the window glass. Once that track was out of the way, everything came out in a nice chunck.

The last part of the harness was attached to that door latch with 2 screws that would be basically unreachable if you leave the latch in the door.

The final part was pulling the harness out through the door. I found it easier to pull the rubber tubing and wiring through the cabin wall and through the door and then out through the speaker hole.

The plastic pieces provide some support for that rubber hosing so they had to be popped out to fit it through the door. They popped right back in afterwords with no issues.

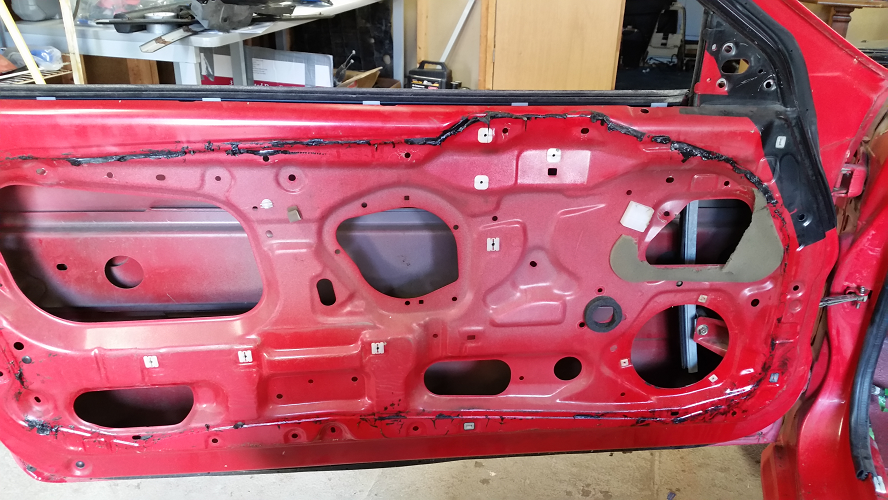
The final result was a semi-clean door ready to be stripped of all the stupid sticky tar stuff that gets everywhere and is a pain to remove.

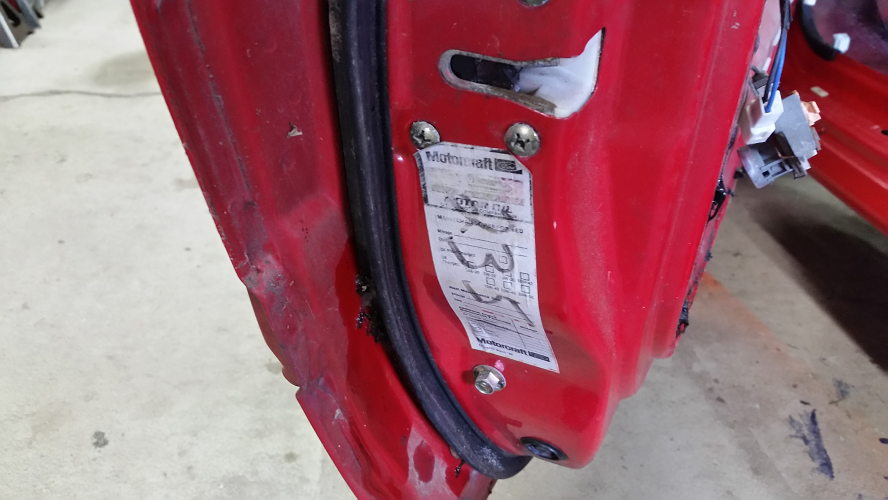
I did put the latch back in because I have to push the car in and out of the garage some and didn't want the door flopping around. Currently I'm cleaning the doors of everything, but I'm debating on cutting them to fit side impact intrusion bars that would give me a bit more room in the cabin area and provide some protection, but I haven't met with a fabricator yet to discuss the cage design.
The window tracks and rubber are likely to go as well. Most places seem to require windows down on course, so if I'm going to have to have the windows down, I see no point in having windows at all as this is not a street build.
I may do the other doors harness this week as well, but I'm not positive I'll get the chance yet.
I started with no door panels, handles, window glass, mirrors, or locks, so that made it all a bit easier. I just popped out some of the plastic clips holding everything in.
I ran into my first issue when I found out that there was a wire running to this latch inside the door that was not removable while it was mounted in the door.
Removing it was pretty easy. The 3 phillips head screws are short and came right out and the bolt is 10mm and holds in the piece of track for the window glass. Once that track was out of the way, everything came out in a nice chunck.
The last part of the harness was attached to that door latch with 2 screws that would be basically unreachable if you leave the latch in the door.
The final part was pulling the harness out through the door. I found it easier to pull the rubber tubing and wiring through the cabin wall and through the door and then out through the speaker hole.
The plastic pieces provide some support for that rubber hosing so they had to be popped out to fit it through the door. They popped right back in afterwords with no issues.
The final result was a semi-clean door ready to be stripped of all the stupid sticky tar stuff that gets everywhere and is a pain to remove.
I did put the latch back in because I have to push the car in and out of the garage some and didn't want the door flopping around. Currently I'm cleaning the doors of everything, but I'm debating on cutting them to fit side impact intrusion bars that would give me a bit more room in the cabin area and provide some protection, but I haven't met with a fabricator yet to discuss the cage design.
The window tracks and rubber are likely to go as well. Most places seem to require windows down on course, so if I'm going to have to have the windows down, I see no point in having windows at all as this is not a street build.
I may do the other doors harness this week as well, but I'm not positive I'll get the chance yet.
I suck and forgot the extensions on the images, and can't edit, so here's the last post, now with pictures.
Finally had a chance to work on the 7 some today. I went out with the thought of removing the weird tar stuff from my drivers door at least, but I ended up removing the door wire harness. It took a bit longer than I would have liked it to, but I couldn't find any tutorials online so I had to wing it.
I started with no door panels, handles, window glass, mirrors, or locks, so that made it all a bit easier. I just popped out some of the plastic clips holding everything in.

I ran into my first issue when I found out that there was a wire running to this latch inside the door that was not removable while it was mounted in the door.
Removing it was pretty easy. The 3 phillips head screws are short and came right out and the bolt is 10mm and holds in the piece of track for the window glass. Once that track was out of the way, everything came out in a nice chunck.
The last part of the harness was attached to that door latch with 2 screws that would be basically unreachable if you leave the latch in the door.
The final part was pulling the harness out through the door. I found it easier to pull the rubber tubing and wiring through the cabin wall and through the door and then out through the speaker hole.

The plastic pieces provide some support for that rubber hosing so they had to be popped out to fit it through the door. They popped right back in afterwords with no issues.

The final result was a semi-clean door ready to be stripped of all the stupid sticky tar stuff that gets everywhere and is a pain to remove.

I did put the latch back in because I have to push the car in and out of the garage some and didn't want the door flopping around. Currently I'm cleaning the doors of everything, but I'm debating on cutting them to fit side impact intrusion bars that would give me a bit more room in the cabin area and provide some protection, but I haven't met with a fabricator yet to discuss the cage design.
The window tracks and rubber are likely to go as well. Most places seem to require windows down on course, so if I'm going to have to have the windows down, I see no point in having windows at all as this is not a street build.
Finally had a chance to work on the 7 some today. I went out with the thought of removing the weird tar stuff from my drivers door at least, but I ended up removing the door wire harness. It took a bit longer than I would have liked it to, but I couldn't find any tutorials online so I had to wing it.
I started with no door panels, handles, window glass, mirrors, or locks, so that made it all a bit easier. I just popped out some of the plastic clips holding everything in.
I ran into my first issue when I found out that there was a wire running to this latch inside the door that was not removable while it was mounted in the door.
Removing it was pretty easy. The 3 phillips head screws are short and came right out and the bolt is 10mm and holds in the piece of track for the window glass. Once that track was out of the way, everything came out in a nice chunck.

The last part of the harness was attached to that door latch with 2 screws that would be basically unreachable if you leave the latch in the door.

The final part was pulling the harness out through the door. I found it easier to pull the rubber tubing and wiring through the cabin wall and through the door and then out through the speaker hole.
The plastic pieces provide some support for that rubber hosing so they had to be popped out to fit it through the door. They popped right back in afterwords with no issues.
The final result was a semi-clean door ready to be stripped of all the stupid sticky tar stuff that gets everywhere and is a pain to remove.
I did put the latch back in because I have to push the car in and out of the garage some and didn't want the door flopping around. Currently I'm cleaning the doors of everything, but I'm debating on cutting them to fit side impact intrusion bars that would give me a bit more room in the cabin area and provide some protection, but I haven't met with a fabricator yet to discuss the cage design.
The window tracks and rubber are likely to go as well. Most places seem to require windows down on course, so if I'm going to have to have the windows down, I see no point in having windows at all as this is not a street build.
Short update, I completely removed everything from the doors except the door handle, the latch and the rods to open the latch. Started removing the sound deadening on the firewall but ran into the issue of it being held in by the pedal assembly. So now I'm removing the pedal assembly. It all had to go sooner or later anyways. now seems like a good time.

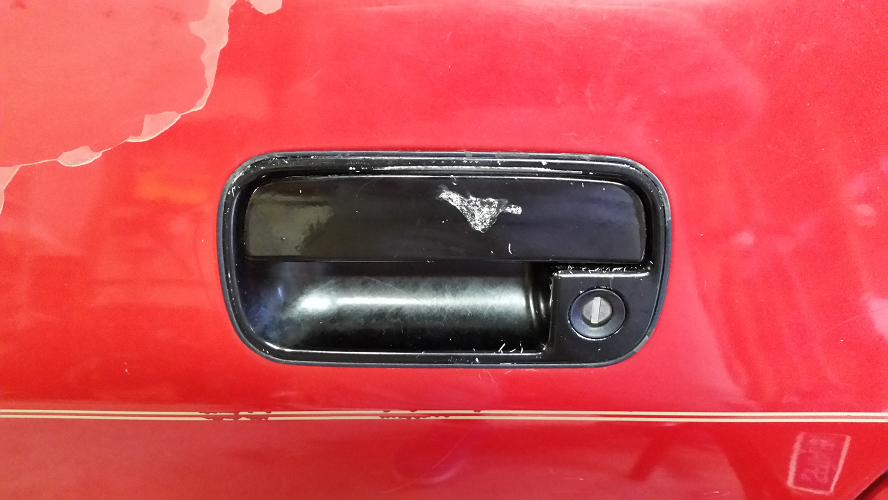
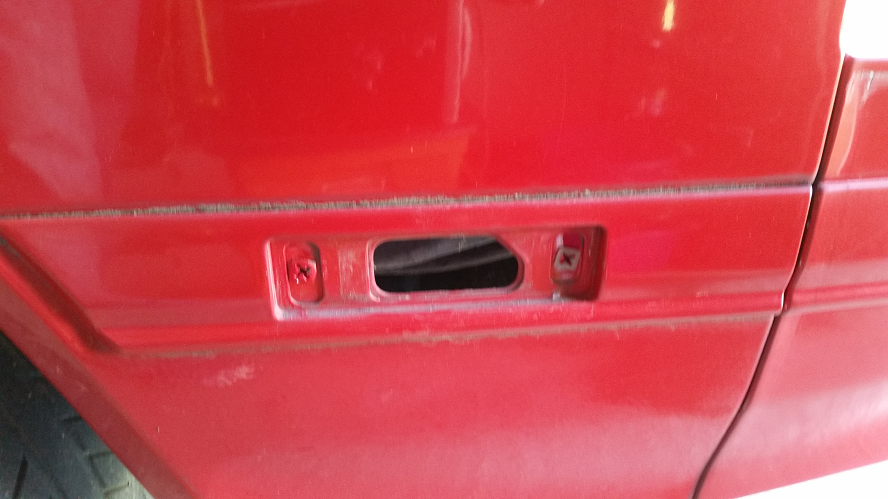
Finally, after a lot of heart ache and misery, I have a door handle on the drivers side of the car. It's a really small victory, but I had to order parts from 2 different people to make it happen.
I had received a door handle from a black FC, but when I went to install it I found out I was missing the plastic piece that connects the push rod from the handle to the door latch. In trying to modify a way to make it work, I accidentally broke the rod.
So, I ordered a new door latch. It came out of an 88 vert and matched up, no issues, as one would expect from cars that are essentially the exact same in almost every way. As a result, I now I have a functioning door handle. I did swap my door lock into it as I still had the drivers side lock connect to the harness for my car. So now I have functioning locks as well, which is great for a car with no windows, or engine, or anything in it.
I actually got some time to work on the car finally on Friday and it is finally almost 100% wire free. The only wiring left in the car is the ignition switch on the steering column and some wires to like the defroster and fuel pump which will go with the parts as they are pulled off.
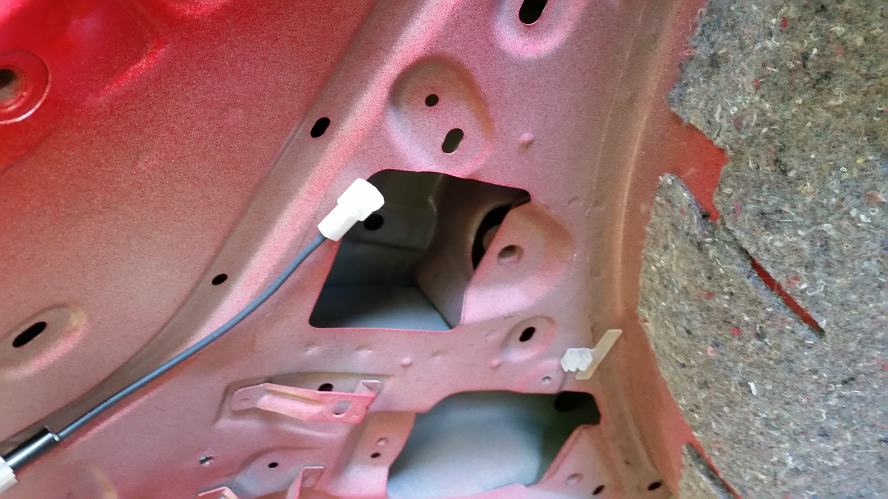
Here's the connector to the hatches defroster. There's one on each side. The driver's side (left hand drive cars) is attached to the rear harness and the harness ends basically at the passenger side connector.

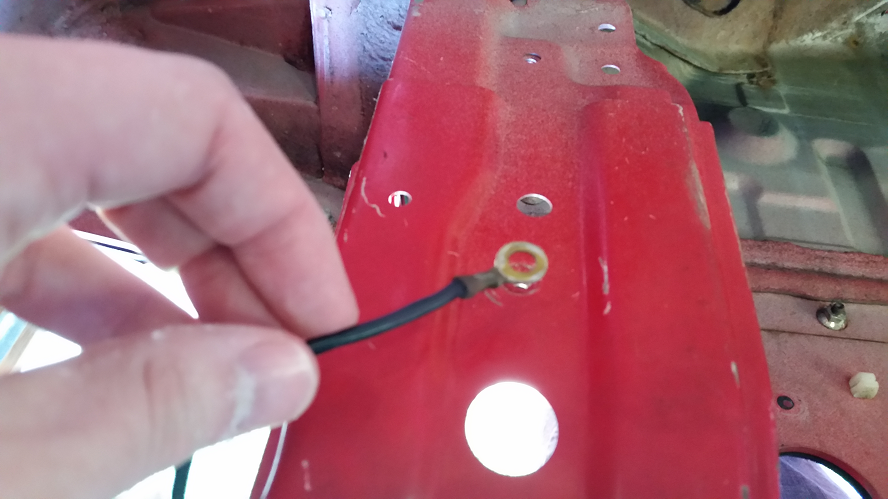
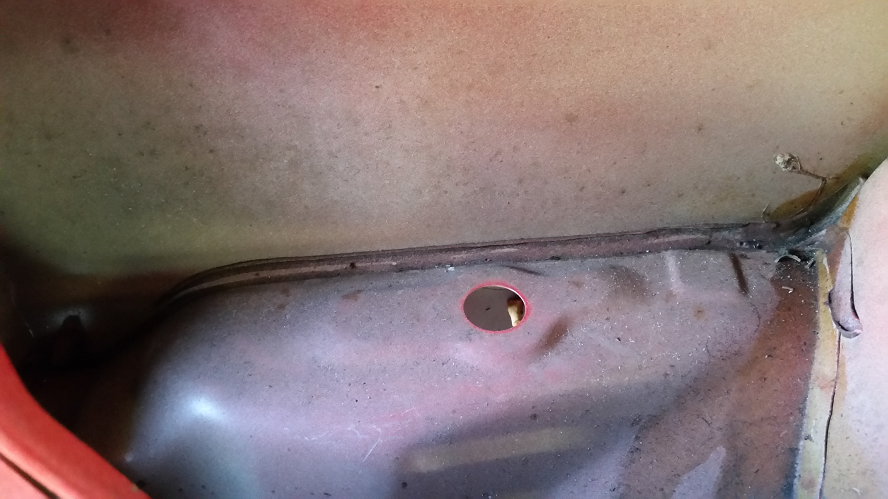
There's quite a few ground wires. I tried to keep them intact, but they will probably get replaced with newer wires, assuming they were attached to something going back in the car. This on is questionable depending on if I go with a fuel cell and how it's mounted. Also, I'm definitely going with a new fuel cell.
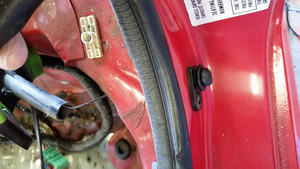
And here's one for the rear hatch latch. There's one on each latch for the rear hatch.

This was the final connection holding the rear wiring harness into the car. The passenger side was completely gone, but I still took the time to carefully unhook this one even though the door light button isn't going back in the car. It has a small clip you have to pry up, then pull the metal tab out to disconnect the wire from the button. It was actually kind of difficult to do carefully.
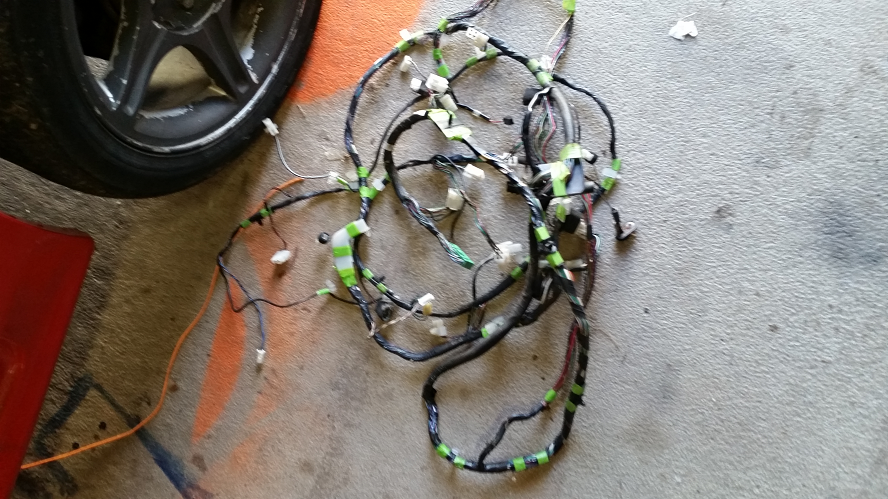
And the final product is the rear wiring harness. I likely won't be needing it. I just need power to the fuel pump(s???) and to the tail lights. I may try to do a custom controller and LED tail lights if I get really bored, just for show. The rules competition only require I have one center mounted working tail light. I plan to just use the stock one unless I need a bigger light.

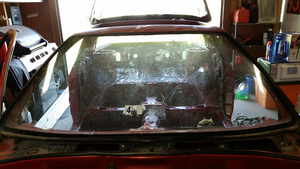
And here it is. Looking very bare. Soon that tar paper will be coming up and sanding will be taking place.
It hasn't been road legal since 1997, and won't ever be road legal again. 8 years was a solid run for a road going car I think.
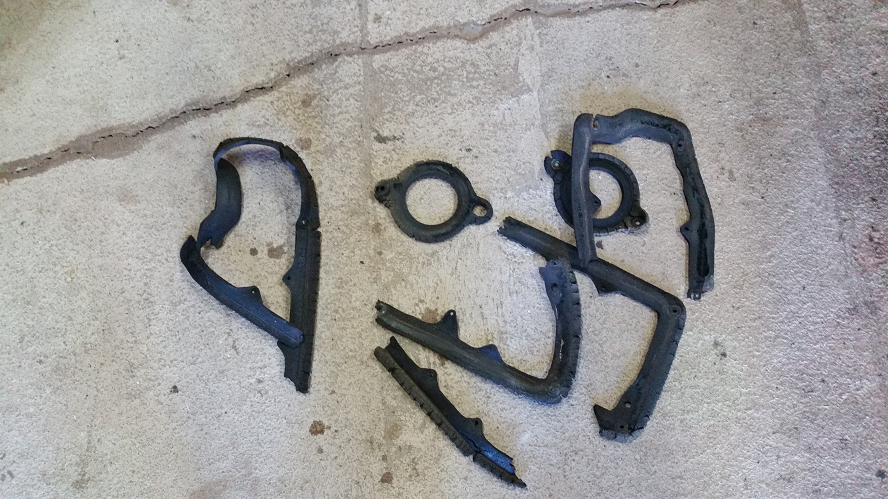
These are the hatch drain tubes. They were garbage and had to go.

The car didn't come with tail lights, but It had these and I tried to save them, but they ended up being baked onto the car. Almost infused with the metal, so into the trash bag they had to go.

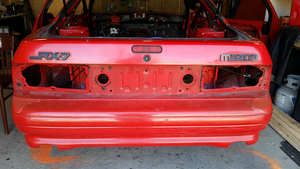
Not a lot left on the rear. The back bumper is coming off next, along with the side trim. All to likely be sold. I'm paranoid about popping the badges off because I really don't want to break them. They are one of the few things I'm very interested in getting back onto the car when it's all painted.
Here's the connector to the hatches defroster. There's one on each side. The driver's side (left hand drive cars) is attached to the rear harness and the harness ends basically at the passenger side connector.
There's quite a few ground wires. I tried to keep them intact, but they will probably get replaced with newer wires, assuming they were attached to something going back in the car. This on is questionable depending on if I go with a fuel cell and how it's mounted. Also, I'm definitely going with a new fuel cell.

And here's one for the rear hatch latch. There's one on each latch for the rear hatch.
This was the final connection holding the rear wiring harness into the car. The passenger side was completely gone, but I still took the time to carefully unhook this one even though the door light button isn't going back in the car. It has a small clip you have to pry up, then pull the metal tab out to disconnect the wire from the button. It was actually kind of difficult to do carefully.

And the final product is the rear wiring harness. I likely won't be needing it. I just need power to the fuel pump(s???) and to the tail lights. I may try to do a custom controller and LED tail lights if I get really bored, just for show. The rules competition only require I have one center mounted working tail light. I plan to just use the stock one unless I need a bigger light.
And here it is. Looking very bare. Soon that tar paper will be coming up and sanding will be taking place.

It hasn't been road legal since 1997, and won't ever be road legal again. 8 years was a solid run for a road going car I think.

These are the hatch drain tubes. They were garbage and had to go.

The car didn't come with tail lights, but It had these and I tried to save them, but they ended up being baked onto the car. Almost infused with the metal, so into the trash bag they had to go.
Not a lot left on the rear. The back bumper is coming off next, along with the side trim. All to likely be sold. I'm paranoid about popping the badges off because I really don't want to break them. They are one of the few things I'm very interested in getting back onto the car when it's all painted.

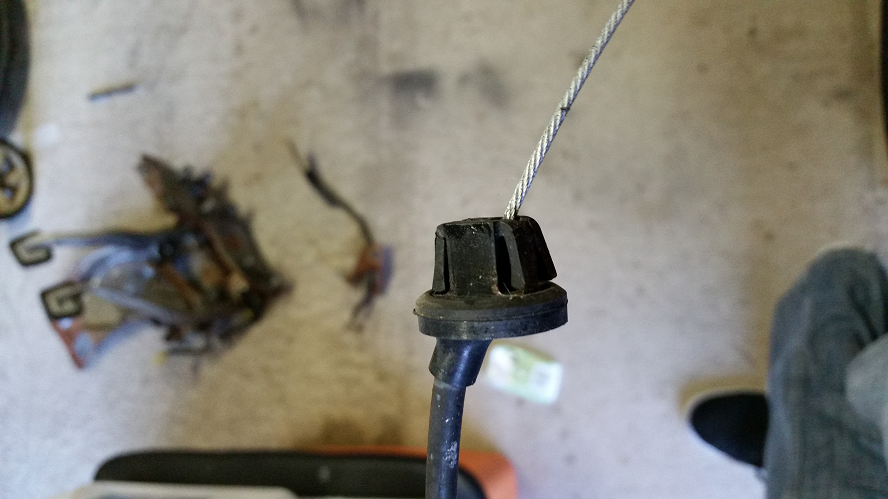
I did pull out the side markers. They were connected to the rear wiring harness and may be going back in, even though I don't need them.

Their wiring pushes out through this small hole. It would be behind the carpet next to the jack and the fuel filler tube on the driver and passenger sides respectively.

These little rubber grommets hold them in place. They were actually in pretty decent condition for an almost 30 year old car.
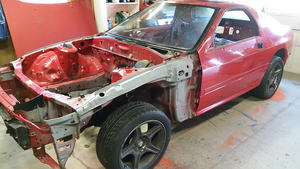
And here's the car in it's current state. It's getting there little by little. I may have found a shop to do my cage when the time comes. I just need to go talk to them about it.
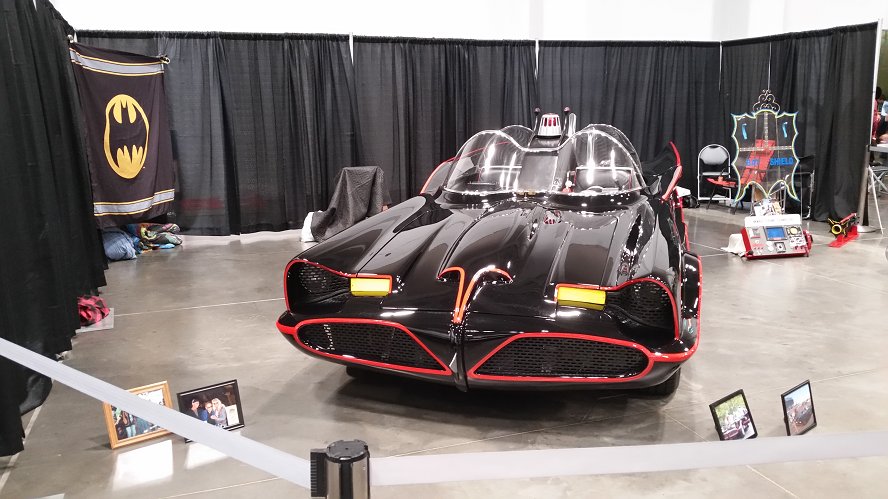
And as a bonus, I went to a comicon today, so here's a picture of a replica Batmobile.

Their wiring pushes out through this small hole. It would be behind the carpet next to the jack and the fuel filler tube on the driver and passenger sides respectively.
These little rubber grommets hold them in place. They were actually in pretty decent condition for an almost 30 year old car.

And here's the car in it's current state. It's getting there little by little. I may have found a shop to do my cage when the time comes. I just need to go talk to them about it.

And as a bonus, I went to a comicon today, so here's a picture of a replica Batmobile.
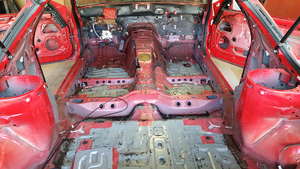
More and more and more has been removed. The car is almost completely empty on the inside.
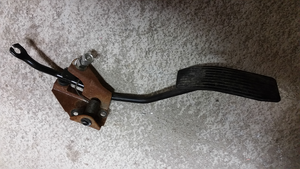
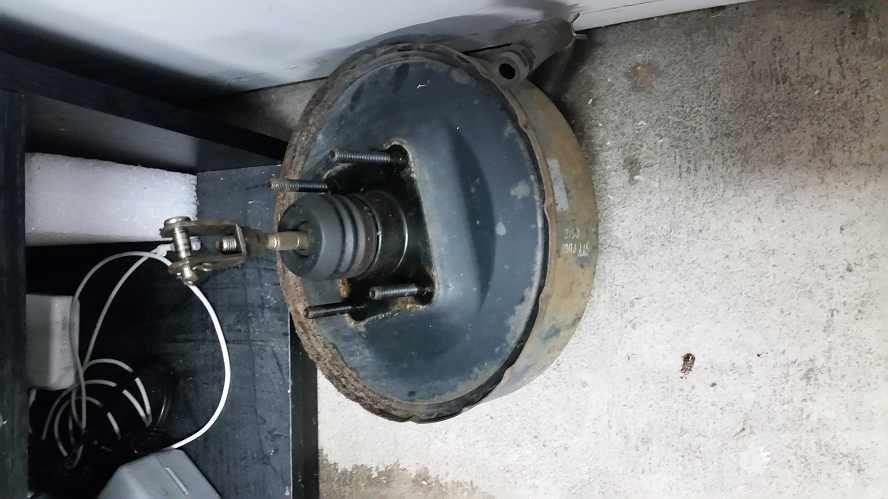
Started by finally removing the brake booster and pedal assemblies.

The brake booster bolts through the pedal assembly so it really worked out to remove both at the same time. These four bolts help hold the pedal bracket in place on the firewall.

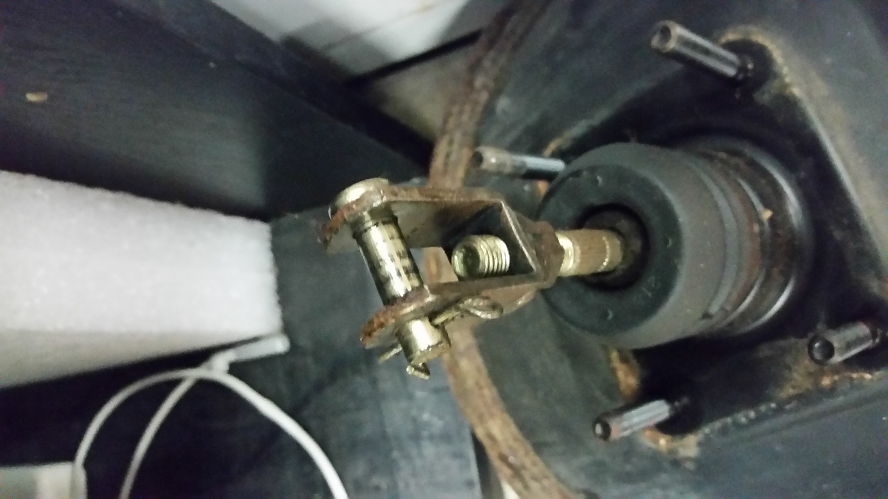
It took me a second to realize that the booster was held to the brake pedal with a pin, held in with a cotter pin. I don't plan on reusing the old brake booster. I'm still on the fence on going dual master cylinders or doing a new booster and a single master cylinder, but this old one is pretty rusty and worn.

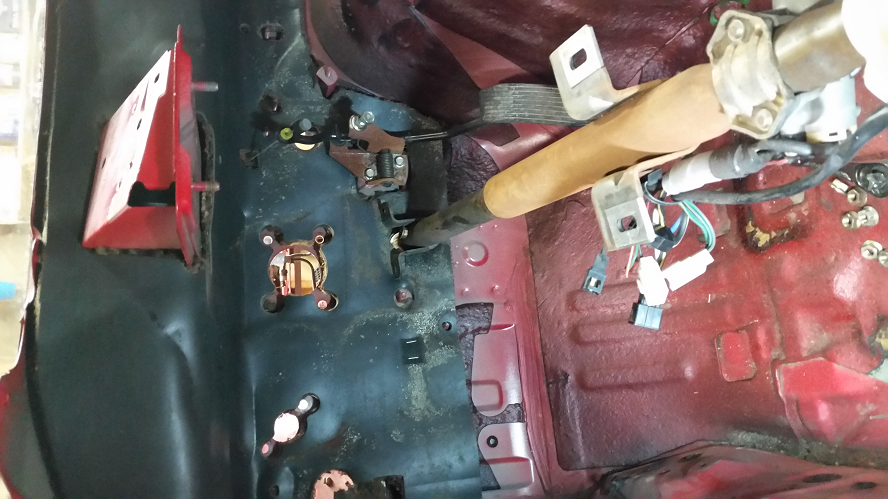
Once that was gone, the clutch and brake pedal assembly came out fairly pain free. It's got a lot of rust, but it's very thin, so I'll likely sand it all down and paint it to keep it from rusting again. I've considered replacing the pedals with some from Wilwood, but I don't know that I'll go that route.
The steering column also bolts to that bracket in 2 different places. So it's pretty limp and useless without it.

The gas pedal is held on by 2 bolts. Came off with ease. the throttle cable is held in with a plastic clip. Just squeeze on the back end and it slides right out.
Then I was left with this. A big, heavy, ugly piece of foam and rubber. It was being slightly held in by this wire on the passenger side that runs up to the windshield. It pops off with 2 screws behind the rubber piece.
Started by finally removing the brake booster and pedal assemblies.
The brake booster bolts through the pedal assembly so it really worked out to remove both at the same time. These four bolts help hold the pedal bracket in place on the firewall.
It took me a second to realize that the booster was held to the brake pedal with a pin, held in with a cotter pin. I don't plan on reusing the old brake booster. I'm still on the fence on going dual master cylinders or doing a new booster and a single master cylinder, but this old one is pretty rusty and worn.
Once that was gone, the clutch and brake pedal assembly came out fairly pain free. It's got a lot of rust, but it's very thin, so I'll likely sand it all down and paint it to keep it from rusting again. I've considered replacing the pedals with some from Wilwood, but I don't know that I'll go that route.

The steering column also bolts to that bracket in 2 different places. So it's pretty limp and useless without it.
The gas pedal is held on by 2 bolts. Came off with ease. the throttle cable is held in with a plastic clip. Just squeeze on the back end and it slides right out.

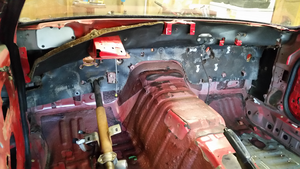
Then I was left with this. A big, heavy, ugly piece of foam and rubber. It was being slightly held in by this wire on the passenger side that runs up to the windshield. It pops off with 2 screws behind the rubber piece.

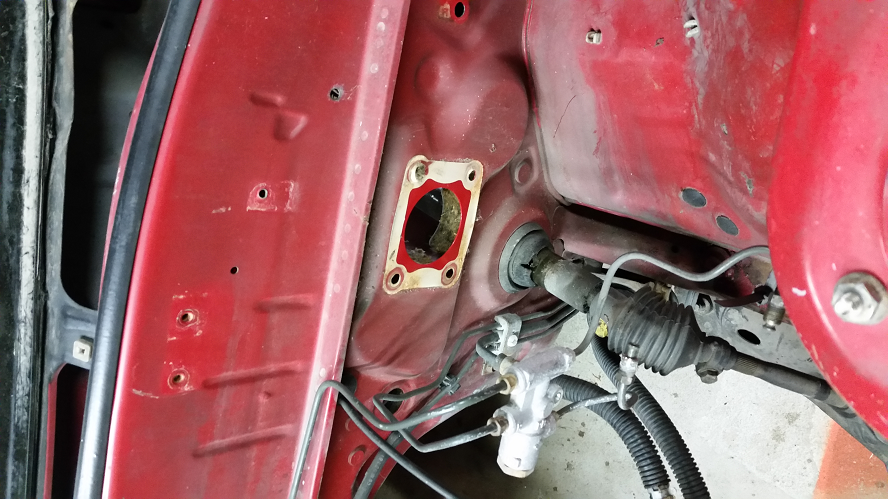
With that foam gone, the firewall looks a lot cleaner. You can also see the many, many holes in it for things, and stuff.
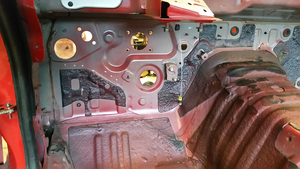
I also took this time to pop the steering column out since it was just dangling there. I need to inspect it a bit more to see if it's worth keeping, or if I should just replace it. New things are always nice, but I'd like to reuse anything that's in good shape or that can easily be cleaned/rebuilt.
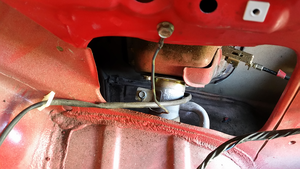
These teeth lock into another joint with a boot over it within the engine bay to allow the wheels to turn. It's held in place by one clamp with a bolt holding it down.
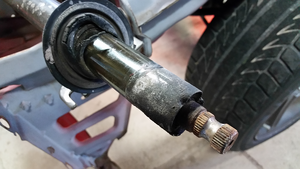
Here's the boot that it slides into. Should be easy enough to put back in if I need to move the car and steer, which I will once I get some more stuff out of it. On the left side of the boot you can see a missing bolt which I took out first. It popped out with ease. Seems normal, but when I removed it it had a cotter pin through the bottom on the other side. So that must have been pretty worn.
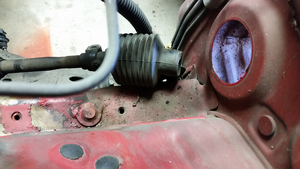
The throttle cable was pretty easy to pop out, but it could be a pain for anyone replacing it when they have a full dash and what not. It's hard to see in the picture, but it's held in place by 4 clipping points. 2 on each side. I was able to wrap some vice grips around it and push it through the other side.

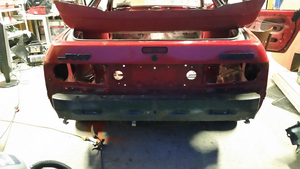
And finally, I popped the rear bumper off. It was full of various abandoned bug nests, and tons of dirt. Honestly, if you want to do some good weight reduction on your car, pull off body panels and clean them. You'll probably save 2-10 pounds from all the dirt and leaves and everything. The bumper was pretty straight forward to remove. It's about 9 bolts across the top on the inside of the hatch, and then 2 on each side holding the bumper to the rear quarter panel. Mine had wasps nests and spider webs everywhere. Hopefully if you have to remove yours, you will not have this problem.
So, I've been getting more and more done. My girlfriend has been hired on full time at her job, so I should be able to start putting more money away for parts and start really getting some work done on the car.
My plan is to go get some dry ice and try to bang the rest of the sound deadening out this weekend. Then, start sanding down any rusted areas or left over tar so I can prime and paint the inside. I'm also not far off from getting an angle grinder to start removing some unneeded metal around the rear struts and making room for a fuel cell. The cage is probably going to get pushed back some more so I can get an idea of how to safely mount the fuel cell so it can all be done at once.

I also took this time to pop the steering column out since it was just dangling there. I need to inspect it a bit more to see if it's worth keeping, or if I should just replace it. New things are always nice, but I'd like to reuse anything that's in good shape or that can easily be cleaned/rebuilt.

These teeth lock into another joint with a boot over it within the engine bay to allow the wheels to turn. It's held in place by one clamp with a bolt holding it down.

Here's the boot that it slides into. Should be easy enough to put back in if I need to move the car and steer, which I will once I get some more stuff out of it. On the left side of the boot you can see a missing bolt which I took out first. It popped out with ease. Seems normal, but when I removed it it had a cotter pin through the bottom on the other side. So that must have been pretty worn.

The throttle cable was pretty easy to pop out, but it could be a pain for anyone replacing it when they have a full dash and what not. It's hard to see in the picture, but it's held in place by 4 clipping points. 2 on each side. I was able to wrap some vice grips around it and push it through the other side.
And finally, I popped the rear bumper off. It was full of various abandoned bug nests, and tons of dirt. Honestly, if you want to do some good weight reduction on your car, pull off body panels and clean them. You'll probably save 2-10 pounds from all the dirt and leaves and everything. The bumper was pretty straight forward to remove. It's about 9 bolts across the top on the inside of the hatch, and then 2 on each side holding the bumper to the rear quarter panel. Mine had wasps nests and spider webs everywhere. Hopefully if you have to remove yours, you will not have this problem.

So, I've been getting more and more done. My girlfriend has been hired on full time at her job, so I should be able to start putting more money away for parts and start really getting some work done on the car.
My plan is to go get some dry ice and try to bang the rest of the sound deadening out this weekend. Then, start sanding down any rusted areas or left over tar so I can prime and paint the inside. I'm also not far off from getting an angle grinder to start removing some unneeded metal around the rear struts and making room for a fuel cell. The cage is probably going to get pushed back some more so I can get an idea of how to safely mount the fuel cell so it can all be done at once.

Thread
Thread Starter
Forum
Replies
Last Post
rx8volks
Canadian Forum
0
Aug 13, 2015 04:55 AM
rx8volks
Canadian Forum
0
Aug 11, 2015 10:30 PM