When you click on links to various merchants on this site and make a purchase, this can result in this site earning a commission. Affiliate programs and affiliations include, but are not limited to, the eBay Partner Network.
got super motivated yesterday and rebuild my rotor and dropped it back in. apex seals went in smooth as butter this time and i'm ready to put the flywheel and clutch back on then back into the car (might even happen today!). expecting good things this time around! stay tuned for results
did the throttle body mod (a while ago actually). a drill with adjustable clutch helped get those nasty screws out. a little rattle goes a long way.
and here's the big news...
after getting the engine back in and hooking everything up, she fired first turn of the key! not holding an idle and is sometimes very erratic with surging or shuddering. gonna double check timing, i know my tps is off (adjuster screw is maxed out and i can only get it down to 1.4k ohms res.). any advice there would be helpful. only other thing i can think of is vacuum leaks (shouldn't be any with all new gaskets unless at the injectors). might try playing with the rich/lean adjuster to see if that helps any too. video to come soon once its all straightened out!
well i finally got to drive it! found out that my leading plugs are getting intermittent spark. just ordered some new wires from mazdatrix (they had purple!). the car cruises great but the idle is terrible and surges, but at least it doesn't stall out! also i need to now address my exhaust...i think my ears were bleeding when i got home, but man does it turn heads.
wow its been a long time since i updated. not a whole lot has been going on. since the last check-in i've had some issues. first off, my tps completely crapped out on me while driving to a local show. nothing like stalling at the entrance with 100 people watching lol. next thing to happen was my battery dying. replaced it with a nice AGM. i FINALLY got my efan to work properly. i just run it on low, apparently high was just pulling too many amps and popping fuses. keeps nice and cool. and to assist with that i took on a little project.
there has bee an s5 sitting in a local pick'n'pull so i grabbed the hood for a whopping $50. i've always wanted a vented carbon hood but have more important things to spend the money on so i decided a custom hood would be fun to make. got to measuring and designing and made up some templates.
now the hood was in rough shape...when i found it since the last time seeing it, someone threw it in the back of an el camino leaning against some rusty subframe. it had some nice dents, the paint was horrible as to be expected but worst of all, it had a bent corner.
since the corner wasn't creased i bent it back, sanded the hood to even it out as much as possible then got to work with the filler. this took a lot of time...
now was the scary part. got out the grinder and dremel and started cutting. only had 1 spot where i got carried away but its on one of the small cuts so barely noticeable.
at this point all my research about aerodynamics came into play. i bent up the leading egde of the main vent to create a low pressure zone to actually pull air out and from the underside used a punch to arch the leading edges of the side vents as well as close the gap between the skeleton and outer layer. then i hit it with primer.
after that i stared with the paint. using rattle cans on such a large surface was a bit tricky but overall i did fairly good. only had one run which was actually the result of using a crappy paint first. i switched over to an enamel after that. a few good coats of paint then some clear and a buff. with LOTS of wet sanding in between layers. and here is the final product.
there are still some noticeable low spots and the paint color is off as expected from a generic auto store paint, but overall i'm happy with the turnout. maybe down the road i'll fix it up a bit more and talk a friend into letting me use his paint booth for a quality spray
Nice build! Just read through this entire thread, crazy how many people get on here just to bad talk other people's builds. Encouraging to see others actually providing constructive comments, there is for sure a divide on this forum. I'm kind of scared of starting my own build thread lol. My goals are similar to yours. Performance/looks good. Keep up the good work!
Very interesting hood work...I have a few questions...
I really like the appearance of the two side vents, did you consider that approach for the center/main one or did you think it was too restrictive?
Although I like the look of the side vents, I question their utility- aren't they sitting over the strut towers?
And finally, how effective have the vents proven to be?
thanks guys. yeah there was definitely some opposition to my "ideal build" but that could partially have come from not clearly explaining my goals. its still mine and i'm gonna do what i want, but getting good criticism helps point people in the right direction.
Clokker, the center vent was designed this way for a few reasons. mainly i don't really like louvers, so doing that would be overkill IMO. also i have an e fan and took measurements so the vent comes down right behind the fan shroud, trying to give it a direct path out of the engine bay, although its not quite right yet. also i followed the lines from the side vents so everything is square and flows well (i have ocd and love symmetry). the sides are almost directly over the strut towers, but there is air space underneath them and i rounded them (raised from the hood surface) to help create low pressure zones to actually pull air out. i haven't done any actual temp measuring or string test yet, but it seems like it is actually doing a great job of pulling out heat. with the fan controller and vents i can dial in where i want the temp to be.
been off here for a while. i had a hard drive failure on my computer, but luckily i got all my pics and video to an external drive before the crash. i've started working at a very well known tuning shop in my area and now have access to tons of equipment and materials that i never had before! i don't want to bore anyone with my life story so straight to the fun stuff!
first big change: coilovers. found a guy on one of the facebook pages selling a brand new unmounted set of ISR pro coils. they go for about $800, but i got them for $575 shipped to my door. install was a breeze and i couldn't be happier with the look. just need to correct the rear camber and do the alignment (which i now can do instead of paying for. man i love my new job!)
the next big thing, and something i've been dying to share is my new wheel setup. now i've been sitting on these and holding it in for over a year now. i found a guy selling a set of Rota Grids. they are 17x9 +25. at the time i was laid off and barely had money to spare, but he only wanted $200 so i couldn't pass that deal up. the tires were absolute garbage. there were 3 different tires, all worn well past the tread blocks and one had a separated sidewall.
they were painted this horrible green and it looked like it was done with house paint and a brush
first thing was to do away with this nastiness. time to get the aircraft remover gel! now i heard this stuff works awesome, and while it did on the crap-tastic paint the kid used, it didn't do so well on the original finish and primer as you can see in the background
so as they were all rid of the green, they were still uneven where it worked through some areas more than others. time to get sanding. this took a LOT of time since i wanted it to be nice and smooth. it's all in the prep! there was also some minor curb rash and blemishes in the metal so i sanded those areas down nice and flat also
time for primer!
after that i was too excited to not see them on the car so i went out for a test fit (mind you this was over a year ago so i didn't have the coils yet)
after that they were painted (after a lot of photoshop to decide on a color). at this point i realized i needed some hub rings and lug nuts so i got those ordered. once the hub rings arrived they didn't fit. maybe it was the paint or the fact that i didn't find a 100% accurate hub size for my wheels. a little sanding around them and they popped right in. then they sat in my kitchen stacked up until this past week when i finally was able to afford tires (again thanks to my shop i get them at cost). i went with a 225/45/17 so they have the tiniest bit of stretch but not so much as to be unsafe.
and here is the moment you've been waiting for. the finished product! all pics were taken at the shops annual open house/dyno day
You found an extremely clean and well taken care of S4. It hurts my soul that you started stripping the interior since it was perfect, but it's your car. As izzy said, 200whp na isn't easy. For what you would spend going that route, you can turbo the car. Just pick up an S5 turbo and install a megasquirt ECU, plus a few other pieces. And since you need to rebuild anyway, you can build the engine for a turbo with the proper seals and a good mild port job for a turbo. After all of that is done you can piece together a TurboII drivetrain to swap in for reliability.
I know stock the s4 NA only had about 146hp but to suggest a person needs to do a TII drivetrain swap to handle 200HP sounds kinda overkill or am I mistaken about the S4 NA drivetrain?
Is it notoriously weak? I have only had mildly modified S4 NA Rx7's in my time, headers exhaust etc.
The S5 NA models came with about 165HP, surely they could handle 35 more HP to the wheel no???
I am debating this suggestion because I too want to do an NA buildup with a non-turbo ported motor and stock NA drivetrain.
Sweet build dude came out pretty clean! Hope you can still hear. Mine had a RB headed and **** that thing was loud!! NA 13B's can be ridiculously loud!!
Last edited by BrapMobile; May 30, 2017 at 05:11 PM.
I know stock the s4 NA only had about 146hp but to suggest a person needs to do a TII drivetrain swap to handle 200HP sounds kinda overkill or am I mistaken about the S4 NA drivetrain?
Is it notoriously weak? I have only had mildly modified S4 NA Rx7's in my time, headers exhaust etc.
The S5 NA models came with about 165HP, surely they could handle 35 more HP to the wheel no???
I am debating this suggestion because I too want to do an NA buildup with a non-turbo ported motor and stock NA drivetrain.
He's talking about swapping in a s5 turbo II motor and that's why he's suggesting the drive train to go with it.
another little bit of progress made. got around to installing my miata short shifter. very stiff but seems to be getting better as it breaks in. pretty notchy but feels good and way shorter throws. also, it feels good to not have the gearstick flop around. there was literally nothing left of the oem shifter bushings.
Didn't know you cut and vented your own hood. I am doing something similar. Subscribed my tall friend. Ps I still have your oil cap. I have to have some aluminum welding work done soon, so I may be swinging my stm.
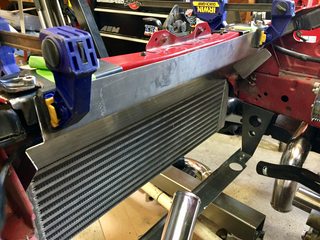
couple more new things! finally got around to making my radiator cooling panel. found a piece of acrylic just sitting around the garage and decided $free.99 was better than buying the abs plastic that i normally use for stuff since its an odd size and i'd have to buy a big sheet or custom order one. not sure how i feel about the clear though...its already showing lots of scratches and was supposed to hide the ugly stuff under it like the fan controller and those relays. had a friend suggested spray tinting it. any input would be appreciated. and along with that i had my friend at work help me make an intake pipe to get rid of that ugly rubber corrugated stock piece. best part was it only cost $10 since i only had to buy the reducer coupler, everything else was scrap or just laying around the shop.
and just for fun here's a pic of my car outside the shop
Go to Klein Steel Direct off of 390N. They have surplus aluminum. You can pick through what they have. Get a big enough piece and use a jigsaw with a metal cutting blade to get the shape you want. You can use your acrylic piece as a pattern. I have a 30" bending brake if you need to put any bends in it.