
The Grumpy Old Bitch: my '86 GX(ish)

Thread Starter
Rx Bandit
Joined: Jul 2008
Posts: 232
Likes: 1
From: Fort St John, BC, Canada
not rx7 related at all, but i'm excited so deal with it ha ha..
new summer wheels for the subaru!


they're 17x9 +42 Mach V 'Awesome' and they really are awesome. 17.8lbs each (very light for a 9" wide rim), dual drilled so i can still use them when i upgrade to an sti drivetrain next summer, and pretty dang reasonably priced.
gotta get some 255/40/17 meats for them and wait for all this snow to melt
-sean
new summer wheels for the subaru!
they're 17x9 +42 Mach V 'Awesome' and they really are awesome. 17.8lbs each (very light for a 9" wide rim), dual drilled so i can still use them when i upgrade to an sti drivetrain next summer, and pretty dang reasonably priced.
gotta get some 255/40/17 meats for them and wait for all this snow to melt
-sean


Thread Starter
Rx Bandit
Joined: Jul 2008
Posts: 232
Likes: 1
From: Fort St John, BC, Canada

Thread Starter
Rx Bandit
Joined: Jul 2008
Posts: 232
Likes: 1
From: Fort St John, BC, Canada
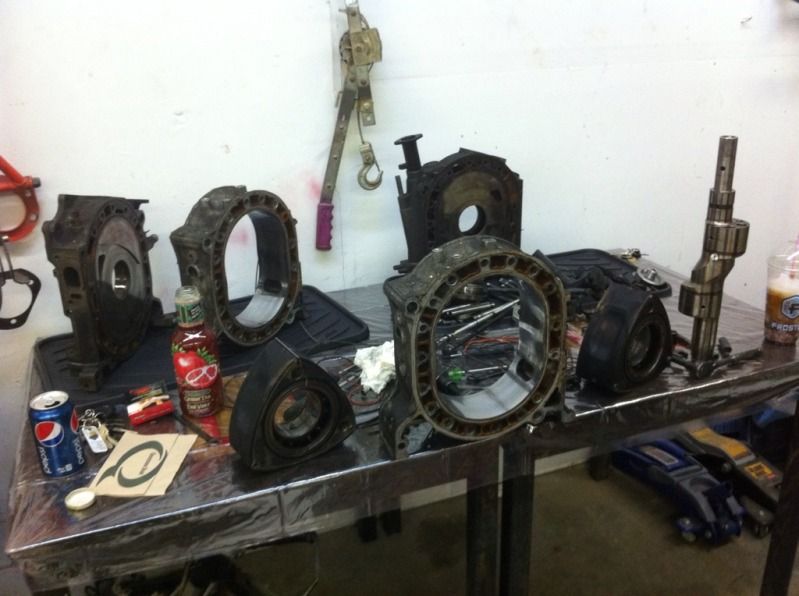
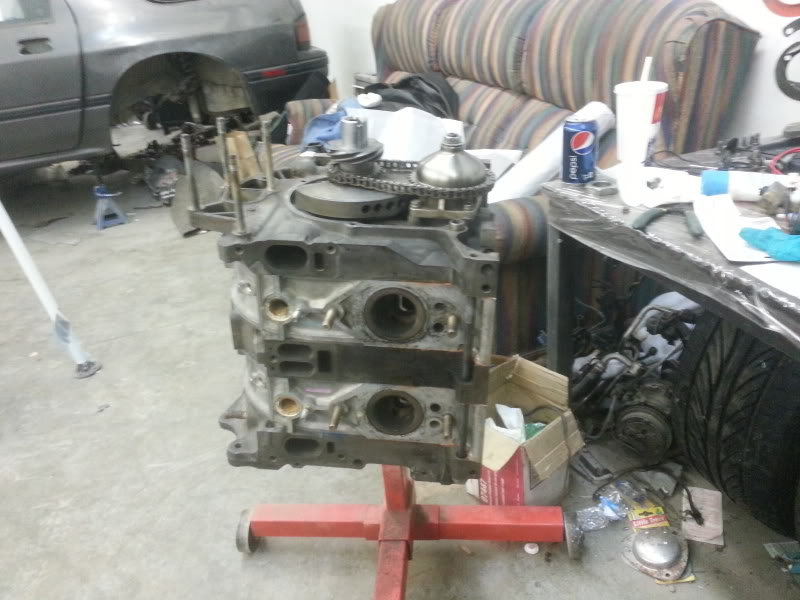
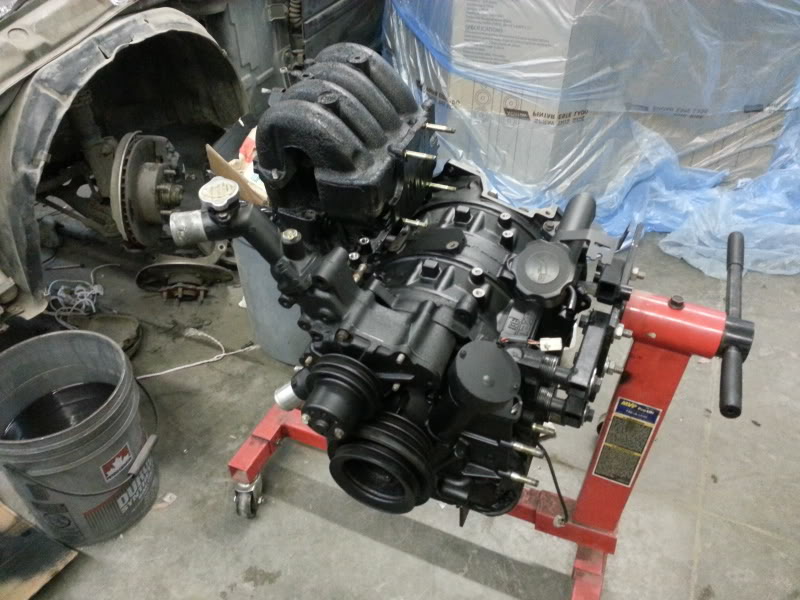
Jeez, 3 months since my last update? doesn't seem that long.
got off my *** today and pulled the engine apart
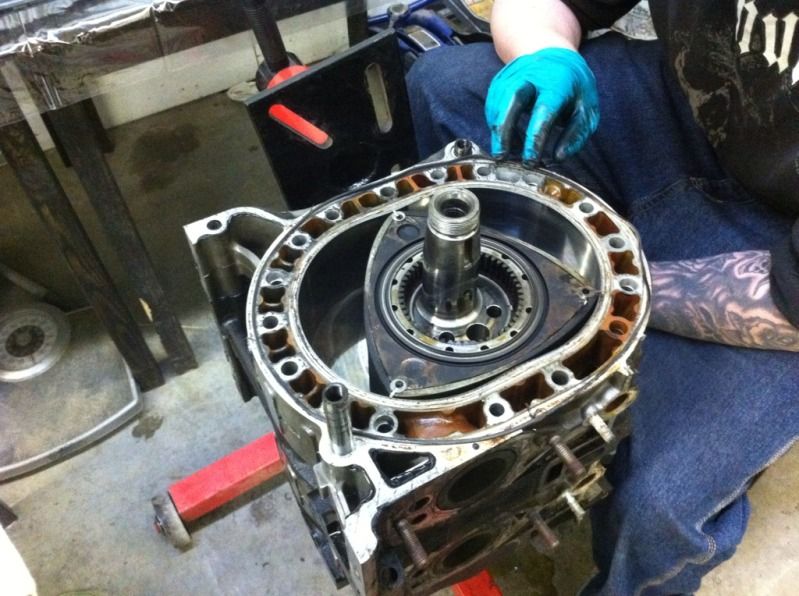
it still blows my mind how 'simple' these engines really are. no cams, no valves, no timing belt, no nothin. but everything seems to have it's own spring
the rotors were pretty damn black, but everything actually looks in pretty good shape. the car was running very rich the entire time i had her (i think the previous owner had upped the injector size but not done much in the way of engine management and the little SAFC i had couldn't quite keep up)
the rotors cleaned up pretty nice though, nothing seems to be damaged or unuseable
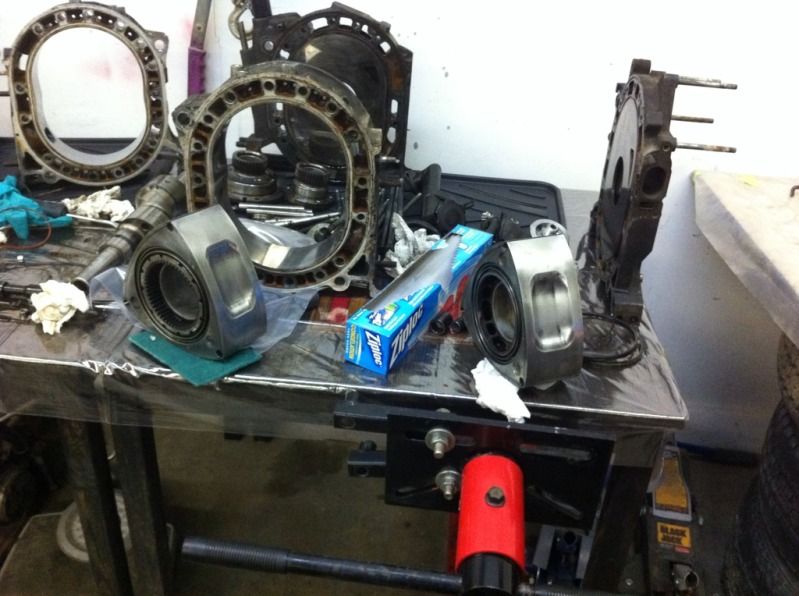
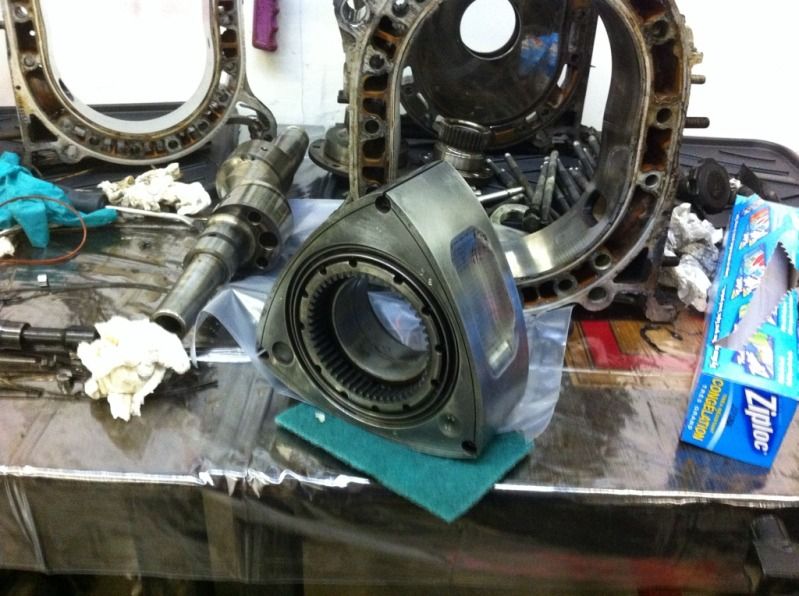
gonna clean the housings up a bit tomorrow and order up some porting templates/rebuild kit
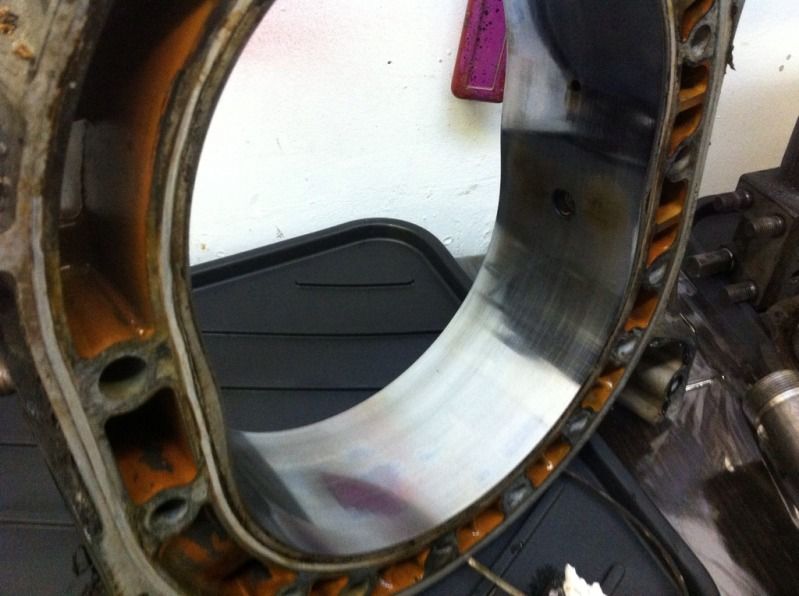
i love how it took literally 3 1/2 minutes to disassemble the entire engine
it would be nice to make some decent drift-able power (400whp or so, without too huge of turbo lag), any thoughts on dowel-pinning at that sort of output? also: yes i will be tuning this myself, so having things a little stronger than necessary would maybe be worth it.
thanks for looking
-sean
got off my *** today and pulled the engine apart
it still blows my mind how 'simple' these engines really are. no cams, no valves, no timing belt, no nothin. but everything seems to have it's own spring
the rotors were pretty damn black, but everything actually looks in pretty good shape. the car was running very rich the entire time i had her (i think the previous owner had upped the injector size but not done much in the way of engine management and the little SAFC i had couldn't quite keep up)
the rotors cleaned up pretty nice though, nothing seems to be damaged or unuseable
gonna clean the housings up a bit tomorrow and order up some porting templates/rebuild kit
i love how it took literally 3 1/2 minutes to disassemble the entire engine
it would be nice to make some decent drift-able power (400whp or so, without too huge of turbo lag), any thoughts on dowel-pinning at that sort of output? also: yes i will be tuning this myself, so having things a little stronger than necessary would maybe be worth it.
thanks for looking
-sean


Joined: May 2006
Posts: 3,881
Likes: 3
From: Jacksonville, Tampa & Tallahassee
^^^This. (As a matter of fact a street port isn't even necessary, running another couple psi on stock ports with AI will produce a more responsive engine with more area under the curve)
Power doesn't destroy engines, there is a guy making over 700whp on an unpinned engine, Rice Racing should be around 600 on a stock FD block, and I've personally seen a few 500+ whp setups on dynos without pinning. (all but one of these setups is using auxillary injection...food for thought)
Bad tuning is what destroys engines, these engines don't take kindly to knock so if you know what you are doing and can avoid it you should be fine. however in the event that something goes wrong, a pinned engine will have a better chance of surviving.....well at least a better chance of not cracking a plate. The force has to got somewhere and if not the iron, then the apex seals or a combination of other parts will have to absorb it.
The point though is that the goal should be avoiding knock at ALL costs, moreso than building an engine strong enough to survive knock.
Thread Starter
Rx Bandit
Joined: Jul 2008
Posts: 232
Likes: 1
From: Fort St John, BC, Canada
^ good food for thought, I really appreciate it guys.
Making the power isn't what I'm worried about, it's the tuning process. I'm going to have to tune this myself as I live a million miles from the middle of nowhere. I'm usually quite meticulous with my research and I have the time and patience to be really careful with the tune, but anything can happen when you've never done it before.
My slight tuning experience that I have is with my Subaru, but I have the feeling this is going to be a whole other ball of wax. The Subaru has a wonderful open ecu that is simple to manipulate with a number of different programs and starts off with the OEM maps and settings as a base point.
I am (at this point anyway, things change) planning to use a haltech setup for my rx7, just trying to decide whether the sprint RE is enough or if the sport 1000 would suit my needs better. I'm expecting the base maps available for those will need much more modification than I have previously gotten into, so I am a little apprehensive.
I haven't spent much time in the engine management section of the forum yet, but I have the feeling I'll be getting very familiar with it very soon. It's nice to know there's some good reliable power being made without pinning the engine, if it's unnecessary then that's one thing less on the list.
Does anybody know of other 'methods' to make things able to stand up to a little more abuse? Besides 'tune it right the first time' ha ha.. I'll try to!
Thanks again everyone,
This car excites me so much
-sean
Joined: May 2006
Posts: 3,881
Likes: 3
From: Jacksonville, Tampa & Tallahassee
I am currently using the R-tek 2.1 primarily because it comes with the stock maps, and allows you to make corrections as needed. It has taught be a lot about the tuning process without overwhelming me with parameters to set and worry about. The main limitation is that it still relies on the stock AFM, and boost sensor which restricts the amount of boost you can run safely (15psi) and max air flow. Many have made 300 plus (highest I believe is 380whp) but I don't think anyone has cracked 400 yet.
Either Haltech will be able to get you to 400 whp, however I believe there are differences in programmable outputs and inputs (like timing pickup) that might make one more attractive than the other. I haven't done too much research into the Haltechs as I believe my next ecu will be a Link unit.
Megasquirt seems to be fairly well supported also, I just didn't feel like building an ecu, and the software is kinda goofy to work with.
Thread Starter
Rx Bandit
Joined: Jul 2008
Posts: 232
Likes: 1
From: Fort St John, BC, Canada
^^ hmm, I hadn't done much reading yet on the link ecu's but after checking them out they seem like a pretty solid product. More research will be needed for sure, thanks for the heads up on another viable option, I appreciate it!
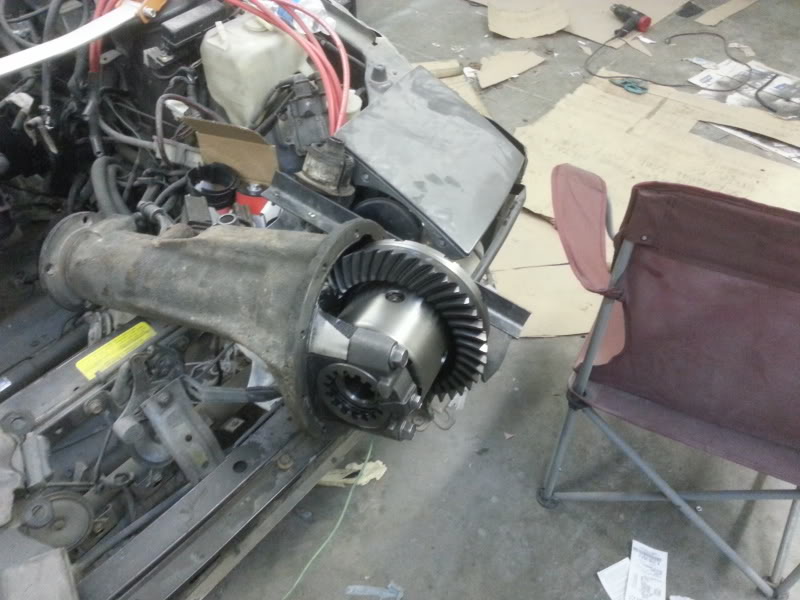
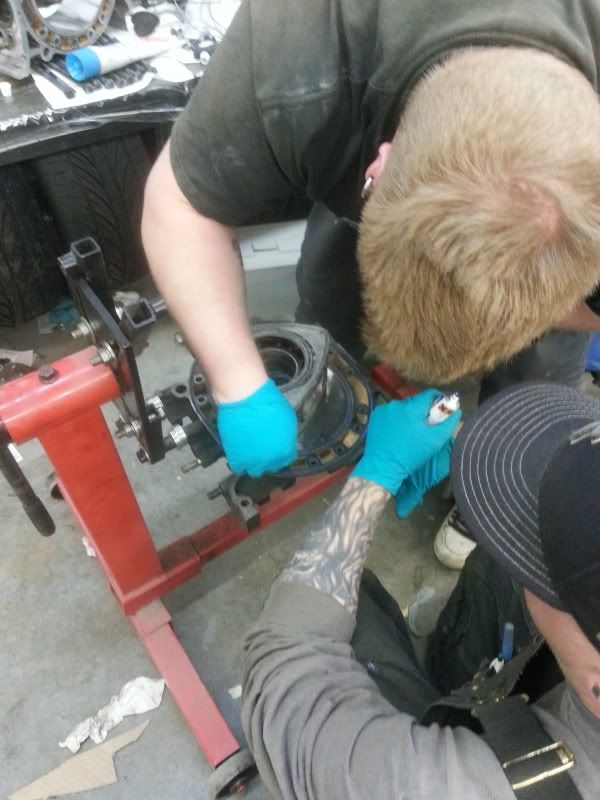
Nothing to update right now really, just more cleaning. I've been helping my buddy pull and disassemble his fd engine, so I haven't had much time dedicated to my stuff. Got some el-cheapo eBay strut tower bars though! Ha ha
-sean
Nothing to update right now really, just more cleaning. I've been helping my buddy pull and disassemble his fd engine, so I haven't had much time dedicated to my stuff. Got some el-cheapo eBay strut tower bars though! Ha ha
-sean
Thread Starter
Rx Bandit
Joined: Jul 2008
Posts: 232
Likes: 1
From: Fort St John, BC, Canada
Well kiddos, it's been a million years since my last update here (as usual)
Nothing too exciting yet, just been gathering parts and changing plans
Carbonetic metal 1.5way LSD (thanks Chris and Adam at THmotorsports, wicked deal)
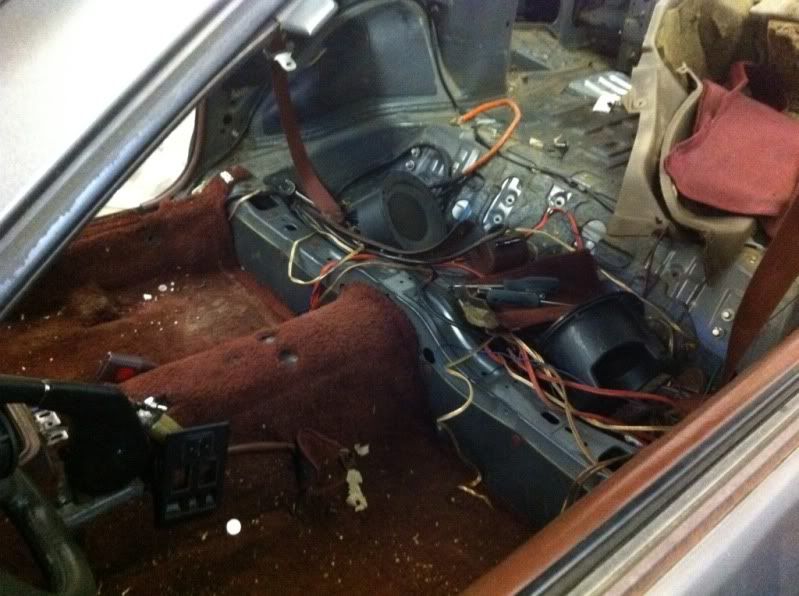
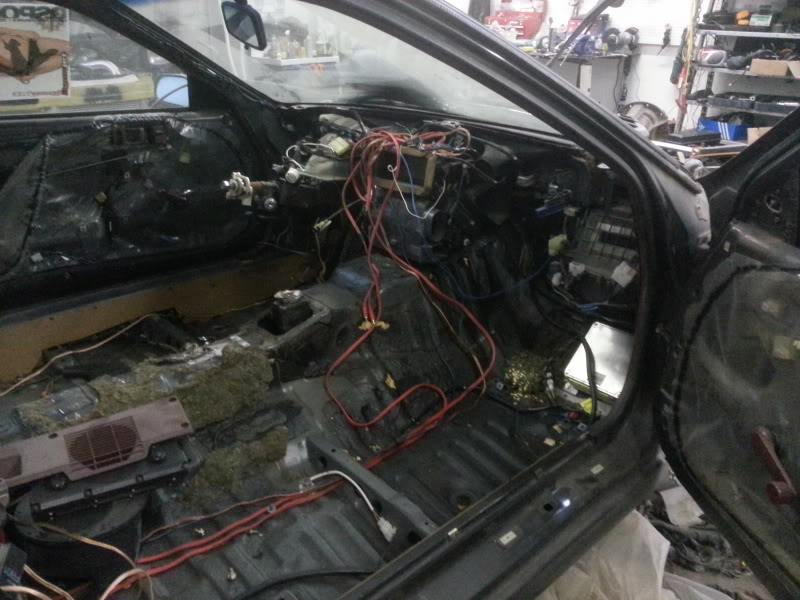
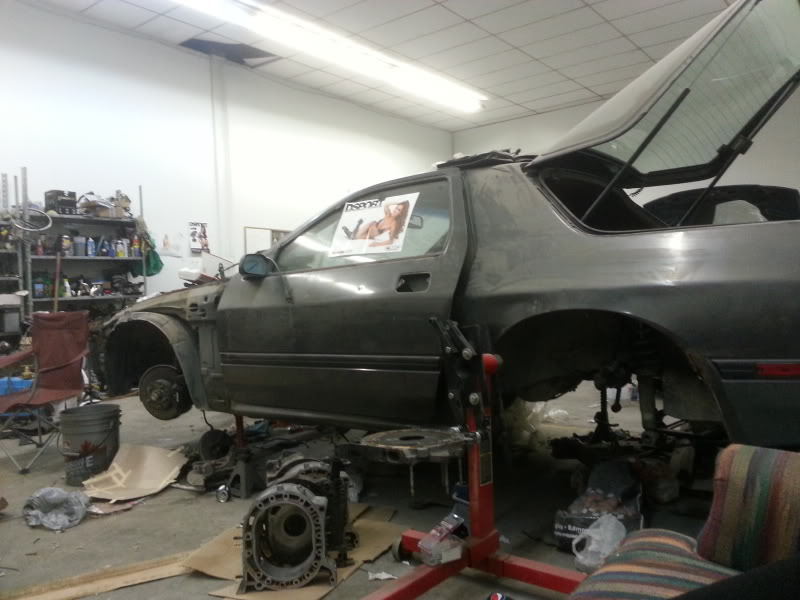
the gutting of the interior has continued. going from all maroon to all black. not gonna be easy
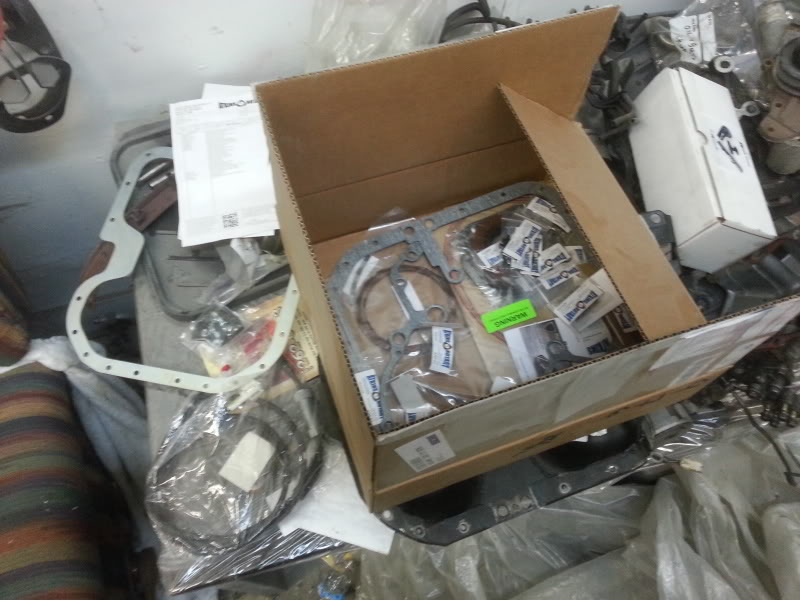
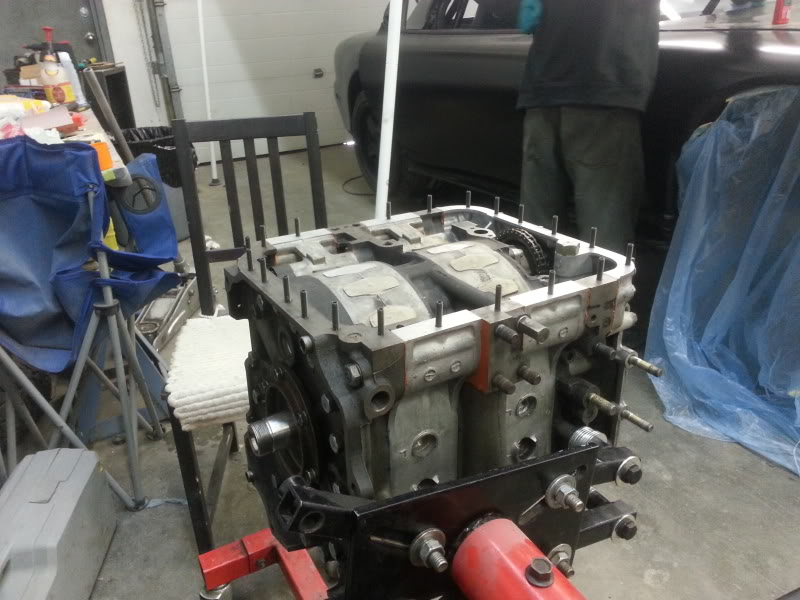
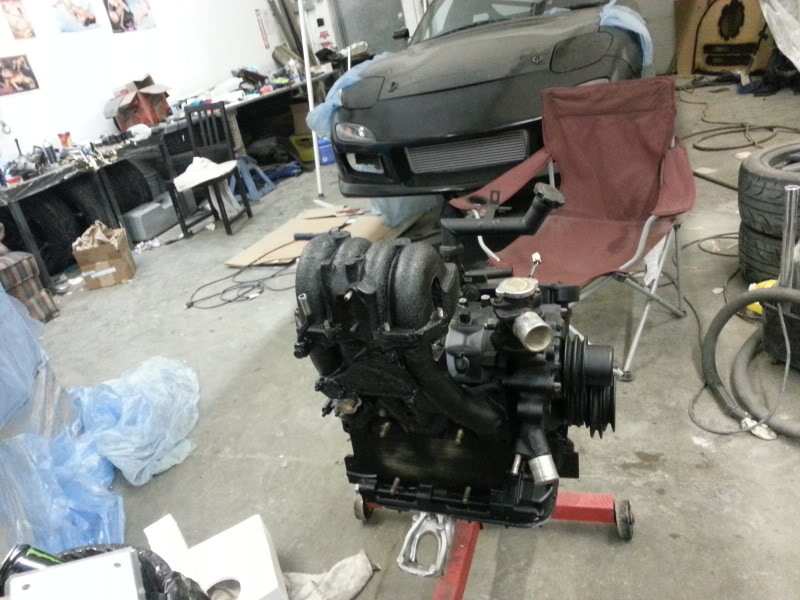
engine now has a pineapple medium street port, pretty much ready to be assembled. will be doing that this weekend
many goodies going in, atkins gaskets, RA classic apex seals, Banzai oil pan brace etc..
there are many many other things i just haven't taken pictures of,
-RisingRPM black fuel rails/oil block (thanks Eric)
-some braided steel OMP lines (thanks Ben at RotaryEvolution)
-OMP external reservoir adapter so i can run 2-stroke without having to premix (Rotary Aviation)
-Level Zero poly engine and trans mounts (they have a real nice looking diff mount prototype that i'd love to get my hands on when it makes it into production)
-i'm sure there's other stuff, i just can't think of it right now
I'm currently waiting on MMR to send me a whole bunch of other bushings and mounts i had ordered back at the end of January. when i emailed them they said they were swamped and were gonna get my order out the next day (valentine's day) but i haven't seen anything show up yet.
I've also been talking to Elliot at Turblown quite a bit recently and bugging him with millions of questions (EVERY SINGLE ONE of which he has answered promptly and thoroughly! amazing guy to deal with!!). I am really leaning towards one of his TDX61R turbos, which i think would let me exceed my previous power goals pretty easily. I would be able to get over 400 rwhp on pump gas at less than 20psi, and not have to lag until 4500rpm to do it.
Actually his whole FC3S turbo lineup of parts has been rolling around in my mind recently, dual 40mm wastegate manifold, 3.5" downpipe, the FC3S street turbo kit would (although not cheap) be a great setup.
After seeing one of the guys from Adaptronic Australia sign up and start posting here (that's right, just because i'm not posting every day doesn't mean i'm not watching.. creepy no?) I started reading about the various ECU's they offer. I was a bit on the fence about engine management for a while, and knew (and still know) very little about it. I had kind of decided to go with a haltech sport 1000 because a couple of buddies were going to be using those and the 3 of us could probably end up putting our heads together and figuring them out eventually. I'm really liking these adaptronic ECU's now though, the e440d especially. I think the 'adaptive tuning' would be a huge help to someone like me who is a first time tuner. It doesn't completely tune the car for you of course, that's just silly, but it would definitely be a huge help i think.
Anyways, i htink that's the setup I'm shooting for, TDX61R turbo (1.00 turbine housing) with some turblown mani and dp goodness, Adaptronic brains, injector dynamics secondaries, and a tender touch when setting it all up for the first time. I just need to save a little bit more cash so i can give it all to Elliot ha ha.. i have a good chunk saved up now, but i had a different turbo setup in mind for a long time and the funding required has jumped significantly.
just for fun, here's a shot of my beautiful girlfriend Dannie Riel who hangs out on my FC and helps keep my spirits up when something pisses me off
she's totally actually my girlfriend you guys.. shut up you guys..
-sean
Nothing too exciting yet, just been gathering parts and changing plans
Carbonetic metal 1.5way LSD (thanks Chris and Adam at THmotorsports, wicked deal)
the gutting of the interior has continued. going from all maroon to all black. not gonna be easy
engine now has a pineapple medium street port, pretty much ready to be assembled. will be doing that this weekend
many goodies going in, atkins gaskets, RA classic apex seals, Banzai oil pan brace etc..
there are many many other things i just haven't taken pictures of,
-RisingRPM black fuel rails/oil block (thanks Eric)
-some braided steel OMP lines (thanks Ben at RotaryEvolution)
-OMP external reservoir adapter so i can run 2-stroke without having to premix (Rotary Aviation)
-Level Zero poly engine and trans mounts (they have a real nice looking diff mount prototype that i'd love to get my hands on when it makes it into production)
-i'm sure there's other stuff, i just can't think of it right now
I'm currently waiting on MMR to send me a whole bunch of other bushings and mounts i had ordered back at the end of January. when i emailed them they said they were swamped and were gonna get my order out the next day (valentine's day) but i haven't seen anything show up yet.
I've also been talking to Elliot at Turblown quite a bit recently and bugging him with millions of questions (EVERY SINGLE ONE of which he has answered promptly and thoroughly! amazing guy to deal with!!). I am really leaning towards one of his TDX61R turbos, which i think would let me exceed my previous power goals pretty easily. I would be able to get over 400 rwhp on pump gas at less than 20psi, and not have to lag until 4500rpm to do it.
Actually his whole FC3S turbo lineup of parts has been rolling around in my mind recently, dual 40mm wastegate manifold, 3.5" downpipe, the FC3S street turbo kit would (although not cheap) be a great setup.
After seeing one of the guys from Adaptronic Australia sign up and start posting here (that's right, just because i'm not posting every day doesn't mean i'm not watching.. creepy no?) I started reading about the various ECU's they offer. I was a bit on the fence about engine management for a while, and knew (and still know) very little about it. I had kind of decided to go with a haltech sport 1000 because a couple of buddies were going to be using those and the 3 of us could probably end up putting our heads together and figuring them out eventually. I'm really liking these adaptronic ECU's now though, the e440d especially. I think the 'adaptive tuning' would be a huge help to someone like me who is a first time tuner. It doesn't completely tune the car for you of course, that's just silly, but it would definitely be a huge help i think.
Anyways, i htink that's the setup I'm shooting for, TDX61R turbo (1.00 turbine housing) with some turblown mani and dp goodness, Adaptronic brains, injector dynamics secondaries, and a tender touch when setting it all up for the first time. I just need to save a little bit more cash so i can give it all to Elliot ha ha.. i have a good chunk saved up now, but i had a different turbo setup in mind for a long time and the funding required has jumped significantly.
just for fun, here's a shot of my beautiful girlfriend Dannie Riel who hangs out on my FC and helps keep my spirits up when something pisses me off
she's totally actually my girlfriend you guys.. shut up you guys..
-sean
Thread Starter
Rx Bandit
Joined: Jul 2008
Posts: 232
Likes: 1
From: Fort St John, BC, Canada
had a good sunday putting the engine all together, everything went nice and smooth with much help from aaroncake's rebuild vid, thanks man
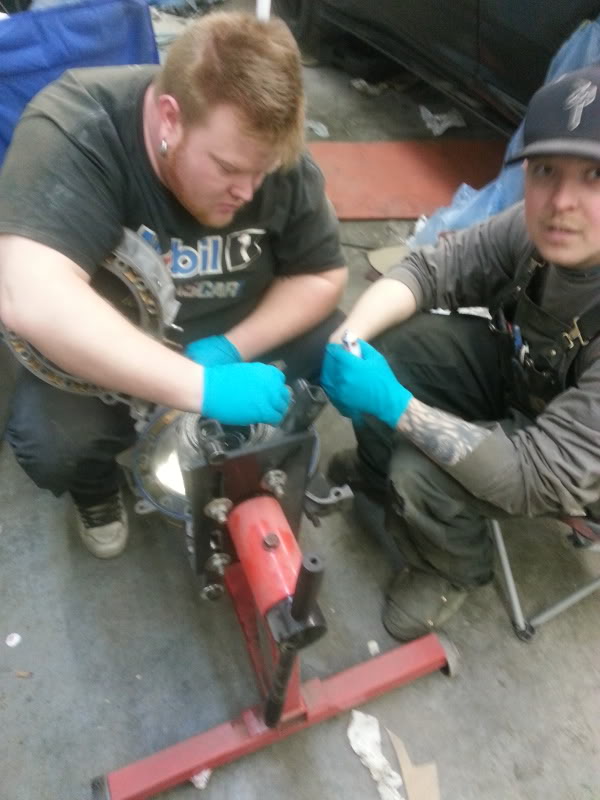
(i'm the big ginger, the little gangster beside me in the hat has an '87 GXL that we're going to be doing a 6-port turbo setup on with my old turbo stuff)
still witing on my MMR bushings etc so i can get the drivetrain back together. arrg
i can't wait to get this thing all back together again
-sean
(i'm the big ginger, the little gangster beside me in the hat has an '87 GXL that we're going to be doing a 6-port turbo setup on with my old turbo stuff)
still witing on my MMR bushings etc so i can get the drivetrain back together. arrg
i can't wait to get this thing all back together again
-sean
Thread Starter
Rx Bandit
Joined: Jul 2008
Posts: 232
Likes: 1
From: Fort St John, BC, Canada
getting more and more stuff buttoned up.
i only really get a couple hours here and there to work on it, it's kind of frustrating.
Banzai oil pan brace and stud kit are pretty awesome.
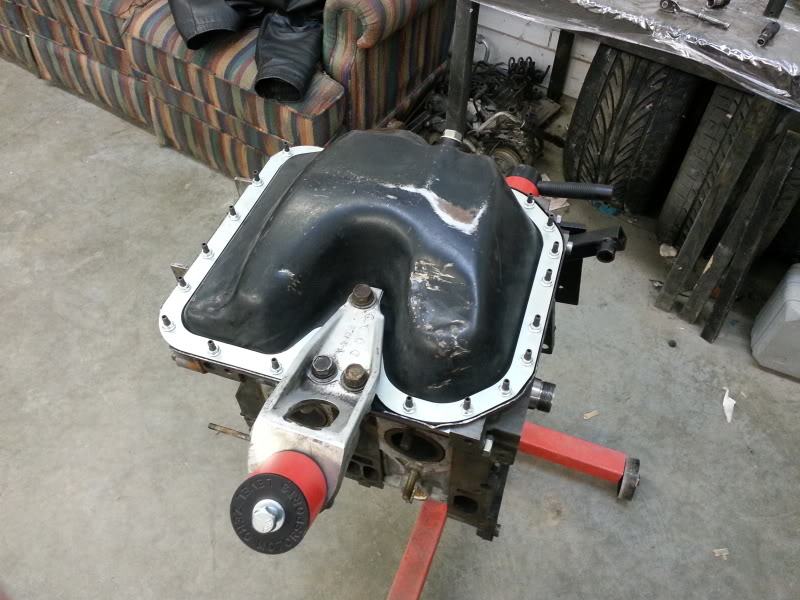
that oil pan has seen some stuff, man..
still waiting on MMR bushings so i can put the drivetrain back together, and a couple more paycheques (paychecks for you americans) so i can get some turbo happening
-sean
i only really get a couple hours here and there to work on it, it's kind of frustrating.
Banzai oil pan brace and stud kit are pretty awesome.
that oil pan has seen some stuff, man..
still waiting on MMR bushings so i can put the drivetrain back together, and a couple more paycheques (paychecks for you americans) so i can get some turbo happening
-sean


Thread Starter
Rx Bandit
Joined: Jul 2008
Posts: 232
Likes: 1
From: Fort St John, BC, Canada
Thanks bud! The car will look quite different eventually, but I want to get all the mechanical stuff done before I do any visual stuff.
If I can get it all back together for summer, it will look pretty much identical, with some minor changes. If fall comes around and it's still not on the road (unlikely) then I'll start going on the body work.
Whichever happens, body work will come next winter I'm pretty sure.
-sean
If I can get it all back together for summer, it will look pretty much identical, with some minor changes. If fall comes around and it's still not on the road (unlikely) then I'll start going on the body work.
Whichever happens, body work will come next winter I'm pretty sure.
-sean
Thread Starter
Rx Bandit
Joined: Jul 2008
Posts: 232
Likes: 1
From: Fort St John, BC, Canada
Most of my mmr bushings/mounts came in. Still missing one set of sleeved control arm bushings, I emailed mmr about it and got another tracking number in reply so I guess I'll see what shows up
Also painted the intake manifolds wrinkle black, looks cool I think
She's coming together!
-sean
Also painted the intake manifolds wrinkle black, looks cool I think
She's coming together!
-sean
this was an awesome story and the build appears to be following suit. many highlights along the way and i really like the way things just seem to fall into place with you and the car.i'm definitely interested in seeing where it all ends up. total sexiness!!!
oh ... and that all black paint scheme on the engine is very intriguing. i like it ... so much so that i usually never paint my engines, but if i ever do paint one, this would be one of two schemes i go with.
oh ... and that all black paint scheme on the engine is very intriguing. i like it ... so much so that i usually never paint my engines, but if i ever do paint one, this would be one of two schemes i go with.
Wrinkle paint is cool but harder to apply correctly than you'd think.
Here are a few tips for your next project:
Heat is your friend.
Prior to paint, heat the part in an oven. Low will work fine but leave it in for a while...with a part like that manifold, I'd say an hour or two. You want the entire thing to be uniformly heated.
I also heat a pan of water and then immerse the paint can in it (heat off).
In order to achieve even, consistent wrinkling, the paint coat needs to be even and heavy, almost to the point of running.
I use a halogen worklight to continue heating the paint/part after application. Move the light around to get even heat or to focus on areas that aren't wrinkling up right.
Following these tips will give a fine, even finish, I think it looks better with lots of small wrinkling than big exaggerated textures.
Finally, allow a lot of time for drying, the paint coat is thick and uneven and will remain soft for 24 hours or so.
It does look bitchin on manifolds though...thank you, Ferrari.
Thread Starter
Rx Bandit
Joined: Jul 2008
Posts: 232
Likes: 1
From: Fort St John, BC, Canada
jaggermouth and diabolical1: thanks guys! i'm getting real excited about driving this thing again and i keep having to remind myself that there's still tons and tons to do. i'm trying to do things as well as i can and not take shortcuts this time, but it's hard
clokker: thanks for the good tips! i may do the intercooler piping or strut bars wrinkle black too, and i am definitely going to do my subaru's intake manifold this summer when i pull it off to install some other stuff. your tips will come in handy, kudos.
clokker: thanks for the good tips! i may do the intercooler piping or strut bars wrinkle black too, and i am definitely going to do my subaru's intake manifold this summer when i pull it off to install some other stuff. your tips will come in handy, kudos.
Thread Starter
Rx Bandit
Joined: Jul 2008
Posts: 232
Likes: 1
From: Fort St John, BC, Canada
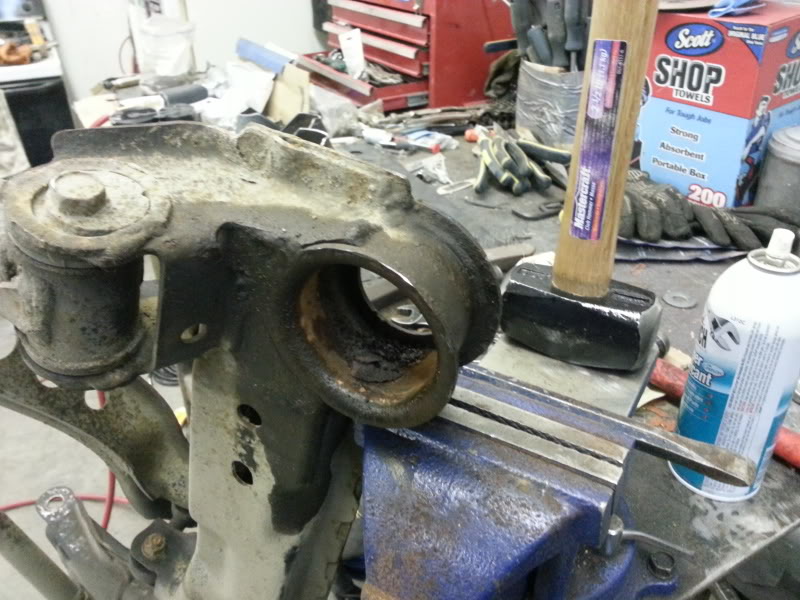
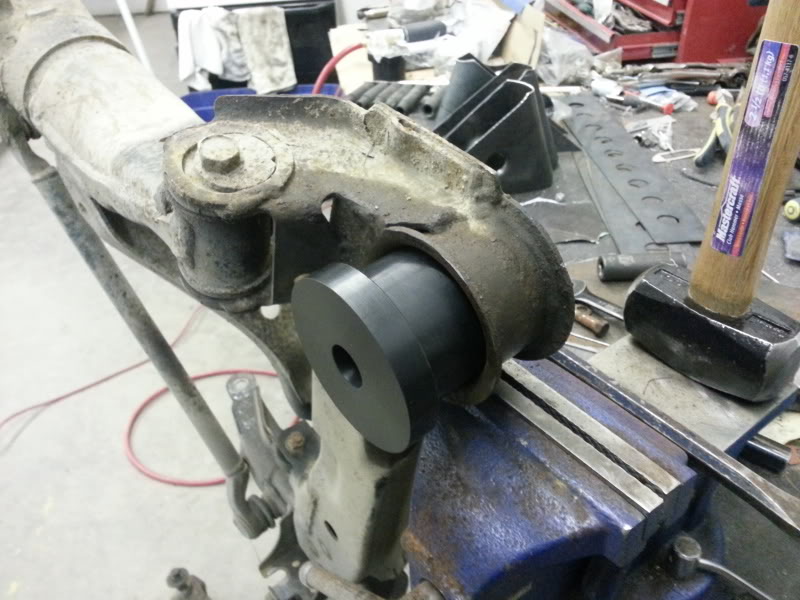
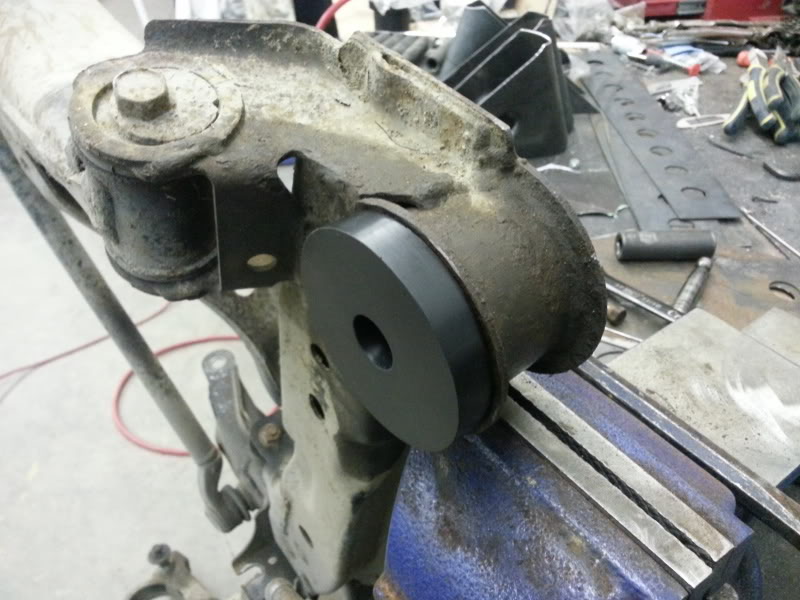
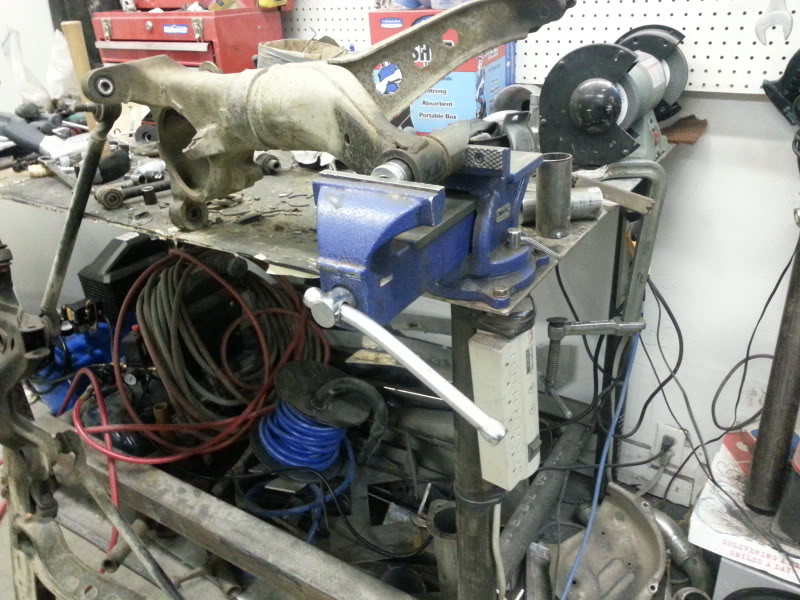
well most of the mounts and bushings are installed. many of the oem 26+ year old bushings are a massive pain in the brain to get out.
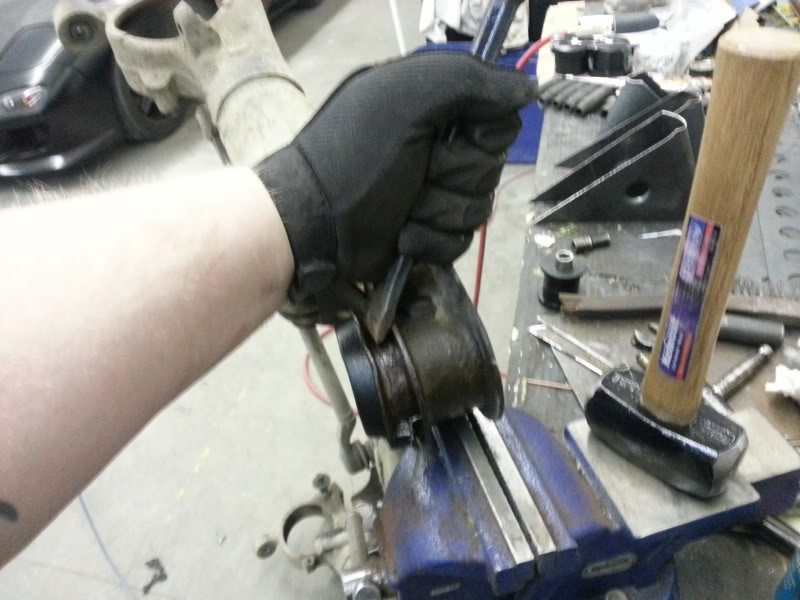
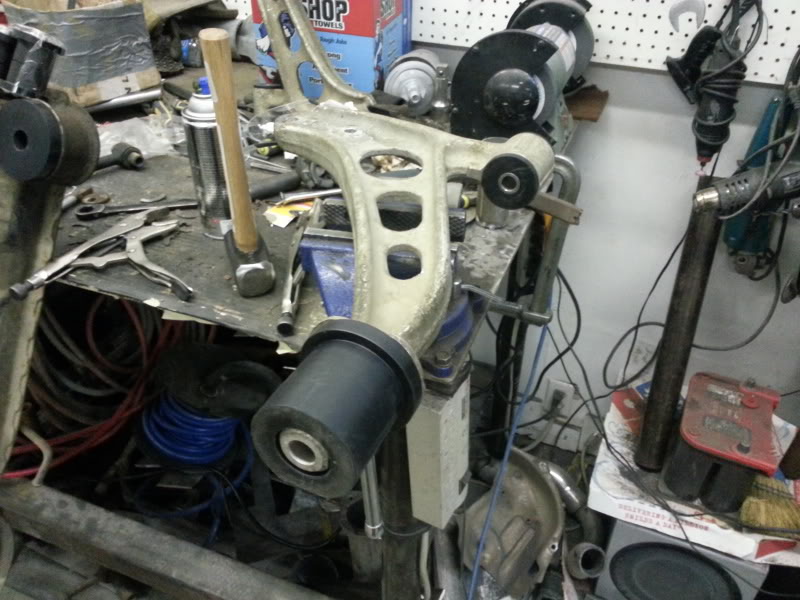
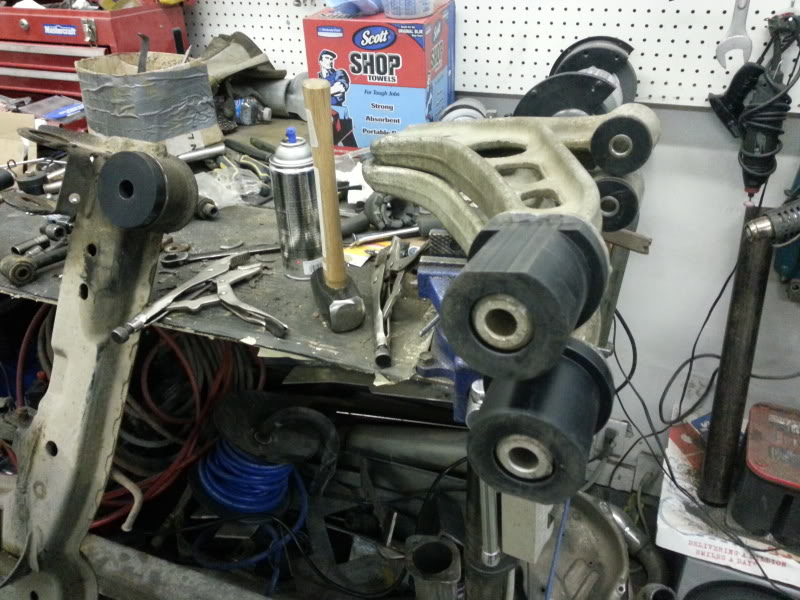
I'm sure there's many more practical ways to go about removing old mounts that i am not aware of. i just used what my poor little brain could come up with
the rear subframe mounts came out with a big 'ol hammer and a big 'ol chisel. the outer steel shell of the mount that sits against the subframe itself is made of 2 semi-circular sleeves. if you can pound the corners in so one sleeve piece kind of sits inside the other the mount comes out pretty quick.
the diff mounts are nearly identical to this, but the whole bottom of the mount is exposed so i just got a socket big enough to sit all around the outer steel sleeve of the mounts and beat the hell out of them
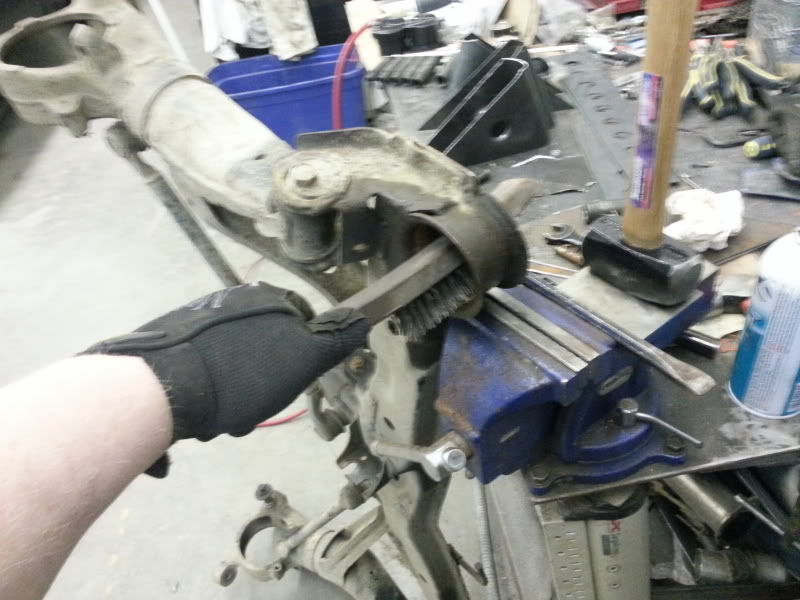
the big rear mounts/bushings of the front control arms are tricky. they are rubber/steel sleeve/rubber/control arm shaft. i ended up cutting away the outer rubber with a razor blade to expose the steel, cutting a strip through the steel sleeve with a die grinder to expose more rubber, then cutting that rubber with a razor blade til i got to the control arm. after that, just spread and twist off.
the smaller forward front control arm bushings got pressed out with a vise using a couple lengths of pipe (2 1/4" diameter maybe? same diameter as the bushing hole in the control arm) and a 22mm socket. worked pretty well
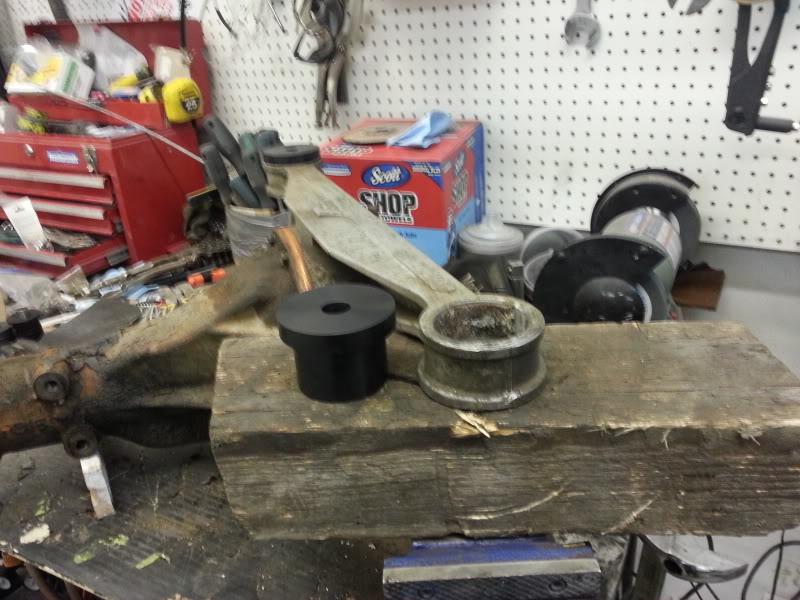
the last set of bushings finally arrived yesterday (rear control arm-to-subframe)
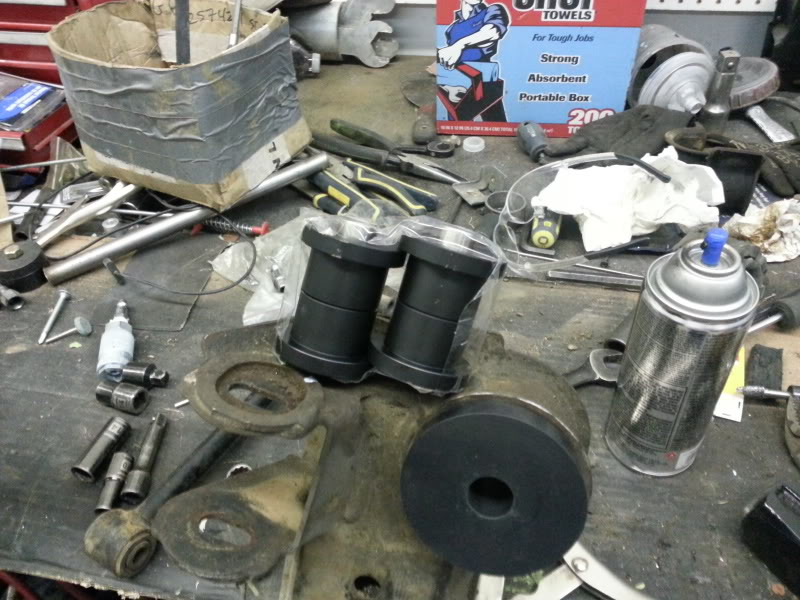
but unfortunately although the oem bushings are very similar to the front control arm bushings, they are a little longer and provide just a bit too much resistance for my poor little vise to handle..
a buddy of mine works in a welding/machine shop that has a nice big hydraulic press. i'll bring my stuff over there after work today and see if we can pop these things out so i can start putting all my drivetrain/suspension back together.
this car is gonna be stiff as *****.
-sean
I'm sure there's many more practical ways to go about removing old mounts that i am not aware of. i just used what my poor little brain could come up with
the rear subframe mounts came out with a big 'ol hammer and a big 'ol chisel. the outer steel shell of the mount that sits against the subframe itself is made of 2 semi-circular sleeves. if you can pound the corners in so one sleeve piece kind of sits inside the other the mount comes out pretty quick.
the diff mounts are nearly identical to this, but the whole bottom of the mount is exposed so i just got a socket big enough to sit all around the outer steel sleeve of the mounts and beat the hell out of them
the big rear mounts/bushings of the front control arms are tricky. they are rubber/steel sleeve/rubber/control arm shaft. i ended up cutting away the outer rubber with a razor blade to expose the steel, cutting a strip through the steel sleeve with a die grinder to expose more rubber, then cutting that rubber with a razor blade til i got to the control arm. after that, just spread and twist off.
the smaller forward front control arm bushings got pressed out with a vise using a couple lengths of pipe (2 1/4" diameter maybe? same diameter as the bushing hole in the control arm) and a 22mm socket. worked pretty well
the last set of bushings finally arrived yesterday (rear control arm-to-subframe)
but unfortunately although the oem bushings are very similar to the front control arm bushings, they are a little longer and provide just a bit too much resistance for my poor little vise to handle..
a buddy of mine works in a welding/machine shop that has a nice big hydraulic press. i'll bring my stuff over there after work today and see if we can pop these things out so i can start putting all my drivetrain/suspension back together.
this car is gonna be stiff as *****.
-sean