
Driven Daily Hillclimb Racer

Thread Starter
Raced Regularly
Joined: Jan 2015
Posts: 135
Likes: 0
From: Manchganistan, NH, USA
This weekend was a lot of math. I already knew that the g35/350z front subframe would be wider than the stock 280z subframe. I also know that the 240sx rear subframe is wider than the stock 280z rear subframe.
The stock front and rear subframes are designed to be the same width.
After math-ing, I came up with the following:
* Original hub-to-hub distance: 53"
* g35 hub-to-hub distance: 60.8"
That's 3.4" wider on each side
But wait! There's more!
The original Datsun wheels were 14x5 (15" diameter by 5" wide), and I'm bumping up to 17x8" (8" wide) for street wheels. I need to accommodate 17x10" race wheels, and my math suggests that I'll have around 6" of those wheels outside of the hub (per side). That's 5" more 'wheel' outside of the hub than stock.
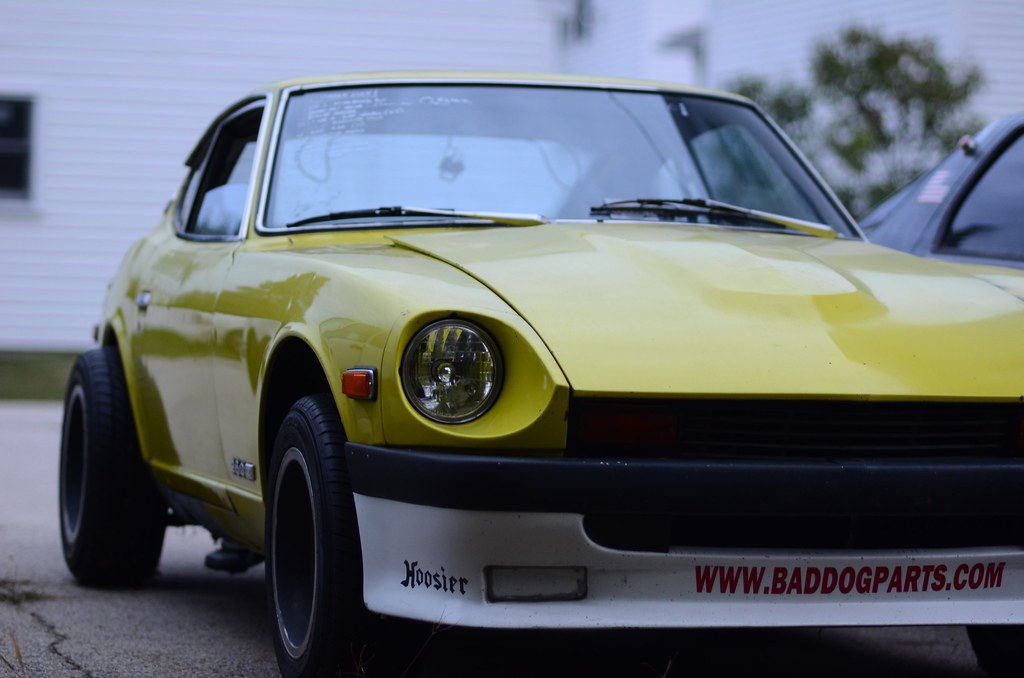
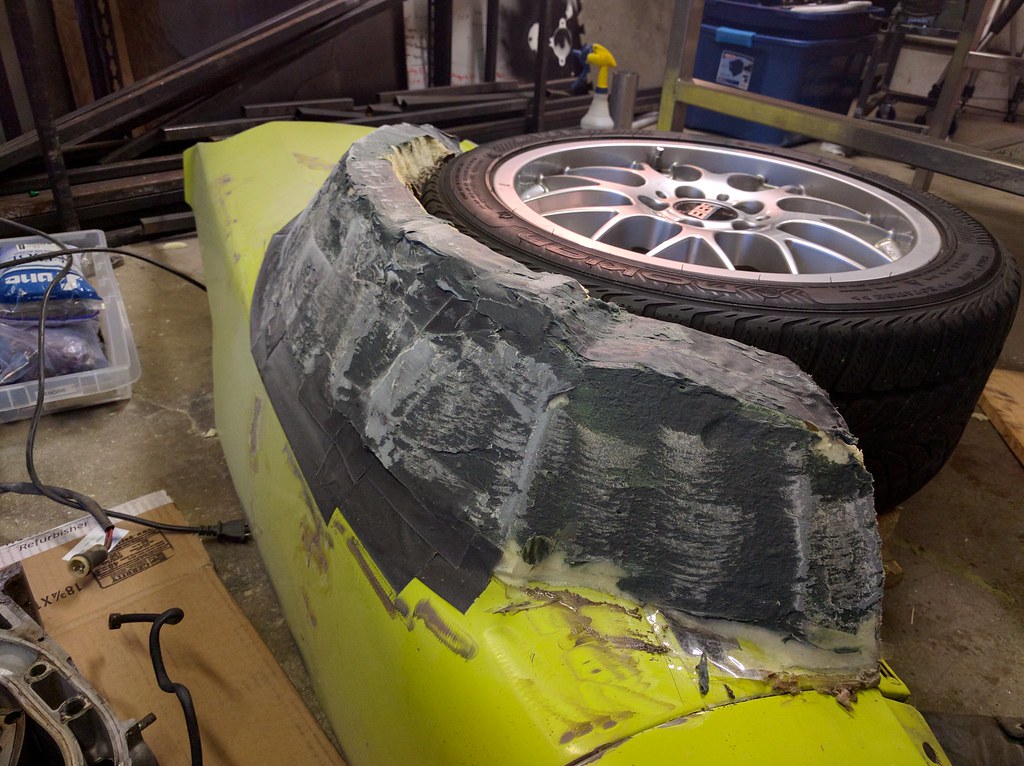
At the end, this all means I'm going from a fender width requirement of 55" to 72", which is 17" wider, or 8.5" wider than stock, per side. This car-shaped thing is starting to show how ridiculous it really is.
My fender plugs just keep growing and growing. It's starting to get ridiculous.
The stock front and rear subframes are designed to be the same width.
After math-ing, I came up with the following:
* Original hub-to-hub distance: 53"
* g35 hub-to-hub distance: 60.8"
That's 3.4" wider on each side
But wait! There's more!
The original Datsun wheels were 14x5 (15" diameter by 5" wide), and I'm bumping up to 17x8" (8" wide) for street wheels. I need to accommodate 17x10" race wheels, and my math suggests that I'll have around 6" of those wheels outside of the hub (per side). That's 5" more 'wheel' outside of the hub than stock.
At the end, this all means I'm going from a fender width requirement of 55" to 72", which is 17" wider, or 8.5" wider than stock, per side. This car-shaped thing is starting to show how ridiculous it really is.
My fender plugs just keep growing and growing. It's starting to get ridiculous.
Thread Starter
Raced Regularly
Joined: Jan 2015
Posts: 135
Likes: 0
From: Manchganistan, NH, USA
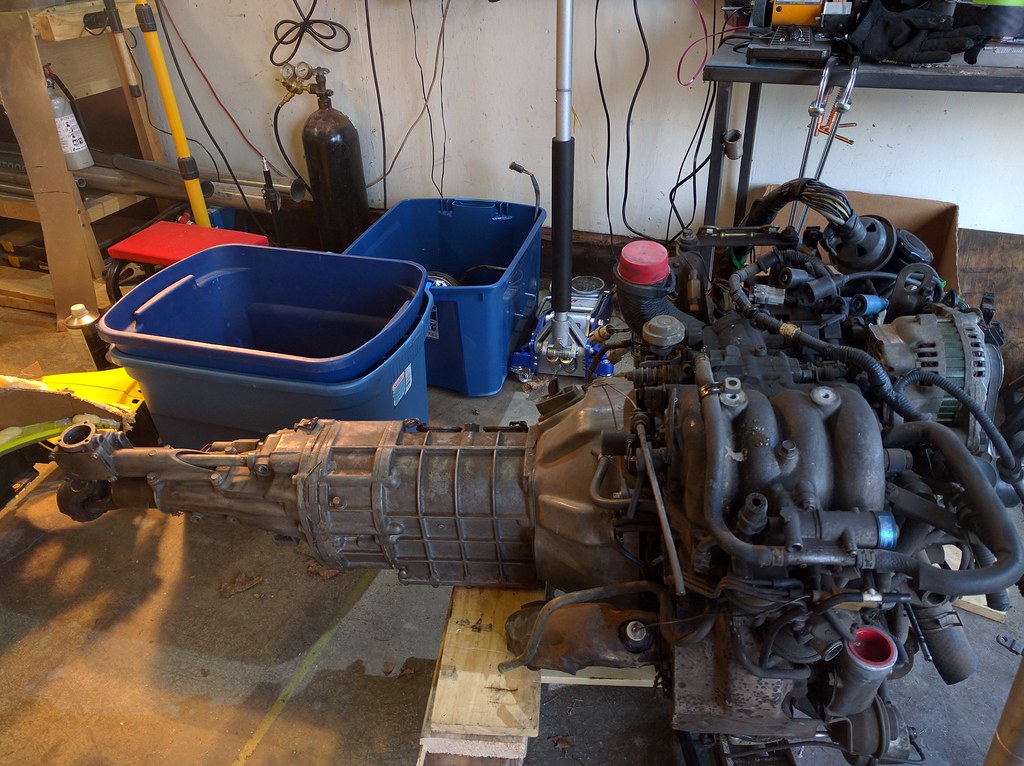
I suppose it's time to start talking about what's going under the hood. The current engine is a test mule, something I picked up off Craigslist that may or may not run. A friend of my fabricator happened to have a 13b that had been sitting on a shelf for a little while. I made an offer on it, and just **barely** squeezed it into my budget ... but this solves my "will it run reliably?" problem pretty completely. It's a ported 2rotor running on VEMS that's already been tuned, and is ready for whatever I want to throw at it ... as long as I'm throwing lots of fuel and oil at it.
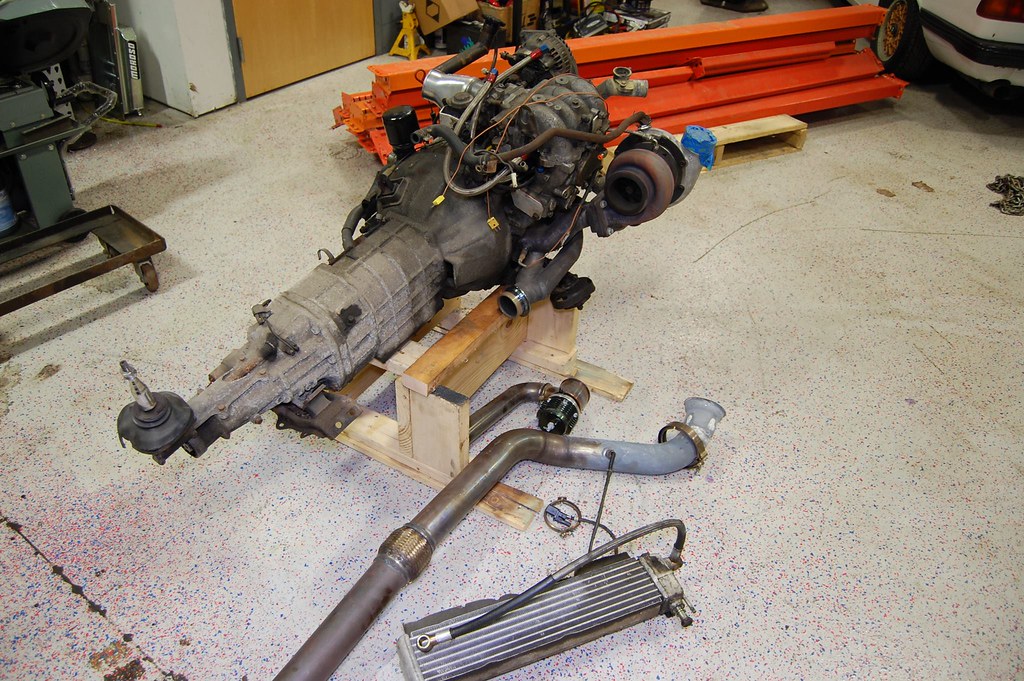
According to the dyno results on this engine, it should be good for better than 350whp. Sometimes, you get lucky and the right deal comes along at the right time. This was my time.
It's going to take some time to get it in the car, get the harness wired in, and build the body harness for it, but I'm in full-on thrash mode now. 14 weekend-days left before the first event.
Last edited by driven-daily; Mar 31, 2016 at 04:43 PM. Reason: syntax
Thread Starter
Raced Regularly
Joined: Jan 2015
Posts: 135
Likes: 0
From: Manchganistan, NH, USA
Thread Starter
Raced Regularly
Joined: Jan 2015
Posts: 135
Likes: 0
From: Manchganistan, NH, USA
No real update, but I can drop this off as a reference of scale. The engine will probably end up slightly farther forward than this, but I think it can safely be called 'mid engine'
Thread Starter
Raced Regularly
Joined: Jan 2015
Posts: 135
Likes: 0
From: Manchganistan, NH, USA
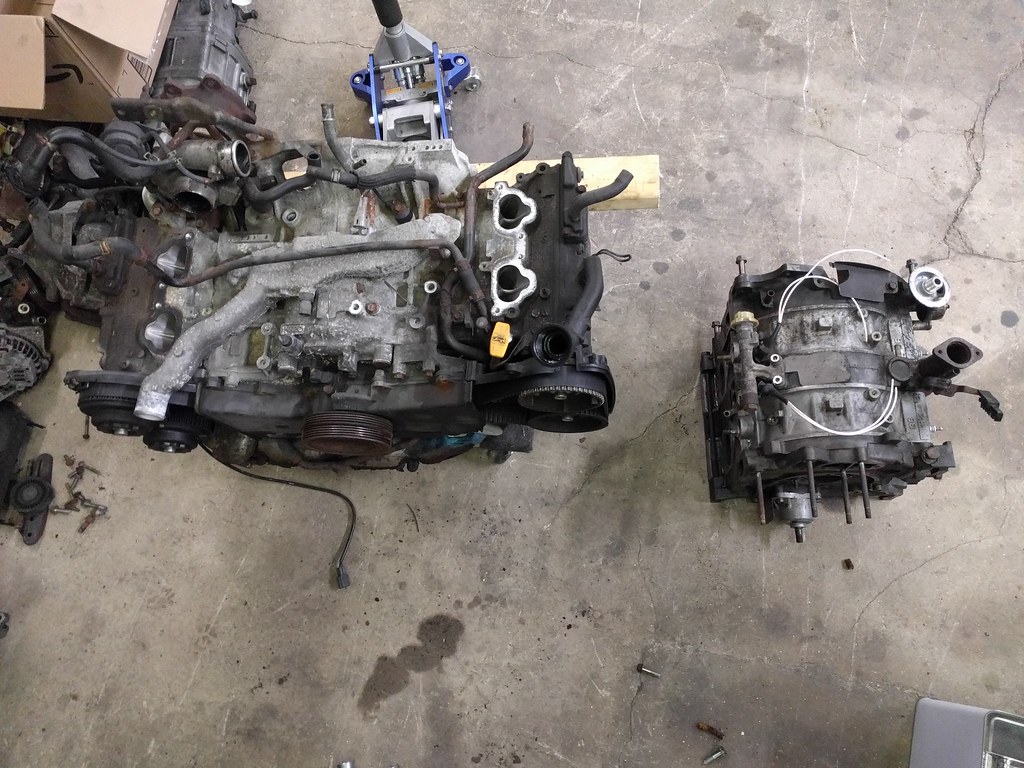
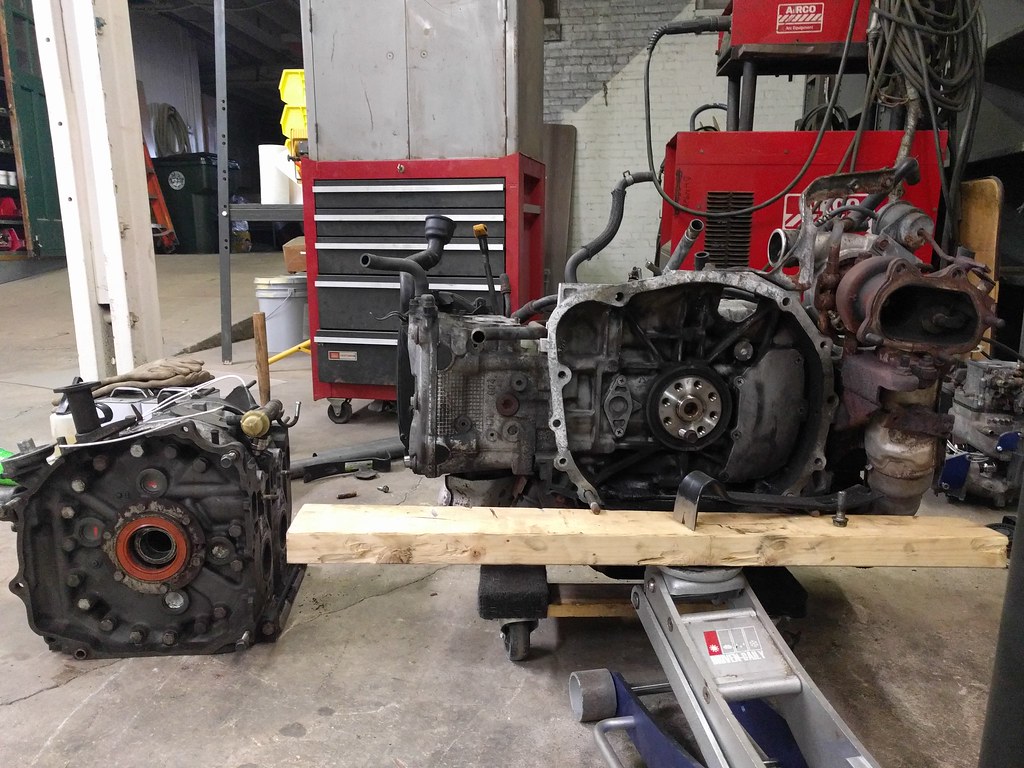
Because the new engine is going in, I now have the 'leftovers' of stuff that isn't going into the car in my shop. That means cleaning, organizing, and storing needs to happen (before the car shows up). This is unacceptable:

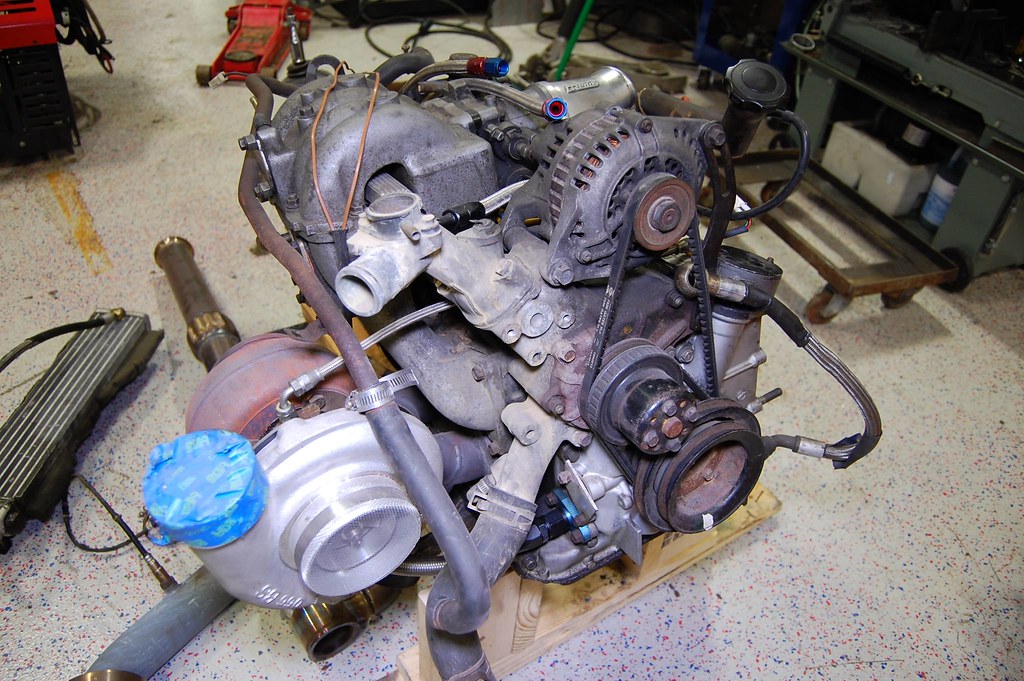
I started by shuffling some parts around, and making room in the 'engine room'. Because I know I won't using OEM EFI on this car, I decided to tear all the extras off of the assembled-spare 13b.
I started with this and a beer:
And ended with less clutter, and no beer. Here's the mockup housing assembly next to the 'assembled spare' block.
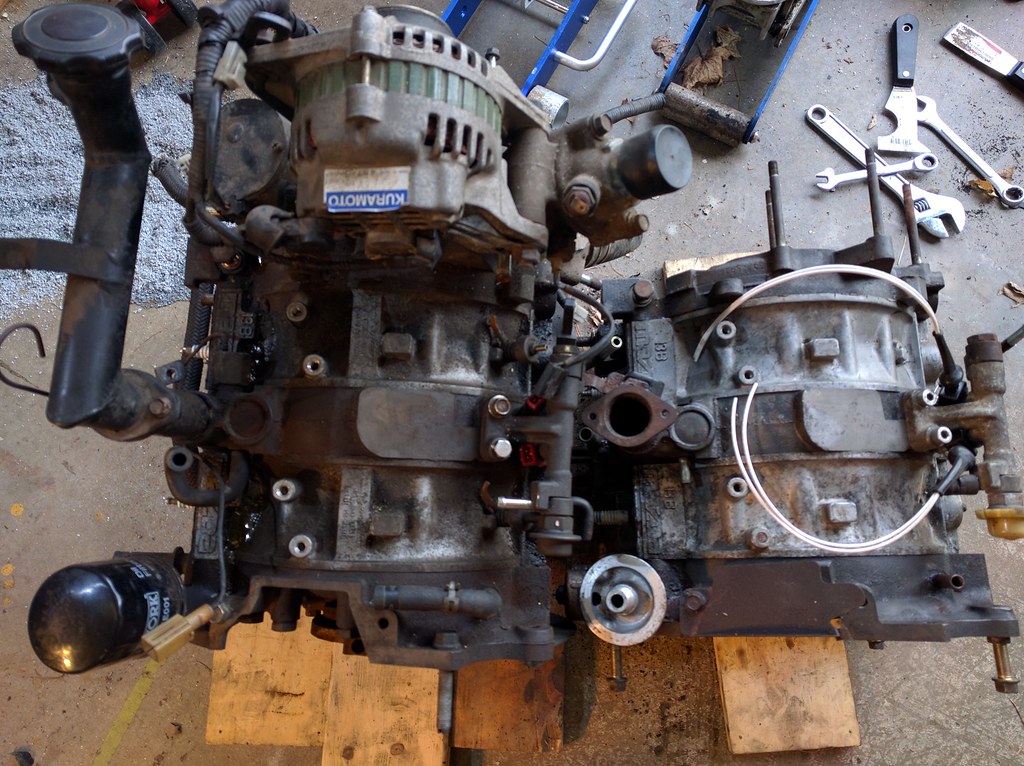
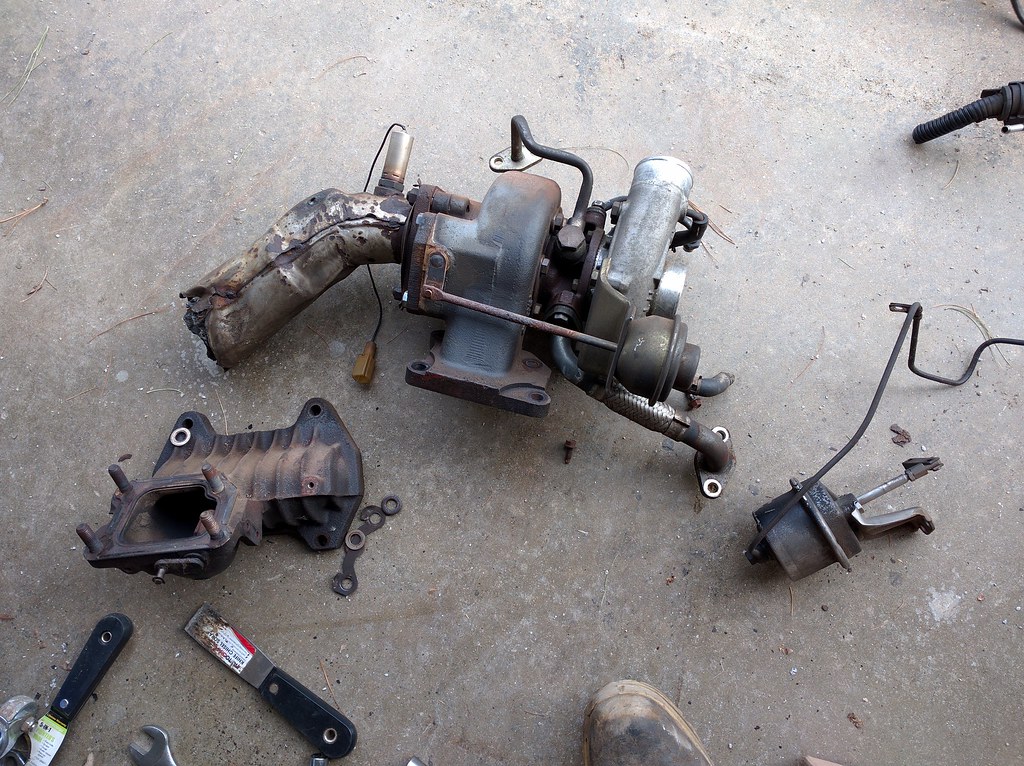
The turbo goes on the 'spare turbos' shelf. If there's any kind of market for it, I'll happily sell the harness/ecu/manifold/turbo/lines off to whoever is interested enough to make it worth putting them in a box. I have no idea what it takes to convert n/a to turbo, or if any of this is worth anything.
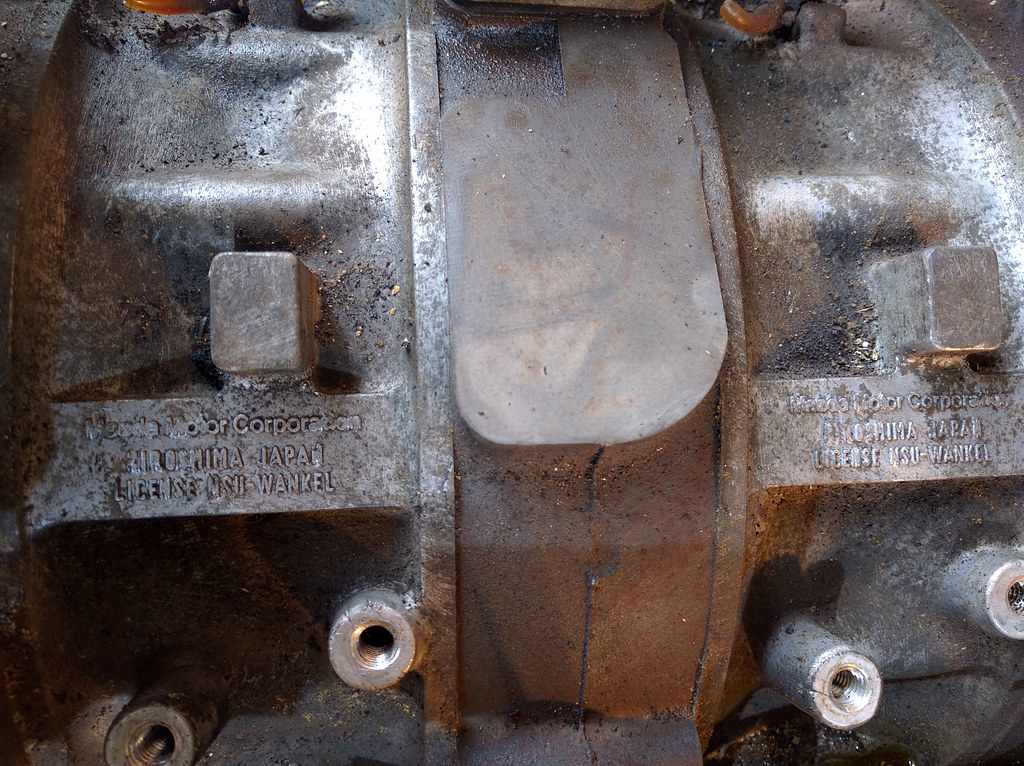
One interesting discovery I came up with is that these two engines apparently have different rotor housings. Otherwise, they appear to be identical.
One with no markings on top
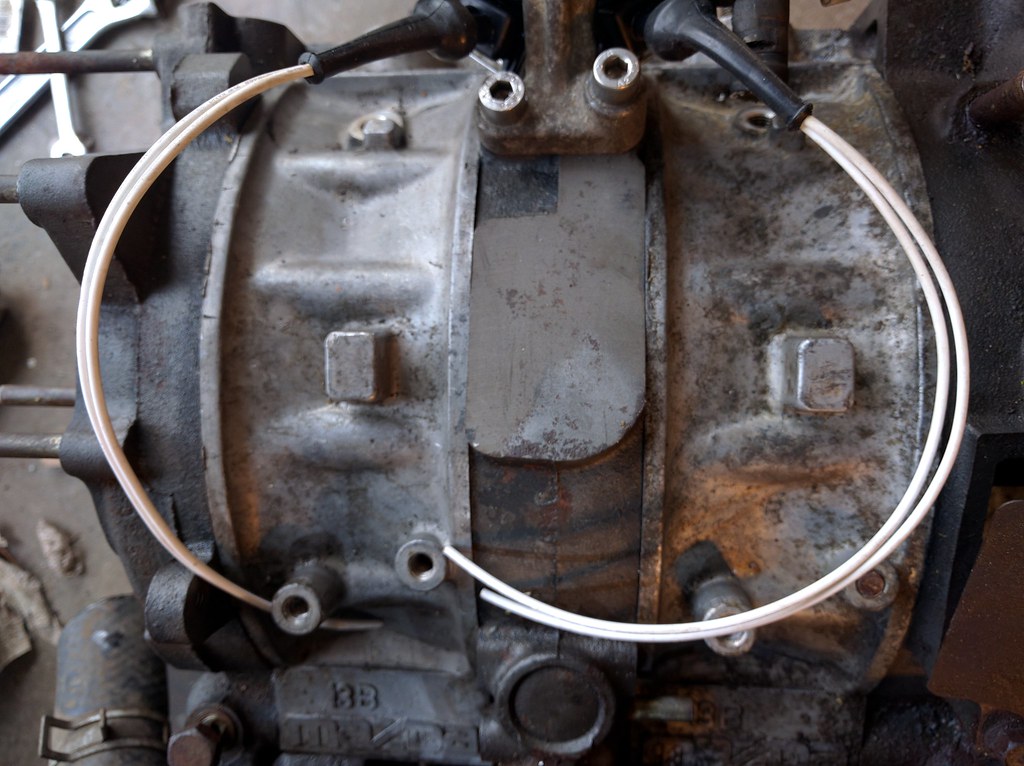
The other with licensing markings on top.
As for accessories, here's one of the spare transmissions (I now have three turbo2 transmissions), and two of the intake manifolds (again, I have a total of three right now).

That emissions block-off kit is really disappointing. It's so thin that I can't use the stock studs. I can either draw up a DXF (just put these on a flat-bed scanner and scan them 1:1) and have Big Blue Saw cut out some proper plates, or pull those studs and use bolts instead. Generally speaking, I find that steel studs in aluminum don't come out as easily as I'd like. I'm leaning toward slightly girthier blockoff plates.
Does anyone have a DXF that's already drawn up, by any chance?
I started by shuffling some parts around, and making room in the 'engine room'. Because I know I won't using OEM EFI on this car, I decided to tear all the extras off of the assembled-spare 13b.
I started with this and a beer:
And ended with less clutter, and no beer. Here's the mockup housing assembly next to the 'assembled spare' block.
The turbo goes on the 'spare turbos' shelf. If there's any kind of market for it, I'll happily sell the harness/ecu/manifold/turbo/lines off to whoever is interested enough to make it worth putting them in a box. I have no idea what it takes to convert n/a to turbo, or if any of this is worth anything.
One interesting discovery I came up with is that these two engines apparently have different rotor housings. Otherwise, they appear to be identical.
One with no markings on top
The other with licensing markings on top.
As for accessories, here's one of the spare transmissions (I now have three turbo2 transmissions), and two of the intake manifolds (again, I have a total of three right now).
That emissions block-off kit is really disappointing. It's so thin that I can't use the stock studs. I can either draw up a DXF (just put these on a flat-bed scanner and scan them 1:1) and have Big Blue Saw cut out some proper plates, or pull those studs and use bolts instead. Generally speaking, I find that steel studs in aluminum don't come out as easily as I'd like. I'm leaning toward slightly girthier blockoff plates.
Does anyone have a DXF that's already drawn up, by any chance?
Thread Starter
Raced Regularly
Joined: Jan 2015
Posts: 135
Likes: 0
From: Manchganistan, NH, USA
Most of tonight was spent simply cleaning/organizing. I still don't have a clean floor, but I did get to dig the dashboard out of the basement and start prepping it for molding.
For those who don't know, s30 dashboards were made of vinyl-wrapped foam that was susceptible to cracking if exposed to sunlight for more than a few years. It's pretty close to impossible to find an original, un-cracked dash these days, and most people just toss a plastic cap on top and call it good. Generally speaking, that works great. It looks good, and the dashboard doesn't need to be structurally sound.
However, the stock dash is pretty heavy. I really can't justify trying to use those old original gauges either, especially with a standalone ECU where I can drive any gauges I want. I do love the design of the s30 dash though, so I decided to repair the surface and pull a mold from it. Fiberglass should work just fine for this.
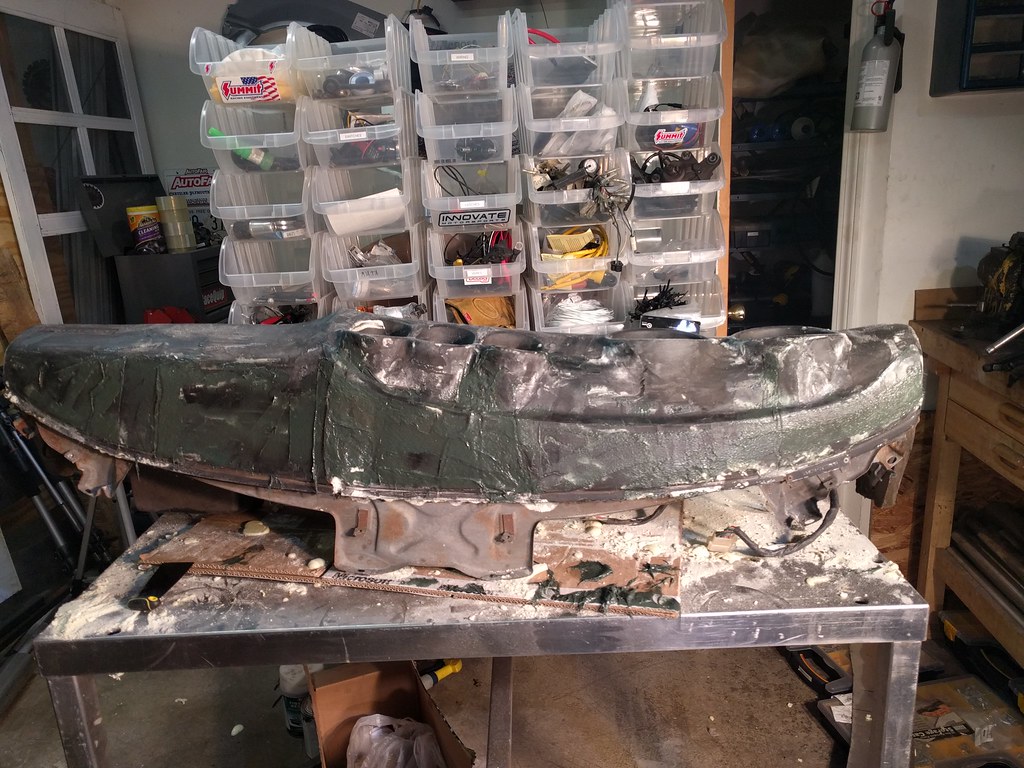
The first step is to fill the large voids left by the cracks. I used some 2lb expanding urethane foam, because it's so easy to work, is fairly rigid, and is stronger than body filler when filling large gaps. I think it took around 15 minutes to go from a badly cracked dash to a mostly-smooth one.
A quick rasping, and I had this
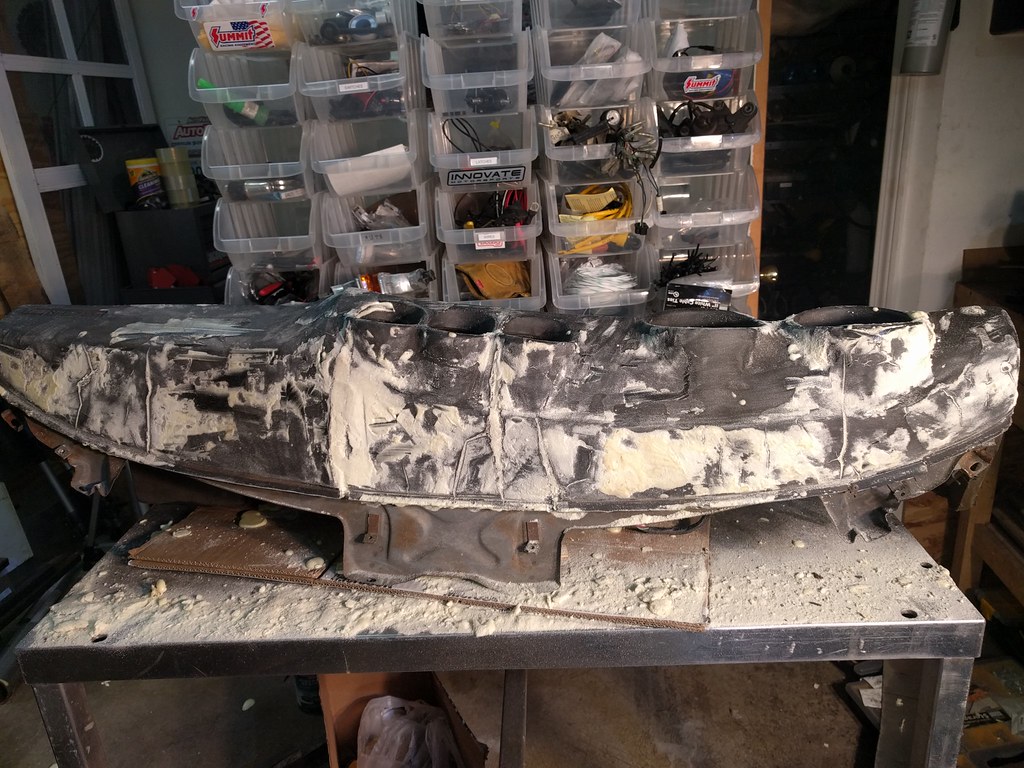
After that, I mixed up some fiberglass reinforced body filler and because it's chilly out, decided to call it a night. I'll get to sanding it down and finishing the surface after work tomorrow.
For those who don't know, s30 dashboards were made of vinyl-wrapped foam that was susceptible to cracking if exposed to sunlight for more than a few years. It's pretty close to impossible to find an original, un-cracked dash these days, and most people just toss a plastic cap on top and call it good. Generally speaking, that works great. It looks good, and the dashboard doesn't need to be structurally sound.
However, the stock dash is pretty heavy. I really can't justify trying to use those old original gauges either, especially with a standalone ECU where I can drive any gauges I want. I do love the design of the s30 dash though, so I decided to repair the surface and pull a mold from it. Fiberglass should work just fine for this.
The first step is to fill the large voids left by the cracks. I used some 2lb expanding urethane foam, because it's so easy to work, is fairly rigid, and is stronger than body filler when filling large gaps. I think it took around 15 minutes to go from a badly cracked dash to a mostly-smooth one.
A quick rasping, and I had this
After that, I mixed up some fiberglass reinforced body filler and because it's chilly out, decided to call it a night. I'll get to sanding it down and finishing the surface after work tomorrow.
Thread Starter
Raced Regularly
Joined: Jan 2015
Posts: 135
Likes: 0
From: Manchganistan, NH, USA
I'm pretty disappointed to admit that there's no way I'll be able to race the Datsun-shaped-car for the beginning of this season. I won't even have it back from the chassis fabricator's until after the first event. The only reason for going for quick, expensive solutions to problems (BBS wheels, shiny new engine, etc) was to get the car on the hill for Ascutney 1, and now that all feels like a waste. What's more: The car won't be at the events my few sponsors were expecting, so now I need to refund them for their support.
I'm absolutely gutted.
However, I can't just lie down and feel sorry for myself. I still have hillclimbs to race. I had to make a decision as to what to drive, and just accepted a deposit on the rx7 (this is the third deposit I've taken on it ... I'm almost making a profit just on deposits now).
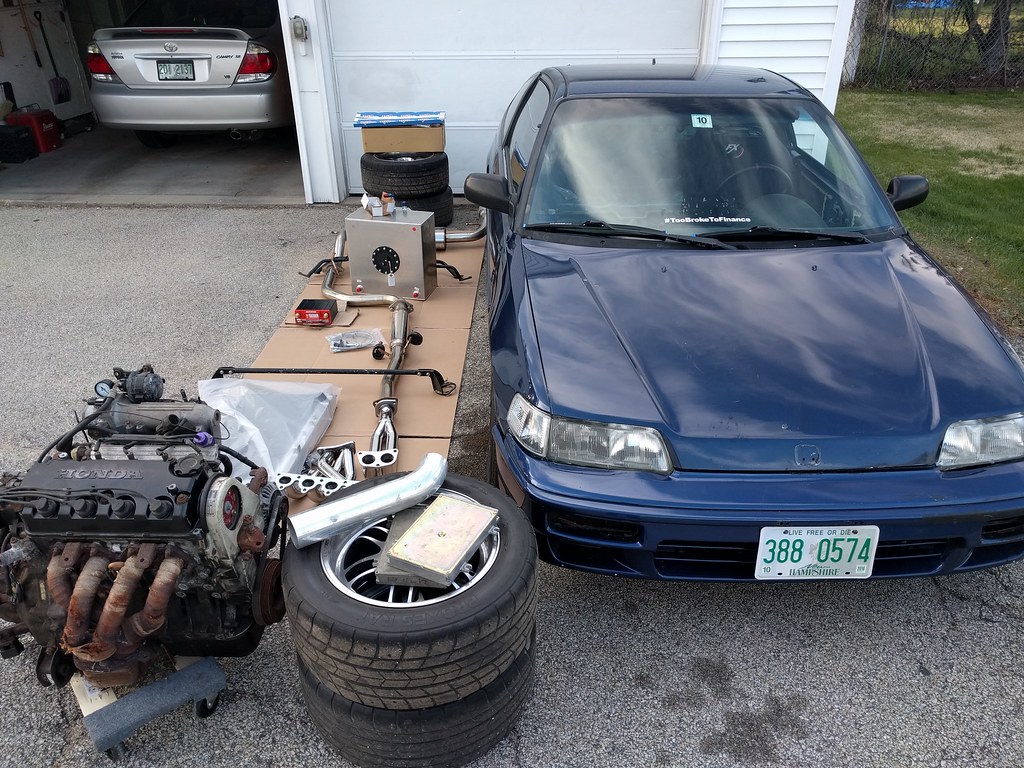
That leaves me with two options: Rent a car from someone else, or do a quick prep on my CRX. If I had more time to put into it, I'd toss a rwd subframe in it and one of the spare turboII powertrains ... but I have less than a month until Ascutney 1.
My best-case scenario is to:
1. Swap out the 325k-mile d15b2 (which was a sad design from day 1) for the high-compression d16z6 engine (sohc 1.6) sitting on a shelf.
2. Toss the 225-series RA1's left over from the Miata on it
3. Tune the suspension as best I can in a short time-period
4. TRY to have a cage installed in it (I have one option for this, and he's pretty busy)
Budget is going to be an issue. Time is an issue that's even more difficult to solve, so I'll probably have to rent a car for the first event, then drive the CRX for a few events. If everything goes great (which is unlikely, when we're talking about race car prep) I might get to drive the Datsun for the second half of the season.
It's going to be a struggle, but I have great friends that I can call in for reinforcements when necessary.
I'm absolutely gutted.
However, I can't just lie down and feel sorry for myself. I still have hillclimbs to race. I had to make a decision as to what to drive, and just accepted a deposit on the rx7 (this is the third deposit I've taken on it ... I'm almost making a profit just on deposits now).
That leaves me with two options: Rent a car from someone else, or do a quick prep on my CRX. If I had more time to put into it, I'd toss a rwd subframe in it and one of the spare turboII powertrains ... but I have less than a month until Ascutney 1.
My best-case scenario is to:
1. Swap out the 325k-mile d15b2 (which was a sad design from day 1) for the high-compression d16z6 engine (sohc 1.6) sitting on a shelf.
2. Toss the 225-series RA1's left over from the Miata on it
3. Tune the suspension as best I can in a short time-period
4. TRY to have a cage installed in it (I have one option for this, and he's pretty busy)
Budget is going to be an issue. Time is an issue that's even more difficult to solve, so I'll probably have to rent a car for the first event, then drive the CRX for a few events. If everything goes great (which is unlikely, when we're talking about race car prep) I might get to drive the Datsun for the second half of the season.
It's going to be a struggle, but I have great friends that I can call in for reinforcements when necessary.
Thread Starter
Raced Regularly
Joined: Jan 2015
Posts: 135
Likes: 0
From: Manchganistan, NH, USA
I already swapped in some good (un-tuned) coilovers from ISC. I'll probably head back up to their shop to get it dialed in a bit better before the first event.
I'm not going to clutter this place up with the build though, so if you're interested, https://www.facebook.com/drivendaily.official/photos/a.480980085437735.1073741831.385255895010155/523850017817408/?type=3&comment_id=523868231148920¬if_t=photo_comment¬if_id=1461968543317276 as that's where I'll be posting updates on this build.
21 days 'till Ascutney.
For those who are unfamiliar with hillclimb races, I have some raw race footage from last year on YouTube:
Thread Starter
Raced Regularly
Joined: Jan 2015
Posts: 135
Likes: 0
From: Manchganistan, NH, USA
Sorry it's taken so long for me to update again. Back to the Datsun, now.
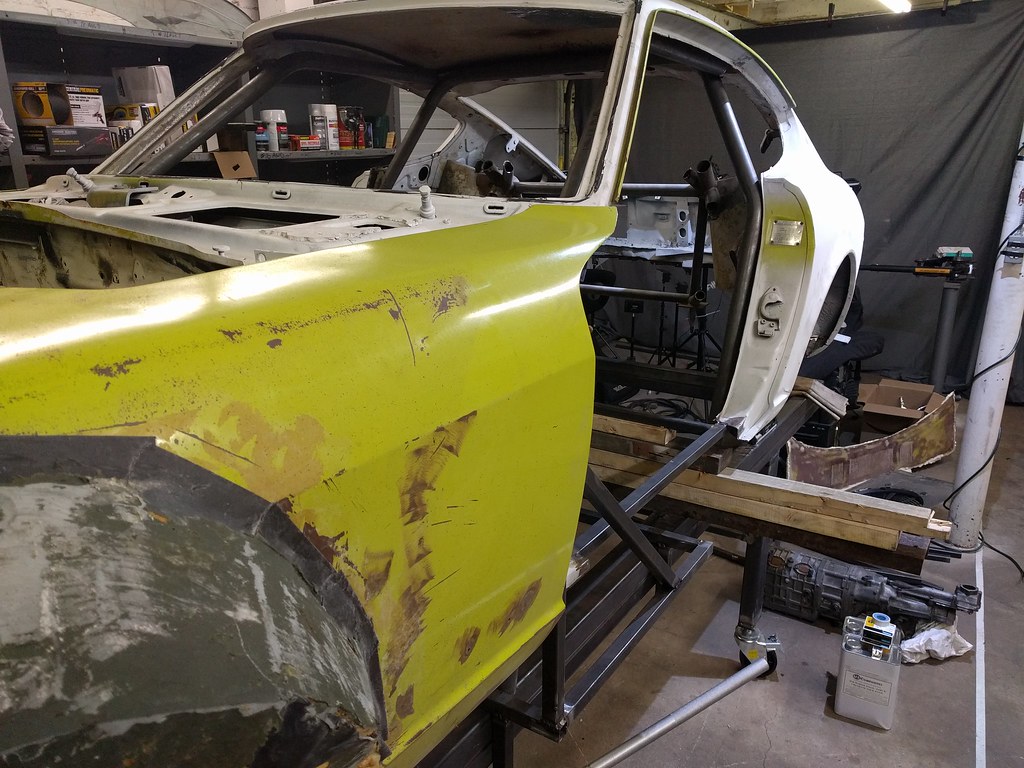
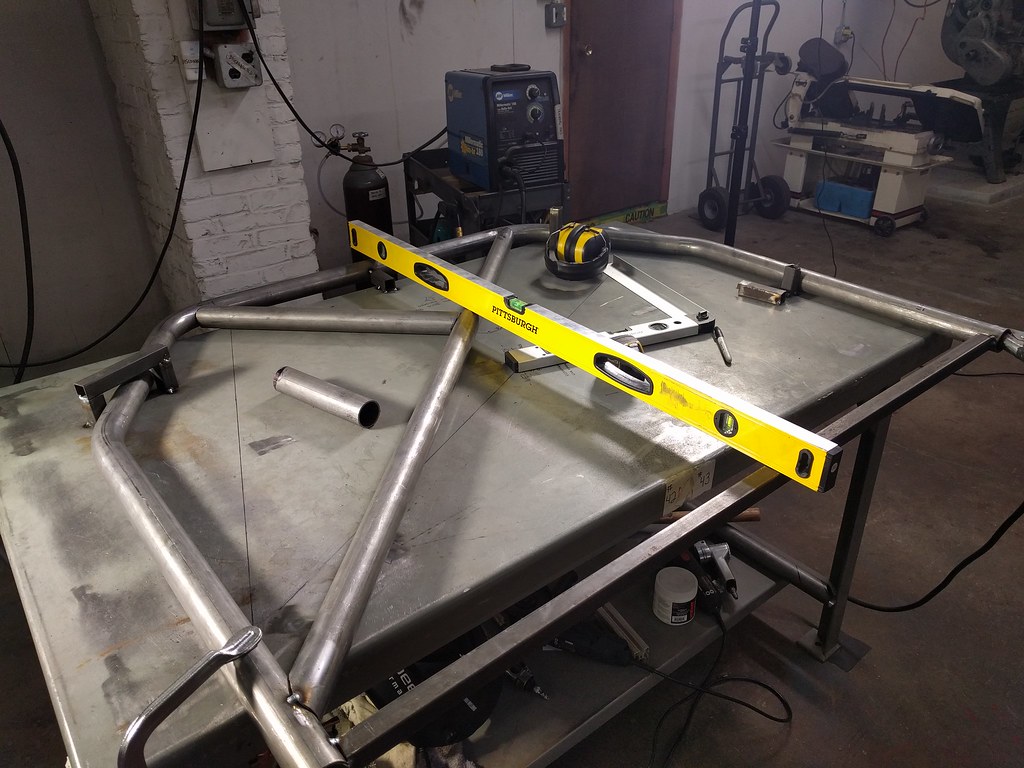
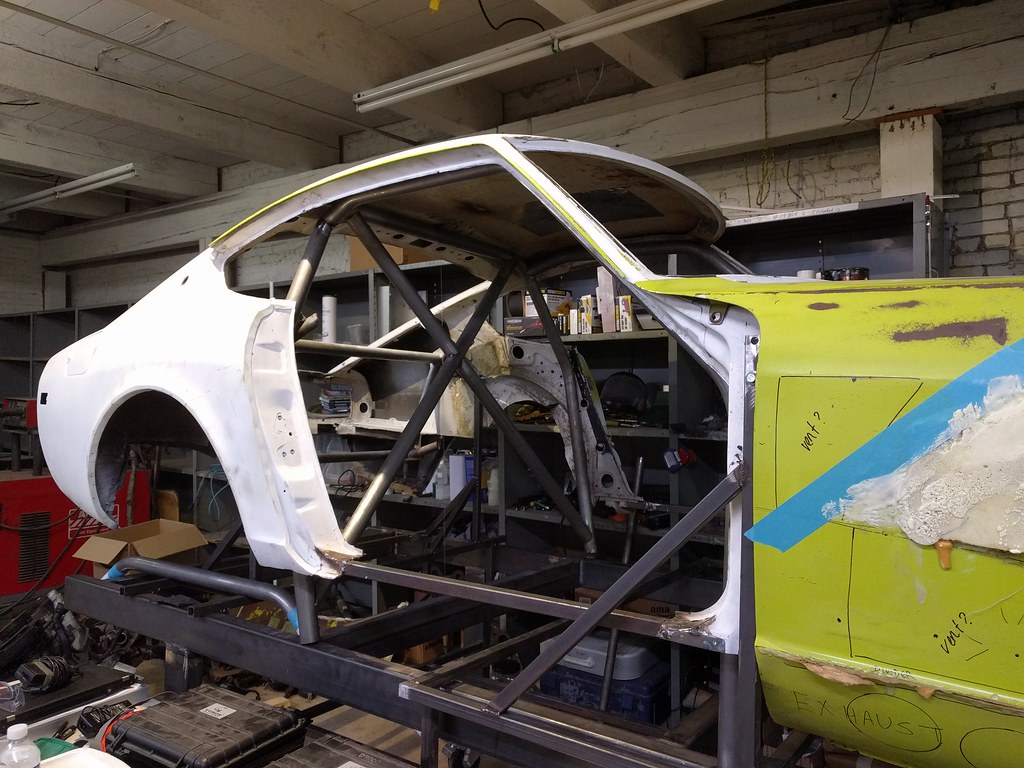
Tonight I enlisted some help to get the body aligned on the chassis table. There wasn't quite enough time to finish the rear body jig, but overall it was a successful adventure. Within 0.5 degrees of being level with the chassis table.
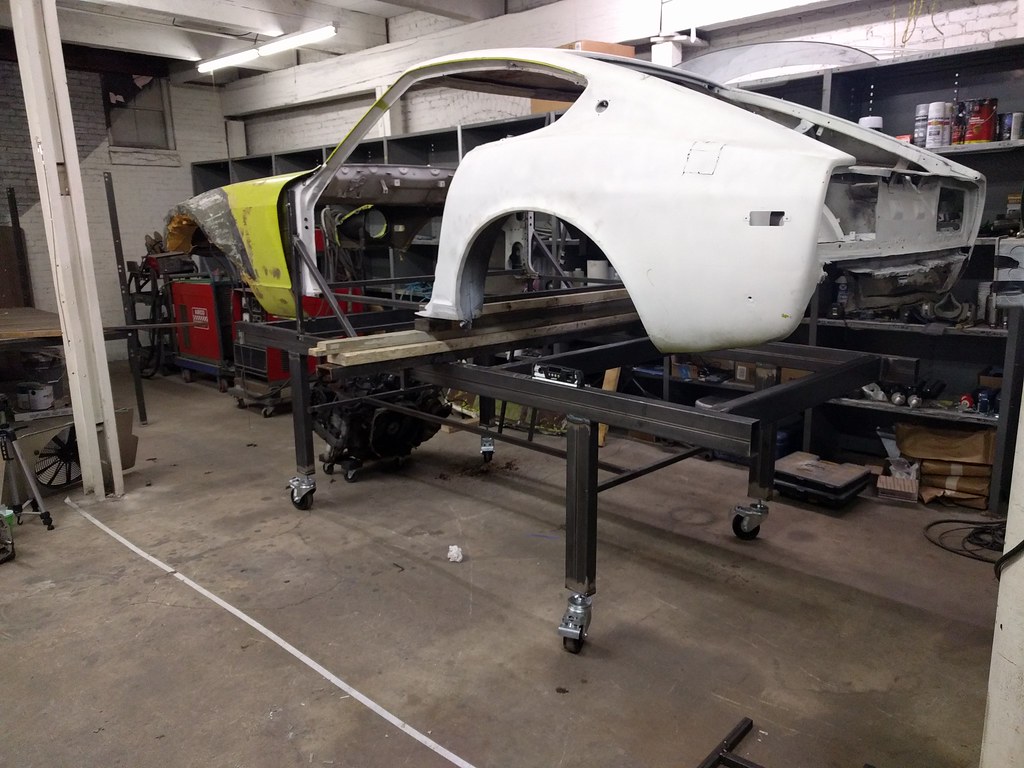
Tonight I enlisted some help to get the body aligned on the chassis table. There wasn't quite enough time to finish the rear body jig, but overall it was a successful adventure. Within 0.5 degrees of being level with the chassis table.
Thread Starter
Raced Regularly
Joined: Jan 2015
Posts: 135
Likes: 0
From: Manchganistan, NH, USA
Today, my ego grew at least 6 sizes.
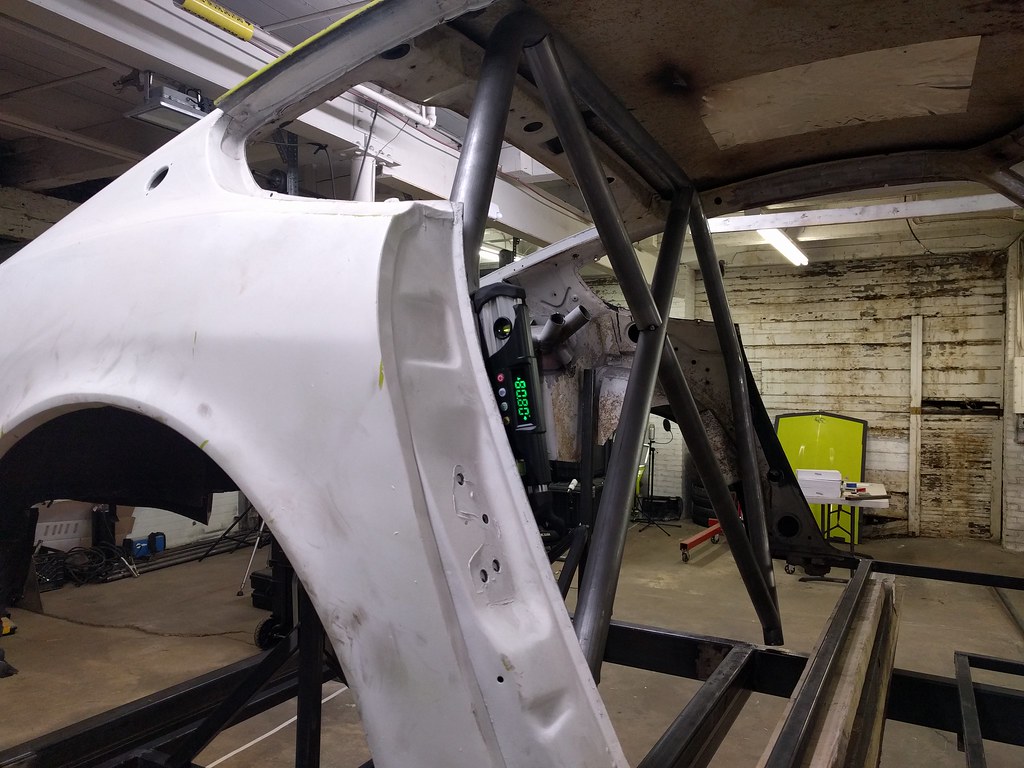
Somehow, I managed to get extremely accurate measurements, and bent the main hoop and A pillars perfectly ... while the old cage was still in the car. I had planned on doing each of these three times before getting one combination that I could call acceptable. I couldn't have asked for them to come out better.
I still need to do some coping and tack welding, but it's all coming together quite nicely.
Thread Starter
Raced Regularly
Joined: Jan 2015
Posts: 135
Likes: 0
From: Manchganistan, NH, USA
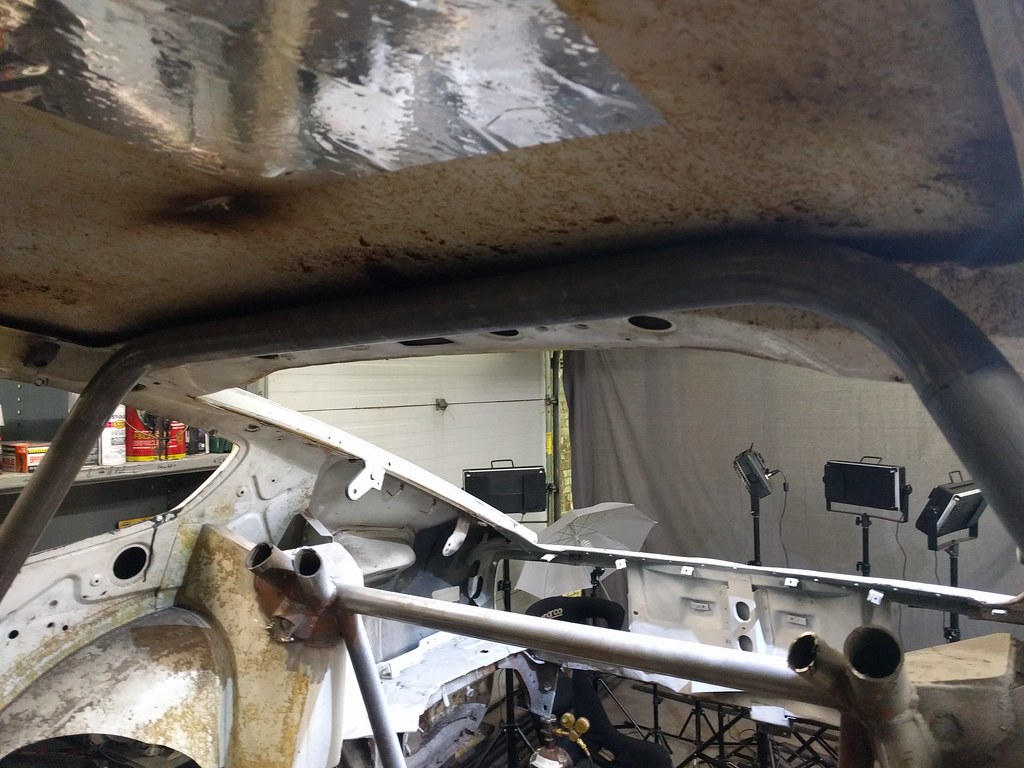
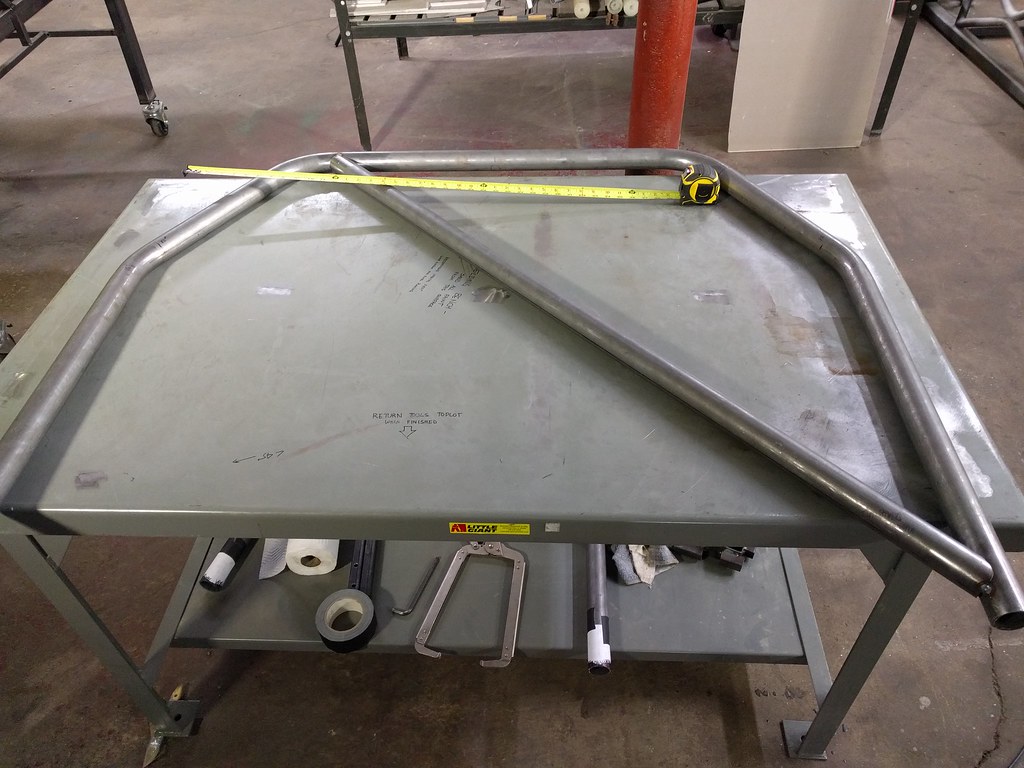
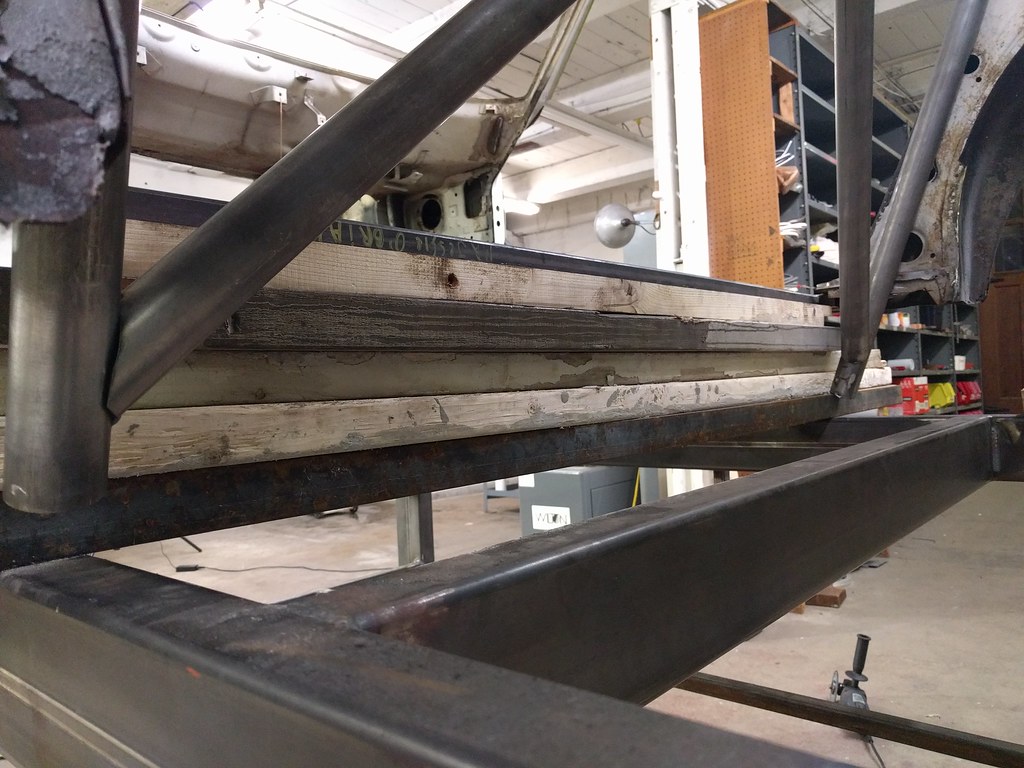
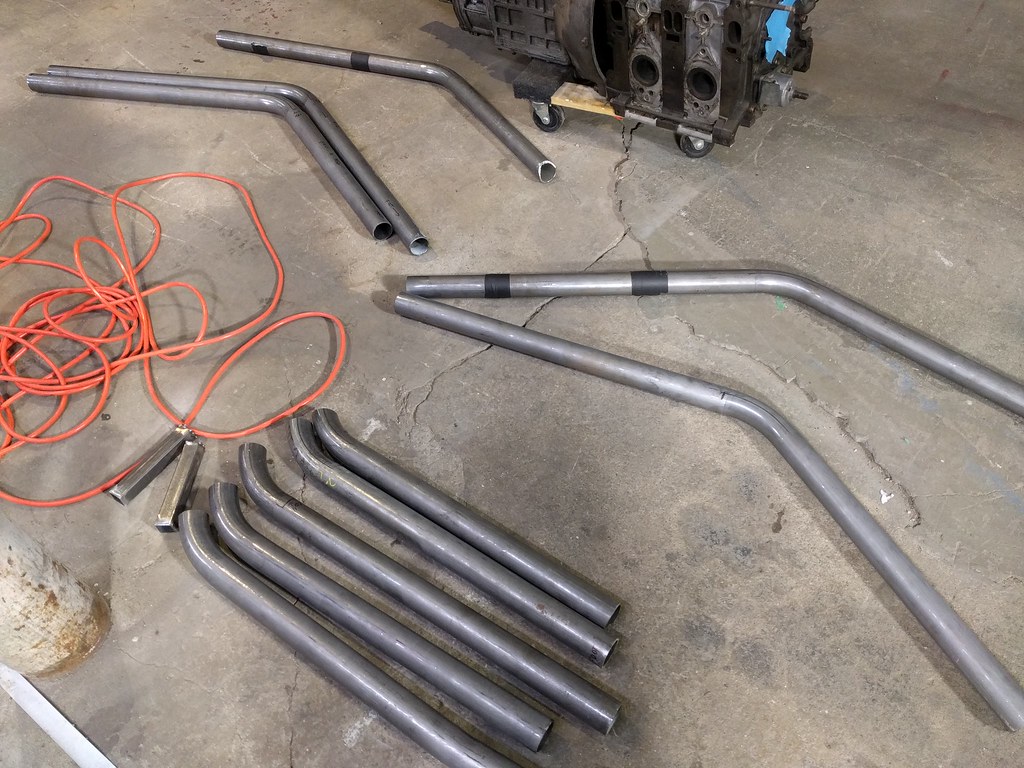
Most of the weekend was checking and double-checking all of my math. The main hoop and diagonal braces are cut, and one is welded in. I think I'm going to make some minor adjustments to my A pillar design rather than making what I have mostly-work. This is the most critical point to get fitment spot-on for everything, since everything after this will be measured against these first 'core' pieces of tubing.
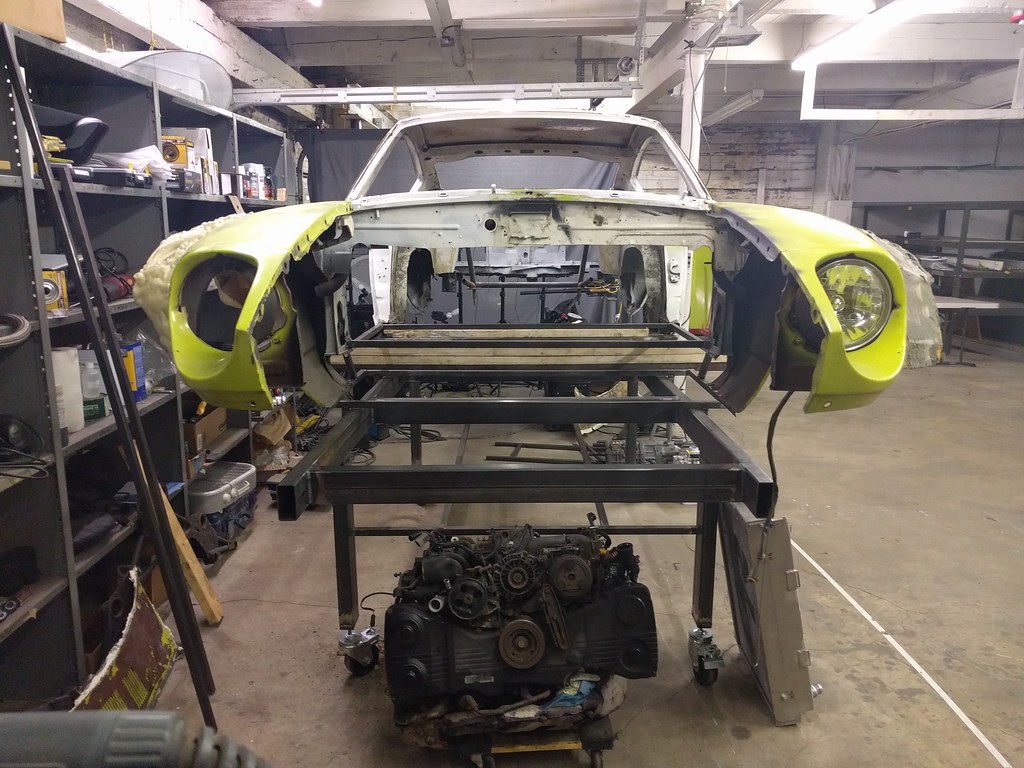
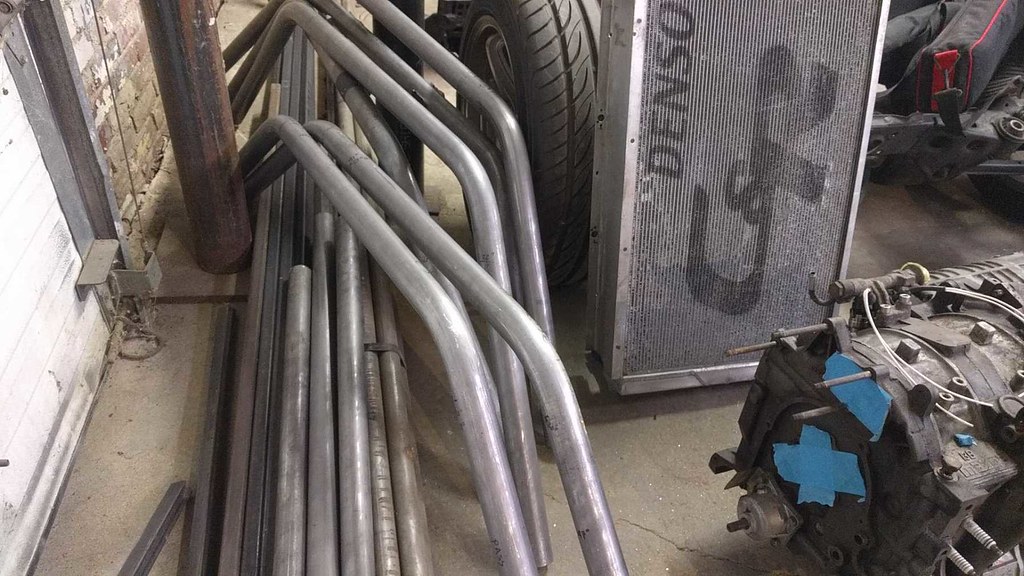
A friend had a non-running ej205 (older 2.0liter Subaru WRX engine) taking up space in his shop, and I generally like having a spare engine on-hand in case something breaks on any of my engines. I just finished pulling the intake manifold off, and decided I'd compare that engine to the engine I'm putting in the Datsun.
This is a complete valve-to-valve comparison of the two. If anyone is confused as to why I'd use a rotary in my Datsun, accept that simplicity and compactness are really the only reasons.
Horizontally opposed engines are known for keeping their mass low and short (front-to-back). As you can see, the rotary pretty much wins in every direction here. I still need to weigh both packages to get a decent reference, but I can easily carry one but the other requires two sets of hands to haul around.
Thread Starter
Raced Regularly
Joined: Jan 2015
Posts: 135
Likes: 0
From: Manchganistan, NH, USA
UPDATE TIME!
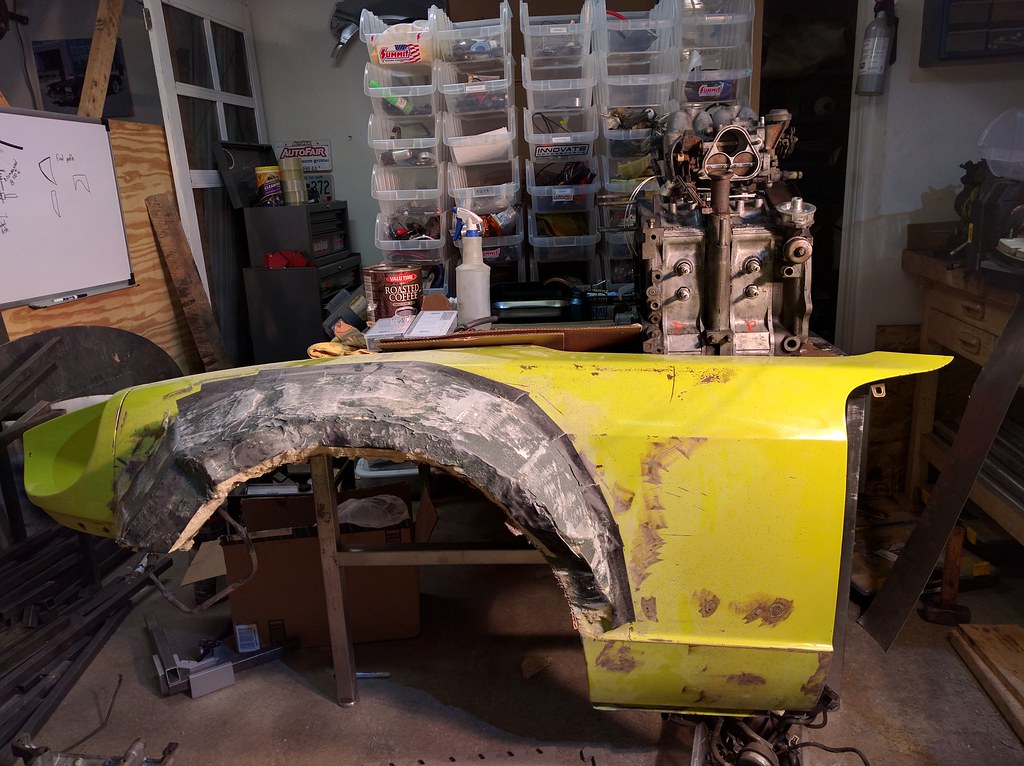
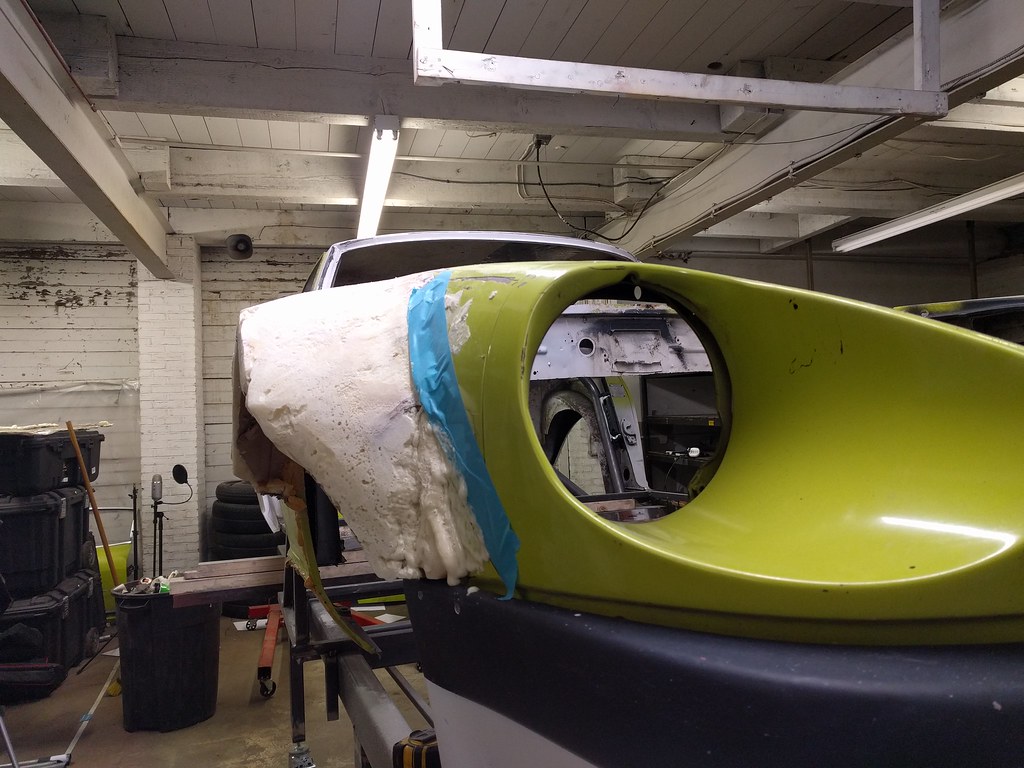
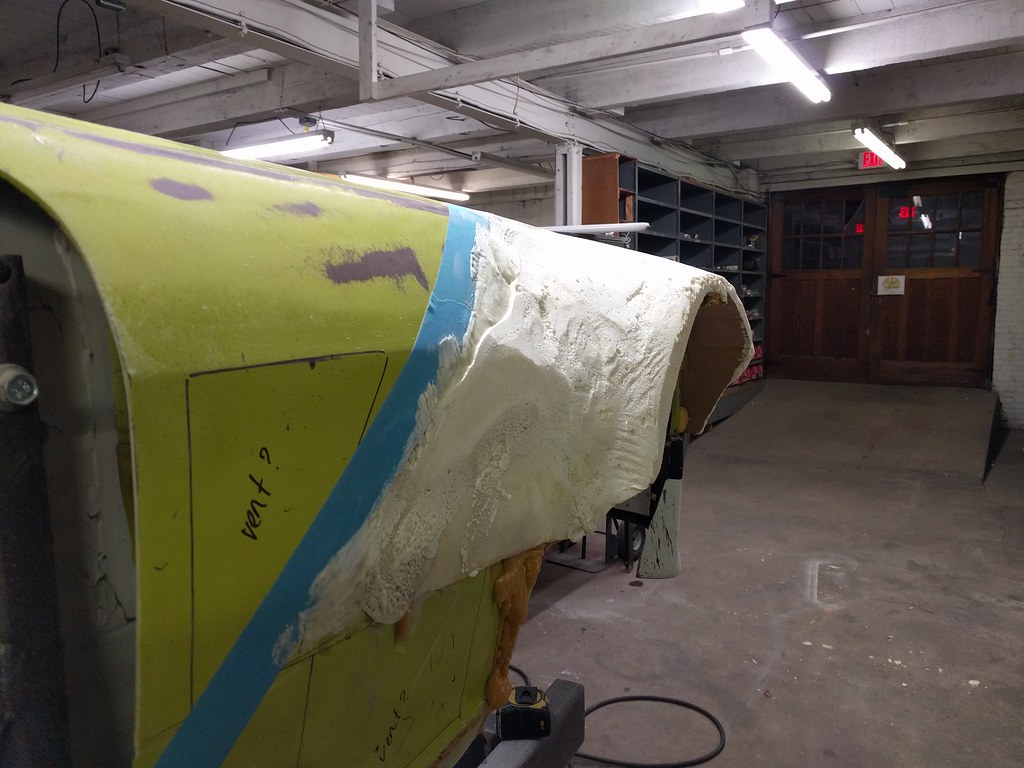
Because it's Saturday, I have an update on the build! I think I've solidified most of the fender profile at this point. I'd say it looks pretty good, and is ready for some final touches and blending to the bumper.
I don't really have a way to express how much math and thinking went into the cage so far, but here are the key points:
1. It's friction-fit.
I didn't even need to tack it into place, it's so tight against the body.
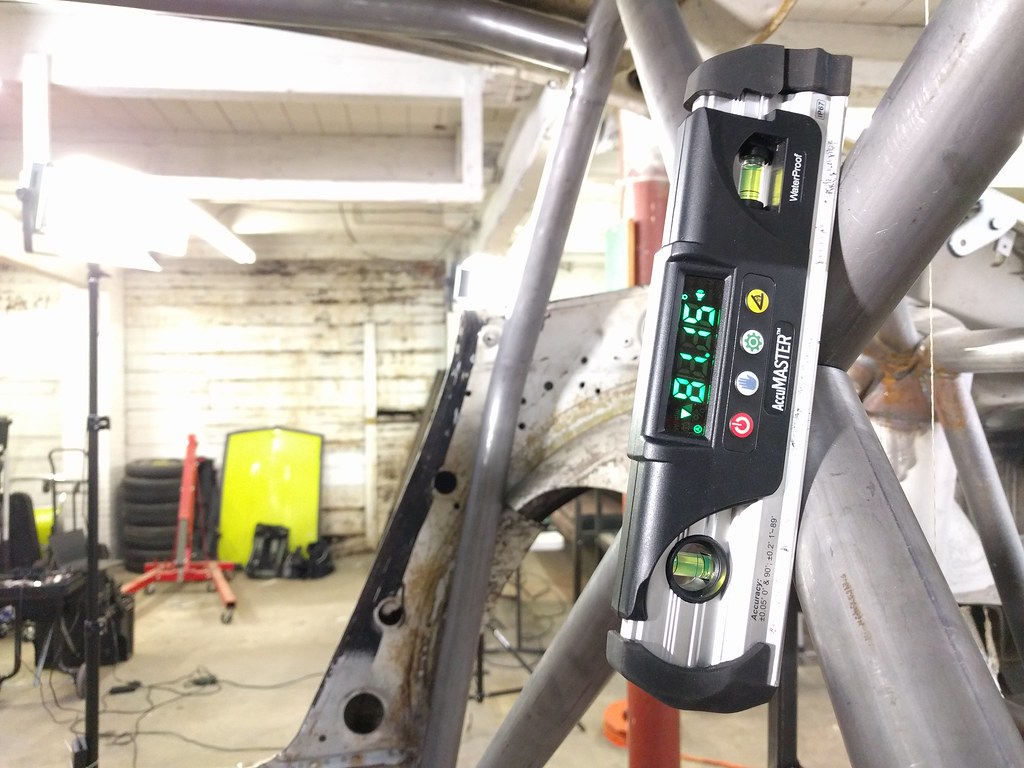
2. It's symmetrical.
... and level within 5mm from any point to any other point
3. There are no visibility problems.
The diagonal X is 16" lower than the roofline, so it won't interfere with my rear-view mirror.
4. It reclines 10 degrees.
Originally I was planning on 15 degrees, as that would fit the lines of the body and rear quarter windows nicely, but FIA regulations require no more than 10 degrees. I'd like to keep my options open as to what racing I do in this car, so I'm going with the most stringent sanctioning body I know of.
Because it's Saturday, I have an update on the build! I think I've solidified most of the fender profile at this point. I'd say it looks pretty good, and is ready for some final touches and blending to the bumper.
I don't really have a way to express how much math and thinking went into the cage so far, but here are the key points:
1. It's friction-fit.
I didn't even need to tack it into place, it's so tight against the body.
2. It's symmetrical.
... and level within 5mm from any point to any other point
3. There are no visibility problems.
The diagonal X is 16" lower than the roofline, so it won't interfere with my rear-view mirror.
4. It reclines 10 degrees.
Originally I was planning on 15 degrees, as that would fit the lines of the body and rear quarter windows nicely, but FIA regulations require no more than 10 degrees. I'd like to keep my options open as to what racing I do in this car, so I'm going with the most stringent sanctioning body I know of.
Thread Starter
Raced Regularly
Joined: Jan 2015
Posts: 135
Likes: 0
From: Manchganistan, NH, USA
Today registration for the Mt Washington Hillclimb race opened (Climb to the Clouds 2017). This has been my life goal for the past three years, since I purchased this car.
For those who aren't already familiar with it, Mt Washington is the closest hillclimb to my home (around two hours away). It's also twice as long as the longest hill we typically run (over 7 miles). It happens roughly once every three years, and is a pretty big deal overall.
The last time it ran I crewed for a friend and one of my racing mentors, Jamie Melhuish. It was quite an experience. In addition to learning twice as much course, we only get four practice runs. Each of those runs is only half of the course, so the first time we stitch the whole hill together, it's the first timed run. There are two timed runs. This is where a rally-style codriver reading pace notes becomes a massive benefit, but I'll be doing it solo. That means watching a lot of footage from past events, and spending a few days driving up at street-legal speeds to ensure that I actually know the course.

Right now, my registration is in, but that doesn't necessarily mean I've been invited to race. I would need to be selected from the list of applicants to be invited to race. In any event, the only way I can be ready for the event if I'm accepted is to continue as planned and assume I'll make it to the start line.
To say I'm excited is a gross understatement, like saying that an atom is "rather small."
For those who aren't already familiar with it, Mt Washington is the closest hillclimb to my home (around two hours away). It's also twice as long as the longest hill we typically run (over 7 miles). It happens roughly once every three years, and is a pretty big deal overall.
The last time it ran I crewed for a friend and one of my racing mentors, Jamie Melhuish. It was quite an experience. In addition to learning twice as much course, we only get four practice runs. Each of those runs is only half of the course, so the first time we stitch the whole hill together, it's the first timed run. There are two timed runs. This is where a rally-style codriver reading pace notes becomes a massive benefit, but I'll be doing it solo. That means watching a lot of footage from past events, and spending a few days driving up at street-legal speeds to ensure that I actually know the course.
Right now, my registration is in, but that doesn't necessarily mean I've been invited to race. I would need to be selected from the list of applicants to be invited to race. In any event, the only way I can be ready for the event if I'm accepted is to continue as planned and assume I'll make it to the start line.
To say I'm excited is a gross understatement, like saying that an atom is "rather small."
Last edited by driven-daily; Dec 1, 2016 at 12:43 PM.
Thread Starter
Raced Regularly
Joined: Jan 2015
Posts: 135
Likes: 0
From: Manchganistan, NH, USA
I didn't really plan to get anything done today, just clean up the shop a bit in preparation for the weekend. Man, was I wrong. I nailed the passenger side A pillar so nicely, I decided to make another driver's side replacement ... but twisted the wrong way, which resulted in another perfect passenger's side A pillar. Then I made one more driver's side, and went so far as to add a small bend on the back of it to get it to fit up with the main hoop just so.
Tomorrow, I get to break out the welder, tack it together, and start in on reinforcements.

Tomorrow, I get to break out the welder, tack it together, and start in on reinforcements.
Thread Starter
Raced Regularly
Joined: Jan 2015
Posts: 135
Likes: 0
From: Manchganistan, NH, USA
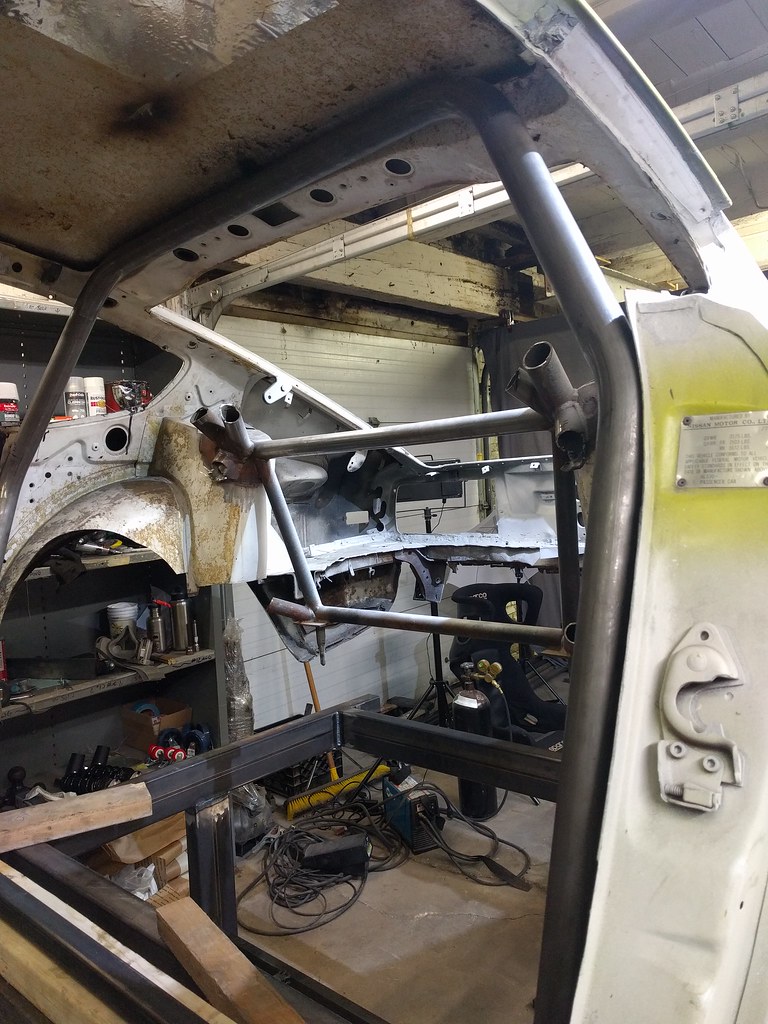
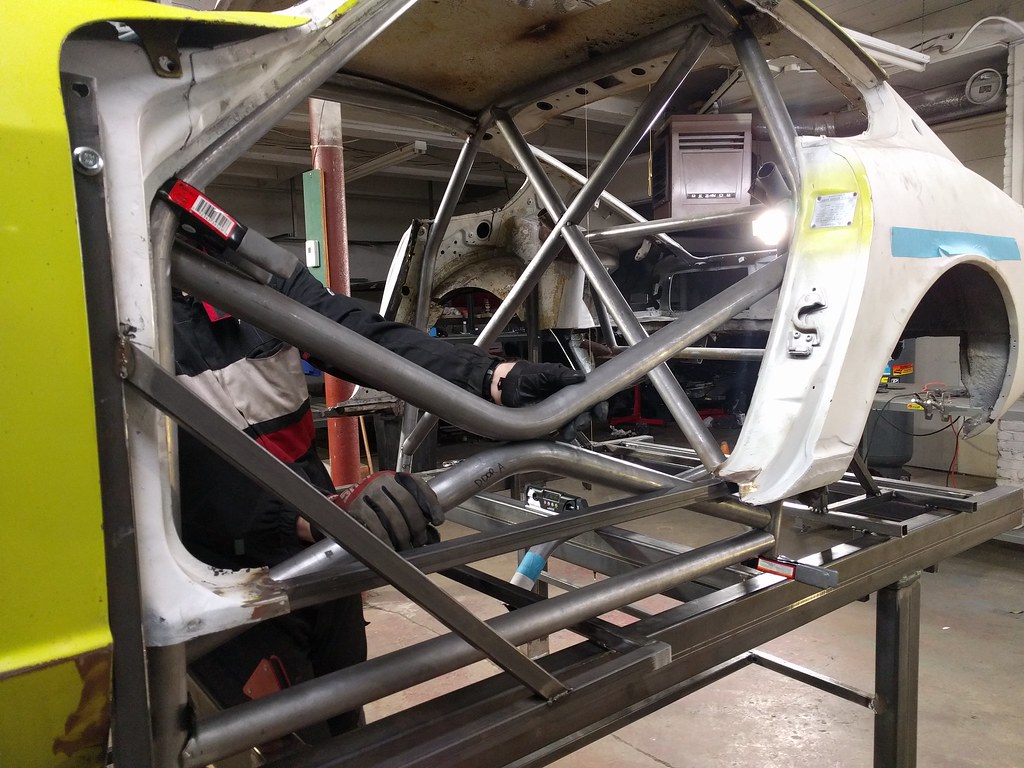
Finally, everything's aligned and tack welded into place. I spent most of the day fine-tuning fitment so it's symmetrical on both sides and so I have as much headroom as possible, but the results are worth it.

All told, I bent 6 'not quite right' A pillars throughout this process, so roughly 40' of material that didn't make it onto the car. It'll all get used, as door bars or similar.
All told, I bent 6 'not quite right' A pillars throughout this process, so roughly 40' of material that didn't make it onto the car. It'll all get used, as door bars or similar.
Thread Starter
Raced Regularly
Joined: Jan 2015
Posts: 135
Likes: 0
From: Manchganistan, NH, USA
A full day of work today, and it doesn't look like much progress.
My friends Mike and Matty came out to help, and we wrapped up the rear body jig, then centered and leveled the body on the chassis. The A pillars weren't perfectly symmetrical, so they came out, received appropriate trimming, and went back in. We coped the dash bar, and bent up all the door bars.
With the car on the rear body jig, we pulled the 2x4's that were supporting the middle of the car. A new horizontal support bar was welded in in front of the A pillars, and the existing horizontal support bar was removed. That free'd up enough room to test fit the seat, and it looks fantastic. I couldn't get any photos of it, but there's plenty of room all around in this thing.
Finally, we took some measurements to ensure that everything that's tacked together so far will pass tech without any issues, and pressed on 'till midnight.
Lots of tubing was cut today.

Thread Starter
Raced Regularly
Joined: Jan 2015
Posts: 135
Likes: 0
From: Manchganistan, NH, USA
Thread Starter
Raced Regularly
Joined: Jan 2015
Posts: 135
Likes: 0
From: Manchganistan, NH, USA
Update Time
It's Saturday, so I don't have a 'big' update to announce.
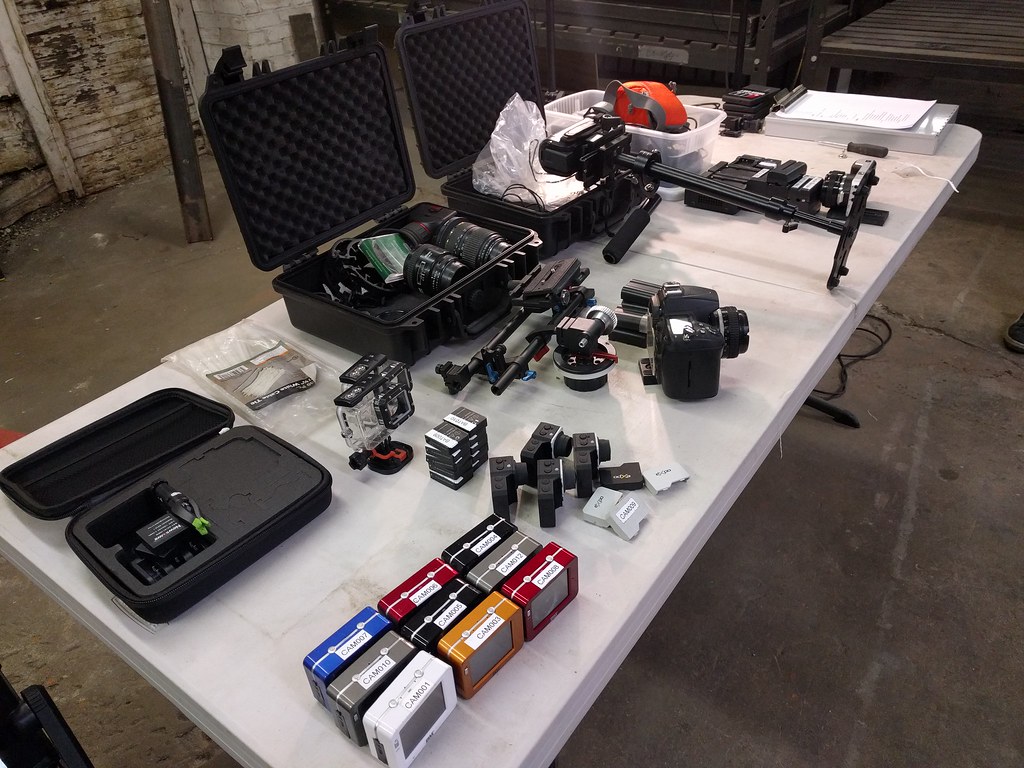
I think I've mentioned it before but in case I hadn't, we're recording a whole web series for this build, similar to what I did for the CRX. I've always enjoyed watching honest, well-produced video over reading build threads, and thought I'd give it a go. As I learned from the CRX build, it really requires a dedicated film crew (of at least 1 person). The level of quality I want really isn't possible if I'm trying to build and film at the same time.
With that goal in mind, I spent the morning laying out the video capture gear and taking an inventory of what we use on a regular basis. This is the result.
Yeah, I agree. This might be a bit silly.
Anyway, with that out of the way Mike and I started off by finishing coping for the dash bar, which looks pretty solid now.
After lunch, Mike took care of the sill bar coping and I took care of the bent door bars. They aren't quite ready to weld in, but we're making good progress.
Unfortunately, we ran out of material for the remaining sill/rocker bar and the windshield bar (both are required to run Mt Washington). I'll have another 24' arriving Monday morning. Tomorrow, I think I want to set our sights on tackling the front suspension jig, since the 'core' of the cage structure is finally coming together.
It's Saturday, so I don't have a 'big' update to announce.
I think I've mentioned it before but in case I hadn't, we're recording a whole web series for this build, similar to what I did for the CRX. I've always enjoyed watching honest, well-produced video over reading build threads, and thought I'd give it a go. As I learned from the CRX build, it really requires a dedicated film crew (of at least 1 person). The level of quality I want really isn't possible if I'm trying to build and film at the same time.
With that goal in mind, I spent the morning laying out the video capture gear and taking an inventory of what we use on a regular basis. This is the result.
Yeah, I agree. This might be a bit silly.
Anyway, with that out of the way Mike and I started off by finishing coping for the dash bar, which looks pretty solid now.
After lunch, Mike took care of the sill bar coping and I took care of the bent door bars. They aren't quite ready to weld in, but we're making good progress.
Unfortunately, we ran out of material for the remaining sill/rocker bar and the windshield bar (both are required to run Mt Washington). I'll have another 24' arriving Monday morning. Tomorrow, I think I want to set our sights on tackling the front suspension jig, since the 'core' of the cage structure is finally coming together.
Thread Starter
Raced Regularly
Joined: Jan 2015
Posts: 135
Likes: 0
From: Manchganistan, NH, USA