Arkadyzv's TII Rx7 verty build thread


 03-18-11, 12:06 PM
#27
looks great so far man. LOVE that hood
if i may make a couple suggestions.
1) relocate the battery to the passenger compartment. not too much work, and definitely worth it
2) remote mount the oil filter. even on an n/a, the benefits are unquestionably worth the price
besides that, i cant think of anything you missed or otherwise disagree with
i hope my vert ends up as nice as yours is on its way to being
Lloyd
03-18-11, 03:40 PM
#28

Glad to be finally making some progress now that the weather cleared up.
looks great so far man. LOVE that hood
if i may make a couple suggestions.
1) relocate the battery to the passenger compartment. not too much work, and definitely worth it
2) remote mount the oil filter. even on an n/a, the benefits are unquestionably worth the price
besides that, i cant think of anything you missed or otherwise disagree with
i hope my vert ends up as nice as yours is on its way to being
Lloyd
if i may make a couple suggestions.
1) relocate the battery to the passenger compartment. not too much work, and definitely worth it
2) remote mount the oil filter. even on an n/a, the benefits are unquestionably worth the price
besides that, i cant think of anything you missed or otherwise disagree with
i hope my vert ends up as nice as yours is on its way to being
Lloyd
Yeah oil relocation kit is a must, as of now I have the fuel system there, the intercooler piping plus my oil filter pedestal with 2 senders there and its a mess. I will definetely moved the oil filter over to I think the other side or maybe where the battery used to be once I moved it and then redo the lines on the fuel system and probably run them across the firewall and mout the frp on the other side as the theres just way too much stuff on one side.
And pick up a koyo rad and efan. Then the only stuff to be cleaned up is the stock harness when do a haltech later on after I'm done with the suspension and the body.
 04-19-11, 02:31 PM
#30
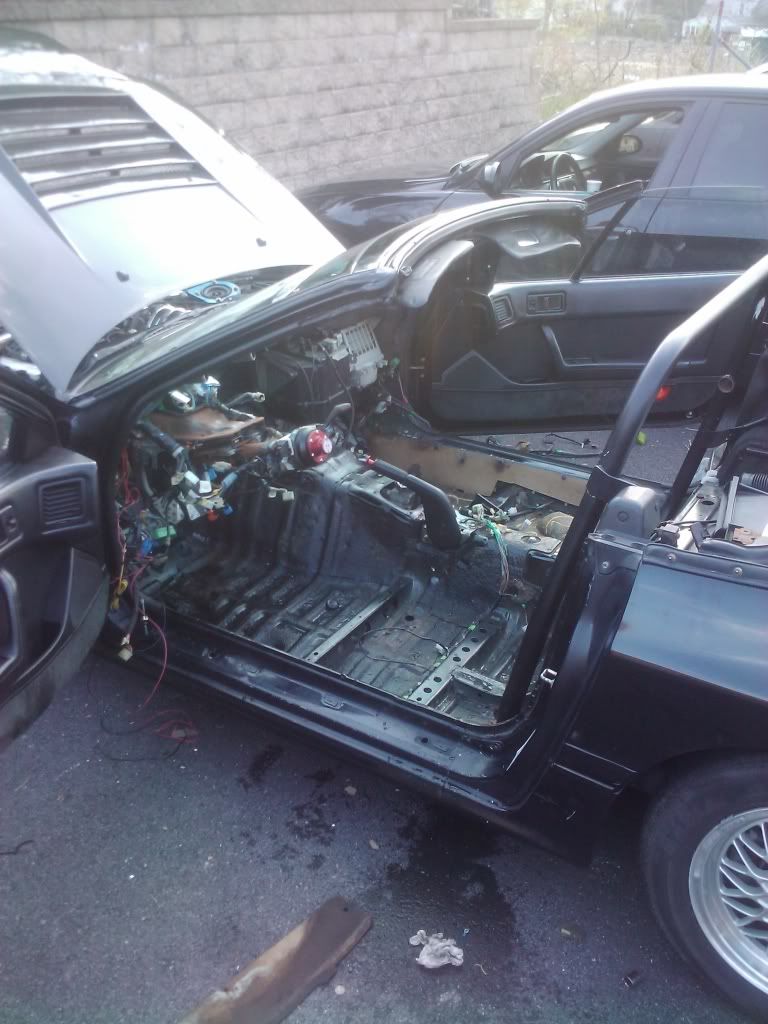
Dash and carpets out.
Going over some stuff with por15, throwing down herculiner and sound deading over it.
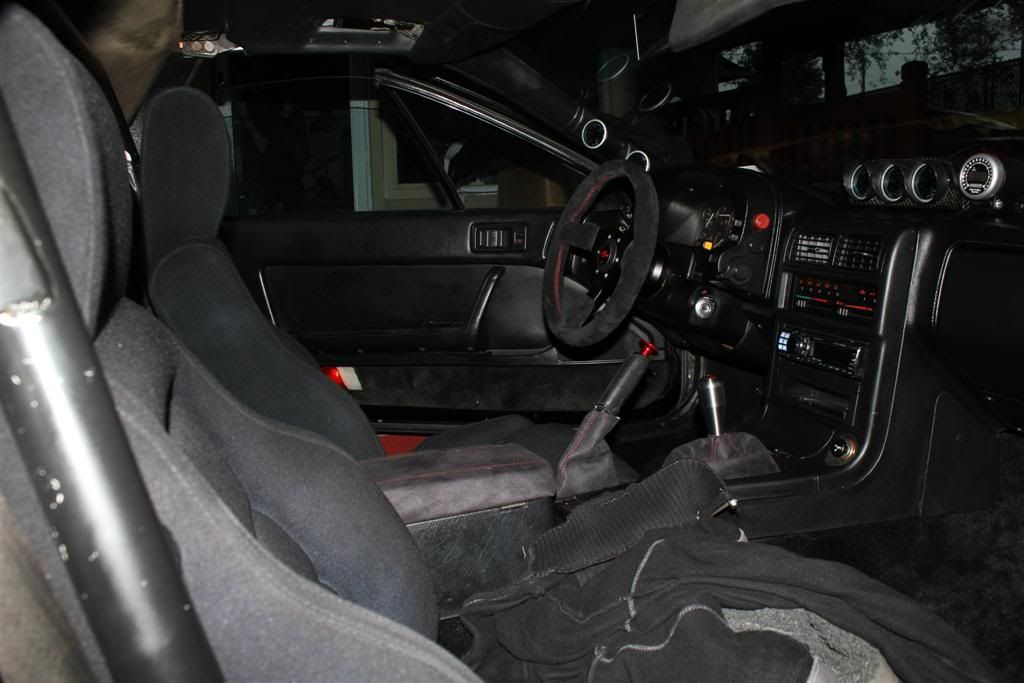
Cleaning up all the wiring, installing newly sprayed black turboII seats.

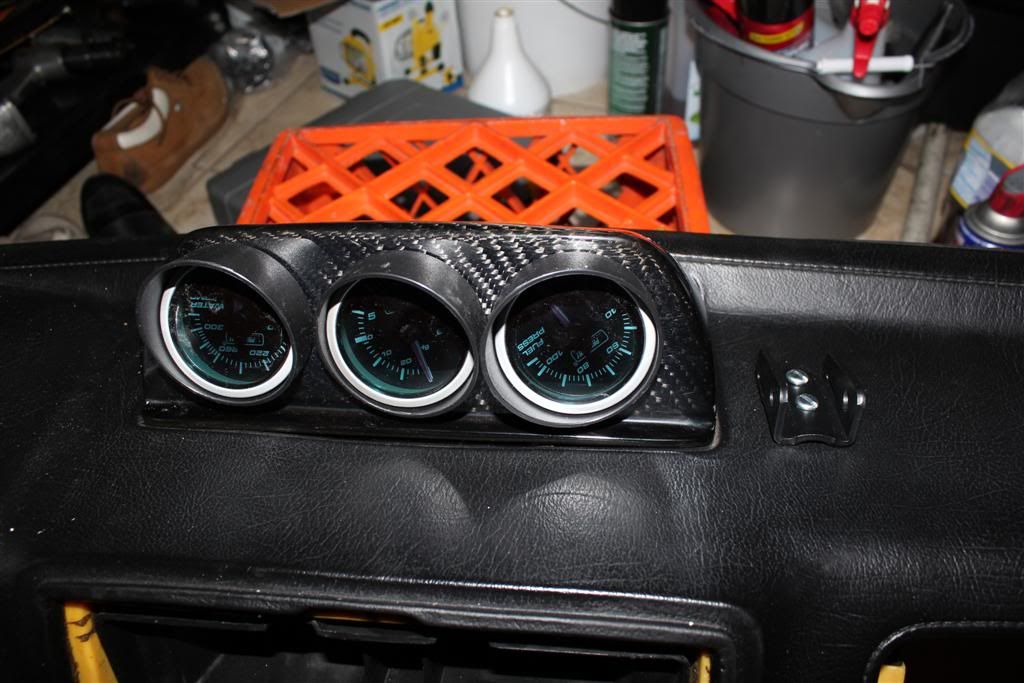
Spraying the carpets and the rear panels black. Installing the cf gauge pod in the center and installing the oil temp, fuel pressure and water temp gauge. Mounting the wideband. Relocating the battery to trunk and covering a bunch of crap in suede.
Got new wheels for it too. Rays Ggames. Redid the front struts, the driver side one was mangled to ****. Need to figure out why the rear struts are all loose and moving around.
04-20-11, 02:09 PM
#32
Registered Loser
iTrader: (6)
Join Date: Dec 2002
Location: Whiterock
Posts: 2,224
Likes: 0
Received 0 Likes
on
0 Posts
awesome. you're adding/fixing all the things I wanted to do with it.
with the dash out use some deodorizer on the heater core and blower. I cleaned the best I could, but still thought it was a little stinky.
with the dash out use some deodorizer on the heater core and blower. I cleaned the best I could, but still thought it was a little stinky.
05-05-11, 03:32 PM
#35
All out, all the crap cleaned out.


Cleaning up the ecu bracket with Marine Clean


Finished with the marine clean, next up is the metal ready to make the por15 stick good. Went over anything that even remotely looked like surface rust.

New wheels, Rays G-games


Figuring out where to mount the battery box

Battery box and Yellow Top, no more ****ty junk yard battery lol.

Cleaning up the ecu bracket with Marine Clean
Finished with the marine clean, next up is the metal ready to make the por15 stick good. Went over anything that even remotely looked like surface rust.
New wheels, Rays G-games
Figuring out where to mount the battery box
Battery box and Yellow Top, no more ****ty junk yard battery lol.
05-05-11, 03:34 PM
#36
Cutting up the stock battery tray to make the yellowtop sit higher in the new battery box

All mounted and wired up, still need to trim the box cover to fit.

Fuel pressure gauge needs to be mounted on the out line of the fuel system. Mounting right after it comes out the secondary fuel rail.

Line cut and T mounted up , had to check clearance of the fuel pressure sender and the manifold above it

Line one mounted
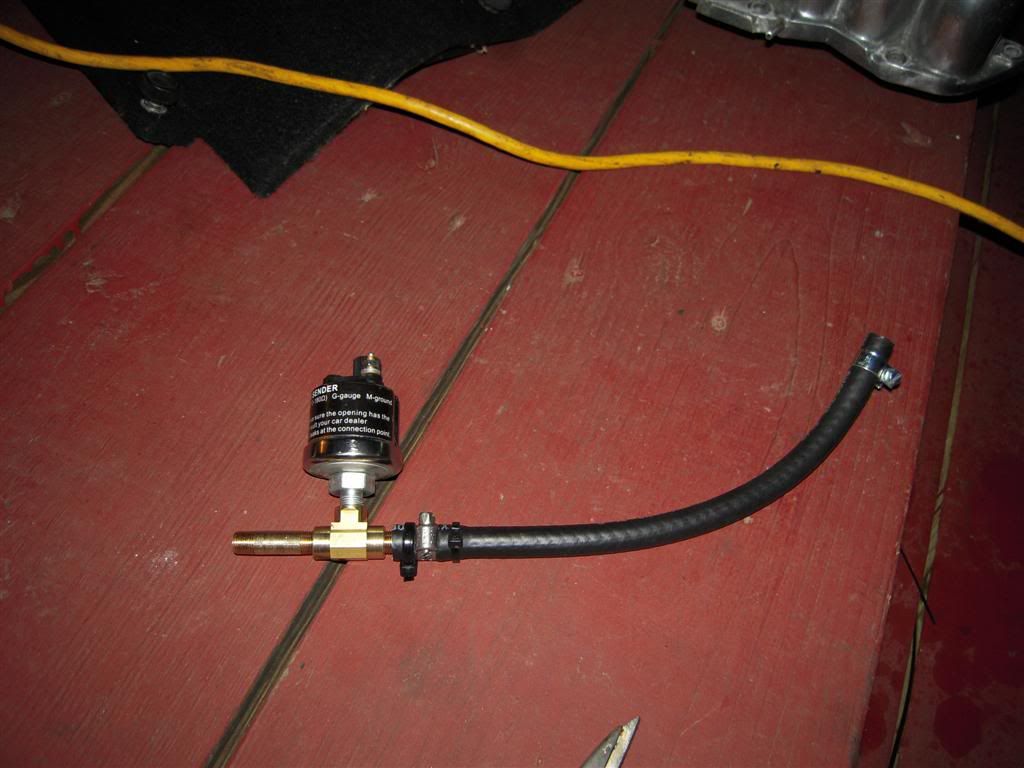

Both lines mounted up

Redid the side pod, decided to keep the Oil Temp and Oil Pressure together

Ran the senders and all the wiring behind the dash so its all clean and tidy and out of the way.


Boost pressure sender used to be in the cabin, moved it to the engine bay, mounted it on the spare mount next to the wideband

Ran 3 sender wires, color taped each wire to correlate to each sender if I need to trouble shoot **** later.
Green- water temp
Blue- Fuel Pressure,
White= Boost
 05-05-11, 03:36 PM
#37
Tried to keep it as tidy as possible, will shrink wrap or tube the wires later so they dont stand out as much.
FP sender is all mounted up and clears the manifold.

Water temp sender, still need to ground it to something

Ran the 3 sender wires and 1 positive from the boost sender in the cabin, again ran them behind the dash and out of the way


Old and crusty water neck

Polished bling blang water neck and water temp sender all mounted up

Mounted to the block, decided to just ground the sender to the water neck bolt.

More blue rice, samco rad hose on. Only did the top one for now, will do the bottom one when I do Koyo Rad and e-fan.
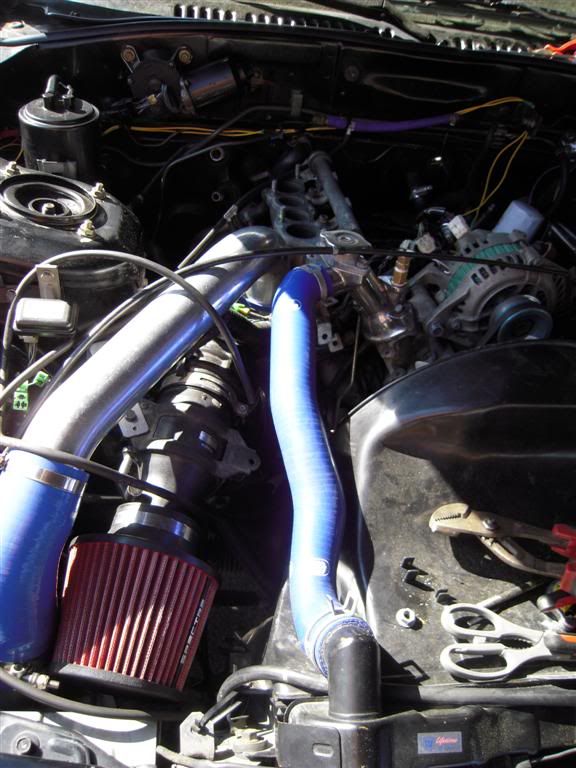


Started the closed cell foam insulation. Glue sprayed on both surfaces.

Stuck on
 05-05-11, 03:38 PM
#38
Mounted the ecu back in, gone rusty ecu bracket, now por15'd ecu bracket lol.

Cleaned and febreezed the **** out of the heater box and mounted it back in.

Passenger side insulation in

Power cable for the battery ran along with a constant 12v from the battery

Separate and color-coded harnesses for the gauges.
Blue- Fuel Pressure
Green- Water temp
White- Boost
Un-plugable power and ground for all the gauges.

Relay for gauge power. Takes signal from ignition on but has its own constant 12v from the battery.

Wire cover panel back on , on drivers side.

Wire cover back on, on passenger side.

Por15'd metal and more spray glue setting.

Por15'd metal and more spray glue setting.

Por15'd metal and more spray glue setting.

More insulation
 05-05-11, 03:40 PM
#39
More insulation

All the heavy insulation done

The dash was in pretty ****ty condition, broken tabs everywhere lol.

More cracked ****.

More cracked ****.

More cracked ****.

More cracked ****.

Superglued all the broken tabs back on and let them dry

Plastic epoxy'd all around for more strength.

Plastic epoxy'd all around for more strength.

Started with the slim closed celled foam. Insulating every part that would touch the metal skeleton of the dash.
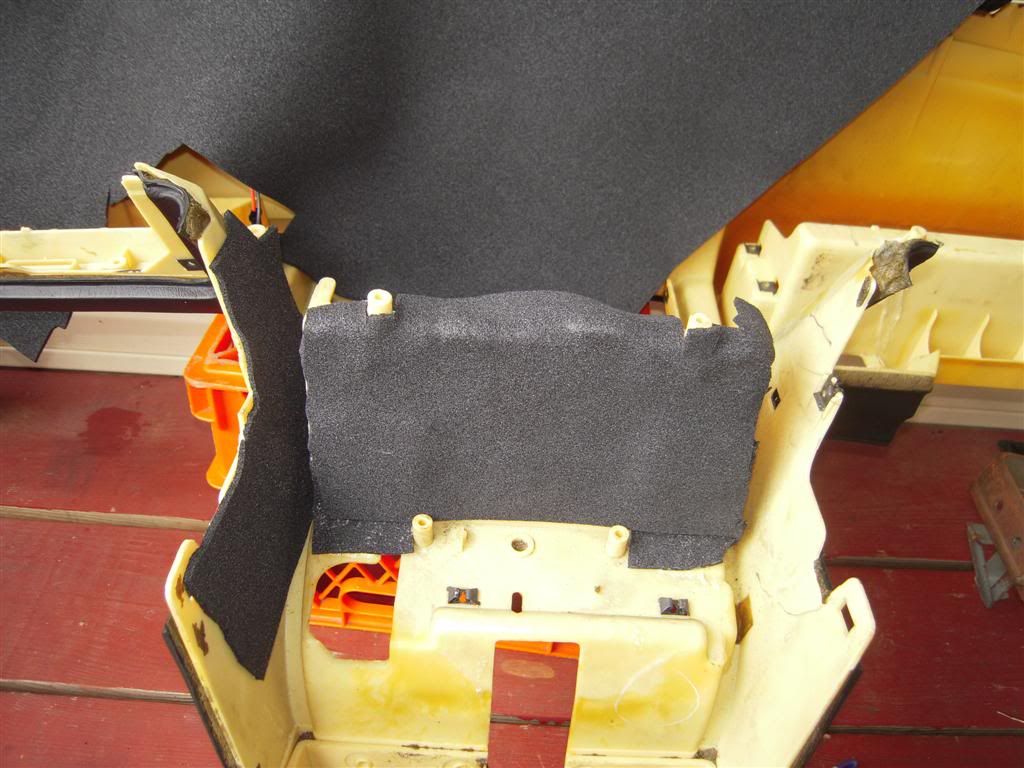
More foam.
 05-05-11, 03:41 PM
#40
More foam.

More foam.

Did the heat vents too.

Did the heat vents too.

One of the main tabs on the top of the dash that holds the dash to the body was broken off too. Got creative with some body kit brackets I found in my box of ****. Cut them up, super glued them on and then plastic epoxied them on.

Same with even the little cracks in the dash


Bottom mount of the dash had the same problem, got the same bracket, glue and epoxy treatment.

Taped off the carbon fiber pod with masking tape, measured all the holes for the hole saw.

All the borders and center marked for the drill bit

All cut out, burnt carbon fiber smells like poo.

Test mounted the gauges in the pod. Decided to the use the sun visors on them as they will sit right in the middle of the dash under the sun. Also drilled and screwed in the mount for the single gauge cup which will hold the wideband.
 05-05-11, 03:42 PM
#41
Wideband mounted up.

Wideband mounted up.

Drilled a hole in the dash for the wiring. Drop right down the center near the rest of the gauges.

All the gauges mounted up.
Boost, Fuel Pressure, Water Temp and Wideband.

Just have to figure out how to mount the pod to the dash itself, will probably use velcro for strength and also ease of removal if need be.
 05-05-11, 06:02 PM
#42
did your dash make lots of rattles when going over bumps? i'm assuming i have the same problem as you..this is my #1 problem with my car.
how hard was it to remove the dash? my car is my daily soo....i cant really go without the dash there. i like the idea of the closed cell foam.
also, does your oil pedistal leak? i cant get mine to stop leaking. i dont know wtf it is. it leaks at the base...my oil pressure peaks at about 95psi. (builder did the smash regulator thing)
05-06-11, 12:09 AM
#44
did your dash make lots of rattles when going over bumps? i'm assuming i have the same problem as you..this is my #1 problem with my car.
how hard was it to remove the dash? my car is my daily soo....i cant really go without the dash there. i like the idea of the closed cell foam.
also, does your oil pedistal leak? i cant get mine to stop leaking. i dont know wtf it is. it leaks at the base...my oil pressure peaks at about 95psi. (builder did the smash regulator thing)
how hard was it to remove the dash? my car is my daily soo....i cant really go without the dash there. i like the idea of the closed cell foam.
also, does your oil pedistal leak? i cant get mine to stop leaking. i dont know wtf it is. it leaks at the base...my oil pressure peaks at about 95psi. (builder did the smash regulator thing)
Dash is fairly easy to remove. All the center stuff comes out, cluster comes out. Side panels off 2 bolts on each side in the back. 3 bolts on the top under the long heater panel. 2 bolts on the sides near the center of the dash and out. I've ripped out a few dashes prior but have not done it for forever. I'd say taking it all takes maybe an hour or so working at a medium pace.
But doing all the foam stuff and in general takes time. Just because you measure, you cut, you spray the glue, you let it start to dry then you apply and repeat and repeat. I'd say this is a weekend project as certain little stuff just takes too long. I think my car has been down atleast 2 weeks but I'm literally redoing everything lol.
Surprisingly the pedestal does not leak, I've heard a few mention leaks but I'm good. Do you have the same pedestal? Maybe try some RTV or Hondabond or whatever, that what people use instead of gaskets when doing oil pans. I doubt that will ever leak.
Thankies will do. I've tried to put pressure on the epoxied parts, they honestly seem stronger than the dash plastic lol which after taking the skeleton out is pretty slim in thickness.
05-17-11, 10:29 AM
#47
Dyed black carpet in. Light cluster used to sit in the center where the gauges now sit. Extended that.

Extended cluster

Mounted in the back of the glovebox

Mounted the light cluster in the glovebox. Made it sit flush the first time but unfortunately it had no room to sit like that because of the heater box so I moved it up, still decent but not as clean as it was before.


Glove box done


 05-17-11, 10:33 AM
#48
Still surprised I remember where all that **** goes.

I got tired of taking pictures of everything lol and just handled business and put it all back.
Here's what it looked like before I started it all.

Finished product. Few things still need some attention but basically 90% done and useable.
Suede and red stitching shift boot, handbrake and extra padded armrest cover to that match the steering wheel.


 05-17-11, 12:47 PM
#49
super jelly. I want a black interior now.
Car looks great! let me know how the dash sound now. If you see a big improvement I will definitely have to make this a summer project.
On a side note, I remember seeing a craigslist ad of the white car you have posted in the OP. i believe you were listing it with a blown coolant seal?
Car looks great! let me know how the dash sound now. If you see a big improvement I will definitely have to make this a summer project.
On a side note, I remember seeing a craigslist ad of the white car you have posted in the OP. i believe you were listing it with a blown coolant seal?
05-17-11, 01:24 PM
#50
super jelly. I want a black interior now.
Car looks great! let me know how the dash sound now. If you see a big improvement I will definitely have to make this a summer project.
On a side note, I remember seeing a craigslist ad of the white car you have posted in the OP. i believe you were listing it with a blown coolant seal?
Car looks great! let me know how the dash sound now. If you see a big improvement I will definitely have to make this a summer project.
On a side note, I remember seeing a craigslist ad of the white car you have posted in the OP. i believe you were listing it with a blown coolant seal?
Nah the white car had a bad tranny. Someone off the forum bought it, brought me a trans, I threw it in and they drove it away lol. Still pissed that I had to sell it lol as I I redid everything in that car as far as the brakes and the all the suspension bushings went.