
86' GXL novice rebuild project


Hey guys,
So, the time has finally come, I've decided to commit to rebuilding my Rx7. It lost compression about a year ago, with how busy I was at the time, there was no way I was able to really do anything at the time. Now, with all the time in the world at my disposal (and warm weather), I think it's about time!
I'm writing this thread not only to help myself commit to this, but to seek advice from anyone that's done this before by either guiding me or just simply answering any dumb questions I may have. Also, I have very little experience when it comes to automotive repair. The most I have ever done automotive repair-wise was replace a water pump and replace wheel bearings (with professional help). So, by writing this I hope to help inspire any one who is intimidated at rebuilding their engine due to lack of experience, as I'll be doing this all by myself.
Specs:
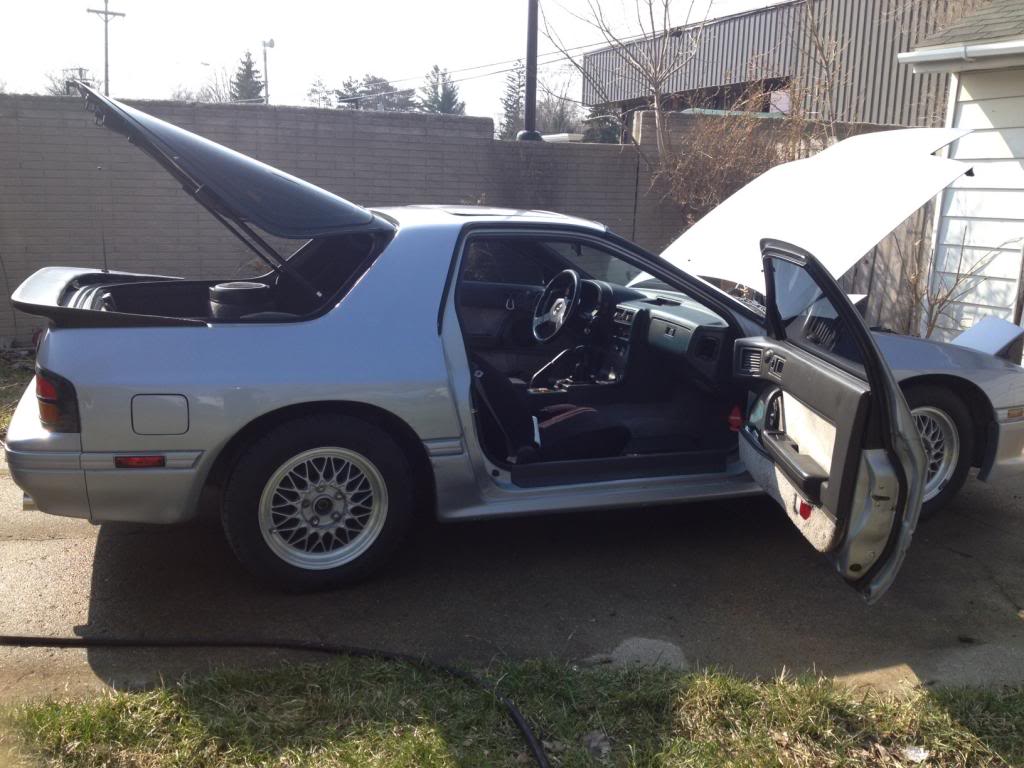
So, as the title says, it's an 1986 GXL, 240,000 kilometers (I think the car is a Canadian build?). Everything is mostly stock, except... the exhaust after the exhaust manifold is aftermarket, racing beat I think. The stock airbox is replaced with a K&N cone filter. The A/C and Air pump are deleted. The stock fan is replaced by an electric fan. That's it, everything else is stock.
Additional things to do:
Besides just rebuilding the engine, I'd like to install a stainless steel header I have (This came with when I bought the car). Fix the Oil metering pump, it leaks a small amount of oil, enough to be an issue. And a few cosmetic things, such as painting the rear wing, and buying a damn new front lip!
The Plan:
I plan to use Rotary resurrection as a guide to pulling the engine. I will be pulling the engine without the trans.
Rotary Resurrection home of the budget rebuild.
Atkins rotary or Mazdatrix for the engine rebuild?
Mazda Rotary Instructional Rebuild DVD (ARE56)
Aaron Cake's OMP rebuild for the... OMP rebuild.
How To Rebuild The Metering Oil Pump
Okay, here are my questions for now.
Atkins or Mazdatrix rebuild video?
Tools!! I'll be buying a cherry-picker from Harbor Freight this coming week as well as two jack stands, or should I buy four? Any specific tools I should have? I have your basic wrench and socket sets standard and metric. Will I need to get underneath the car?
Anyways, I'm very excited on starting this project, and any tips, suggestions, jokes, and or comments are welcome!
So, the time has finally come, I've decided to commit to rebuilding my Rx7. It lost compression about a year ago, with how busy I was at the time, there was no way I was able to really do anything at the time. Now, with all the time in the world at my disposal (and warm weather), I think it's about time!
I'm writing this thread not only to help myself commit to this, but to seek advice from anyone that's done this before by either guiding me or just simply answering any dumb questions I may have. Also, I have very little experience when it comes to automotive repair. The most I have ever done automotive repair-wise was replace a water pump and replace wheel bearings (with professional help). So, by writing this I hope to help inspire any one who is intimidated at rebuilding their engine due to lack of experience, as I'll be doing this all by myself.
Specs:
So, as the title says, it's an 1986 GXL, 240,000 kilometers (I think the car is a Canadian build?). Everything is mostly stock, except... the exhaust after the exhaust manifold is aftermarket, racing beat I think. The stock airbox is replaced with a K&N cone filter. The A/C and Air pump are deleted. The stock fan is replaced by an electric fan. That's it, everything else is stock.
Additional things to do:
Besides just rebuilding the engine, I'd like to install a stainless steel header I have (This came with when I bought the car). Fix the Oil metering pump, it leaks a small amount of oil, enough to be an issue. And a few cosmetic things, such as painting the rear wing, and buying a damn new front lip!
The Plan:
I plan to use Rotary resurrection as a guide to pulling the engine. I will be pulling the engine without the trans.
Rotary Resurrection home of the budget rebuild.
Atkins rotary or Mazdatrix for the engine rebuild?
Mazda Rotary Instructional Rebuild DVD (ARE56)
Aaron Cake's OMP rebuild for the... OMP rebuild.
How To Rebuild The Metering Oil Pump
Okay, here are my questions for now.
Atkins or Mazdatrix rebuild video?
Tools!! I'll be buying a cherry-picker from Harbor Freight this coming week as well as two jack stands, or should I buy four? Any specific tools I should have? I have your basic wrench and socket sets standard and metric. Will I need to get underneath the car?
Anyways, I'm very excited on starting this project, and any tips, suggestions, jokes, and or comments are welcome!

Yes you will be getting underneath more than a few times. Get some buckets for fluids, zip lock baggies for bolts and nuts, masking tape to label everything, you may need a torque wrench for certain things when putting the motor back together (after rebuilding). And lots of brake cleaner and wire brush for any gunk you're more than likely to clean off.
Hey man, I'm going through a similar issue right now with my 86 gxl. I'm not going through a rebuild though, I'm doing a complete engine swap (n/a to T2) and repaint. I'm looking for a cherry picker right now as well to take out my engine, let me know if that harbor freight one works out, that is the closest tool store to me.
As for advice, I haven't got very far in my swap, but in basic repairs and tweaks that I have done so far, I have been using 4 jack stands. Honestly, even if I didn't use all 4 at once, it is nice to have the option. As for the oil metering pump, there are places online that sell a block off kit and you can just pre-mix when you gas up. It will clean up your engine bay a little bit, and you won't have to be concerned about the dang thing going bad. Just my 2 cents, anyway. Another suggestion is a few rolls of shop towels, our 86 RXs have seen almost 30 years of road groads and are filthy everywhere.
Feel free to watch my build thread too, it isn't going very fast because of funds and lack of time and space for such a big project, but it is creeping along. I'll be sure to keep watching yours too.

Junior Member
Joined: Nov 2007
Posts: 30
Likes: 0
From: Savannah, GA
The harbor freight one is ok but we did have an issue with it at a very bad time.
We had to lift the motor as high as the lift would go and when we lowered it we were unable to lift it again at all so we had to be extremely careful while we were sliding the motor in.
My assumption is that is has to do with the way the hydraulics are designed. So if you can avoid lifting to it's max position.
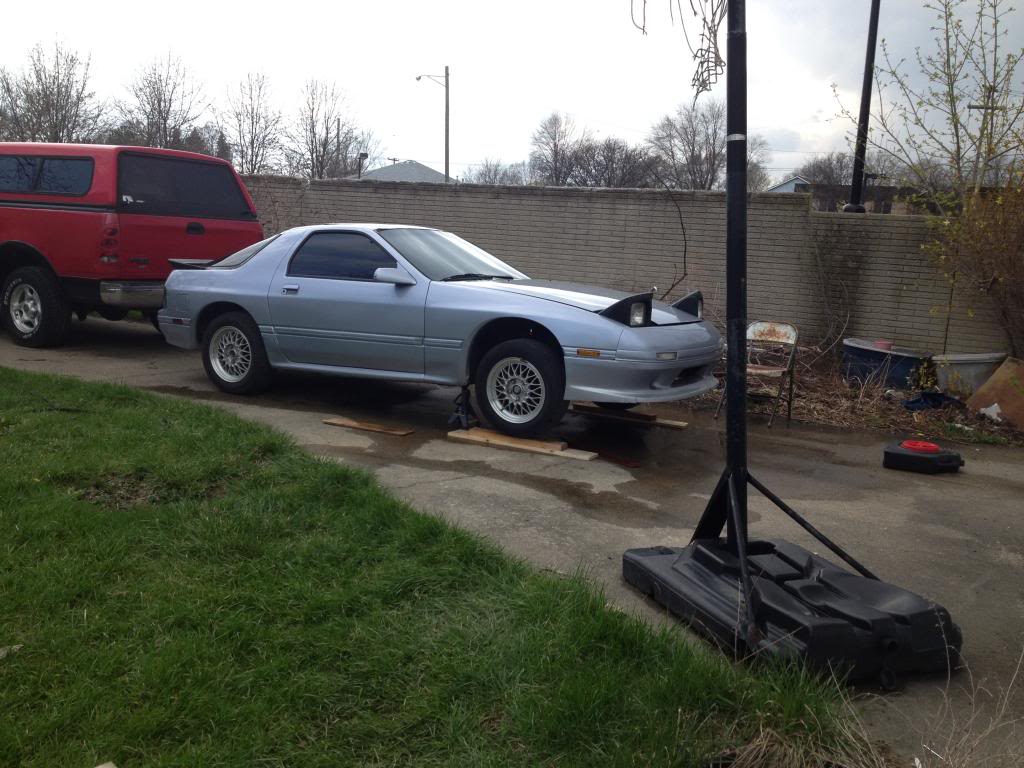
Hope everyone had a great Easter weekend, I know I did watching game of thrones all day, haha. I managed to pick up 4 jack-stands from a family member this weekend. Today I planned on raising the car, and begin draining fluids, with the low clearance I have I decided it would be best to take the front lip off first. Finding and removing all the screws and bolts wasn't too bad, but the last two screws underneath the flip up lights proved to be a challenge. Either today or tomorrow I'll go and pick up a ratchet with a shorter drive so I can get to them without taking the lights off. I also need to buy a floor jack, I don't feel safe using the pinch jack that comes with the car, perhaps I can find someone willing to lend me one later today.
88fc3sT2, Thanks! This is great advice, either later today or tomorrow I'll go and buy a bunch of bags, and a drain pan.
StrandedRX, looks like I'll be going with 4 jack stands haha. Yeah I'm not sure if I want to remove the OMP entirely, however, it's not a bad idea, I guess I'll see how it goes when I get to that point.
Thanks for the input mreed772, I found a place called Chet's rentals, that rents out shop equipment such as engine hoists, i will probably just go with that then. Plus, it's close by!
Forgot to mention, I'll also be giving the engine some sort of street port, (I'll probably take it to a shop and have them do it though) I'm really undecided which to go with though, as it's a 6-port.
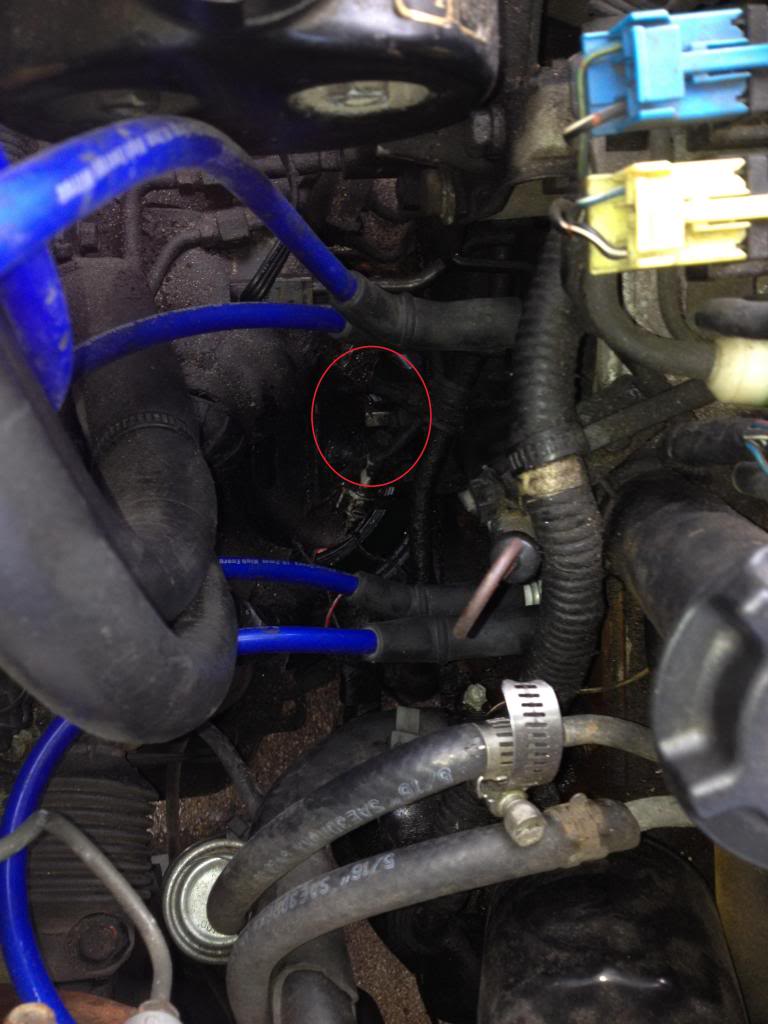
Alright, so I got all the nuts and screws off, so I thought at least. Then I realized there were 2 more, I have no idea how I'm to access these? I've included pictures so you guys can see what I'm talking about. It's connecting the fender to the frame I guess. I plan on switching out the fender, but I don't want to destroy it, but it looks like i might have to. Any idea?
The red circle is what I'm trying to explain.
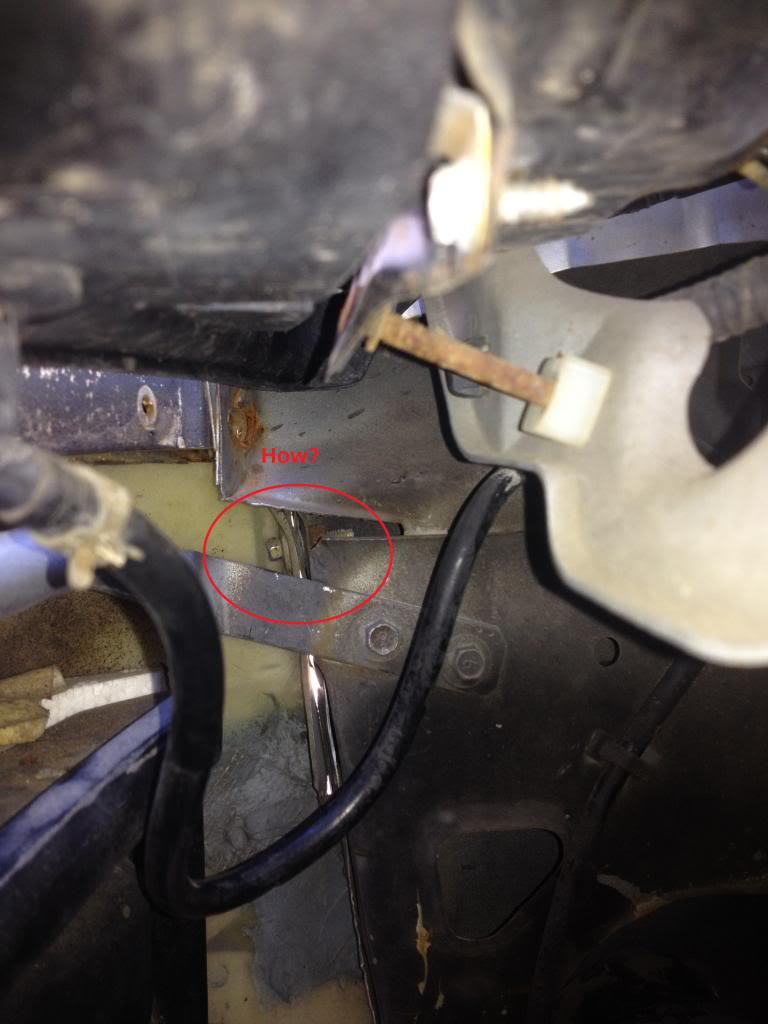

The red circle is what I'm trying to explain.


^ TBH, I think it'd be easiest to unbolt both fenders and pop off the whole thing as one unit, then you can get to the front corner jack points easier and just about everything else. I don't actually remember how the front fenders are bolted in, but I'm assuming it's just the 5-ish bolts in the engine bay (for each fender) and that one you pointed out that's attached to the front bumper.
As for tools, you're going to like metric sockets. Oh yes, especially the 10mm socket. Other common socket sizes I've run into are 12, 13, and 14mm, but outside of the lug nuts (which are 19mm), that's about it. Pliers and screwdrivers (flathead and Philips) for hose clamps and misc screws. Like other people mentioned, torque wrenches are a must. 3/8" and 1/2" drive, especially if you're tearing down and putting back the engine together. Life's much easier when you have the torque specs close by. And hey! What do you know? You're going to love this thread:
https://www.rx7club.com/2nd-generati...-specs-851448/
This will keep your engine together and your wheels from falling off (trust me, I've seen it happen and almost happen, both of which are scary in their own right)
Oil pans and buckets are great, depending on the cleanliness of your engine bay. You might want Gunk Engine Degreaser (by word of mouth, the gel is the best) and Simple Green. A tarp can come in handy if you decide to just spray down the whole engine bay. A parts cleaner is also handy, though not necessary. Just take a bucket and a degreaser and let the parts soak if you're too cheap for one.
Having the FSM handy is great, especially for the wiring diagrams. They also provide exploded diagrams which is amazing if you forget what goes where. Both links below will work:
Foxed.ca - Mazda RX-7 Manuals
1988 Mazda RX-7 Factory Service Manual
A multimeter is also great. It'll let you check the resistance in your injectors, ignition wires, sensors, etc., continuity, battery voltage, etc. and generally allow you to diagnose your electronics, which may be necessary considering it's sat for a while.
The masking tape/zip lock bag suggestion is absolutely great, props to 88fc3sT2 for that one. Make sure you have a sharpie to go with both.
Another random suggestion, once you've got the car securely up on jackstands, check that anything rubber in the engine bay or under the car isn't ruined. 28 year old bushings, fuel lines, and coolant hoses tend to be like that. Though, if you're in the northeast, I don't suppose dry rot is as bad. Customary frame rust check is a must though.
Good luck with your build! It's great to see more FC NAs being revived.
Trending Topics
Oops, correction, there's a bolt holding the front fenders to the brake vents, but with the car jacked up and the wheels out of the way, it should be easy to access through the wheel well. There's also another bolt hiding in the crack between the door and fender. You should be able to get to it with the door ajar.
^ TBH, I think it'd be easiest to unbolt both fenders and pop off the whole thing as one unit, then you can get to the front corner jack points easier and just about everything else. I don't actually remember how the front fenders are bolted in, but I'm assuming it's just the 5-ish bolts in the engine bay (for each fender) and that one you pointed out that's attached to the front bumper.
As for tools, you're going to like metric sockets. Oh yes, especially the 10mm socket. Other common socket sizes I've run into are 12, 13, and 14mm, but outside of the lug nuts (which are 19mm), that's about it. Pliers and screwdrivers (flathead and Philips) for hose clamps and misc screws. Like other people mentioned, torque wrenches are a must. 3/8" and 1/2" drive, especially if you're tearing down and putting back the engine together. Life's much easier when you have the torque specs close by. And hey! What do you know? You're going to love this thread:
https://www.rx7club.com/2nd-generati...-specs-851448/
This will keep your engine together and your wheels from falling off (trust me, I've seen it happen and almost happen, both of which are scary in their own right)
Oil pans and buckets are great, depending on the cleanliness of your engine bay. You might want Gunk Engine Degreaser (by word of mouth, the gel is the best) and Simple Green. A tarp can come in handy if you decide to just spray down the whole engine bay. A parts cleaner is also handy, though not necessary. Just take a bucket and a degreaser and let the parts soak if you're too cheap for one.
Having the FSM handy is great, especially for the wiring diagrams. They also provide exploded diagrams which is amazing if you forget what goes where. Both links below will work:
Foxed.ca - Mazda RX-7 Manuals
1988 Mazda RX-7 Factory Service Manual
A multimeter is also great. It'll let you check the resistance in your injectors, ignition wires, sensors, etc., continuity, battery voltage, etc. and generally allow you to diagnose your electronics, which may be necessary considering it's sat for a while.
The masking tape/zip lock bag suggestion is absolutely great, props to 88fc3sT2 for that one. Make sure you have a sharpie to go with both.
Another random suggestion, once you've got the car securely up on jackstands, check that anything rubber in the engine bay or under the car isn't ruined. 28 year old bushings, fuel lines, and coolant hoses tend to be like that. Though, if you're in the northeast, I don't suppose dry rot is as bad. Customary frame rust check is a must though.
Good luck with your build! It's great to see more FC NAs being revived.
As for tools, you're going to like metric sockets. Oh yes, especially the 10mm socket. Other common socket sizes I've run into are 12, 13, and 14mm, but outside of the lug nuts (which are 19mm), that's about it. Pliers and screwdrivers (flathead and Philips) for hose clamps and misc screws. Like other people mentioned, torque wrenches are a must. 3/8" and 1/2" drive, especially if you're tearing down and putting back the engine together. Life's much easier when you have the torque specs close by. And hey! What do you know? You're going to love this thread:
https://www.rx7club.com/2nd-generati...-specs-851448/
This will keep your engine together and your wheels from falling off (trust me, I've seen it happen and almost happen, both of which are scary in their own right)
Oil pans and buckets are great, depending on the cleanliness of your engine bay. You might want Gunk Engine Degreaser (by word of mouth, the gel is the best) and Simple Green. A tarp can come in handy if you decide to just spray down the whole engine bay. A parts cleaner is also handy, though not necessary. Just take a bucket and a degreaser and let the parts soak if you're too cheap for one.
Having the FSM handy is great, especially for the wiring diagrams. They also provide exploded diagrams which is amazing if you forget what goes where. Both links below will work:
Foxed.ca - Mazda RX-7 Manuals
1988 Mazda RX-7 Factory Service Manual
A multimeter is also great. It'll let you check the resistance in your injectors, ignition wires, sensors, etc., continuity, battery voltage, etc. and generally allow you to diagnose your electronics, which may be necessary considering it's sat for a while.
The masking tape/zip lock bag suggestion is absolutely great, props to 88fc3sT2 for that one. Make sure you have a sharpie to go with both.
Another random suggestion, once you've got the car securely up on jackstands, check that anything rubber in the engine bay or under the car isn't ruined. 28 year old bushings, fuel lines, and coolant hoses tend to be like that. Though, if you're in the northeast, I don't suppose dry rot is as bad. Customary frame rust check is a must though.
Good luck with your build! It's great to see more FC NAs being revived.
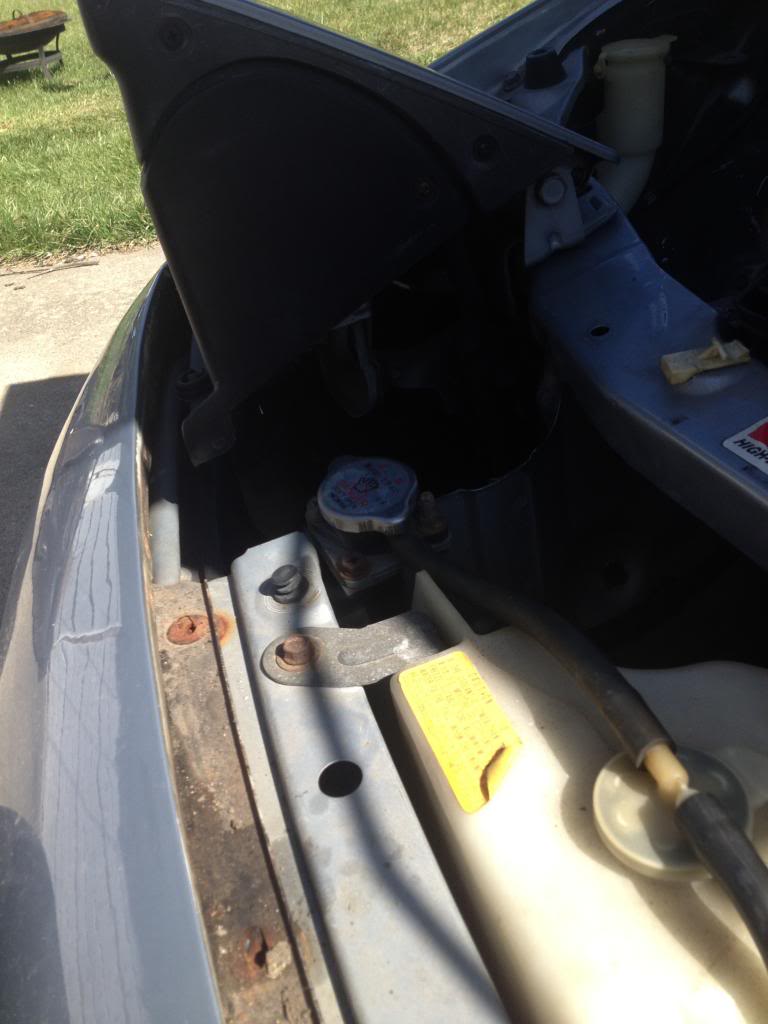
So I came down with strep throat a week ago, finally better now. Jacked the car up, removed the battery, and drained the coolant. I couldn't quite tell which bolt was the block coolant drain, looking at the Haynes manual made it quite easy though (I've included a picture for anyone else confused). I used a 9/16 socket wrench for the block drain, and a phillips for the radiator drain. Looks like it might rain, so I'll get to the oil tomorrow hopefully! 


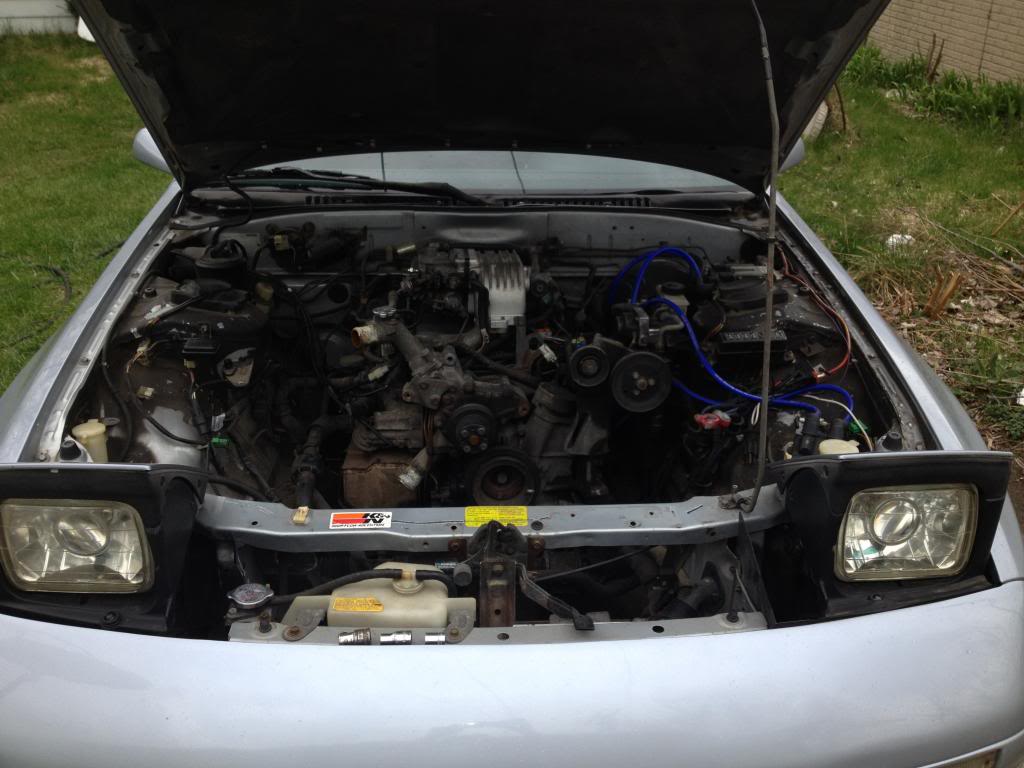
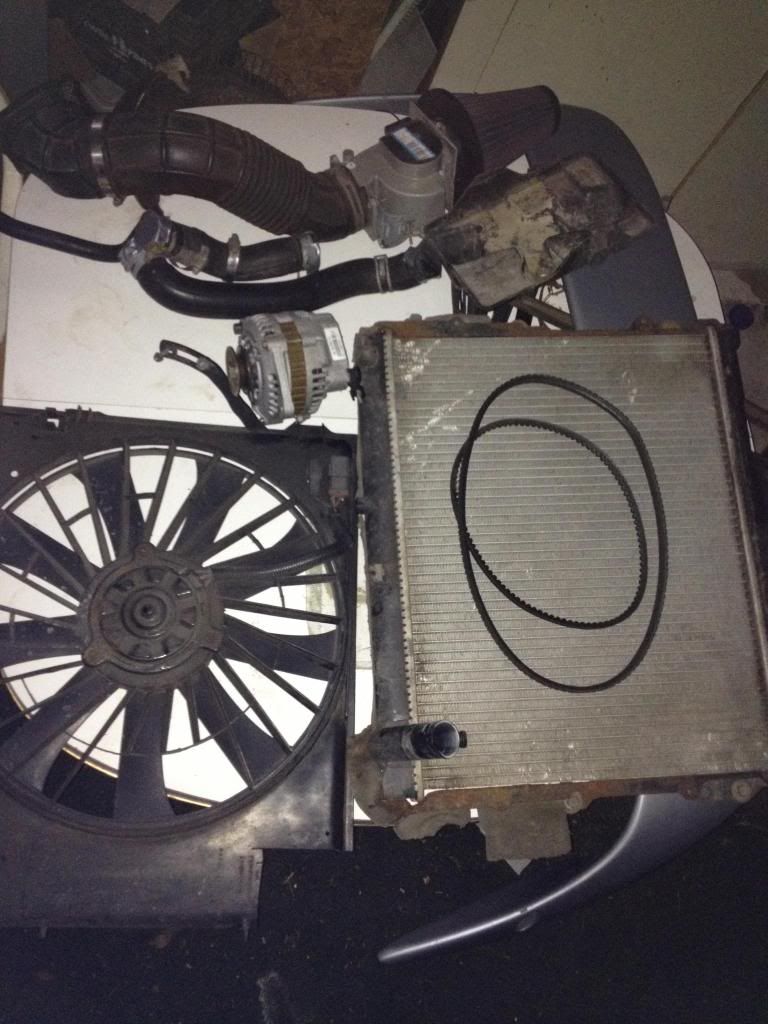
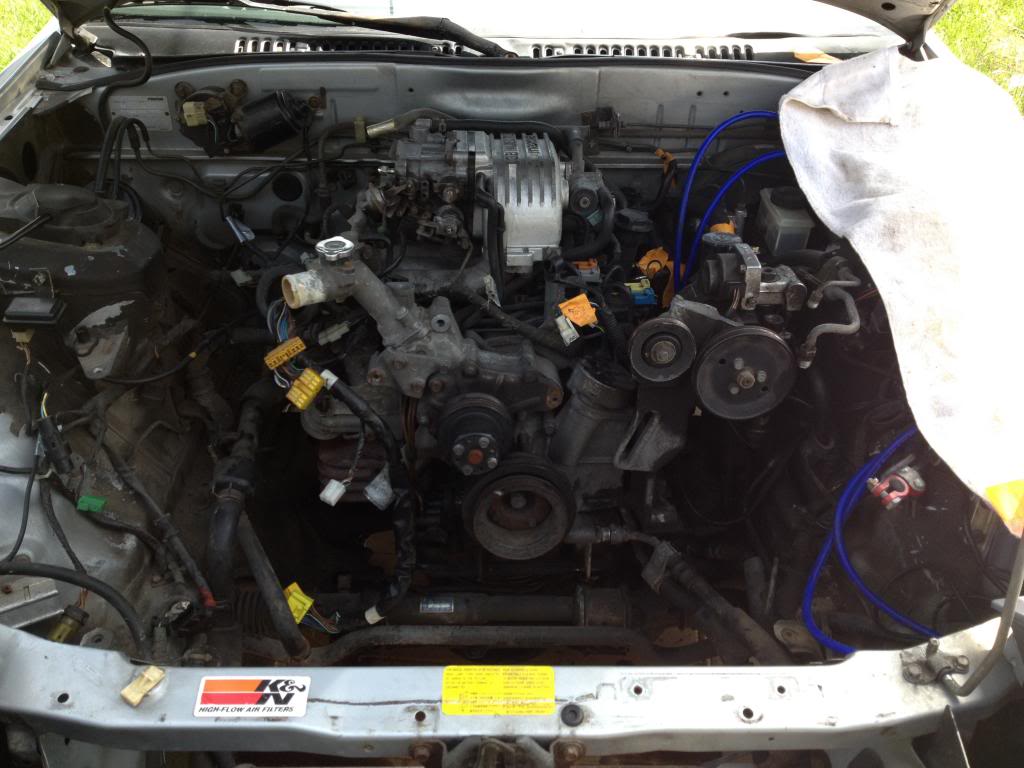
Got a bit done today, before the rain and cold set in. Took off the radiator and hoses, the electric fan, intake, and the alternator. Disconnected the throttle cable, tomorrow I'll hopefully disconnect the engine harness. Everything went smoothly today, quite simple really.
I've read somewhere on here to remove the Sub Zero starting system, where exactly is it? Can't seem to find an image of it anywhere.
I've read somewhere on here to remove the Sub Zero starting system, where exactly is it? Can't seem to find an image of it anywhere.


The subzero system was located on the passenger side by the firewall, near the evap canister and cruise control module.
It looks basically like a windshield washer tank/pump.
You probably don't have one.
It looks basically like a windshield washer tank/pump.
You probably don't have one.


Glad to be of help!
As for the above post about the sub-zero system, it probably is. I've never actually seen one so I can't verify it with certainty. It's supposed to be a small reservoir filled with antifreeze with a pump and hose leading to the intake tract somewhere. I'd remove it and toss it, and go get a block off plate for it. You may want to have rags or a pan handy if antifreeze spills out. Maybe the leak they're referring to is just an intake vacuum leak?
BTW, your drain pan is freaking awesome. Where'd you get one like that?
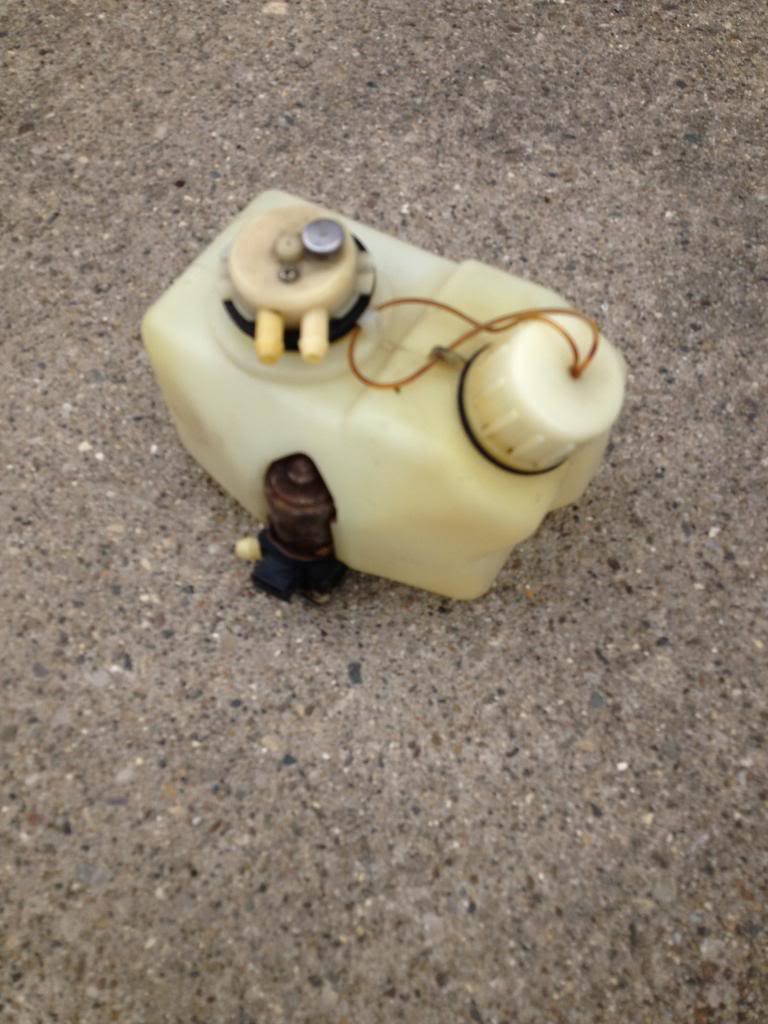
Alright, it was filled with antifreeze as well, probably really really old antifreeze... It just slides out! No need to unscrew anything, as I realized a bit too late. Anyways, this is what it looks like, I capped one of the hoses just incase. Working at getting the wiring harness unplugged right now, any tricks to this? or is it just as easy as everything else so far?
Pzr2, thanks, I picked it up at Napa auto parts for like +/- 30$, with the lid and wheels it's awesome!

Pzr2, thanks, I picked it up at Napa auto parts for like +/- 30$, with the lid and wheels it's awesome!
Alright, finally unplugged the engine harness from the Ecu, this has been the hardest thing yet. The awkward positioning with little space to unplug the ancient wires without destroying the wiring deserved alot of time, but I finally got it, removing the blower fan helped somewhat. Next came the upper oil line going to the block, then unbolting the P/S pump (2 bolts on top and 1 hose on the side), and removing the two fuel lines above the filters. Charcoal canister vacuum hose to the block was next, unplugged the CAS plug and the oil pressure sending unit thing that slides off. Took off the O2 sensor, removed the spark plug wires, heat shield and then the coolant hose under the oil filter.
I'm getting excited as It's almost time to pull it out, however, the rear oil line bolt is on there pretty solid. I haven't removed the hood yet, just incase of rain, but doing so could make it easier using a breaker bar on those.
Questions:
I've decided I want to make this NA machine run around 200hp (Nothing more). Besides porting, a full RB exhaust, what else can I do to achieve this, what would you guys recommend?
When I removed the upper oil line, I noticed it was bone dry, no oil, is that normal? I haven't yet drained the oil.

For a bit more performance, you could get a SAFC tuner to help with the air/fuel controlling, or an Rtek chip installed onto your ecu. Something along those lines will help with the street port and whatever other mods you plan on doing.
Today, I've accomplished a bit.
-Removed the hood
-Removed rear oil line, unplugged 2 connectors to the oil pan
-Removed P/S bracket from engine bay
-Unplugged brake booster hose, plug and more engine harness wires, as well as the ground from the air pump actuator thing
-Unbolted the exhaust manifold from the exhaust, and unplugged the Split air pipe that connects to exhaust (One bolt busted off, one didn't...)
-Removed starter, hanging freely
All I have left to do is to unbolt the engine mount and transmission, I have a few questions though, as the step by step processes don't quite elaborate on this.
Which bolts/nuts am I removing from the engine mounts? Even the Haynes manual doesn't describe this too well.
The rear engine lift hook is connected to the transmission, how do I get around this? (I'm leaving the transmission in the car) I've attached a photo that shows this from the passenger side of the car. I figure if I just remove the bolt, then how will the hoist grab it? Maybe I'm just confused, it is quite hot outside.

If you're leaving in the transmission, then just undo the bolts that hold the engine and tranny together. As for the mounts, fairly straight forward as they're on the sides. Just make sure you really strap the motor up very snug when you get ready to lift it out. Good to see you making some progress. I helped a buddy of mine pull out an engine out of his car, it was the first time for both of us and it is a bit of a tedious process but once you start looking at how things are held on, it'll come clear to you as to what to remove.
http://www.rotaryresurrection.com/2ndgen/tech_turbo_engine_removal.html
This may help, but it doesn't explain how to access the rear engine hook (and it refers to a turbo engine and trans, but it works for the most part). I've never removed the engine first, so I've no idea how to deal with the rear hook. My best suggestion is to split everything, use the engine hoist to hook into the front hook, slide the engine forward a little with the rear supported by a jack (you'll probably need wood blocks), wiggle in the rear engine hook and bolt once you have enough space, hook in, and then pull straight out. To be honest though, I'd wait until you got professional advice before trying out something so dodgy.
This may help, but it doesn't explain how to access the rear engine hook (and it refers to a turbo engine and trans, but it works for the most part). I've never removed the engine first, so I've no idea how to deal with the rear hook. My best suggestion is to split everything, use the engine hoist to hook into the front hook, slide the engine forward a little with the rear supported by a jack (you'll probably need wood blocks), wiggle in the rear engine hook and bolt once you have enough space, hook in, and then pull straight out. To be honest though, I'd wait until you got professional advice before trying out something so dodgy.
Last edited by pzr2; May 8, 2014 at 11:32 PM. Reason: missed a parenthesis!
Hmmm, I've been using rotaryresurrection.com's guide actually, and using the haynes manual for better visuals. What I was trying to describe is that the rear engine hook is bolted onto the engine with a bolt that also bolts onto the transmission. The bolt head is also beneath the throttle body. Pulling the bolt half way out and supporting the engine with a bolt that's half way out just doesn't sound right. I plan on pulling it Monday, so I'll figure out something by then either way.
Once I pull it, I'll probably support it with an engine stand, is it possible to undo the flywheel while on the stand, or should I throw it on a pallet?
The thing with the engine mounts is, it seems like I'm to remove the bolt from the mount to the frame on the driver's side, but on the passenger side I only remove the 3 bolts that bolt through the oil pan. Just want to clarify this.
Been doing a lot of research today and last night, so I'll think I'll upgrade to an Aluminum flywheel and a new clutch. Eventually I'll grab a piggy back ECU and an aluminum radiator as well. I'm also torn between fixing the OMP and going premix...
I've looked on Racing beat's website, and I like what I see, how ever, wondering if you guys have any input on what I should go with?
Exedy clutch kit stage 1 - Exedy Clutch Kit - Stage 1 for 83-92 Non-turbo RX-7 - Racing Beat
RX-7 Flywheel Aluminum - RX-7 Flywheel - Aluminum for 83-92 RX-7 Non-Turbo - Racing Beat
Mind you, I'm not trying to make a track car or a drag car, just something I can daily drive with a bit more pep. Thanks guys!
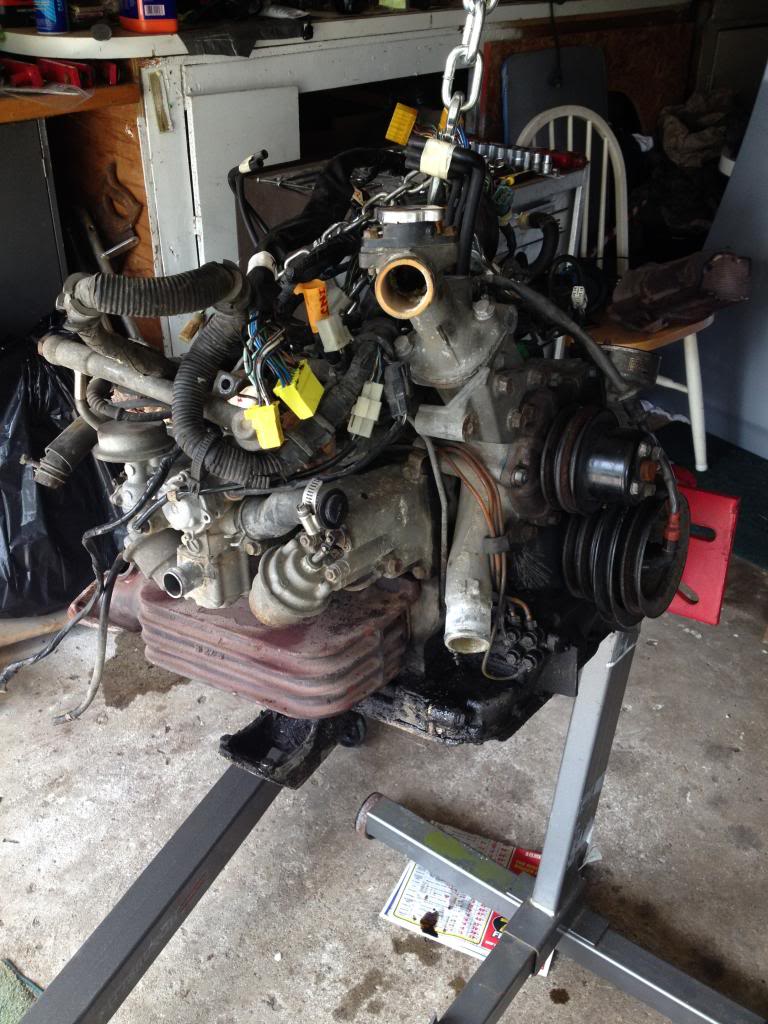
Finally, got the engine out! Ended up buying a new 1 ton engine hoist from harbor freight for $99.00! Pulled off the upper intake manifold, came off relatively easy. Hooked up the engine to the hoist, had to approach from the passenger side of the car, as the lift was a bit short to approach from the bumper. Unbolted the transmission and engine mounts, re situated the rear engine lift hook and pulled it right out while shaking it a bit, easy day.
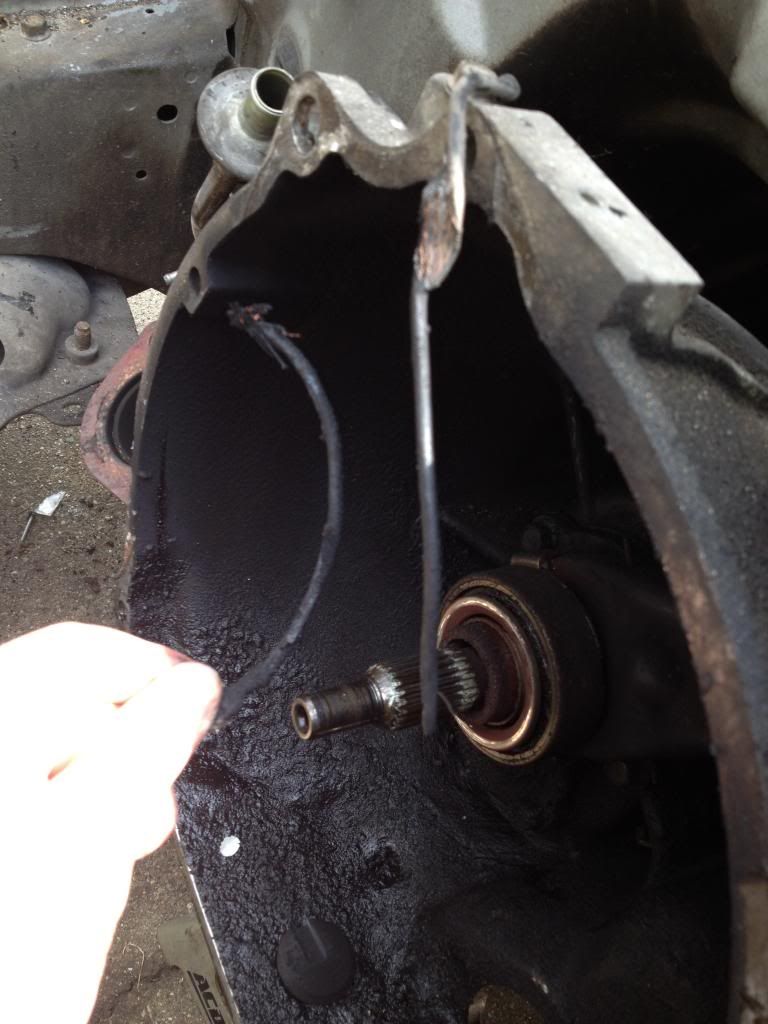
I noticed a wire that was pinched between the engine and the transmission, the other half of it was inside the bell-housing... Any idea what this went to? One end has what looks like to be a spade connector almost, looks like maybe a ground of some sort? I never noticed any issues with the transmission, other than the reverse lights didn't work.
Also, the passenger side engine mount was broken in half, so I've ordered a new set of engine mounts from racing beat as well as the flywheel puller and a new clutch for the hell of it. I'm still deciding on whether I should go with a lightweight steel flywheel or an aluminum flywheel, I want to maintain drive-ability, so I'm thinking maybe the steel one.

I noticed a wire that was pinched between the engine and the transmission, the other half of it was inside the bell-housing... Any idea what this went to? One end has what looks like to be a spade connector almost, looks like maybe a ground of some sort? I never noticed any issues with the transmission, other than the reverse lights didn't work.

Also, the passenger side engine mount was broken in half, so I've ordered a new set of engine mounts from racing beat as well as the flywheel puller and a new clutch for the hell of it. I'm still deciding on whether I should go with a lightweight steel flywheel or an aluminum flywheel, I want to maintain drive-ability, so I'm thinking maybe the steel one.
Junior Member
Joined: Nov 2007
Posts: 30
Likes: 0
From: Savannah, GA
Interesting find on the wire. It looks like a ground to me. Seems like it was overlooked last time the clutch replaced would be my guess.
From what I remember hearing a while back the lighter the flywheel the better for us NA cars.
From what I remember hearing a while back the lighter the flywheel the better for us NA cars.