
The turbo gRoadster 7

Thread Starter


Joined: Apr 2012
Posts: 3,060
Likes: 216
From: Charleston
Long time no post..... Long story short Calculus and Physics and a 50+ hour work week and moving. 
Here is the adaptor plate almost made.
The 12A nikki manifold is attached to the plate by bolts and holes will be drilled through the plate to mate it to the surface of the engine.
I've got the Mallory 4309 FPR and I'm pretty decided on using the Mallory Comp 140 fuel pump. Just because Mallory suggests using it, BUT if anybody here has other oppinions on the Comp 140 pump I'd love to hear them.
Thread Starter
Joined: Apr 2012
Posts: 3,060
Likes: 216
From: Charleston
This is the poor man build btw....
$1000 for the car
$200 for soft coolent seals and whatnot
$40 for the idler arm
$100 for the spare engine/turbos
$20 oil feed line
$90 FPR
$100 downpipe
$1550 so far.
I might be able to come out under 2k
I still need the pump $150 or so, BOV $30, and a wide band $300.
$1000 for the car
$200 for soft coolent seals and whatnot
$40 for the idler arm
$100 for the spare engine/turbos
$20 oil feed line
$90 FPR
$100 downpipe
$1550 so far.
I might be able to come out under 2k
I still need the pump $150 or so, BOV $30, and a wide band $300.
I went with the MSD 2225 pump. It seems to work pretty well for this application. About $100 on ebay. Just follow Mallory's instructions of 5/16" send and 3/8" return lines to avoid flooding issues. The MSD has a convenient 5/16" outlet nipple that fits our stock 5/16" hardline.
I had access to a BLitz BOV with charge pipe so I used it. But I got an SSQV for around 55 or 60 on ebay. It'll go on my next Nikki turbo install.
I got an AEM wideband on eBay for around $162. I like this gauge because it does everything I need it to do and is super easy to install. I put the O2 bung down under the car to keep it away from most of the heat (location is adjacent to the tranny drain bolt area). It's self heated so you can do this. Most guys put the sensor right after the turbo outlet and then experience sensor failure.
Thread Starter
Joined: Apr 2012
Posts: 3,060
Likes: 216
From: Charleston
I'm going with the Innovate LM-2 wide band.... Just cause its hand held and I can clamp it onto motorcycle exhausts without having to weld a bung in each tail pipe. Also, it has an OBD2 scanner which is nice.
Up until now I've always tuned with plug chops and sound/exhaust temp, but I've never steped outside of the relm of N/A or air cooling. There are just more variables with liquid cooling and boost.
I'm real stoked about the wide band. I've used a "sniffer" on stuff before, but this thing can log runs and everything else under the sun.
Hmmm MSD 2225 you say.
Yeah, I'm looking at running new lines to and from the tank. I've also been thinking about a 20gal fuel cell. The tank that came with the car was rusted badly. So I had to use my white SA's tank as a temporary fix. I like the idea of having LOTS of fuel; less fill ups
I've got a factory downpipe I'm using. Would the factory O2 sensor location be fine?
The factory FC downpipe is kinda small, right? I've heard you're supposed to use at least a 3" downpipe, then the rest of the exhaust can be 2.5". This is what I'll do on my next system as my current full 3" is kinda loud and larger than needed on a stock S5 turbo.
The factory O2 sensor is where?
Yeah, my MSD 2225 and my current backwards fuel system (3/8" send and 5/16" return) allows flooding when you let off. This is common on blow through according to a guy in my recent Mallory 4309 thread. I assume if I had known about the fuel lines and done them according to Mallory's intructions, I wouldn't have any flooding problems, or they'd be vastly less.
The car is still very driveable but only two out of the four hogged out boost prepped Nikkis I modded earlier this year can handle my current fuel system. It's as if I'm feeding the carb with a 3/8" line from pump to carb with only a short length from the mallory to the carb at 5/16". When I let off, all that extra fuel has to go somewhere which it can't effectively do when my return is only 5/16". It all has to go into the carb.
Thread Starter
Joined: Apr 2012
Posts: 3,060
Likes: 216
From: Charleston
The MSD 2225 does 40#s. The Mallory Comp 140 only 14#s.
Under stock boosting (7 psi??) 14psi fuel pressure should be enough right?
And yeah, whatever I decide on fuel pump wise I am definitely going to do the Mallory recommended test for a maximum of 3 psi on the return line. I'll probably end up just replacing the 5/16" hard line with a big ole 3/8 one.
I don't have the downpipe with me atm, but its like 2.5". The o2 bung is right next to the turbo.... Like half an inch (if I am recalling correctly).
14psi might be enough. Think of how the Mallory 1:1 boost reference works. You take the "base pressure" the carb likes such as 2.5, then add 7psi to it and you end up with 9.5psi of required fuel pressure. So it sounds like a 14 psi pump should work, but I was advised to just go with the MSD pump. The guy who suggested it didn't have any flooding problems as far as he knew but his system also had 5/16" send and return hardlines. He also said his Mallory could go all the way down to 1psi on the very same Mallory I'm using now (I got it from him) where on my setup the lowest it goes is 2psi but is usually between 3 and 2 at its lowest setting with an average of 2.5psi so the carb doesn't usually complain. It only overfills sometimes when it was empty and you first turn it on so the bowls will fill, but I think it's due to new needles trying to burnish themselves in after a carb rebuild. It's getting less frequent and was only kinda mild in the first place. I think t_g_farrel said his likes to do that too, also a fresh rebuild.
That bung location might work but either way I'm glad mine is under the car. I just ran the wires next to the speedo cable and used twist ties. Simple but effective. Zip ties are another option.
That bung location might work but either way I'm glad mine is under the car. I just ran the wires next to the speedo cable and used twist ties. Simple but effective. Zip ties are another option.
Joined: Jun 2006
Posts: 4,815
Likes: 24
From: Columbia, Tennessee
Are you using the sockets and stuff for reference? Id like to try this, but Im afraid without a drill press Id end up mucking up the shape and theyd be uneven. Is there an easy way to press out the venturis? Without a press. Say hammer and socket method? Then you could have a bunch of spare venturis from parts Nikkis for tuning. Just like a jet change.
Thread Starter
Joined: Apr 2012
Posts: 3,060
Likes: 216
From: Charleston
Are you using the sockets and stuff for reference? Id like to try this, but Im afraid without a drill press Id end up mucking up the shape and theyd be uneven. Is there an easy way to press out the venturis? Without a press. Say hammer and socket method? Then you could have a bunch of spare venturis from parts Nikkis for tuning. Just like a jet change.
I do have a few spare nikkis just in case

I have been using HF's "sanding cartridges" and my air die grinder to enlarge the venturis. HF part number 96826.
Most people remove the venturis because it gives easier access. Also prevents the metal dust mess all over the carb you've got now.
I tried hogging them out without removing them from the carb at first, but quickly found it fairly difficult compared to having them out. This gave me easy access from both sides for more accurate shaping.
I only used a die grinder with a couple cheap burrs to take out the majority of the material, and a dremel for final shaping with a sanding drum. I used washers of various sizes held with a bolt and nut to get the venturi taper I wanted. Some sets turned out better than others, but I was learning as I went.
The end result is some carbs feel more powerful than others mainly due to the size of the venturis. For example the 24.9mm carb seems to be the most powerful, while a 24.7mm seems to have less tip-in and low end. While a 24.5mm carb seems to be the weakest on primaries, however its stock secondaries rival the huge hogged out racing nikki when both are used NA.
Thread Starter
Joined: Apr 2012
Posts: 3,060
Likes: 216
From: Charleston
I looked back to the PM you sent me Jeff.... Yeah, I must have skipped the part where you said "remove the venturis" hehe. Oh well, I'm here now.
I have a spare 83' carb I think I'll go ahead and **** the venturis out of that one and try it both ways.
The metal dust is dis-concerting. I think I should've taped the crap out of it prior to sanding, but like you said this is a learning process. And I'm mostly doing this JUST for a learning experience. (If I was after heeps of power I could just get a loan and buy a GTR or something)
I found a washer in the pile, along with a nut and a bolt, that was the perfect diameter to get the venturis out. I take the carb base off, support the main body with a couple of 1x1 pieces of wood or whatever, and using a big hammer, I lightly tap the venturis down and out of the main body. Then to reinstall, you just hammer them back down into the body. You'll see what I'm talking about.
To clean all the metal dust off, just take out all the air bleeds and other stuff that can be unscrewed, then use some degreaser and water. The dust comes right off. You gotta use compressed air to dry everything of course. Make sure all the "passages" are clean with no water or metal dust remaining.
To clean all the metal dust off, just take out all the air bleeds and other stuff that can be unscrewed, then use some degreaser and water. The dust comes right off. You gotta use compressed air to dry everything of course. Make sure all the "passages" are clean with no water or metal dust remaining.
^Good luck with that. The direct approach with a hammer is a better choice because you can feel what you're doing while you're doing it.
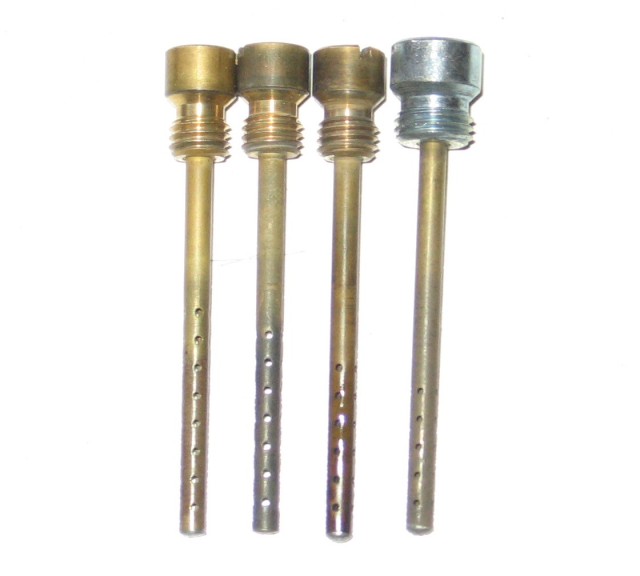
One quick tip if you're going to hog out a Nikki is get a small drill bit in .045" or .046". Drill out the accel pump nozzle with this size, not Sterling's recommended .050" as that is way too big in my opinion. This .045" drill bit is the 118 I refer to all the time (1.18mm). Also use it to drill out the nickel plated 60s on the secondary slow air bleed location. Transfer these drilled bleeds to the primary side. Then the primary brass slow air bleeds (they range from 150 to 190 with 170 being the most common on later FB carbs) need to be filled with solder and installed in the secondary side. The reasons to do this are 1) to bring the idle circuit back into calibration and 2) the secondaries, being mechanical, tend to have a bog or delay caused by too much air and not enough fuel, even with the accel pump mod sometimes. The stock slow bleeds are meant for smooth transitoning vacuum secondaries, which we can't use here so the filled bleeds reduce this wait time and gives us the ability to make a trade in locations without needing to have another parts carb available. You will also need to fill the long secondary slow bleeds as this reduces the extra air futher. I left the primary long slow bleeds alone.
I'm not talking about the big main air bleeds here. Only the slow air bleeds. Speaking of the main air bleeds, they will need some tuning probably. I tried some 90s with 6 and 7 sets of progression holes. Not much difference. I then tried some 80s and they seemed to help a problematic carb while others did fine with 90s. Go figure. It takes tuning time. Maybe even try the stock 70s? Or 60s? I had access to all four sizes but you can make your own with Holley air bleeds and some careful drilling and thread cutting of the stock air bleeds like Sterling does. I have yet to figure out how he does it but it seems pretty straight forward if you have a drill press or better yet an end mill. That's getting way too advanced for this thread though. Good luck hogging out those venturis! Remember to keep the shape as venturiish as possible to maintain the highest vacuum. Probably more important on a 12A as it pulls less vacuum at the same RPM as a 13B does. Maybe 24.0mm is the right size for you?
Now for some photos. Here is the 24.9mm Nikki. The secondary nickel plated 60s were removed, drilled to 118 and installed in the primary side. The primary brass 170s were removed, filled with solder and installed in the secondary side.
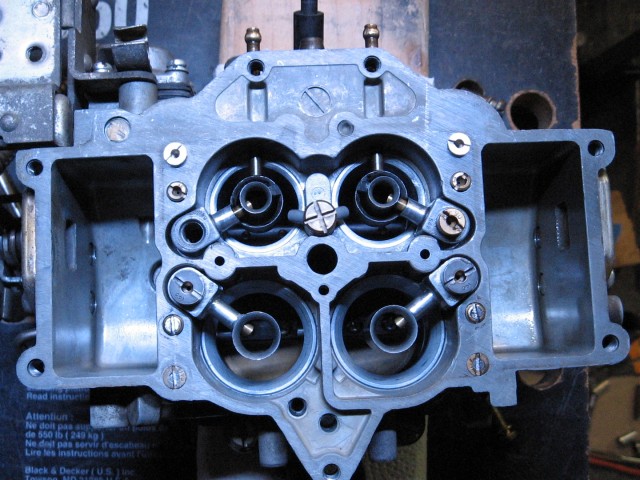
Notice the primary air bleed is missing on the left side. I pulled it for a comparison picture below.
With flash. Notice the solder in the secondary slow bleeds.

Air bleed comparison. Count the progression holes.
Notice the primary air bleed is missing on the left side. I pulled it for a comparison picture below.
With flash. Notice the solder in the secondary slow bleeds.
Air bleed comparison. Count the progression holes.
carb whisperer
Joined: Jan 2008
Posts: 1,485
Likes: 4
From: Greenfield, Ohio
Now for some photos. Here is the 24.9mm Nikki. The secondary nickel plated 60s were removed, drilled to 118 and installed in the primary side. The primary brass 170s were removed, filled with solder and installed in the secondary side.
Notice the primary air bleed is missing on the left side. I pulled it for a comparison picture below.
With flash. Notice the solder in the secondary slow bleeds.
Air bleed comparison. Count the progression holes.
Notice the primary air bleed is missing on the left side. I pulled it for a comparison picture below.
With flash. Notice the solder in the secondary slow bleeds.
Air bleed comparison. Count the progression holes.
build me one for NA
For NA, do exactly what you see in the pics, but use a set of 70 primary air bleeds and a set of 130 fuel jets. Everything else stays the same.
For completeness sake, I'll list the specs for turbo: I've found 90 primary air bleeds and drilled 118 fuel jets work. Why does turbo want bigger bleeds and smaller jets? I'm open the theories. Maybe because the Mallory pushes more fuel into the carb thus requiring smaller jets and large bleeds? Hey, I'm still learning. All I can do is try something and if it works, I talk about it here.
For completeness sake, I'll list the specs for turbo: I've found 90 primary air bleeds and drilled 118 fuel jets work. Why does turbo want bigger bleeds and smaller jets? I'm open the theories. Maybe because the Mallory pushes more fuel into the carb thus requiring smaller jets and large bleeds? Hey, I'm still learning. All I can do is try something and if it works, I talk about it here.
You don't really need to when the venturis are hogged because you will notice there is plenty of room for the air to get around them compared with stock venturis. However I still do the mod because I like air flow and it's on a 13B. Makes sense to me.
Thread Starter
Joined: Apr 2012
Posts: 3,060
Likes: 216
From: Charleston
I drove out the venturis... Much easier to work with.
I used the hammer and socket method. I used my hammer and socket right next to a 40 ton press. haha Something about putting a flimsy carburetor in a press makes me feel uneasy.
I used a socket to bang out a spare venturi out of a spare carb. Then I used that sacrificial venturi to bang out the others.
A nice Mazda metric washer, if you can find one, is the best choice because it has a nice 90 degree sharp edge and doesn't hurt the venturi.
So I did a mod to a few sets of secondary main air bleeds to make them adjustable like Sterling's. My method is probably different from his, so here is how I did it. Grab a sacrificial secondary booster. Crush it in a vice so the booster is the same width as the threaded part where the air bleed screws into. Then use the crushed booster as your parts holder so you can grind the top of the head down several mm about the thickness of the head of a fuel jet. See where I'm going with this? Then cut a new slot in it with a hack saw or my favorite, a sawsall. hahah. This is so you can remove it and install it in the carb later, duh. But leaving it in the holder tool, take it to your drill press. Get the alignment just right in your drill press vice (you do have one, right?) so the drill bit will go in straight. Use the bit recommended for 10-32, drill deep enough but not too deep to cut enough threads so a fuel jet will fit. I had to find this depth through trial and error. Next, thread cutting.
Here is where it gets weird for you. See, I used a 5mm x 0.80 tap. This is the correct one for Mazda jet thread pitch. Don't use a 10-32 tap because it will damage the threads of your fuel jet as it is just slightly too small. Only use a 10-32 tap if you have a selection of Holley air bleeds, as that is the size they use. I didn't have any, but I did end up using my 10-32 tap later on because it was modified to be a bottoming tap (I ground the pointy section off the end until it was abrupt and sharp/flat). This was good enough because now I can cut threads all the way to the bottom of the hole and the threads just start to get tight as the jet fully seats in the air bleed. Perfect. So my method worked for me, and that is how I did it, and if you're brave enough to attempt this project, you might come up with a different, better solution. But I gotta say my way worked so well I did a production run of four sets. That's 8 modded air bleeds. Enough to do four carbs. They're not pretty but I installed a set today and they went in perfectly. They fit under the air horn with like-stock clearance for the air to get in. Good enough.
So I did a mod to a few sets of secondary main air bleeds to make them adjustable like Sterling's. My method is probably different from his, so here is how I did it. Grab a sacrificial secondary booster. Crush it in a vice so the booster is the same width as the threaded part where the air bleed screws into. Then use the crushed booster as your parts holder so you can grind the top of the head down several mm about the thickness of the head of a fuel jet. See where I'm going with this? Then cut a new slot in it with a hack saw or my favorite, a sawsall. hahah. This is so you can remove it and install it in the carb later, duh. But leaving it in the holder tool, take it to your drill press. Get the alignment just right in your drill press vice (you do have one, right?) so the drill bit will go in straight. Use the bit recommended for 10-32, drill deep enough but not too deep to cut enough threads so a fuel jet will fit. I had to find this depth through trial and error. Next, thread cutting.
Here is where it gets weird for you. See, I used a 5mm x 0.80 tap. This is the correct one for Mazda jet thread pitch. Don't use a 10-32 tap because it will damage the threads of your fuel jet as it is just slightly too small. Only use a 10-32 tap if you have a selection of Holley air bleeds, as that is the size they use. I didn't have any, but I did end up using my 10-32 tap later on because it was modified to be a bottoming tap (I ground the pointy section off the end until it was abrupt and sharp/flat). This was good enough because now I can cut threads all the way to the bottom of the hole and the threads just start to get tight as the jet fully seats in the air bleed. Perfect. So my method worked for me, and that is how I did it, and if you're brave enough to attempt this project, you might come up with a different, better solution. But I gotta say my way worked so well I did a production run of four sets. That's 8 modded air bleeds. Enough to do four carbs. They're not pretty but I installed a set today and they went in perfectly. They fit under the air horn with like-stock clearance for the air to get in.
Good enough.
Thread Starter
Joined: Apr 2012
Posts: 3,060
Likes: 216
From: Charleston
^^ Nice stuff. Unfortunately my holley jet collection is smaller than my nikki jet collection. I do have a few drawers full to the brim of Kehini and Mikuni jets, but that doesn't help at all here. :P I might end up doing this when I'm really tuning the crap out of it.
So, with the venturis out I was able to get the shape I wanted. I don't see how I could have shaped them without removing them from the body. Tapered just about the same as the stock venturis only 24.5mm. 24.5mm for now I want a more accurate measuring device other than an 18mm socket before I shave off anymore.
One venturi pretty much done at this point the other is about 23 or so. I'm getting excited. The plate is almost done just a little more grinding and some hole drilling. I think I'm going to go ahead and setup the nikki to run N/A and swap out the edlebrock before the whole turbo addition takes place
Jeff, have you tried 24.6mm?
I'm sure 24.6mm can be found somewhere on at least one of my venturis. I was going for average measurement because they never come out perfectly round when you cut them by hand.
So today I got another carb back together. It has 24.7mm (average) primary venturis and modded boosters with the usuall accel pump mod, mechanical secondaries, and more recent mods like solder filled secondary slow air bleeds for thart extra crisp jump in power we all come to expect these days that only a modded Nikki can provide. The solder filled bleeds are easily reversible back to stock if they don't work very well on an NA setup. This is a 79 carb, by the way, and now it has a set of grose jets and some other cool parts from the racing nikki. I think this will make a good auto cross carb for a mild ported 12A.
I was tempted to attempt cutting the secondary venturis, but decided not to this time. The reason is because the stock secondaries of a Nikki are good enough that they work fine on a 74 ported 13B. No need to make them bigger for a 12A, eh? Sterling and Yaw didn't mod their secondaries, did they? I don't recall. Only the Racing Nikki (created by a guy named Dave ******* back int he 90s) has modded (enlarged) the secondaries out to 31mm up from a stock 26mm. I decided to set this carb aside for a mild streetported 13B with a reverse runner manifold in the MG Midget. Why? Because it will never handle boost due to a warped main body, and its primaries are also hogged out to 26mm which, by the looks of them, is as large as you can physically go and still have at least a mild venturi effect. You'd hope so anyway. It does ok on 74 ported 13Bs though. The MG has such a cramped engine bay that no Hitachi would ever flow enough, and a Holley, while not really out of the question if I use a carb adpator on a stock manifold, would be a fairly bad choice for such a tiny car and a tiny fuel system. Besides the Holley is usefull elsewhere on aftermarket manifolds like the RB for an FC engine and what not where it can flow to its full potential. I swapped tops from the stock 79 carb mentioned above to the racing Nikki for a working fast idle linkage and swapped the base plate because the one from the racing nikki is partially damaged and has a fat flat spot right off idle. Not a problem for a racing carb, but nasty on a daily driver, as I found out this summer. It starts to buck and won't improve until you let off and get bacl on it. If you stay on it without letting off, it braps so hard it's kinda embarassing. Hopefully the weird base plate on a carb with smaller venturis will hide the glitch due to increased vacuum signal. Thoughts?
So today I got another carb back together. It has 24.7mm (average) primary venturis and modded boosters with the usuall accel pump mod, mechanical secondaries, and more recent mods like solder filled secondary slow air bleeds for thart extra crisp jump in power we all come to expect these days that only a modded Nikki can provide. The solder filled bleeds are easily reversible back to stock if they don't work very well on an NA setup. This is a 79 carb, by the way, and now it has a set of grose jets and some other cool parts from the racing nikki. I think this will make a good auto cross carb for a mild ported 12A.
I was tempted to attempt cutting the secondary venturis, but decided not to this time. The reason is because the stock secondaries of a Nikki are good enough that they work fine on a 74 ported 13B. No need to make them bigger for a 12A, eh? Sterling and Yaw didn't mod their secondaries, did they? I don't recall. Only the Racing Nikki (created by a guy named Dave ******* back int he 90s) has modded (enlarged) the secondaries out to 31mm up from a stock 26mm. I decided to set this carb aside for a mild streetported 13B with a reverse runner manifold in the MG Midget. Why? Because it will never handle boost due to a warped main body, and its primaries are also hogged out to 26mm which, by the looks of them, is as large as you can physically go and still have at least a mild venturi effect.
You'd hope so anyway. It does ok on 74 ported 13Bs though. The MG has such a cramped engine bay that no Hitachi would ever flow enough, and a Holley, while not really out of the question if I use a carb adpator on a stock manifold, would be a fairly bad choice for such a tiny car and a tiny fuel system. Besides the Holley is usefull elsewhere on aftermarket manifolds like the RB for an FC engine and what not where it can flow to its full potential. I swapped tops from the stock 79 carb mentioned above to the racing Nikki for a working fast idle linkage and swapped the base plate because the one from the racing nikki is partially damaged and has a fat flat spot right off idle. Not a problem for a racing carb, but nasty on a daily driver, as I found out this summer. It starts to buck and won't improve until you let off and get bacl on it. If you stay on it without letting off, it braps so hard it's kinda embarassing. Hopefully the weird base plate on a carb with smaller venturis will hide the glitch due to increased vacuum signal. Thoughts?