When you click on links to various merchants on this site and make a purchase, this can result in this site earning a commission. Affiliate programs and affiliations include, but are not limited to, the eBay Partner Network.
Very nice work!!! The shroud looks great as well! I really like the setup!
Thanks again! Of course I fix one this and something else then needs attention. It looks like one of the oil cooler lines/connections is leaking. The lower one of the two right at the cooler. I have read several other threads now about being extra careful when loosening/tightening them so I guess I have that to look forwards to.
This is my next project though. This tablet was for the test fit and I have a newer tablet on the way. I already have a Kenwood bluetooth receiver installed behind where that tablet would sit, normally connecting my phone to it wirelessly but id like to have something more permanent. I intend on ultimately mounting it with neodymium magnets. I am also repainting all the center console trim and gear shift surround in a satin black to match my steering wheel. The silver color always bothered me.
I am also repairing the common crack with some plastic weld and sanding it to hopefully look original again
Before installing new oil cooler lines, I recommend removing the oil cooler and inspecting it for cracks. Cracks in the threaded area of the bungs is common. If cracks are found, a good solution is to have the fitting welded to the bungs and the crack in the bung welded. This will seal the cracks in the threads and prevent future overtightening of the line to the bung. I've been down that road. I did that in my 85.
Before installing new oil cooler lines, I recommend removing the oil cooler and inspecting it for cracks. Cracks in the threaded area of the bungs is common. If cracks are found, a good solution is to have the fitting welded to the bungs and the crack in the bung welded. This will seal the cracks in the threads and prevent future overtightening of the line to the bung. I've been down that road. I did that in my 85.
Sounds like im going to have some fun with that. I am praying that its just the crush washers but I will find out more once I get it to work. Not fiddling with that stuff in the driveway, id like to go from below with a drain bucket underneath
So i received my KYB struts today, now i'm just waiting on the Racing Beat springs.
I also ordered my rims today! Going full Fujiwara in this b*tch. 15x8 +10. Just a little aggressive But i will be doing some fender rolling and possibly ZG flares.
You had me with everything but the wheels and fender rolling. Not my taste on such a beautiful car. The RB springs and the new shocks should provide a nice ride and improve the handling quite a bit.
On a side note, I remove and replace the oil cooler from the top. You can access the lines from either the top or from underneath. It may be beneficial to remove the undertray and brake clean off the oil around the bungs and ensure the area is clean. Then go start the engine and get back under the car to check for oil seepage if you cannot see it from above.
I'm sorry! Unfortunately i have never ever been a fan of Stock GSL-SE wheels.
I have had a vision in my head since I was 16 of what I wanted my Rx7 to look like. I've had 3 prior to this one that I either lost or had to sell because of unseen circumstances. This is my forever car now. I also intend on installing ZG Style fender flares but that are going to be 3M taped on, not riveted.. The fender rolling will be very minimal as I do care about the body, only enough to accommodate the wheels/tires and no more. This is not a teenagers Civic with 45 degree cambered wheels haha.
Keep in mind, if this was all original I would never do such a thing, but seeing as it is a rebuild title from the theft recovery, I don't think its every going to be worth an absorbent amount of money. So forever it shall remain my car, or in the family to my child.
Originally Posted by mazdaverx713b
You had me with everything but the wheels and fender rolling. Not my taste on such a beautiful car. The RB springs and the new shocks should provide a nice ride and improve the handling quite a bit.
On a side note, I remove and replace the oil cooler from the top. You can access the lines from either the top or from underneath. It may be beneficial to remove the undertray and brake clean off the oil around the bungs and ensure the area is clean. Then go start the engine and get back under the car to check for oil seepage if you cannot see it from above.
Its all good. Its your car and you do what makes you happy. It will definitely look nice with those wheels. I'm just more for originality and I like the look of these cars in their stock form is all. So for me, I would keep it cosmetically original for the most part. The car definitely deserves to be well cared for given its past and I think you're doing an amazing job.
Its all good. Its your car and you do what makes you happy. It will definitely look nice with those wheels. I'm just more for originality and I like the look of these cars in their stock form is all. So for me, I would keep it cosmetically original for the most part. The car definitely deserves to be well cared for given its past and I think you're doing an amazing job.
Thanks man!
I got the oil cooler out today. It looks like it was previously repaired. I'm thinking that the lower line crush washer was leaking as it had some silicon on it. I'm going to get it tested and go from. There's the lines look surprisingly good condition.
Upon closer inspection I don't see any cracked but I also couldn't see where it was leaking from. I'm going to assume the lower line crush washer and put if back together with all new washers. If it is In fact cracked and leaking it's going on my buddy's shop where the radiator was redone.
When I dropped my FMOC for servicing, I had a pro aircraft shop professionally flush/clean/test the cooler. I usedhttp://www.oilcoolers.com/services.htm
Pacific Oil Coolers
Aircraft use oil coolers on all engine applications and they know how to do this right.
When I got it back I used Eastwood's radiator paint to restore finish. Lighter paint than rattle can stuff, heat resistant and will not plug up the fins.
Add to the Love on your fan shield. TOB! (Thing of Beauty)
Just be careful as crush washers usually do not randomly develop a leak. It takes a break in tension to cause them to leak. This concerns me given the area the oil cooler is leaking. I still suspect the oil cooler. Maybe a shop can clean it and pressure test it.
Just be careful as crush washers usually do not randomly develop a leak. It takes a break in tension to cause them to leak. This concerns me given the area the oil cooler is leaking. I still suspect the oil cooler. Maybe a shop can clean it and pressure test it.
I think thats my best bet. I just cant help but wonder why the lower hose had silicon on the threads. Seems to me, if I was a betting man - They pulled it apart and fixed the oil cooler, but used the same crush washers, put it back together, it was now leaking from the crush washer area so they took it apart again and used thread sealant. Just a hunch but would make sense as the crush washers are pretty fubar'd.
Those are pretty ugly. If both seating surfaces are clean and true and you can find no cracks, it would be worth a shot to get some new crush washers from Mazda and put it back together. If the crush washers were never replaced to begin with, that could certainly be the issue.
So upon further inspection, it was definitely that lower crush washer mating surface that was leaking. Whoever worked on it last damaged the mating surface putting a divot in it where the oil was leaking out. I welded the mating surface and then sanded it flush. I will reinstall it tonight and test it out. Crossing my fingers that was the only issue. Pressure test came back as not currently leaking.
If you're not going to use new crush washers, you can in a pinch (pun intended) anneal the old ones (both copper an aluminum) by heating with a propane torch and letting them cool slowly. This takes out the work-hardened characteristics and allow them to crush once or twice more. For the copper, heat until it glows red and then let it cool (hold with needle nosers) for the aluminum there is no outward sign to stop heating...it won't glow. I guess heat it "enough".
Like I said, in a pinch. It's better to use new crush washers,.
Bah, i spoke too soon. The oil cooler will be coming back out and shipped down to my friend so he can rebuild/recore it. There seems to be a hairline crack developed now where its seeping from. Not nearly as back as before but ill be damned this time its getting fixed haha.
On a lighter note, I managed to get the rear struts installed. What a difference just having the new rears installed made. I am waiting for my racing beat springs to come before I do the fronts.
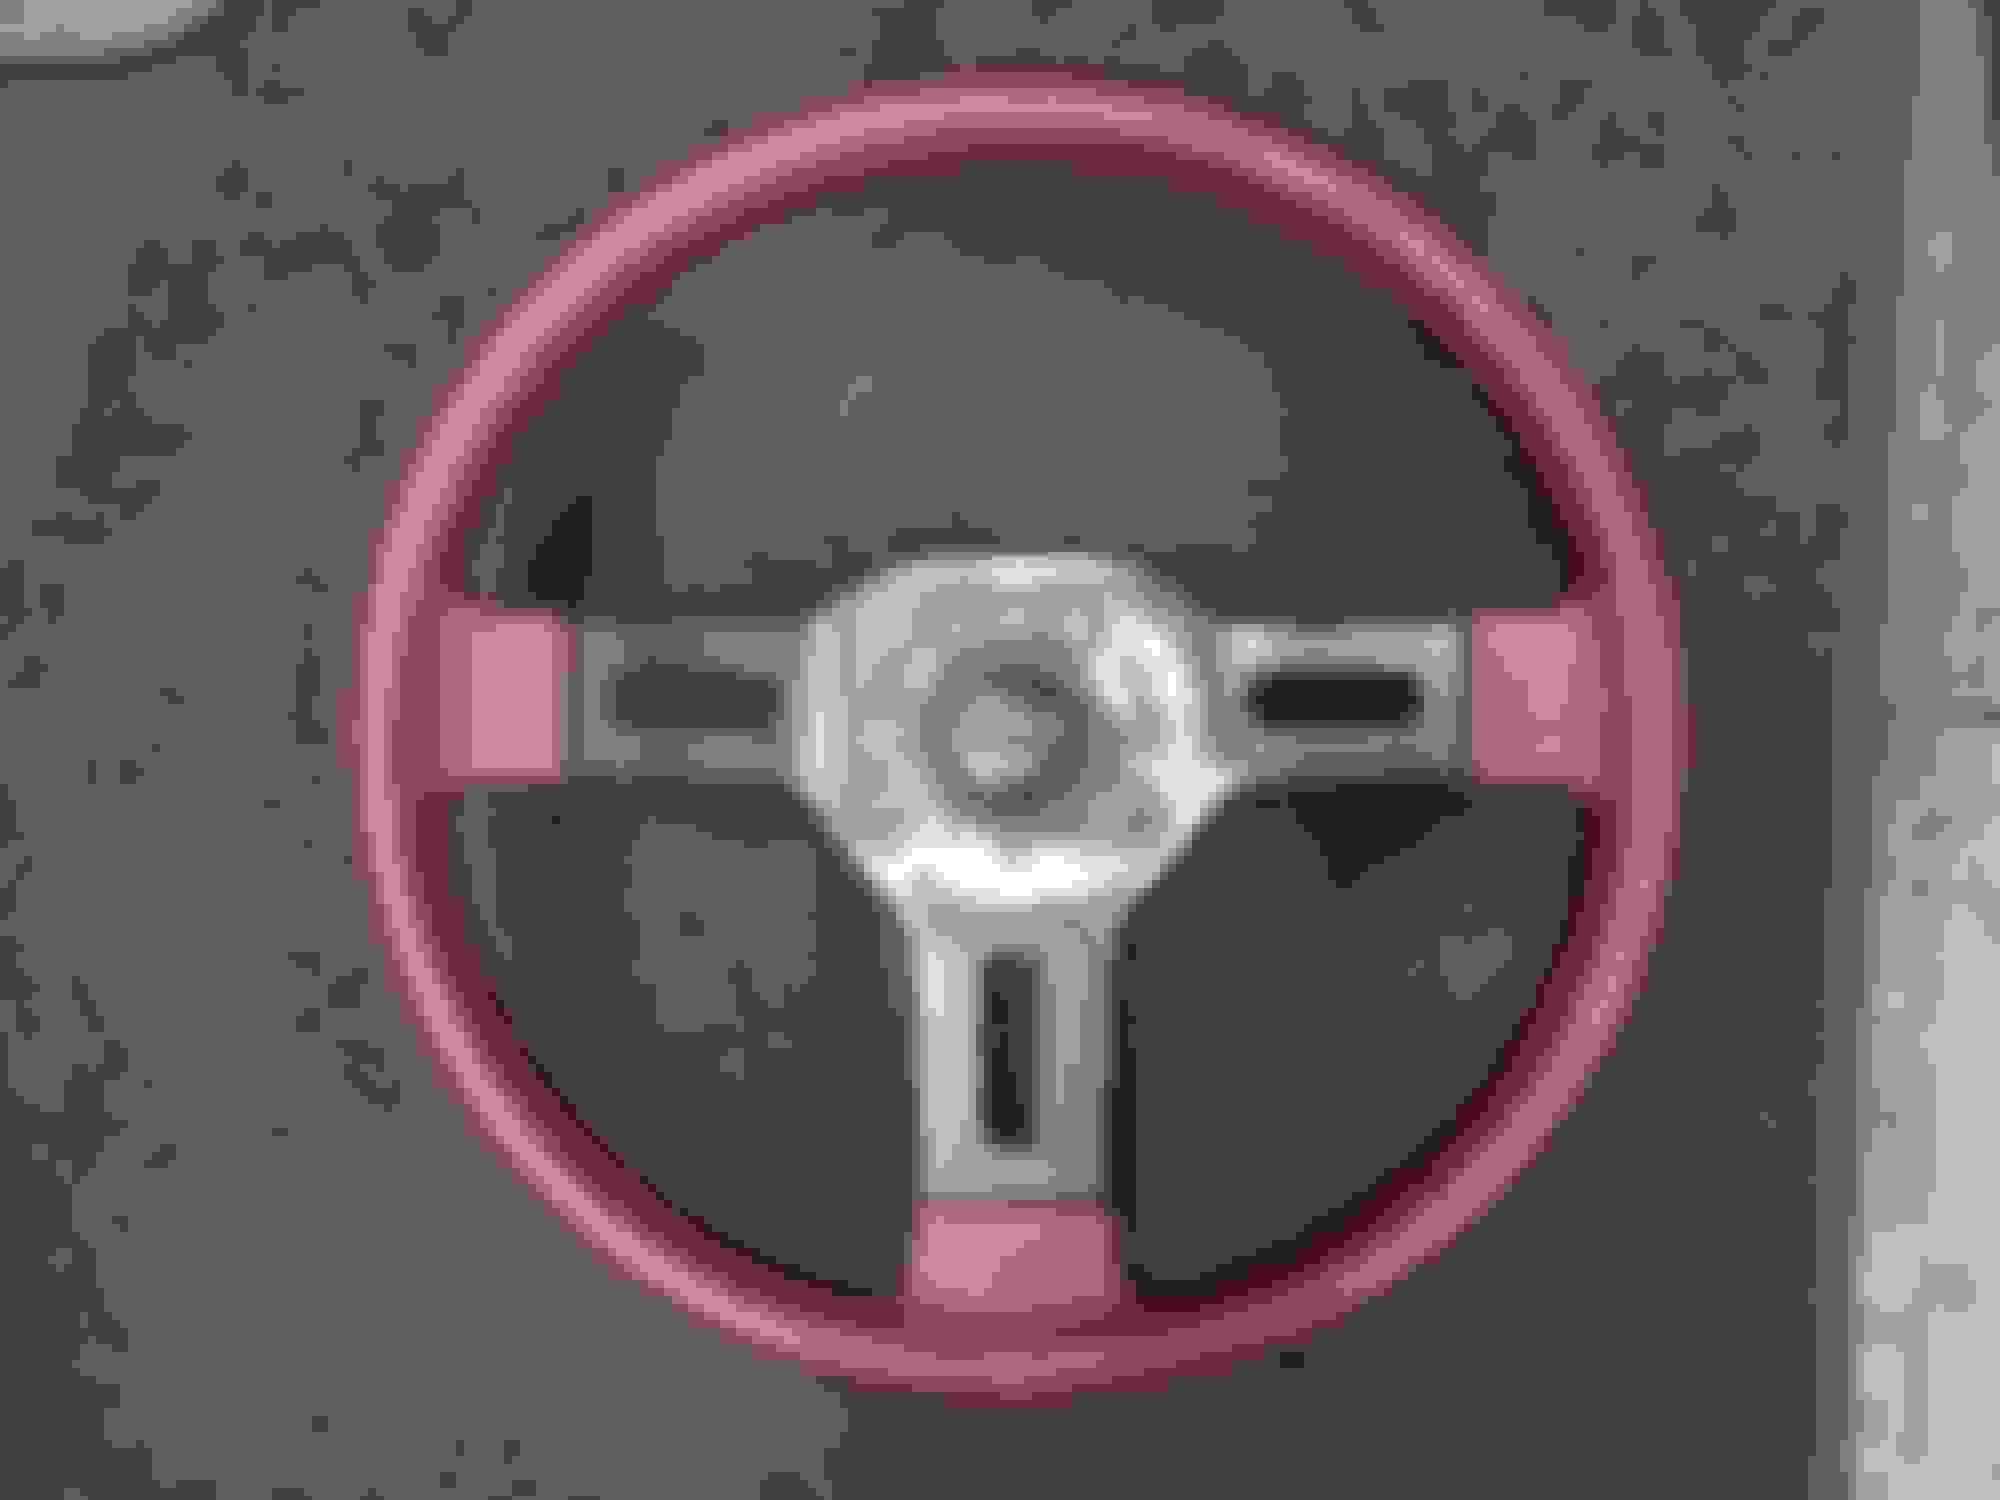
So, i wasn't really happy with the Grant Steering Wheel Adapter, it was as tight as humanly possible but the threads kept skipping and I didn't want my chance to be in a situation where I lose steering just because of an adapter. So i decided to customize an OEM steering wheel
Here is how the steering wheel originally looks. I am not a fan of the giant brown horn in the center Here is how the steering wheel looks without the horn attached. Hey... that could look pretty sweet.... Lets fill the holes with metal weld and skim coat with epoxy Here is it before the final sand and paint.
I intend on picking up a Mazda Horn button from revlimiter.net to keep it looking OEM. The GT Grant horn button was for test fitting purposes. The center hole needed to be bored out 2mm for the horn button to fit. With the way the rear steering wheel console piece screws to the backside of the steering wheel you still get full function of the horn with the new button as well.
I update the next post with the finished steering wheel. The center metal portion will be satin black like it was prior.
Should look pretty nice once you're finished. Are you keeping any of the contacts so that you will be able to use the horn?
So the trim ring that screws to the back of the steering wheel has a metal/copper ring around it, which makes contact with the steering column - on the front side of the trim ring there is a spade connector that is part of that metal/copper ring, instead of having the factory horn button connected to it, I just snipped the wire and added another spade connector so the aftermarket horn button can plug into it. I haven't tested it yet, but in theory this is basically the same way the OEM horn is connected/as well as the instruction manual for the install kit. The horn button grounds to the steering wheeI/wire. I should have a full functioning horn. I can upload pictures of how I have it wired if anyone would like to see.
Great news, here is a sneak peak of how the finished product will look! I need to do some more sanding and finishing paint work, then a clear coat but this was after a 2 coats with a light sanding. I have been doing more around the house with a baby expected on the way so the car doesn't always come first. I did also pickup some plastic adhesion promotor as well as plastic paint for the center console bits. They will be changed to the same color as the steering wheel to match. Essentially my rims, steering wheel and center console will all be this satin obsidian black
I am still waiting on my Racing Beat springs so I can do the front strut install as well. My rims have been on order for 1 month now at this point, i was told up to 3 months ETA Modified VS Original


 05-05-21, 12:48 PM


 But i will be doing some fender rolling and possibly ZG flares.