
SCCA Super Touring U Build

Thread Starter


Joined: Nov 2006
Posts: 1,578
Likes: 288
From: Parkville, Mo
That's interesting. What kind of tires are you guys using? I am not restricted to 200 UTOG tires.
My only previous experience with hubs made out of rotors was an SCCA A Sedan Mustang where the owner was making 5 lug FOX body rotors into hubs. The failure I saw was at the fast end of Heartland Park Topeka front straight. The driver's side front wheel bounced past my corner station followed by the car skidding on three wheels. No thanks.
If I had to do this, the rotors from a GS - GSL with the 4x110 lug pattern is the ones I would use. The GSL-SE rotor/hubs are a failure waiting to happen.
I'll write a letter to the SEB and get a clarification. I can also race with NASA in ST3 so I am not sweating this deal.
Thread Starter
Joined: Nov 2006
Posts: 1,578
Likes: 288
From: Parkville, Mo
Thanks Frankenmazda! Glad you are working on your car again. Projects like these can be a chore and sometimes makes wish I would just push the easy button. As in sell of all my old car stuff and buy a Mustang GT or something...
Thread Starter
Joined: Nov 2006
Posts: 1,578
Likes: 288
From: Parkville, Mo
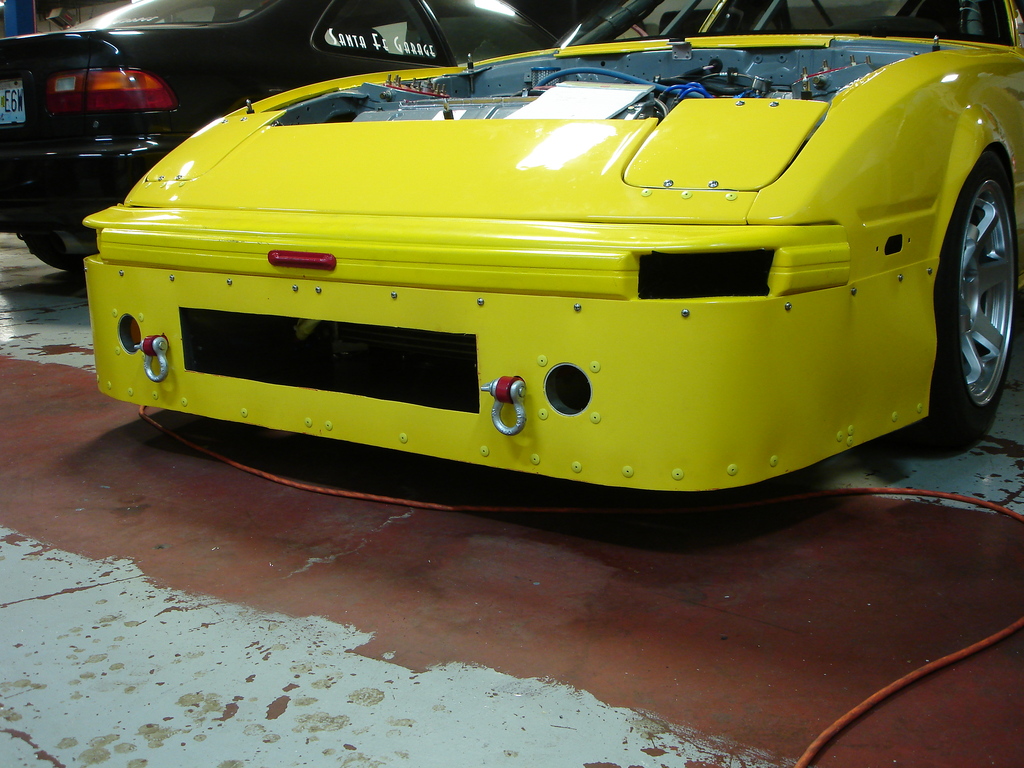
Air Dam and Tow Hooks
Finishing up the last of the body work for this year....baring a crash!
The actual air dam is made out of yellow stock car plastic . You can get this stuff in various colors from vendors like Pit Stop USA or Left Hander Chassis. It comes on a roll that 2 foot wide and is priced by the foot. I got mine from Motorsports of Kansas City. Underneath the plastic is a structure of aluminum to help it hold its shape.
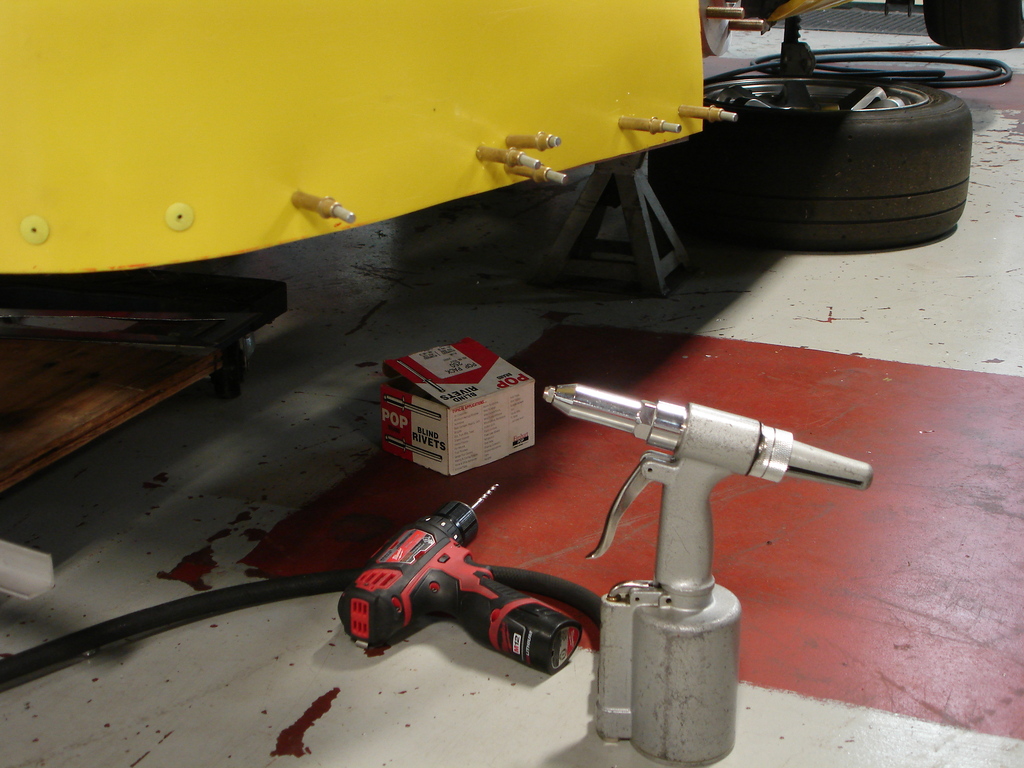
I started the process by riveting strip of 2"x .125" aluminum to the OE bumper under the rub strip. I curved it to match the contour of the bumper. The rivets have back up washers so they don't pull through the bumper cover. This is where the air dam will be attached to on the car using 10/24 screws. If you look closely you can see the riv-nuts next to the rivets. The screws allow me to remove the air dam for repairs without the need to drill our rivet.
There is another piece of 2" x .125"aluminum that the plastic is riveted too on the bottom. This is braced on the sides to the car and there is a piece of angle aluminum on the back side below the radiator air box to keep that part of the air dam flat. The air dam does not attached to the radiator air box - it rests against several layers of foam the seal the air box to the grill opening in the air dam.
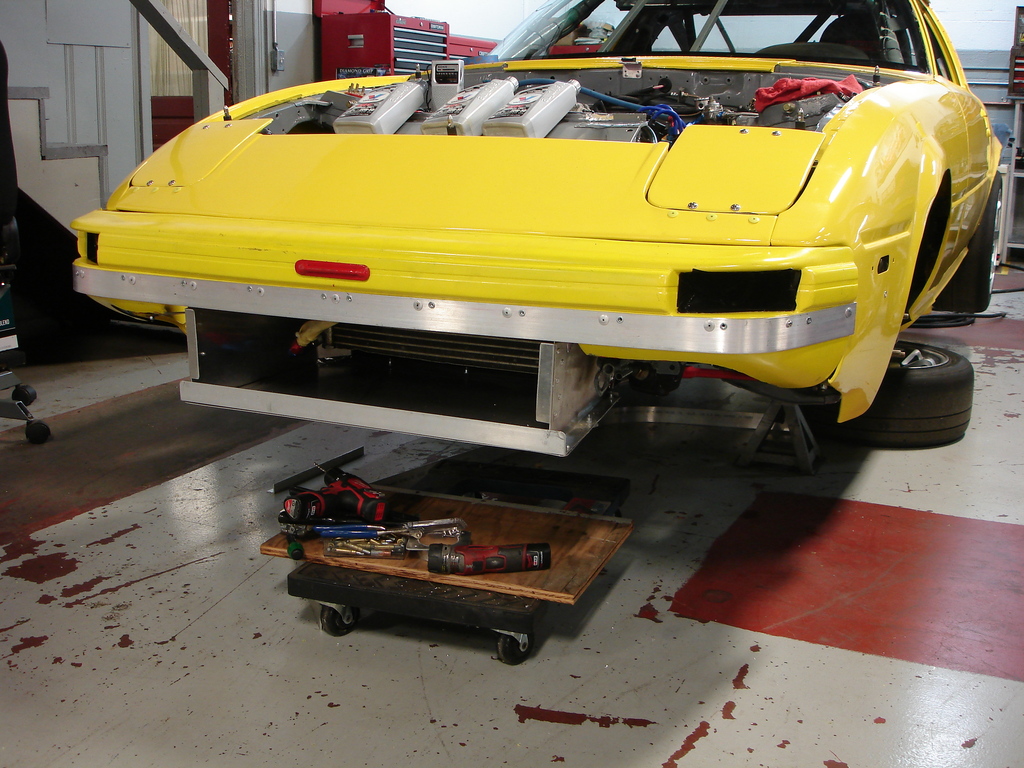
What you need for this project- Air Riveter, Clecos and a big box of rivets!
Finished product!
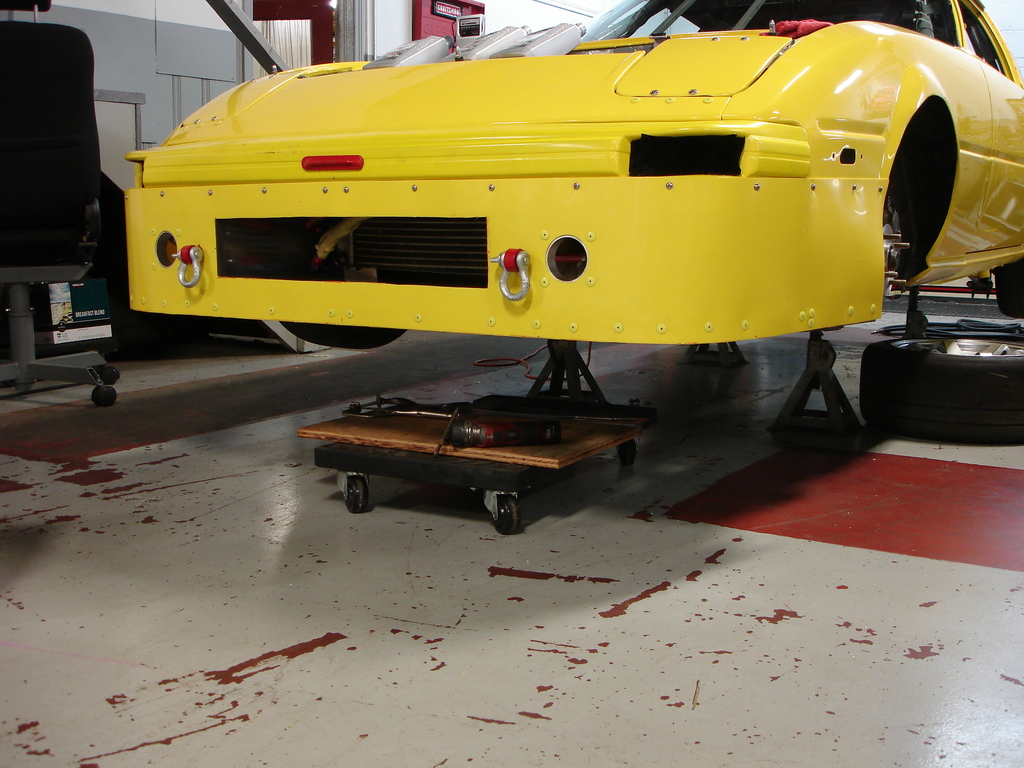
Tow Hooks. One of the things that was a PITA on the car before this build was locating something on the car to use as a tie down point on the trailer. Yes Mazda provided two loops on the front of the car but they were buried behind the old air dam like they are with the new one. So I built these:
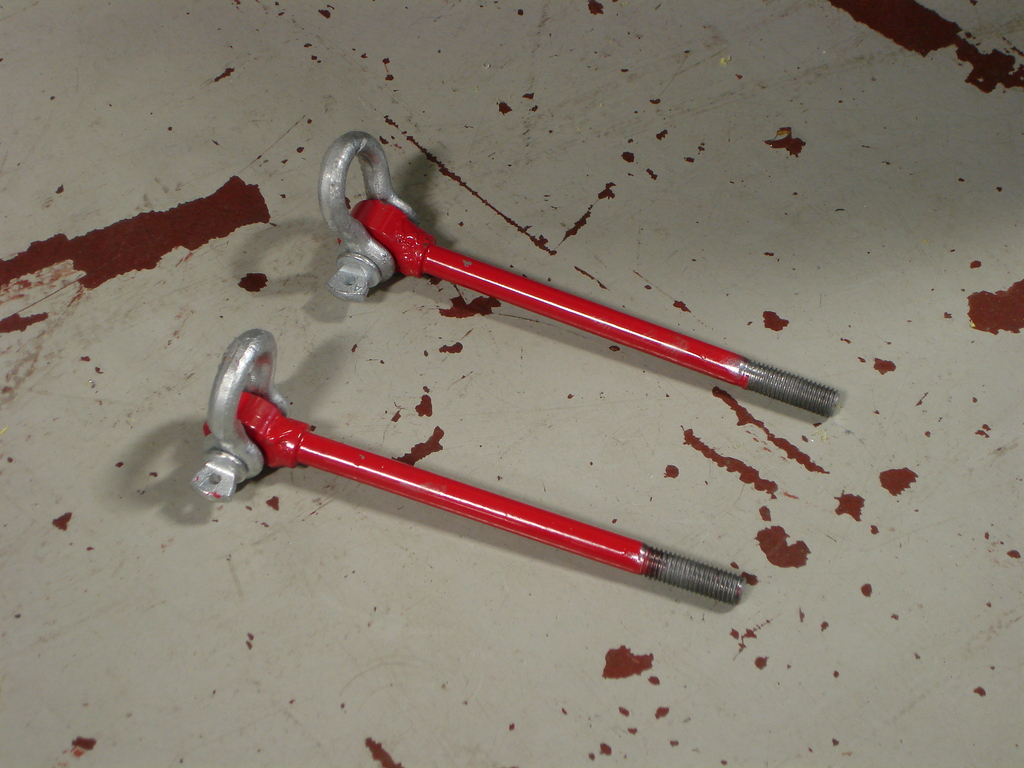
Two 10" x 5/8" bolts with rings welded to them that allow the use of 12000lb clevises. On the car I welded 5/8" coupler nuts to the sides of the factory tie down points. So these just screw into place:
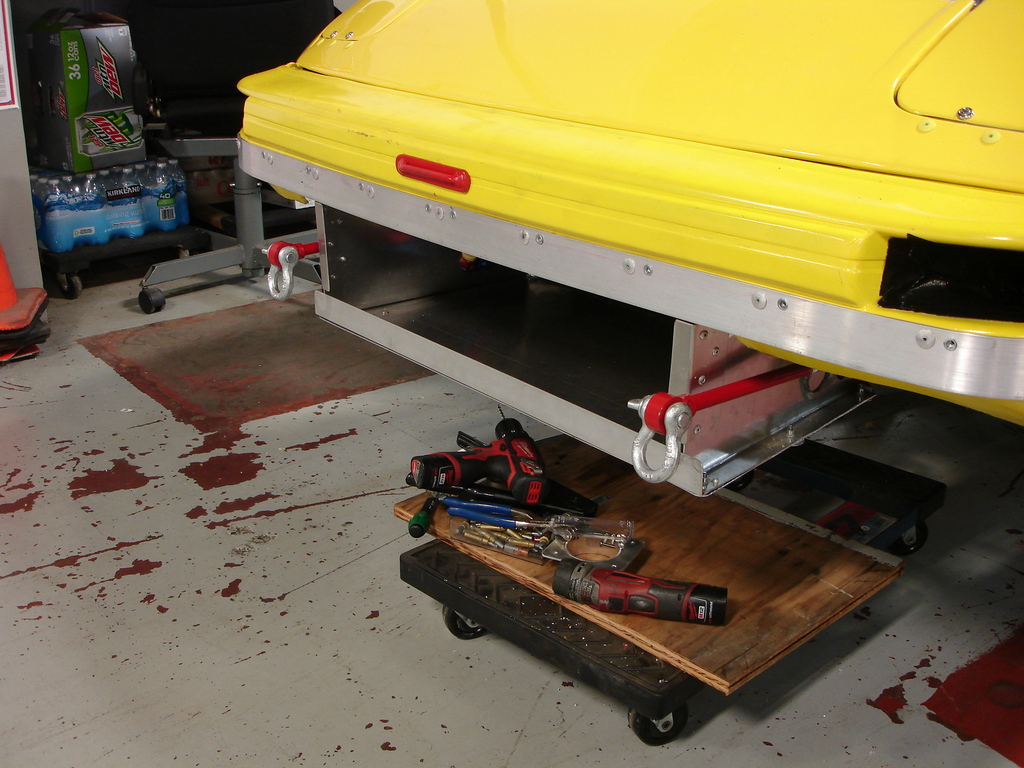
I put a couple of holes in the air dam so these can be installed. I'll remove them before I race the car. If I have to get towed off the track they will use the retractable tow point in the bumper above the grill opening.
The actual air dam is made out of yellow stock car plastic . You can get this stuff in various colors from vendors like Pit Stop USA or Left Hander Chassis. It comes on a roll that 2 foot wide and is priced by the foot. I got mine from Motorsports of Kansas City. Underneath the plastic is a structure of aluminum to help it hold its shape.
I started the process by riveting strip of 2"x .125" aluminum to the OE bumper under the rub strip. I curved it to match the contour of the bumper. The rivets have back up washers so they don't pull through the bumper cover. This is where the air dam will be attached to on the car using 10/24 screws. If you look closely you can see the riv-nuts next to the rivets. The screws allow me to remove the air dam for repairs without the need to drill our rivet.
There is another piece of 2" x .125"aluminum that the plastic is riveted too on the bottom. This is braced on the sides to the car and there is a piece of angle aluminum on the back side below the radiator air box to keep that part of the air dam flat. The air dam does not attached to the radiator air box - it rests against several layers of foam the seal the air box to the grill opening in the air dam.

What you need for this project- Air Riveter, Clecos and a big box of rivets!

Finished product!

Tow Hooks. One of the things that was a PITA on the car before this build was locating something on the car to use as a tie down point on the trailer. Yes Mazda provided two loops on the front of the car but they were buried behind the old air dam like they are with the new one. So I built these:

Two 10" x 5/8" bolts with rings welded to them that allow the use of 12000lb clevises. On the car I welded 5/8" coupler nuts to the sides of the factory tie down points. So these just screw into place:

I put a couple of holes in the air dam so these can be installed. I'll remove them before I race the car. If I have to get towed off the track they will use the retractable tow point in the bumper above the grill opening.


Senior Member
Joined: Sep 2013
Posts: 301
Likes: 34
From: asheville
That's interesting. What kind of tires are you guys using? I am not restricted to 200 UTOG tires.
My only previous experience with hubs made out of rotors was an SCCA A Sedan Mustang where the owner was making 5 lug FOX body rotors into hubs. The failure I saw was at the fast end of Heartland Park Topeka front straight. The driver's side front wheel bounced past my corner station followed by the car skidding on three wheels. No thanks.
If I had to do this, the rotors from a GS - GSL with the 4x110 lug pattern is the ones I would use. The GSL-SE rotor/hubs are a failure waiting to happen.
I'll write a letter to the SEB and get a clarification. I can also race with NASA in ST3 so I am not sweating this deal.
My only previous experience with hubs made out of rotors was an SCCA A Sedan Mustang where the owner was making 5 lug FOX body rotors into hubs. The failure I saw was at the fast end of Heartland Park Topeka front straight. The driver's side front wheel bounced past my corner station followed by the car skidding on three wheels. No thanks.
If I had to do this, the rotors from a GS - GSL with the 4x110 lug pattern is the ones I would use. The GSL-SE rotor/hubs are a failure waiting to happen.
I'll write a letter to the SEB and get a clarification. I can also race with NASA in ST3 so I am not sweating this deal.
Yes we used the regular rotors, I am friends with a team that runs a GSL-LE and they had a hub break in a race not pretty. I have been working with guys that are trying to get the IT7R class going, the first one of them running with the big brakes has the same modified hubs like I have. I designed a hub for them that would be a drop in to use the second gen 5 lug rotors on the first gen spindle but the tolerance required for proper wheel bearing race press are so tight that nobody wanted to touch it for the few parts that we would have bought. Now they have found someone to do the hubs for them so future cars will have a nice aluminum 5 bolt hub.
Senior Member
Joined: Sep 2013
Posts: 301
Likes: 34
From: asheville
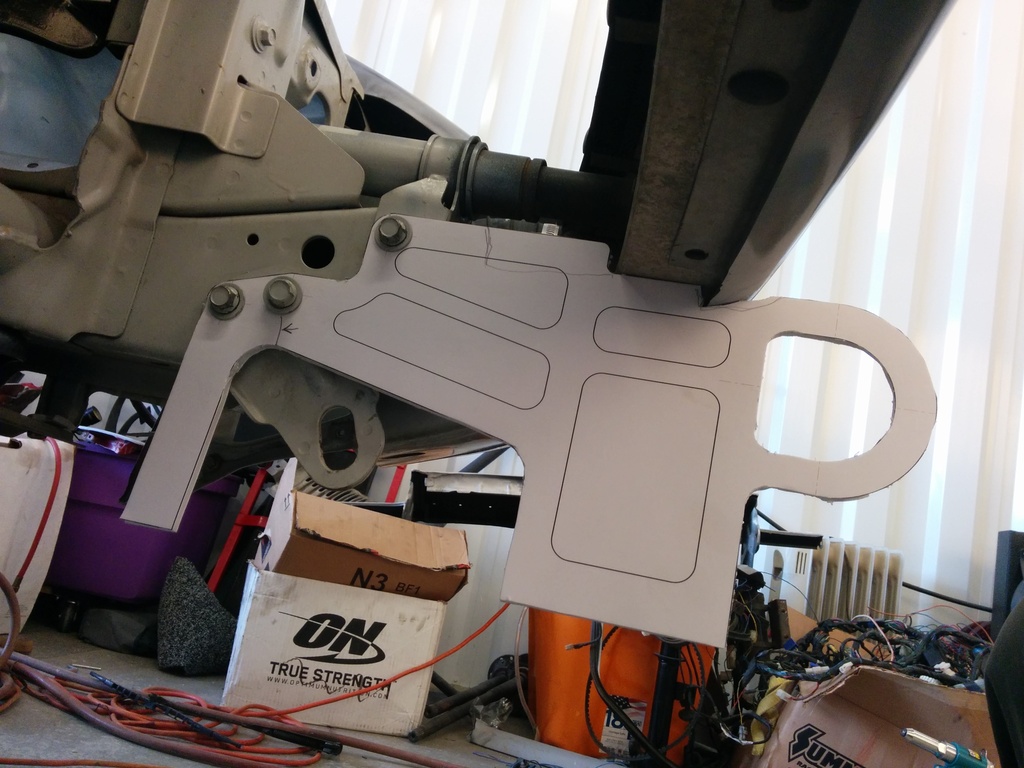
How topical, I am working on the air dam and splitter for my car right now. so far I have designed maybe the most elaborate tow hook in history. In ChumpCar tow hooks are free, if my tow hooks just so happen to hold up my splitter so be it still shouldn�t be value add� I will still have to include the square footage of the splitter in my value.
Next up will be rear spoiler, I was thinking a simple NASCAR style aluminum blade spoiler what are you planning to use?
Next up will be rear spoiler, I was thinking a simple NASCAR style aluminum blade spoiler what are you planning to use?

Thread Starter
Joined: Nov 2006
Posts: 1,578
Likes: 288
From: Parkville, Mo
Damn! A tow hook like that would double the value of my car!
My racetrack tow hook is a reinforced 3/8" U-bolt that is spring loaded to retract into the face of the OE bumper. That way I have nothing sticking out that would damage other cars if I "rub" them.
Spilter mounting is something I haven't fully baked yet. I did weld some 1/2" diameter tubes to the sides of the OE tie down points that I can use to hang a structure from. What ever I do will be designed to tear away and not damage the unibody in the event of an off track event. Had a buddy that attached his spliter/air dam "too good" on his E36. To the extent that an off track bent the core support so much it took out his radiator
In SCCA STU I get a 48" x 8" wing on the back of the car. Per the SCCA this has to be mounted 6" below the roof line. In NASA there doesn't appear to be a spec so I will run a wing of some kind.
Senior Member
Joined: Sep 2013
Posts: 301
Likes: 34
From: asheville
I hear what you say about not making the splitter so strong, I designed the bracket to be strong in the upper area where the tie down’s are but not so much in the lower area. The wooden splitter itself will be mounted to aluminum angle so that should hopefully take the brunt of any off track excursions.
I could run a wing instead of spoiler, one of the groups I run with aero is completely free, and in ChumpCar it comes down to cost of materials. Maybe I will whip something up in CAD to see how it looks.

I could run a wing instead of spoiler, one of the groups I run with aero is completely free, and in ChumpCar it comes down to cost of materials. Maybe I will whip something up in CAD to see how it looks.

Thread Starter
Joined: Nov 2006
Posts: 1,578
Likes: 288
From: Parkville, Mo
Damn again! I have bee thinking about using 1/4" fasteners in shear to mount the spliter.
What ever I do has to be easy to install/remove at the track so the car fits on the trailer.
What ever I do has to be easy to install/remove at the track so the car fits on the trailer.
Joined: Aug 2011
Posts: 3,078
Likes: 42
From: Cambridge, Minnesota

I love the idea of the removable front air dam, thanks for sharing your insights!

Thread Starter
Joined: Nov 2006
Posts: 1,578
Likes: 288
From: Parkville, Mo
Thank You!
This car was an ITA/IT7 car before this build started. If you have a question, feel free to send me an PM
Thread Starter
Joined: Nov 2006
Posts: 1,578
Likes: 288
From: Parkville, Mo
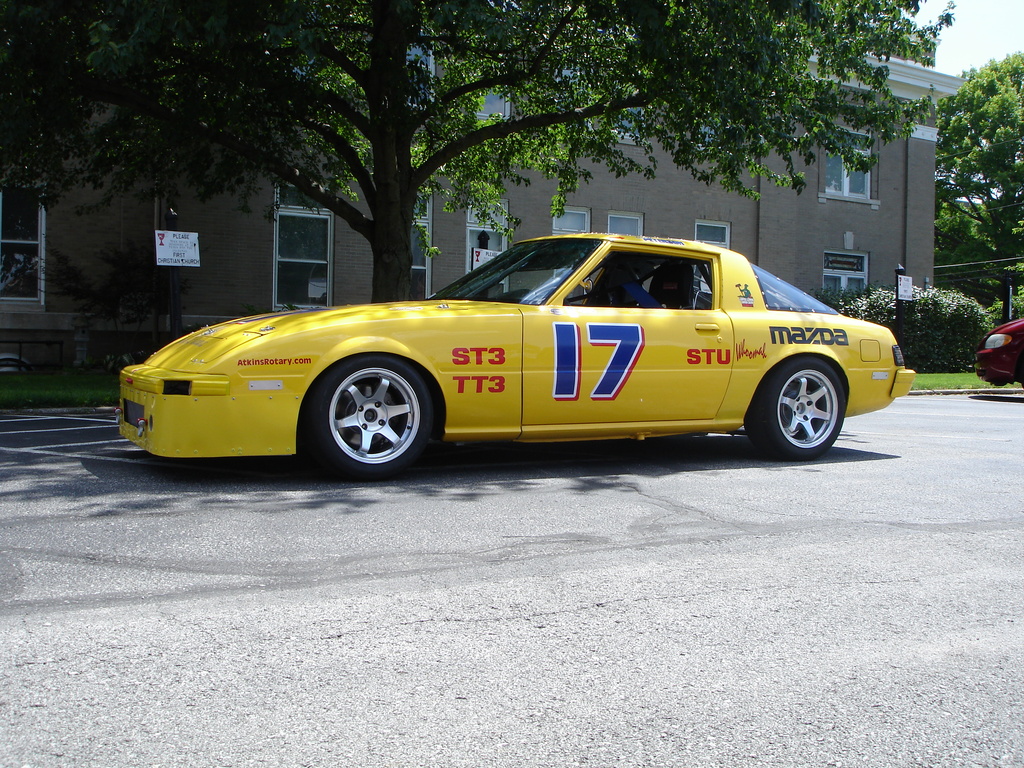
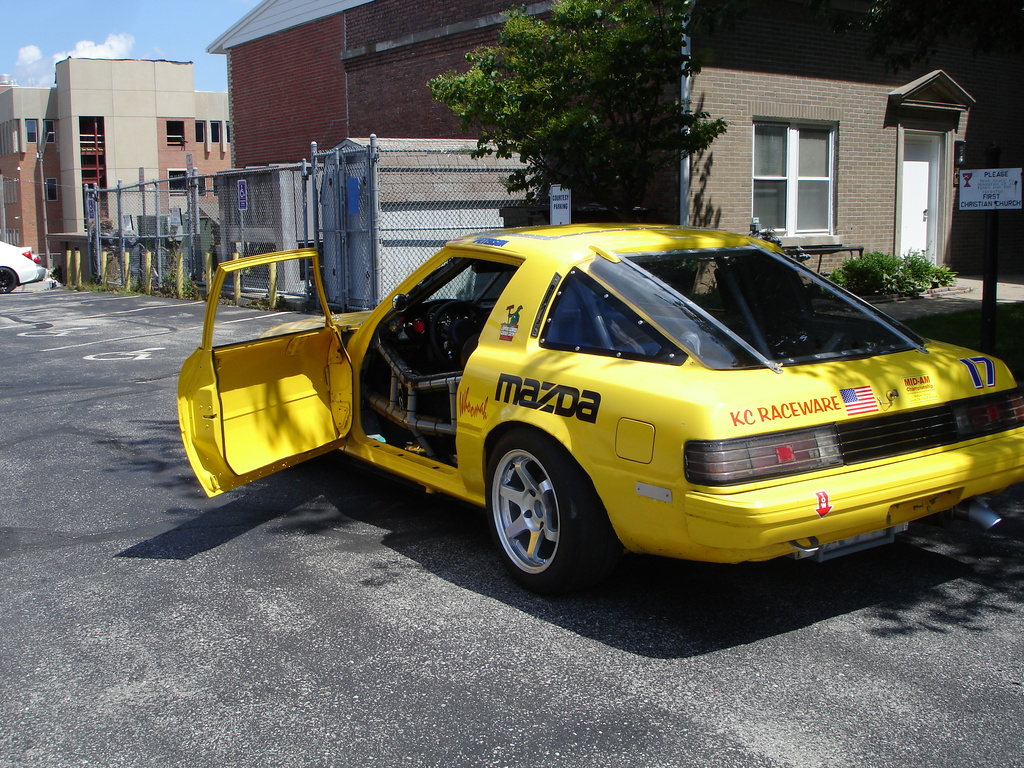
Finally!
The last few months have been frustrating to say the least. NASA, SCCA and FindTheLine events have been planned for, entered in and then cancelled. Most of the cancellations have been my fault but the weather and a lack of entries has also helped keep me in the garage. But now, FINALLY, I have driven this car in a competitive event - A KC Region SCCA Autocross.
In the short the engine ran great and the brakes started working once the pads got seated. Very pleased at this time. Next up is a test session at Raceway Park of the Midlands in a couple of weeks.
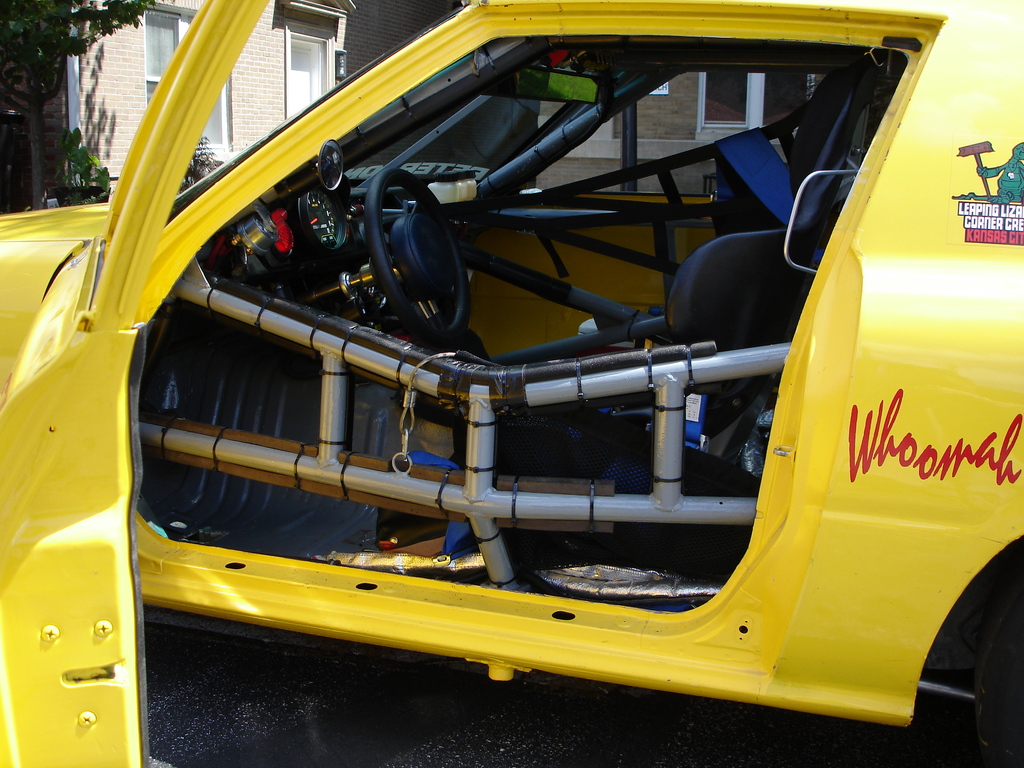
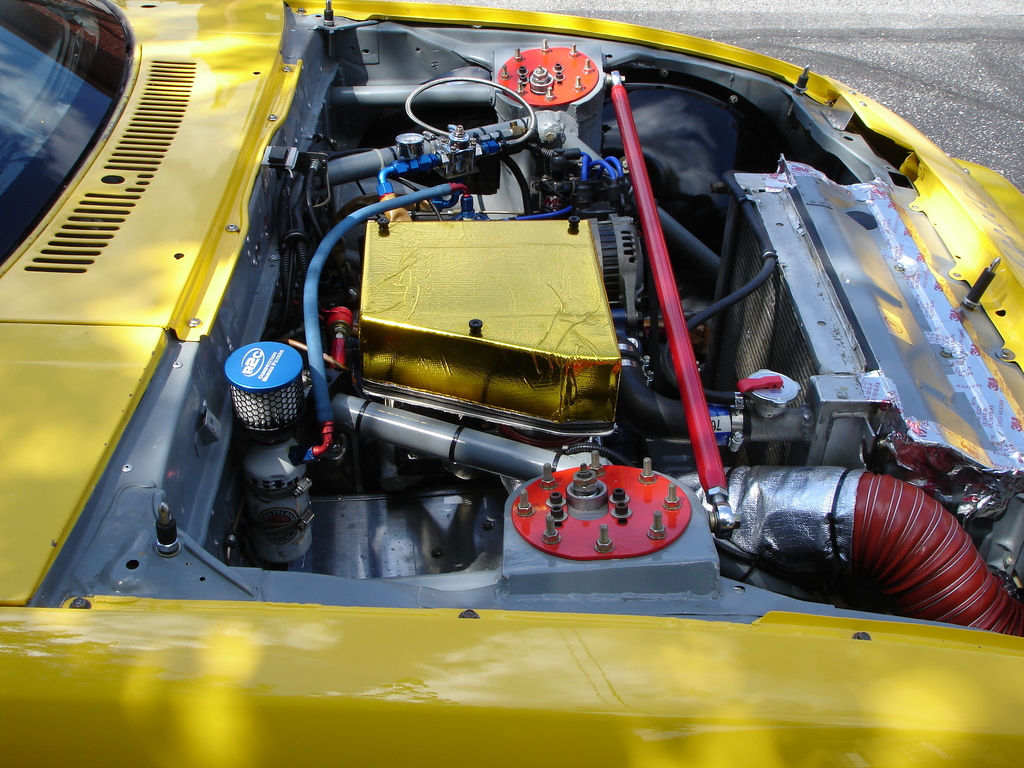
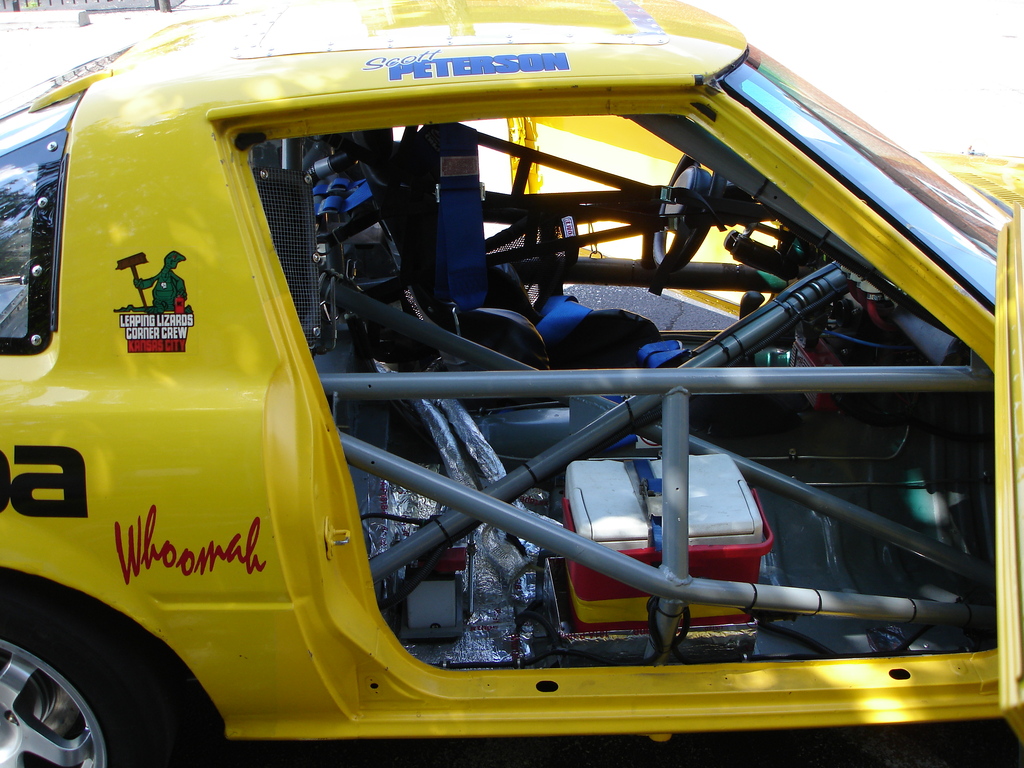
Here are some shots of the car as it sits now:
In the short the engine ran great and the brakes started working once the pads got seated. Very pleased at this time. Next up is a test session at Raceway Park of the Midlands in a couple of weeks.
Here are some shots of the car as it sits now:


Thread Starter
Joined: Nov 2006
Posts: 1,578
Likes: 288
From: Parkville, Mo
Thanks guys! The autox worked out well and yeah no room on the right side!
Here is a video that the guy behind me at the event shot of a couple of my launches. The car that this being shot from is the best handling 85 Monte SS you have ever seen! It runs in SCCA CAM-C which like the Optima Batteries series.
Here is a video that the guy behind me at the event shot of a couple of my launches. The car that this being shot from is the best handling 85 Monte SS you have ever seen! It runs in SCCA CAM-C which like the Optima Batteries series.
Thread Starter
Joined: Nov 2006
Posts: 1,578
Likes: 288
From: Parkville, Mo
where is your oil filler neck vented to? Who made the cap?
just went through the post and found everything out.
does that setup get rid of all the condensation in the neck? I have a setup like that on my fd and it works great but on my fb I have a line coming from the nipple on the filler neck going to an old oil can and it does not get any of the oil butter out of there. any advice?
Last edited by evo_koa; Jul 1, 2015 at 02:09 PM.
Thread Starter
Joined: Nov 2006
Posts: 1,578
Likes: 288
From: Parkville, Mo
Thread Starter
Joined: Nov 2006
Posts: 1,578
Likes: 288
From: Parkville, Mo
where is your oil filler neck vented to? Who made the cap?
just went through the post and found everything out.
does that setup get rid of all the condensation in the neck? I have a setup like that on my fd and it works great but on my fb I have a line coming from the nipple on the filler neck going to an old oil can and it does not get any of the oil butter out of there. any advice?
just went through the post and found everything out.
does that setup get rid of all the condensation in the neck? I have a setup like that on my fd and it works great but on my fb I have a line coming from the nipple on the filler neck going to an old oil can and it does not get any of the oil butter out of there. any advice?
Atkin's cap that vents into a 16oz Miller Lite can. I drilled and tapped the cap for the -6 fitting.
I am not sure if it will eliminate that or not but it may because it vents at the highest point in the filler neck. That wasn't why I put it there. I wanted to run a larger vent hose and I wanted to use AN type fittings.
The stock port 12A I used to have in this car would occasionally have some of that gunk on the bottom side of the cap. Not sure it really matters so I never worried about it. Since it is race car the oil is changed after 8 heat cycles (two race weekends).
