
Rising from the Ashes... (Pics be warned!)

Thread Starter
Wrkn Toyota, Rootn Wankel
Joined: Sep 2007
Posts: 1,642
Likes: 1
From: "Haystack" Hayward, CA
Update-
Well so far, I'm getting over being sick and falling back into the school groove, which means things should be back on track soon.
So this is what I have been doing so far:
Tore down the engine to an almost bare block, just have to get that ridiculously large nut off the fly wheel and then crack her open to measure.
I also have been sandblasting parts here and there, working on a few more, but this is what I have so far.
So here's is the Engine in all her dirty glory:

Another lovely side view of her:

The oil pan, which is so damn clean, it looks like brand ******* new:

And last but not least, the sandblasted stuff that needs to be painted with good old flat black rustoleum!

Well so far, I'm getting over being sick and falling back into the school groove, which means things should be back on track soon.
So this is what I have been doing so far:
Tore down the engine to an almost bare block, just have to get that ridiculously large nut off the fly wheel and then crack her open to measure.
I also have been sandblasting parts here and there, working on a few more, but this is what I have so far.
So here's is the Engine in all her dirty glory:
Another lovely side view of her:
The oil pan, which is so damn clean, it looks like brand ******* new:
And last but not least, the sandblasted stuff that needs to be painted with good old flat black rustoleum!
Thread Starter
Wrkn Toyota, Rootn Wankel
Joined: Sep 2007
Posts: 1,642
Likes: 1
From: "Haystack" Hayward, CA

Thread Starter
Wrkn Toyota, Rootn Wankel
Joined: Sep 2007
Posts: 1,642
Likes: 1
From: "Haystack" Hayward, CA
I sadly didn't not get the engine cracked open on Thursday, our tool room did not have the socket, but my engine teacher is bringing one for Tuesday's night class. Of course our 3rd member of our group wasn't there Thursday night, and I forgot the combination to our locker; so I couldn't even clean the intakes and stuff...
Well I got some stuff done at least today...
Was slow at work so I went ahead and disassembled my rotors from my spindles and cleaned them up so that I can go ahead and sandblast and paint them also sometime next week.
My boss calls me in and says they made a accounting error and they owed me quite a bit of money... can you say "The bank has made an error in your favor, pass go and collect $800." so money is starting not to be as big an issue as it was the beginning of this long project. So thankfully I should be fairly prepared in case of any surprises with the engine or the restoration of my RX7.
Sorry for the lack of pictures guys, I'll keep you updated on the progress.
Thread Starter
Wrkn Toyota, Rootn Wankel
Joined: Sep 2007
Posts: 1,642
Likes: 1
From: "Haystack" Hayward, CA
As far as I can tell the axle that I pulled from my '82 is not the stock axle that came with that car because:
1.) its running an LSD
2.) I have disc brakes installed on the axle.
I've had a pain in the *** time trying to identify my 1982 for what it was orginally, and gave up...
but from the looks of it, I'm just going to stick with the axle I have now, after all LSD and Disc brakes? those will be fine until I decide to go for more power later on down the road, ya know?
Thread Starter
Wrkn Toyota, Rootn Wankel
Joined: Sep 2007
Posts: 1,642
Likes: 1
From: "Haystack" Hayward, CA
Okay Guys, been a while since an update and I've been lazy as hell in trying to keep this updated.
But! I did manage to get stuff done so I am happy about that!
I media blasted some more parts, painted my battery tray in Black Matte Rustoluem (It looks nice, I'll take pictures after I do a few more pieces), Waiting on some rubber bushings before the front brakes get rebuilt and painted.
Most importantly though, I finally cracked open the engine and I must say that it was a learning experience. The housings and other bits actually looked pretty good when I started getting everything apart, but I haven't started measuring and cleaning everything up yet.
That's the next step, will try and get some cleaning and such done tuesday.
and now for some pictures to tide you over until I take better quality pictures next week:
Benifits of a Rotary Engine, when rebuilding it is easy to store in a cabinet:

The Front Rotor inside the housing with the intermediate plate removed, it actually looks fairly okay, at least at first glance, we'll see how bad it is next week!

And no those two rings at the bottom of the picture are not scores, its actually some oil sheen and such from be being dirty.
But! I did manage to get stuff done so I am happy about that!
I media blasted some more parts, painted my battery tray in Black Matte Rustoluem (It looks nice, I'll take pictures after I do a few more pieces), Waiting on some rubber bushings before the front brakes get rebuilt and painted.
Most importantly though, I finally cracked open the engine and I must say that it was a learning experience. The housings and other bits actually looked pretty good when I started getting everything apart, but I haven't started measuring and cleaning everything up yet.
That's the next step, will try and get some cleaning and such done tuesday.
and now for some pictures to tide you over until I take better quality pictures next week:
Benifits of a Rotary Engine, when rebuilding it is easy to store in a cabinet:
The Front Rotor inside the housing with the intermediate plate removed, it actually looks fairly okay, at least at first glance, we'll see how bad it is next week!
And no those two rings at the bottom of the picture are not scores, its actually some oil sheen and such from be being dirty.
Thread Starter
Wrkn Toyota, Rootn Wankel
Joined: Sep 2007
Posts: 1,642
Likes: 1
From: "Haystack" Hayward, CA


Joined: Mar 2001
Posts: 31,851
Likes: 3,239
From: https://www2.mazda.com/en/100th/
Thread Starter
Wrkn Toyota, Rootn Wankel
Joined: Sep 2007
Posts: 1,642
Likes: 1
From: "Haystack" Hayward, CA
Well, I'm open to suggestions?
I mean, essentially all I am doing is cleaning and refurbishing the engine right now. Unless someone has some suggestions for improvements?
Tomorrow I am going to try and finish painting what I have so far, will post pictures when I get them done.
I mean, essentially all I am doing is cleaning and refurbishing the engine right now. Unless someone has some suggestions for improvements?
Tomorrow I am going to try and finish painting what I have so far, will post pictures when I get them done.
Thread Starter
Wrkn Toyota, Rootn Wankel
Joined: Sep 2007
Posts: 1,642
Likes: 1
From: "Haystack" Hayward, CA
Good god? How hard is it to find some freaking guide pin bushings!?
I tried every parts store I know of and I thought I got the right part from Rock Auto, ended up they send me two bolts for the calipers...
Anyone else ever have this much trouble trying to get replacement bushings?!
I tried every parts store I know of and I thought I got the right part from Rock Auto, ended up they send me two bolts for the calipers...
Anyone else ever have this much trouble trying to get replacement bushings?!
Joined: Mar 2001
Posts: 31,851
Likes: 3,239
From: https://www2.mazda.com/en/100th/
Good god? How hard is it to find some freaking guide pin bushings!?
I tried every parts store I know of and I thought I got the right part from Rock Auto, ended up they send me two bolts for the calipers...
Anyone else ever have this much trouble trying to get replacement bushings?!
I tried every parts store I know of and I thought I got the right part from Rock Auto, ended up they send me two bolts for the calipers...
Anyone else ever have this much trouble trying to get replacement bushings?!
Thread Starter
Wrkn Toyota, Rootn Wankel
Joined: Sep 2007
Posts: 1,642
Likes: 1
From: "Haystack" Hayward, CA
Well sorry I haven't been updating much... I've been dealing with some personal issues and this rain is really hampering a lot of the work I can do.
I finally got my front calipers torn down and cleaned up, so now the brake parts need a coat of Caliper Paint.
In any case, its late right now, but I will try and snap some photos for you guys tomorrow and update the thread with what's been going on in terms of the project.
I finally got my front calipers torn down and cleaned up, so now the brake parts need a coat of Caliper Paint.
In any case, its late right now, but I will try and snap some photos for you guys tomorrow and update the thread with what's been going on in terms of the project.
Thread Starter
Wrkn Toyota, Rootn Wankel
Joined: Sep 2007
Posts: 1,642
Likes: 1
From: "Haystack" Hayward, CA
Okay, thank the gods that today was a fairly nice sunny day! I actually got a ton of painting done today because I was afraid that we might not see sunlight for a while after today.
In any case, all the brake parts got a coat of DupliColor Black Caliper paint, the crossmember, control arms, battery tray, and other bits got coated in Rustoleum Textured Black Satin to prevent rust mainly.
I don't have any pictures of the engine right now, mainly because its in pieces... though I did manage to finally measure everything and it looks like its still good condition. The apex seals are about 7-7.5mm average, but I am going to go ahead and wait for my next pay check and buy a master rebuild kit, I'll post pictures and such when I am installing everything.
In the meantime how ever, I am expecting some parts today so if all goes well then all these painted pieces should be assembled tomorrow into a full front suspension!
And now for the one picture that screams Black:

Oh, also... I am machining the rotors tomorrow so they'll be nice and paint free where the pads need to make contact.
In any case, all the brake parts got a coat of DupliColor Black Caliper paint, the crossmember, control arms, battery tray, and other bits got coated in Rustoleum Textured Black Satin to prevent rust mainly.
I don't have any pictures of the engine right now, mainly because its in pieces... though I did manage to finally measure everything and it looks like its still good condition. The apex seals are about 7-7.5mm average, but I am going to go ahead and wait for my next pay check and buy a master rebuild kit, I'll post pictures and such when I am installing everything.
In the meantime how ever, I am expecting some parts today so if all goes well then all these painted pieces should be assembled tomorrow into a full front suspension!
And now for the one picture that screams Black:
Oh, also... I am machining the rotors tomorrow so they'll be nice and paint free where the pads need to make contact.
Thread Starter
Wrkn Toyota, Rootn Wankel
Joined: Sep 2007
Posts: 1,642
Likes: 1
From: "Haystack" Hayward, CA
So I didn't get everything I would have liked done today, a lot of other classwork got in the way of that...
But I did manage to install the ball joints, poly urethane lower control arm bushings, rebuild the calipers, and get the old races for the bearings out.
I still need to install and pack the new wheel bearings, machine the rotors, and then assemble the front suspension.
Not bad for like an hour or two or work. I can probably get the rest done tomorrow on lunch break or something if I can.
Well I can take pictures of the stuff if you want, it hasn't really changed that much from the above picture. BTW that poly urethane lubricant is sticky as hell...
Thread Starter
Wrkn Toyota, Rootn Wankel
Joined: Sep 2007
Posts: 1,642
Likes: 1
From: "Haystack" Hayward, CA
Well today was a slow day and I probably only worked on 2 or 3 cars and spent some 6 hours of my 9 hours of work twiddling my thumbs. So at lunch I went home and grabbed my Blazer and brought all the parts over to work, I figured if I wasn't going to be working, might as well take advantage of the shop's tools. Sometimes Flat Rate sucks...
So after punching out the old bearing races, I spent a good 20 minutes trying to figure out how to get the weirdly shaped rotors onto our machine. After figuring it out I went ahead and turned them to a nice new finish. Now that the rotors were ready to be installed, it was time for the fun messy part; packing the bearings. I actually love packing bearings, for some odd reason the grease feels fun to squeeze, I just hate the damned clean-up after words.
After getting the rotors onto the spindles, I went ahead and installed the original brake pads onto the bracket and then added the rebuilt calipers over them. Side note here, why Mazda decided to make their guide pins the way they did on these first gens confuses the hell out of me. I think my next set of brakes in the future are going to be just 4 pots, I hate dealing with guide pins seizing and such.
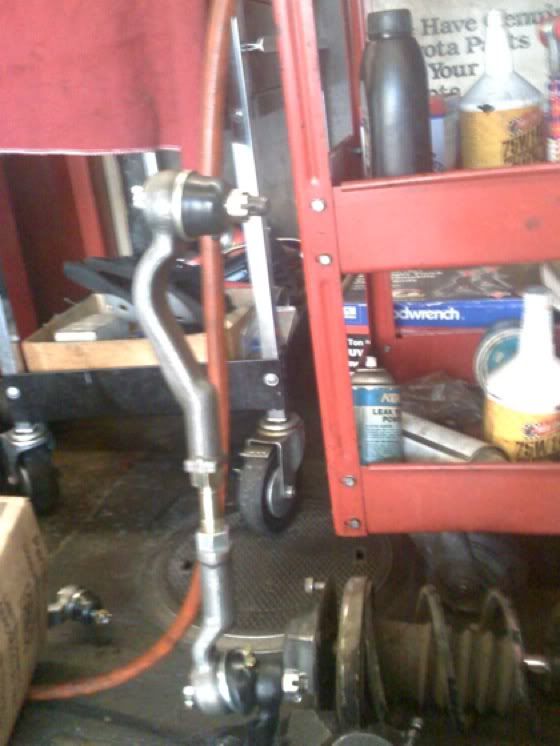
The control arms and ball joints went together rather easily and didn't give me too much crap. I already installed the RE-Speed Poly bushings for the lower control arm. The strangest problem I came across was actually with my Moog Tie Rods! They have a nipple that seems to be sliced on all the tie rods, now we were all thinking it has to be a vent because they have zerk fittings on them to relieve pressure if you inject too much grease. But just moving them around produces an obscene amount of grease squirting out of that nipple, is this normal or some sort of defect? It doesn't seem like that much grease should be escaping.
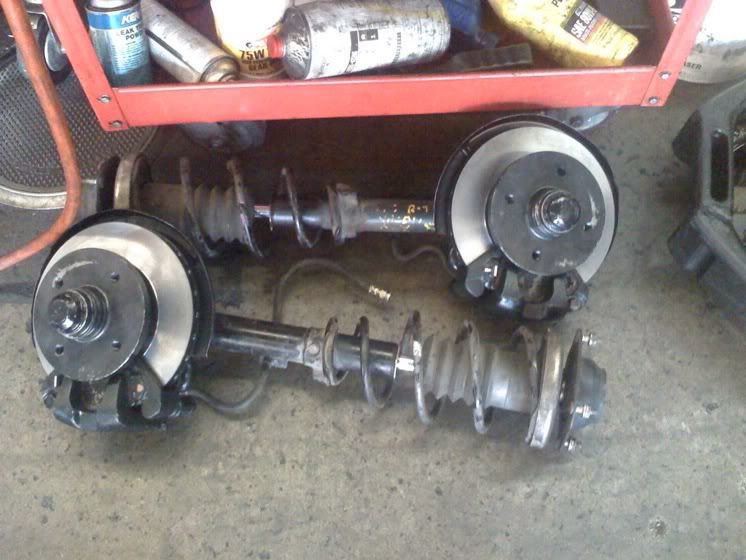
I didn't have enough time to mount the control arms to the crossmember, but I will go ahead and do that tomorrow if its slow again or after work. Now for the pictures!:
Turned Rotors installed on the spindle:

A top view of the caliper:

The control arms assembled and ready to go onto the strut housings:

The final product, two complete strut assemblies ready to bolt into the crossmember and car:
Now here's the tie rod before I took it back off to double check them. You can see the grease starting to squirt out with little pressure other than seating the ball joint onto the knuckle:
I know most of you don't really care for this thread but, I figured that if anyone actually cared I would still update it... worst case scenario, I at least feel like I am doing something.
So after punching out the old bearing races, I spent a good 20 minutes trying to figure out how to get the weirdly shaped rotors onto our machine. After figuring it out I went ahead and turned them to a nice new finish. Now that the rotors were ready to be installed, it was time for the fun messy part; packing the bearings. I actually love packing bearings, for some odd reason the grease feels fun to squeeze, I just hate the damned clean-up after words.
After getting the rotors onto the spindles, I went ahead and installed the original brake pads onto the bracket and then added the rebuilt calipers over them. Side note here, why Mazda decided to make their guide pins the way they did on these first gens confuses the hell out of me. I think my next set of brakes in the future are going to be just 4 pots, I hate dealing with guide pins seizing and such.
The control arms and ball joints went together rather easily and didn't give me too much crap. I already installed the RE-Speed Poly bushings for the lower control arm. The strangest problem I came across was actually with my Moog Tie Rods! They have a nipple that seems to be sliced on all the tie rods, now we were all thinking it has to be a vent because they have zerk fittings on them to relieve pressure if you inject too much grease. But just moving them around produces an obscene amount of grease squirting out of that nipple, is this normal or some sort of defect? It doesn't seem like that much grease should be escaping.
I didn't have enough time to mount the control arms to the crossmember, but I will go ahead and do that tomorrow if its slow again or after work. Now for the pictures!:
Turned Rotors installed on the spindle:
A top view of the caliper:
The control arms assembled and ready to go onto the strut housings:
The final product, two complete strut assemblies ready to bolt into the crossmember and car:
Now here's the tie rod before I took it back off to double check them. You can see the grease starting to squirt out with little pressure other than seating the ball joint onto the knuckle:
I know most of you don't really care for this thread but, I figured that if anyone actually cared I would still update it... worst case scenario, I at least feel like I am doing something.
Thread Starter
Wrkn Toyota, Rootn Wankel
Joined: Sep 2007
Posts: 1,642
Likes: 1
From: "Haystack" Hayward, CA
Thread Starter
Wrkn Toyota, Rootn Wankel
Joined: Sep 2007
Posts: 1,642
Likes: 1
From: "Haystack" Hayward, CA
Well I am almost to the point where I can prep the engine parts to paint them pretty colors before the rebuild kit gets ordered....
That is if I can get these god damn gaskets off, I mean good god what the hell are they made from!? I've tried soaking them, scraping, using gasket remover products, hell even a razor blade. Its like the damned things are made from frickin' concrete!
Well, in any case I'll figure that out eventually...
Anyways! What colors should I paint the engine? I was thinking Black/Green... but I can't find any Silicone hoses that come in green. So any color suggestions?