
My 85 S, the parts sponge "Pacman" - Yes, I have too many builds going on

Thread Starter
Joined: Feb 2002
Posts: 8,389
Likes: 120
From: North Jersey
My 85 S, the parts sponge "Pacman" - Yes, I have too many builds going on
Hey guys, yep that’s right, yet another build thread from me. This has long since moved past the “hobby” phase and now boarders on unhealthy obsession… Anyway, let’s get started shall we. Many of you probably know me on here already and have seen my other threads. Those that do, will know that most of my builds usually involve mountains of rust and hundreds of hours of metal fab/welding/sandblasting/painting etc. Thankfully this is not one of those projects, at least not for the most part . To make a long and probably boring story short, I’ve been doing this for close to 15 years and in that time have amassed quite a pile of spare parts, both of the stock and aftermarket variety and for a while now have been wanting to find another shell to use up as many of these parts as possible. I won’t go through the whole back story on where all the parts came from (although, sadly I could lol) but assume that 75%+ of the parts going on this car were already in my stash (hence “pacman” - it’s eating up all my spare parts, har har). I will point out things that I actually had to buy.
Not to make excuses, but the work done in this thread is not indicative of my best work, for that please see the Pandafb restoration thread, I spent a whole lot more time on that – the point of this car is to make a fun driver and use up parts, not make it perfect.
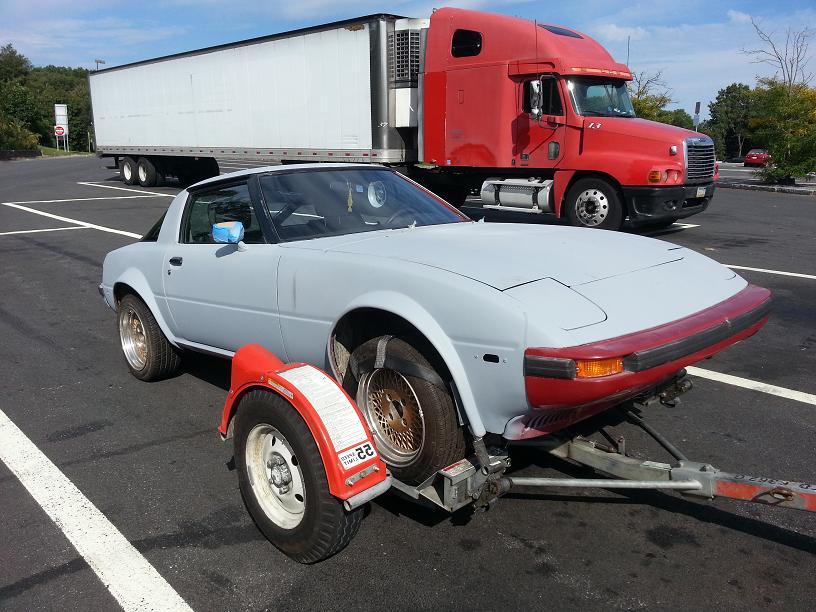
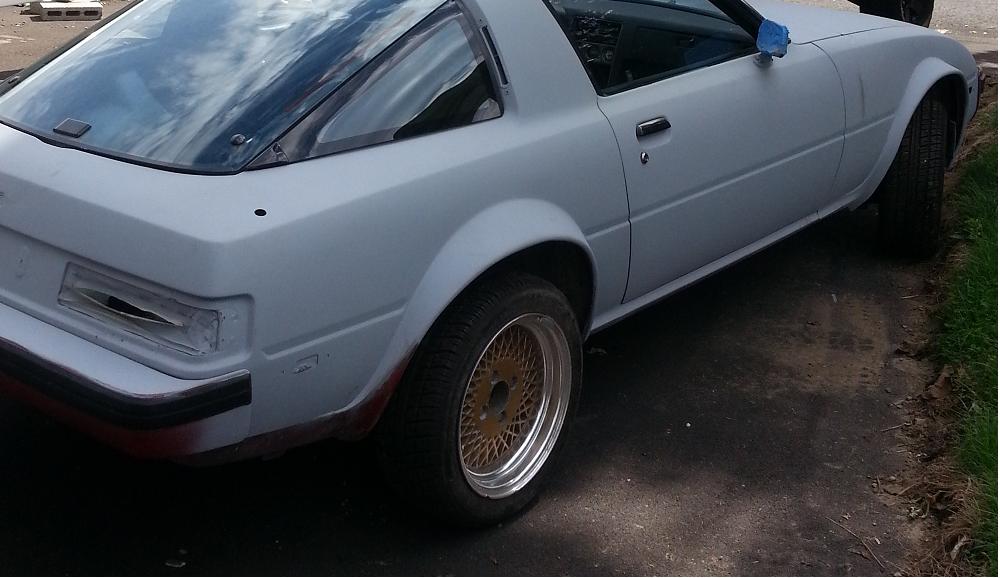
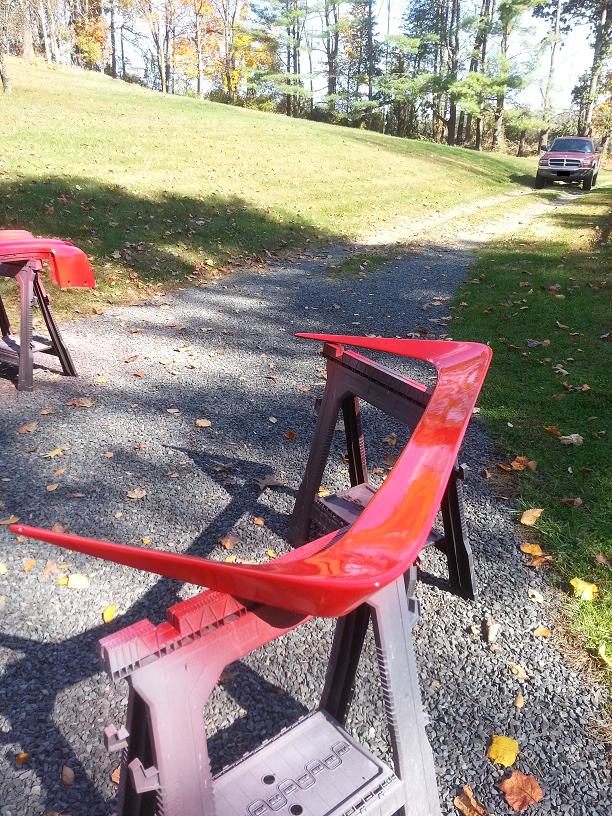
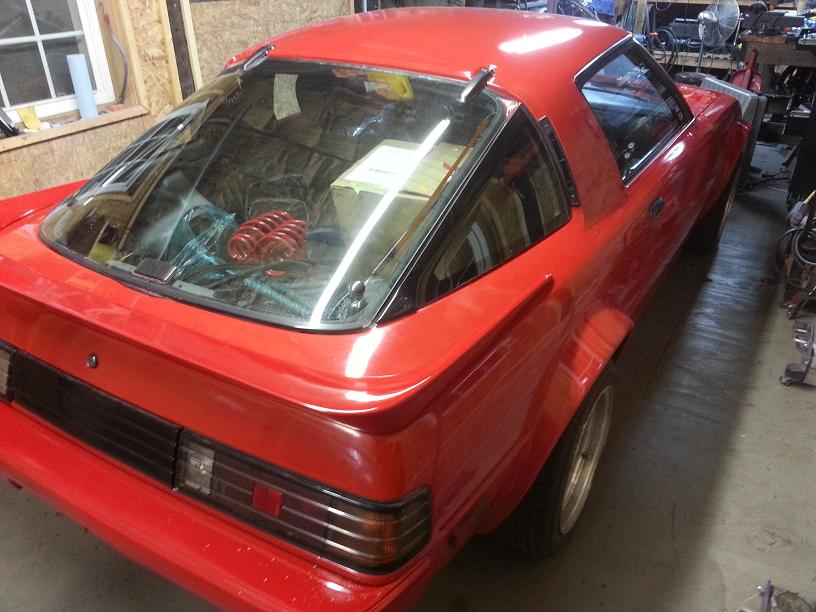
Anyway, that’s kinda the quick back story about where my head is at, now on to the car. I bought it from a guy on here (mazrx2man) back in September. He had purchased it a few years ago from a guy who had owned it since at least the early 90’s. It had been off the road since 1997 and only has 65k miles on it. The flares were done at least 10 years ago and are metal - while they aren’t done the way I would do them, they are decent enough and give the car a mean look. The underside is quite clean especially given that it’s a New York car. Mazrx2man had already started stripping off the maroon color that was on there (it’s originally a tender blue metallic car and had been in an accident so there was quite a few layers of paint on there) and had primed the whole thing and started cleaning up the flares. Anyway, he moved out of state and was having a hard time finishing the car so he sold it to me with no drivetrain but otherwise complete. Some money and a few hours with Dad’s truck and a tow dolly later and this is what I’ve got. A pretty clean FB that’s already got a bunch of the prep work done, and really only a few issues to deal with. You’ll see in one pic (I tried to zoom the pic so you can see, it’s difficult) that the guy who did the flares also had side skirts on it, and attempted to mold the flares into the skirts by piling up a ton of bondo at the rear of each flare. I mean like 2-3” inches of the stuff, a definite no no. More about that in the next post
Not to make excuses, but the work done in this thread is not indicative of my best work, for that please see the Pandafb restoration thread, I spent a whole lot more time on that – the point of this car is to make a fun driver and use up parts, not make it perfect.
Anyway, that’s kinda the quick back story about where my head is at, now on to the car. I bought it from a guy on here (mazrx2man) back in September. He had purchased it a few years ago from a guy who had owned it since at least the early 90’s. It had been off the road since 1997 and only has 65k miles on it. The flares were done at least 10 years ago and are metal - while they aren’t done the way I would do them, they are decent enough and give the car a mean look. The underside is quite clean especially given that it’s a New York car. Mazrx2man had already started stripping off the maroon color that was on there (it’s originally a tender blue metallic car and had been in an accident so there was quite a few layers of paint on there) and had primed the whole thing and started cleaning up the flares. Anyway, he moved out of state and was having a hard time finishing the car so he sold it to me with no drivetrain but otherwise complete. Some money and a few hours with Dad’s truck and a tow dolly later and this is what I’ve got. A pretty clean FB that’s already got a bunch of the prep work done, and really only a few issues to deal with. You’ll see in one pic (I tried to zoom the pic so you can see, it’s difficult) that the guy who did the flares also had side skirts on it, and attempted to mold the flares into the skirts by piling up a ton of bondo at the rear of each flare. I mean like 2-3” inches of the stuff, a definite no no. More about that in the next post
Last edited by 82transam; Dec 10, 2013 at 09:11 AM.
Thread Starter
Joined: Feb 2002
Posts: 8,389
Likes: 120
From: North Jersey
As many of you know, back in September I was still working on painting my blue FB and getting that thing back together so this car sat for about a month or so. Late October/Early November we had a warm spell so I took a few days off and decided to push myself to get this thing painted. That way I could get the mechanicals done over the winter (more details about what I’m doing mechanically in a later post).
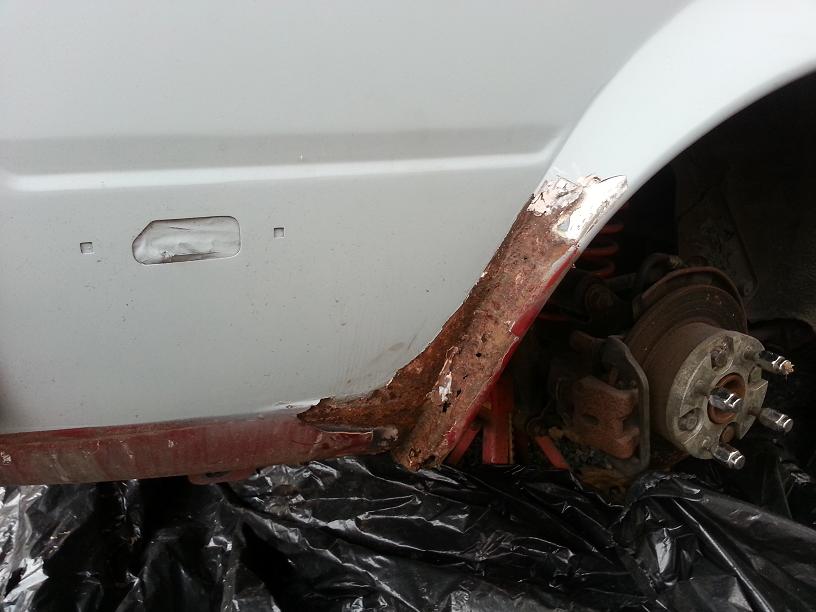
First step was to get all that bondo off the bottom of the flares (see pic in above post). The previous owner had already done so on the driver side rear flare so I just had the other 3 to do. After about 15 seconds with a hammer and chisel all the bondo was off of the passenger rear and it wasn’t pretty… The questionable approach the original guy took with these flares became apparent. He used a piece of pipe bent into a hoop (more common way to do it is to use a smaller, solid rod) then small pieces of sheet metal to connect the body to that hoop. That’s somewhat acceptable, but they did basically nothing to seal it up and as such it had rusted. Add to that the –way too thick- bondo that had cracked and let water in and you’ve got some nice rot.
Damn, here I thought I was gonna get away without doing a bunch of rust repair
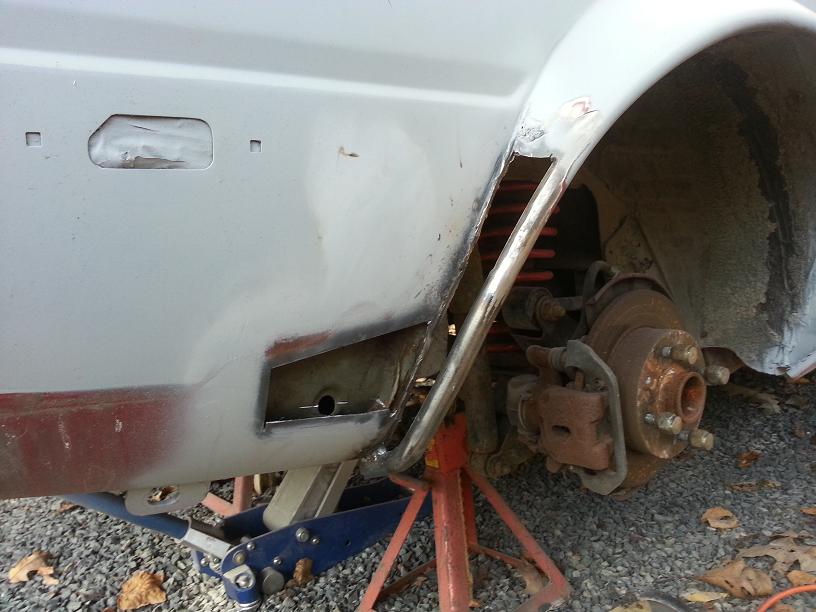
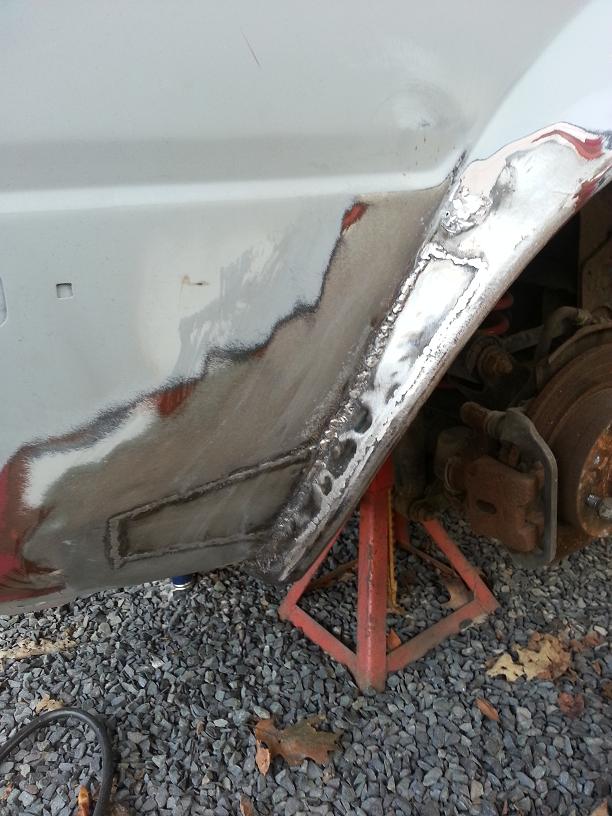
Anywho, a few hours, some pipe, sheet metal and filler later and it’s all patched up. I didn’t want to redo the whole thing, so I just copied what they had done – made for quick work at least… I also sandblasted the inner wheel well and sealed that all up. Hopefully it’ll last well enough. I didn’t take pics of the front fenders, but they weren’t nearly as bad – just some surface rust hiding under the filler. Easy enough to fix. I’ll consider myself lucky, that was really the extent of the rust, and the rest of the body needed almost no filler, although I did spend some time cleaning up the lines on the flares – they weren’t bad, I just wanted them to transition into the quarter panels a bit smoother.
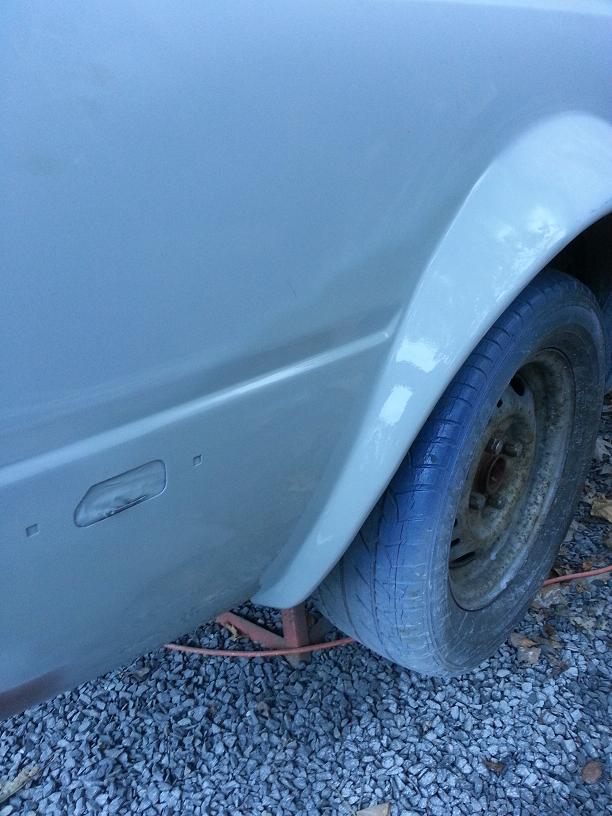
First step was to get all that bondo off the bottom of the flares (see pic in above post). The previous owner had already done so on the driver side rear flare so I just had the other 3 to do. After about 15 seconds with a hammer and chisel all the bondo was off of the passenger rear and it wasn’t pretty… The questionable approach the original guy took with these flares became apparent. He used a piece of pipe bent into a hoop (more common way to do it is to use a smaller, solid rod) then small pieces of sheet metal to connect the body to that hoop. That’s somewhat acceptable, but they did basically nothing to seal it up and as such it had rusted. Add to that the –way too thick- bondo that had cracked and let water in and you’ve got some nice rot.
Damn, here I thought I was gonna get away without doing a bunch of rust repair
Anywho, a few hours, some pipe, sheet metal and filler later and it’s all patched up. I didn’t want to redo the whole thing, so I just copied what they had done – made for quick work at least… I also sandblasted the inner wheel well and sealed that all up. Hopefully it’ll last well enough. I didn’t take pics of the front fenders, but they weren’t nearly as bad – just some surface rust hiding under the filler. Easy enough to fix. I’ll consider myself lucky, that was really the extent of the rust, and the rest of the body needed almost no filler, although I did spend some time cleaning up the lines on the flares – they weren’t bad, I just wanted them to transition into the quarter panels a bit smoother.
Last edited by 82transam; Dec 10, 2013 at 09:10 AM.
Thread Starter
Joined: Feb 2002
Posts: 8,389
Likes: 120
From: North Jersey
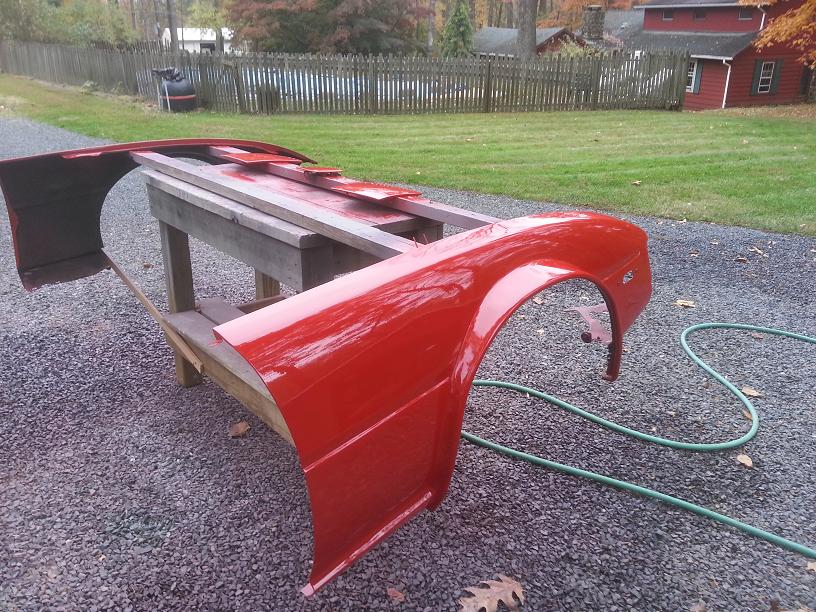
The aforementioned rust and minor body work took a solid day, but with that done I could move on to painting this. I had close to 2 quarts of sunrise red left from my 83 S (painted last year) so I decided to use that here – no point in it sitting on a shelf and going bad. I had JUST enough to paint this thing, and I didn’t do door jams or the engine bay. In fact I had to dig deeper into my stash to break out a can of NAPA paint that I bought back in 2004 to do some minor repairs (again on my 83 S). I had to buy a can of hardener (for the napa paint), but the paint at this point was basically “free” since it’s been sitting so long. The color is not an exact match to the PPG paint that I used on the rest of the car, but I don’t care, I’m happy with it anyway Big thanks to Jeff, the prior owner, for doing all that prep work. I sanded his primer with 400, laid down a few heavy coats of Durabuild, knocked that down with 400, wiped it down and on went the red. Is it a perfect paint job? Absolutely not, but again, not the point of this build  After the paint cured I loosely reassembled the front clip and back outside the car went for a few months.
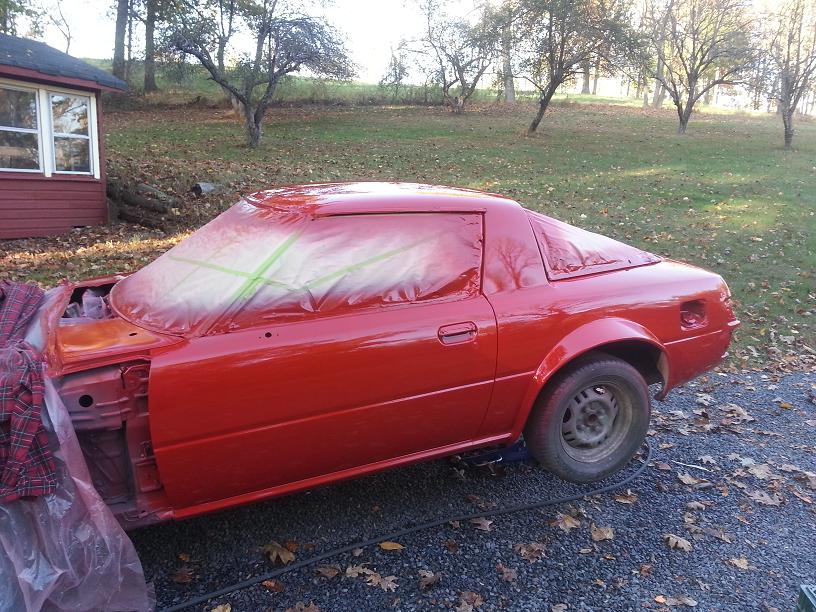
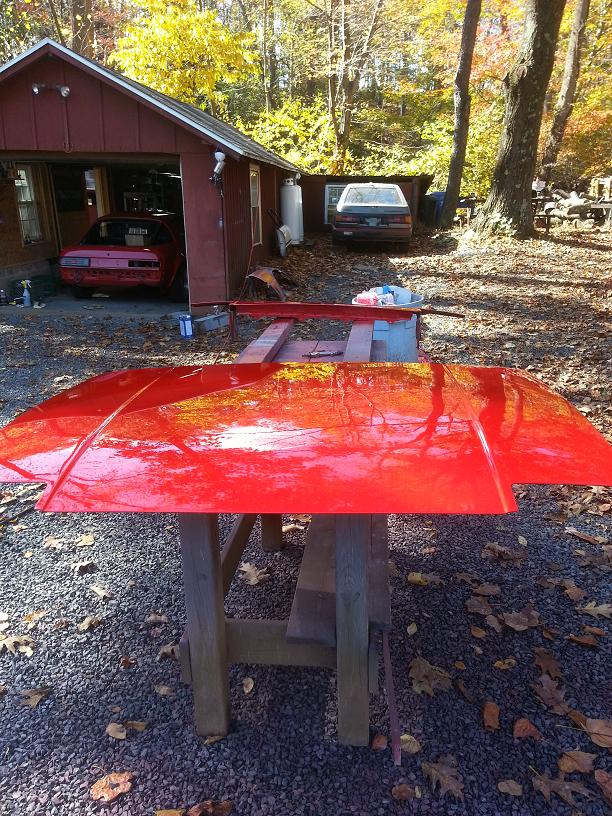
Big thanks to Jeff, the prior owner, for doing all that prep work. I sanded his primer with 400, laid down a few heavy coats of Durabuild, knocked that down with 400, wiped it down and on went the red. Is it a perfect paint job? Absolutely not, but again, not the point of this build After the paint cured I loosely reassembled the front clip and back outside the car went for a few months.
Last edited by 82transam; Dec 10, 2013 at 09:09 AM.
Thread Starter
Joined: Feb 2002
Posts: 8,389
Likes: 120
From: North Jersey
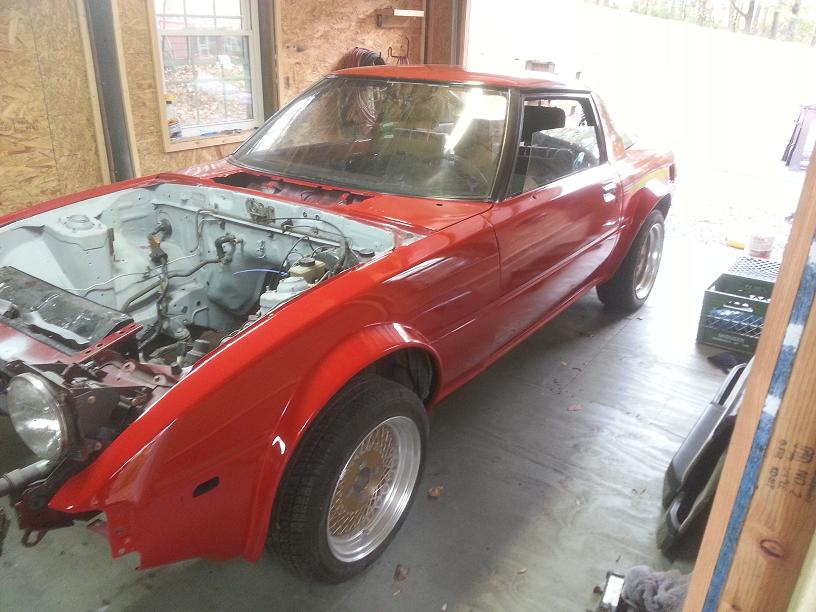
Fast forward to this past weekend and back into the shop this went. Basically here are my plans mechanically –
• S5 NA engine (needs oil control rings and a full rebuild, but I have much of it)
• Stock FC ECU (might get it RTek’d eventually if budget allows)
• FC style in tank fuel pump – did this on both of the other FB’s, works fantastic
• FB trans/driveshaft (to keep the swap nice and simple, plus I don’t have an FC NA trans anyway)
• Maintain the current wheels it has. I believe they are old Enkei 92’s – they are the 4x114.3 pattern and the car currently has adaptors to hold them on. The tires are basically brand new too - eventually I will get something bigger to fill those flares up, but not now.
• GSL-SE axles/rear brakes to get rid of the above adaptors (car already has a GSL rear so it’s just a matter of swapping the axles in, I don’t care about the SE diff enough to go find/buy one at this point)
• FC front subframe with 4 lug hubs and base model manual steering rack (makes the S5 engine an easy bolt in, upgrades steering, gets rid of the above mentioned wheel adaptors etc etc etc)
• FB struts/shocks (The car has something non stock in there, but haven’t looked at what yet, might need to buy a set of KYB’s or something)
• FB Racing Beat springs (car already has them in the hatch, 0 miles on them!)
• FC oil cooler
• FB tall Radiator (will need to buy, as well as new hoses)
• Double din head unit with NAV (bought this a few weeks ago as a early xmas gift to myself)
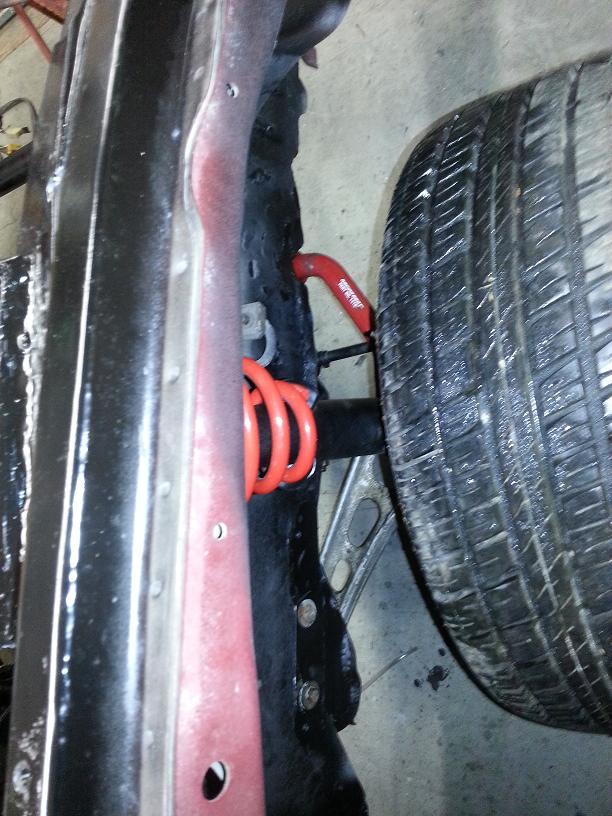
I’m sure there are a few other minor things that I’m sure I’m forgetting, but basically it’s a straight forward build, the biggest piece of fabrication work is chopping out the strut towers and moving them up an inch, to retain strut travel with the FB struts and springs (I did this on my 83 S last year and it has been performing beautifully) Note – there are other ways to solve this problem if you’re doing this swap – the easiest of which is to use FC struts/springs and top hats etc. Since my car already has the RB springs I wanted to use them. Plus I like welding
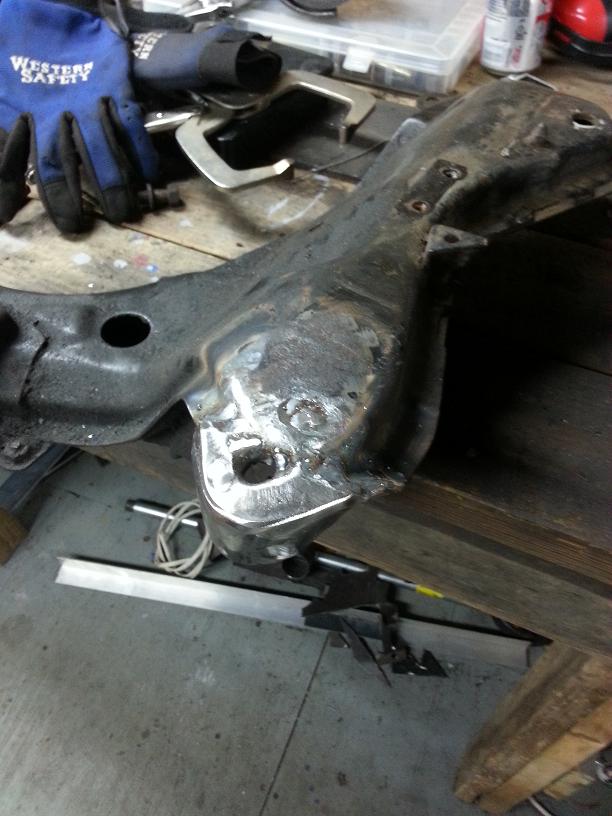
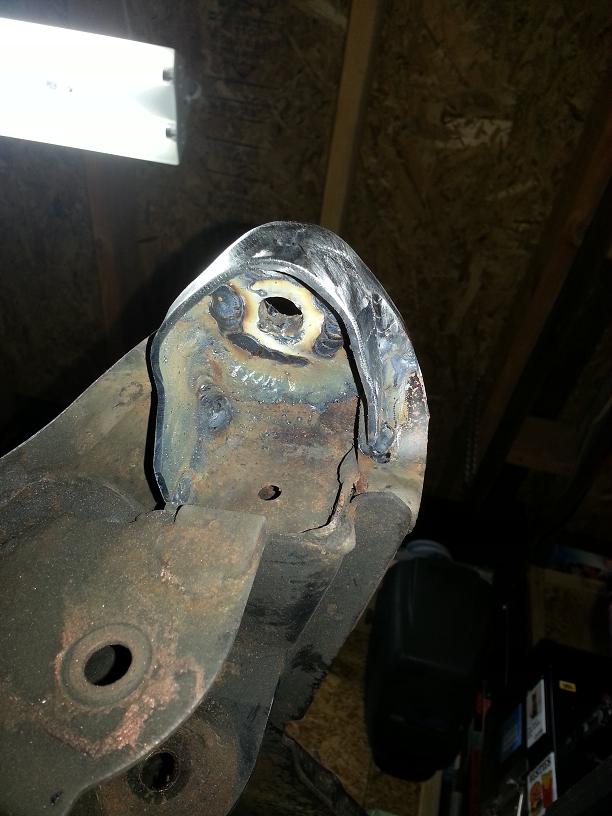
So the first thing on that list that I tackled this weekend was the strut tower changes. I figured I’d get that out of the way first. I actually had what was left of the cut up towers from my 83 S left, so I used those as the basis of the new towers on this one. Basically I just got some bolts/nuts and put them through the existing tower holes, and put a nut 1” up. Then I attach the new tower piece to that and basically build off of it. That way I know it’s exactly 1” up and in the exact same spot. Because I used a plasma cutter to remove these towers from my 83 I had to do a fair amount of work to make them fit correctly, but it was just a matter of cutting some 1/8” steel to make the extensions, tacking it into place, making the next piece and tacking that etc. Then I ran finish welds and remove it from the car (it’s still just bolted on at this point, not welded in). I ran welds on the bottom of each joint to ensure full penetration and then spend a TON of time grinding everything on the top side smooth (I use a grinding disc on an angle grinder first to knock down the major high spots, then switch to a flap wheel to finish smoothing it out). My goal was to make it look as stock as possible but not hide all of my work. Once the part itself is made then it’s a matter of marking where to cut on the body, cut all but a few small spots (don’t want to remove the tower completely since it’s what holds the new one in the correct spot) bolt the new one in, weld it completely, then finish cutting the old one out. Voila, new towers up an inch. I still need to seam seal the weldes and undercoat them etc, but they are done for now.
I didn’t take a whole lot of “during” pics of this process since it’s just a lot of back and forth from the car to the work bench and back again fiddling around to get everything to fit correctly – and some of the pics are blurry. Sorry! Hopefull you can get an idea of what I did. It was a ton of work – probably 10-12 hours total, but starting with an old set of tower (really just the tower top I guess) saved a ton of time. When I did this last year on my 83 I fabbed the whole thing from scratch which took forever.
Anyway, that’s where I’m at right now, I’m hoping to get the rest of the FC subframe swap completed this week/weekend so I can move on to painting the engine bay and getting the FC swap wiring harness made. I am not treating this as a full restoration and as such am hoping to be done in a month or two. We’ll see how that goes though
Hopefully this is of some interest to you guys, comments/questions welcome.
-Sean
• S5 NA engine (needs oil control rings and a full rebuild, but I have much of it)
• Stock FC ECU (might get it RTek’d eventually if budget allows)
• FC style in tank fuel pump – did this on both of the other FB’s, works fantastic
• FB trans/driveshaft (to keep the swap nice and simple, plus I don’t have an FC NA trans anyway)
• Maintain the current wheels it has. I believe they are old Enkei 92’s – they are the 4x114.3 pattern and the car currently has adaptors to hold them on. The tires are basically brand new too - eventually I will get something bigger to fill those flares up, but not now.
• GSL-SE axles/rear brakes to get rid of the above adaptors (car already has a GSL rear so it’s just a matter of swapping the axles in, I don’t care about the SE diff enough to go find/buy one at this point)
• FC front subframe with 4 lug hubs and base model manual steering rack (makes the S5 engine an easy bolt in, upgrades steering, gets rid of the above mentioned wheel adaptors etc etc etc)
• FB struts/shocks (The car has something non stock in there, but haven’t looked at what yet, might need to buy a set of KYB’s or something)
• FB Racing Beat springs (car already has them in the hatch, 0 miles on them!)
• FC oil cooler
• FB tall Radiator (will need to buy, as well as new hoses)
• Double din head unit with NAV (bought this a few weeks ago as a early xmas gift to myself
)I’m sure there are a few other minor things that I’m sure I’m forgetting, but basically it’s a straight forward build, the biggest piece of fabrication work is chopping out the strut towers and moving them up an inch, to retain strut travel with the FB struts and springs (I did this on my 83 S last year and it has been performing beautifully) Note – there are other ways to solve this problem if you’re doing this swap – the easiest of which is to use FC struts/springs and top hats etc. Since my car already has the RB springs I wanted to use them. Plus I like welding
So the first thing on that list that I tackled this weekend was the strut tower changes. I figured I’d get that out of the way first. I actually had what was left of the cut up towers from my 83 S left, so I used those as the basis of the new towers on this one. Basically I just got some bolts/nuts and put them through the existing tower holes, and put a nut 1” up. Then I attach the new tower piece to that and basically build off of it. That way I know it’s exactly 1” up and in the exact same spot. Because I used a plasma cutter to remove these towers from my 83 I had to do a fair amount of work to make them fit correctly, but it was just a matter of cutting some 1/8” steel to make the extensions, tacking it into place, making the next piece and tacking that etc. Then I ran finish welds and remove it from the car (it’s still just bolted on at this point, not welded in). I ran welds on the bottom of each joint to ensure full penetration and then spend a TON of time grinding everything on the top side smooth (I use a grinding disc on an angle grinder first to knock down the major high spots, then switch to a flap wheel to finish smoothing it out). My goal was to make it look as stock as possible but not hide all of my work. Once the part itself is made then it’s a matter of marking where to cut on the body, cut all but a few small spots (don’t want to remove the tower completely since it’s what holds the new one in the correct spot) bolt the new one in, weld it completely, then finish cutting the old one out. Voila, new towers up an inch. I still need to seam seal the weldes and undercoat them etc, but they are done for now.
I didn’t take a whole lot of “during” pics of this process since it’s just a lot of back and forth from the car to the work bench and back again fiddling around to get everything to fit correctly – and some of the pics are blurry. Sorry! Hopefull you can get an idea of what I did. It was a ton of work – probably 10-12 hours total, but starting with an old set of tower (really just the tower top I guess) saved a ton of time. When I did this last year on my 83 I fabbed the whole thing from scratch which took forever.
Anyway, that’s where I’m at right now, I’m hoping to get the rest of the FC subframe swap completed this week/weekend so I can move on to painting the engine bay and getting the FC swap wiring harness made. I am not treating this as a full restoration and as such am hoping to be done in a month or two. We’ll see how that goes though
Hopefully this is of some interest to you guys, comments/questions welcome.
-Sean
Last edited by 82transam; Dec 10, 2013 at 09:16 AM.

Thread Starter
Joined: Feb 2002
Posts: 8,389
Likes: 120
From: North Jersey
Well, the wheels that are on there now are 15", I think the width is 7", but it's only got a 195 tire on there so it doesn't really fill out that well at all. I'd have to do some measuring to confirm but I'm thinking a 16x8 0 offset would fill that in quite nicely. Not sure what size tires I'd go with, maybe 235's?? Honestly though wheels and tires for this will be a while from now.
Jeez
You make me feel guilty when I'd rather chill than work on my one car
Those strut tops look familiar. They look great. I may have missed it but; second gen front steering?
Those strut tops look familiar. They look great. I may have missed it but; second gen front steering?
Trending Topics
Thread Starter
Joined: Feb 2002
Posts: 8,389
Likes: 120
From: North Jersey
Haha don't feel guilty, yours is coming along nicely :-)
Yeah, FC subframe with a s4 manual rack, fb struts/springs. More or less what my other fb has just 4 lug and the slower rack.
Yeah, FC subframe with a s4 manual rack, fb struts/springs. More or less what my other fb has just 4 lug and the slower rack.
Joined: Aug 2011
Posts: 3,078
Likes: 42
From: Cambridge, Minnesota
Glad you finally posted up a build thread man! I love the look of the flares on this car and the rims do mach very well. Just a bit more of a dish and you'll be spot on.
I really wanna see a writeup on the Double DIN head unit - I always wanted one in my 84 and you do quality work.
Keep up the build man, will be awesome when done!
Keep up the build man, will be awesome when done!

Thread Starter
Joined: Feb 2002
Posts: 8,389
Likes: 120
From: North Jersey
Thanks guys
Started working on the FC subframe last night but ran out of welding wire, also almost out of shielding gas and have almost not 1/8" steel left lol. I need to get some supplies tonight.
Yeah the double din is something I've wanted to do for a while, but putting on in the 83's would take some cutting and modifying - which I wasn't really interested in doing. S3's alredy have the double din opening so I figured why not! I'll post details once I get to that stage.
I'll post pics of the subframe once I have something worth showing
Looking fwd to this build...I recently scrapped a second gen with 5 lug and regret not being able to keep what I needed to do the subframe swap. Is extending the strut tower just something else necessary to do to get this swap right or are you going way low with the front supension? I know it was a popular mod on like IMSA race cars but I figured it was because they were lowered within an inch of their lives. Anyway great job so far!
Thread Starter
Joined: Feb 2002
Posts: 8,389
Likes: 120
From: North Jersey
Ah too bad you couldn't save the parts, it's not an overly difficult swap, and definitely worth the effort!
A Bit more about the towers - There are several ways you can do this swap. The easiest (although not cheapest) would be to just use all FC parts and buy some coil overs (FC coil overs) The FC strut tops will fit into stock FB towers with some some slight oveling of the mounting holes, and then you can control the ride height with the coil over.
The issue (self created) I have (with both this one, and my 83 S) is that I want to retain FB struts and springs, since I already have aftermarket ones that I want to keep. To do this I cut the bottom off of a FB spindle, as well as the spring perch and brake line holder (basically just leaving a bare tube) and then cut off the top (and remove the guts) of the FC strut. The FB tube goes inside the FC lower half and you're left with something that will hold an FB strut but bolt to the FC spindle. Yes that is probably confusing, but you can look at my FC subframe swap thread (which desperately needs updating for pics. I will post some here too later to make it more clear)
The above is actually not the problem, the FB tube conveniently fits right into the FC lower half and everything works there BUT if you want to keep the stock towers, Use FB springs and keep the thing from sitting like a 4x4 you will need to move the spring perch on the strut housing down an inch - that's where issues arise. The spring is so close to the wheel that if you run 205 tires they will no doubt rub, and worse, it puts the strut down low enough in it's travel that it will bottom out very easily. Besides being bad for the strut it causes the car to have very little usable suspension travel and thus rides/handles poorly at best.
There are two solutions -
1. Leave the FC spring perch where it is and move the towers up an inch to compensate - which is my preferred method.
2. Drill out/cut out the bottom of the FC strut tube and make a new bottom so the strut can sit lower and not be at the bottom of it's travel. You still need to move the spring perch down an inch to keep the ride height correct so you'll have potential tire rubbing issues, but it does solve the strut travel issue. There is enough room between the bottom of the strut and the top of the ball joint to accomplish this.
I'm hoping to get the subframe in the car in the next few days and actually start working on the struts so when I do I'll take pics to clear up any confusion. Hope that helped explain what I'm doing haha.
Thread Starter
Joined: Feb 2002
Posts: 8,389
Likes: 120
From: North Jersey
Glad it made sense, I was having a hard time organizing my thoughts there. For me it came down to a money decision. Ideally I would get some FC coil overs, but this car already had RB springs, and I had all the steel and supplies. So the only cost was my time, and I enjoy welding and fabricating things so it just made sense for me to do it this way.


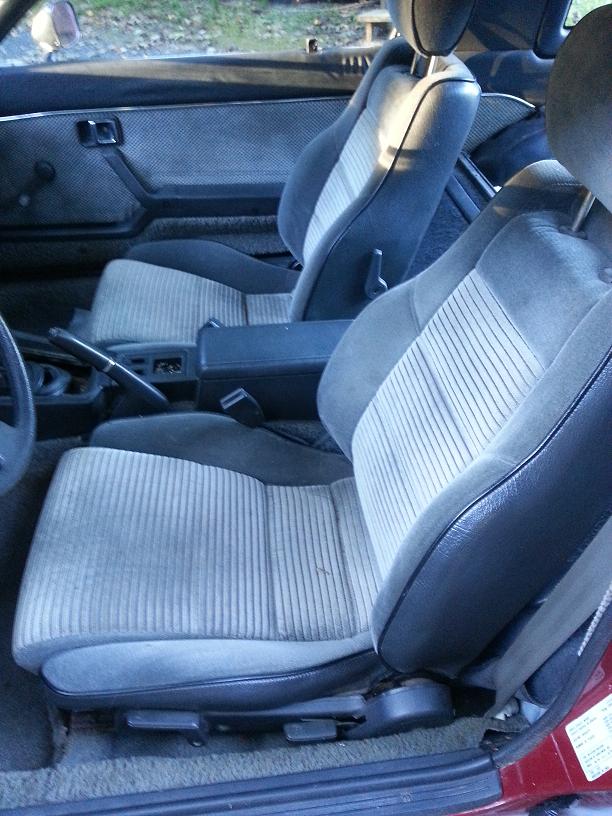
a VERY good start indeed!! looks like a solid car and has some very nice add ons that make the car special. the GSL rear end, RB springs, nice flares and rear wing, SE seats, aftermarket wheels, etc. Can't wait to see more pics of the car and I look forward to following this build thread!!
Thread Starter
Joined: Feb 2002
Posts: 8,389
Likes: 120
From: North Jersey
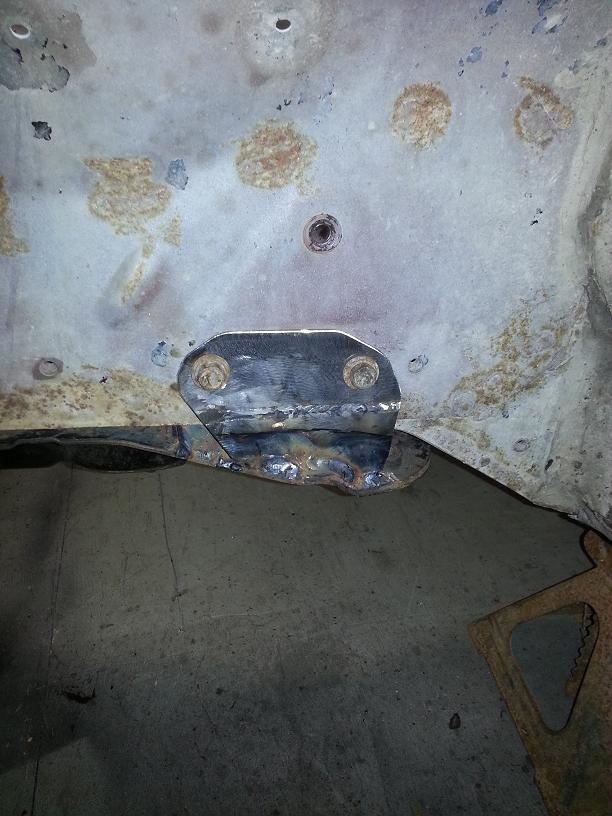
Thanks man, yeah it's a great platform to start with for what I want out of this car. I spent a bunch of time over the weekend working on the FC subframe. I wanted to make this one a bolt in deal using the holes in the frame for the steering box and idler arm to hold the rear of the subframe in. When I did the FC subframe on my 83 i drilled a hole through the frame and used a 1/2" bolt to hold the rear and while it's held up really well for the last few years it was a pain in the *** to get lined up right, and drilling through the frame wasn't as easy as you might think. Plus I just wanted to do this one differently, because, why not
Anyway, like the 83, I wanted to retain the FB front subframe studs, so I moved the hole on the FC subframe forward about 1-1/8" inches, and slightly in, then reinforced the whole area (so nofords doesn't tell me I've "reinforced a piece of cardboard with a tissue, or whatever it is he said with my last one lol). Once that was done I could hold the subframe in there with the front studs and hold the rear up with a jack to start making the rear mounts. I was actually able to finish them yesterday but I was so exhausted at the end I didn't take any pics, but i will!
I ignored the old adage "measure twice, cut once" and it bit me in the *** a few times on this and I had to go back and redo a bunch of my work to get this thing to fit correctly - hence the exhaustion and lack of pics haha. I will get some pics this week of the rear mounts I made, but basically each is a pair of tabs that sandwiches the FB frame rail and uses two of the steering box/idler arm bolts. I also built a small boxed section to act as a spacer so that the subframe sits right up against the frame rail. Pics are obviously needed here, hopefully soon
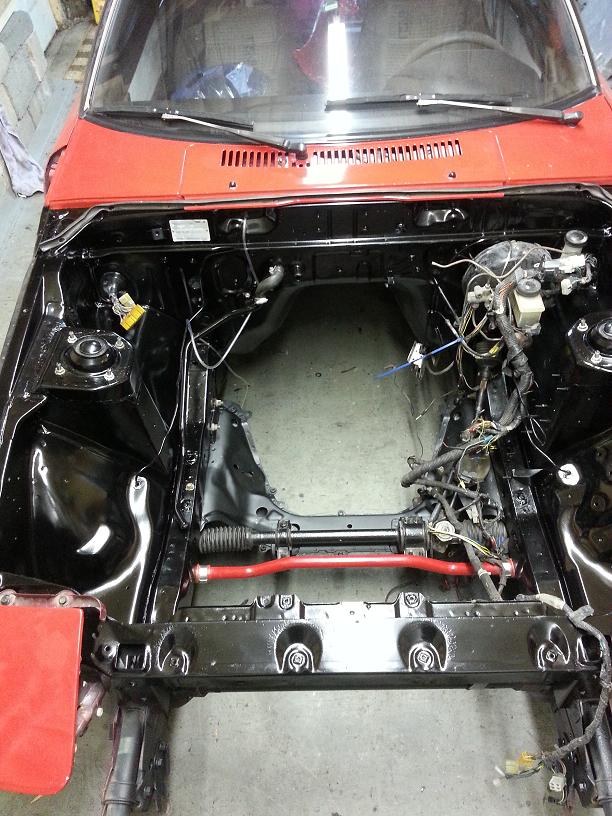
Anyway, I still need to finish smoothing out some of the metal work, and sandblast the whole subframe, but that's it for now, hoping to get the steering column, struts and sway bar mounts done this week so I can focus on painting the engine bay (gloss black)

Anyway, like the 83, I wanted to retain the FB front subframe studs, so I moved the hole on the FC subframe forward about 1-1/8" inches, and slightly in, then reinforced the whole area (so nofords doesn't tell me I've "reinforced a piece of cardboard with a tissue, or whatever it is he said with my last one lol). Once that was done I could hold the subframe in there with the front studs and hold the rear up with a jack to start making the rear mounts. I was actually able to finish them yesterday but I was so exhausted at the end I didn't take any pics, but i will!
I ignored the old adage "measure twice, cut once" and it bit me in the *** a few times on this and I had to go back and redo a bunch of my work to get this thing to fit correctly - hence the exhaustion and lack of pics haha. I will get some pics this week of the rear mounts I made, but basically each is a pair of tabs that sandwiches the FB frame rail and uses two of the steering box/idler arm bolts. I also built a small boxed section to act as a spacer so that the subframe sits right up against the frame rail. Pics are obviously needed here, hopefully soon
Anyway, I still need to finish smoothing out some of the metal work, and sandblast the whole subframe, but that's it for now, hoping to get the steering column, struts and sway bar mounts done this week so I can focus on painting the engine bay (gloss black)
Thread Starter
Joined: Feb 2002
Posts: 8,389
Likes: 120
From: North Jersey
Took Thursday and Friday off to get some solid work done on this thing. I finished all the welding on the subframe, including small ~3/4" box sections on the rear to sit flush against the FB frame rails, and finished reinforcing the rear mounting tabs. Had to trim down the reinforcing pieces on those front tabs because they rubbed the steering rack boots, but it's all good.
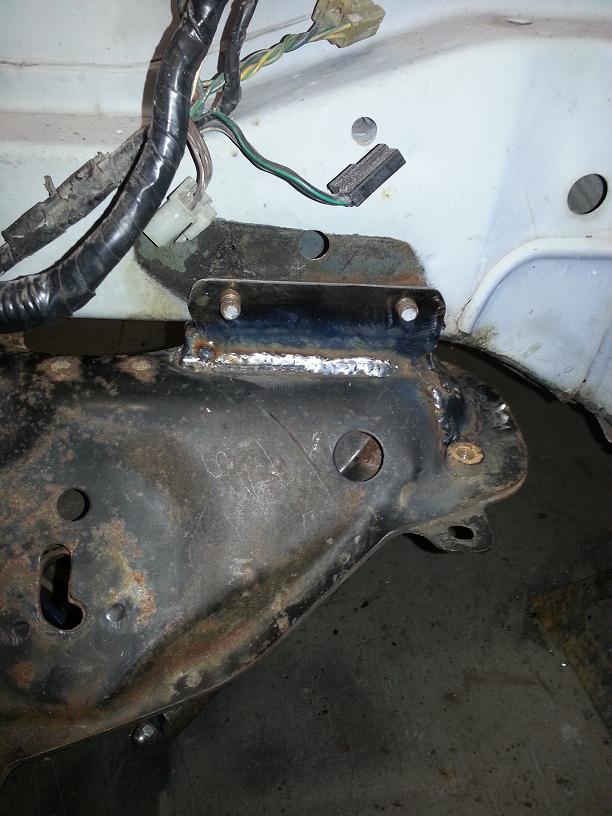
I also got the strut assemblies welded up (FC lower half including spring perch, FB tube with upper threads to hold an FB strut) and also got my steering column done -FB upper, FC lower, welded together (didn't bother trying to recreate the collapsible portion) and made a simple bracket from some 16ga steel to hold the bottom of the column. On that note I will say this S3's make this swap a bit easier since they have that reinforcing plate bolted to the firewall around the steering column hole. Makes a bracket very easy to fabricate since you can attach it to those studs. 83 and earlier doesn't have this and I had to make something more complex on my 83.
The final bit of fab work was to make some mounting points for the FC racing beat sway bar I'm using. I didn't really take any pics but basically it's just some 1/8" angle iron that I drilled some holes through and welded bolts through those holes to create studs. Then I drilled some relief holes in the FB frame railes so that this bracket could sit flush to the frame and I welded it all in. Having studs makes sway bar installs easier than trying to get bolts into a blind nut, at least in my opinion.
Pulled everything back apart, smoothed out any rough edges/welds and sandblasted it all (had unusually warm weather so I took advantage of that) and got some good rustolium primer and undercoating on everything. While all that was drying I turned my attention to the engine bay. I made a few simple brackets (no pics yet) to hold the FC coils/relays and the FC oil cooler, then cleaned it up, scuffed the primer that was already there, covered the rest of the car and let some paint fly.
Spent the rest of the weekend reassembling everything. I'm temporarily using the struts that were in the car (one is blown, no idea what brand they are) so that I can have a rolling car but I will need to replace them before the car is driveable. I also realized that I put the strut housings on the wrong side (the brake line bracket is side specific on FC's annoyingly enough, so i'll switch that once I do the new struts...)
So that's basically where I'm at - waiting on front rotors before I can really attach the wheels, they are just loosely bolted to the hubs right now and I need to buy struts. Otherwise the front is done! One thing I'm not sure about yet is the radiator. I don't have a spare FB rad to test fit, but with the FC sway bar there it's gonna be a tight fit. I might have to modify the rad brackets a bit to make everything work but it's doable.
Plan this week is to reassemble the front clip and start working on wiring. The harness is a bit rough and I've yet to put power to it, so I want to go over everything thoroughly. Once that's done I need to start making yet another FC swap harness. The fun never stops!
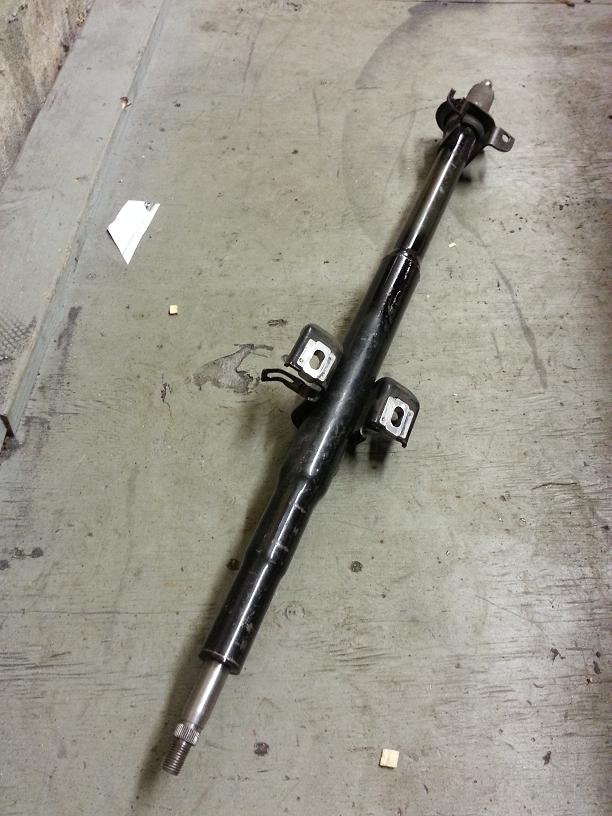
Thread Starter
Joined: Feb 2002
Posts: 8,389
Likes: 120
From: North Jersey
Nothing very picture worthy just yet, but I've gotton a bunch of stuff done in the last week. We had some relatively warm (above freezing lol) weather this weekend so my wife and I pushed the car outside and washed it off. I wanted to get all the metal/cutoff wheel dust off of it and give it a thorough cleaning inside and out. I didn't go crazy pulling interior apart, but I did remove the seats and some trim to access under the carpet etc.
Since the car has been sitting so long I knew there would be mouse nests in there somewhere (had already found one in the cowl when painting this a few months ago) and sure enough the little bastards had a nice disgusting nest made under the ECU cover plate on the passenger side. Thankfully they didn't damage the carpet, but I tore all the insulation out from under it and will replace that. Gave the floor pan a good cleaning and used a bunch of foamy oxy clean stuff on the carpets. Gave everything a good wipe down with F21 protectant (I much prefer this to armorall, or other brands)
Anyway, I am now confident that all mouse nests are gone and am very happy with the overall condition of the interior - smells much better too!
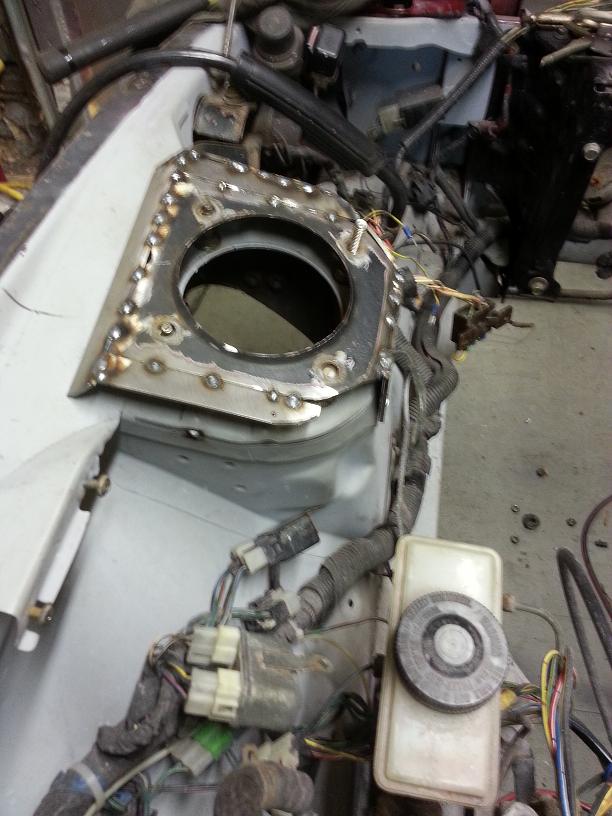
With that done I decided to dive into the wiring. The engine bay portion of the body harness looked pretty rough and was obviously hacked in a few spots. As such I didn't want to risk any problems and decided to cut the whole thing open (again, just the engine bay portion, everything inside looks good for the most part) and go over all the wires to make sure I won't have any problems. Was a good thing too, half a dozen wires near the battery tray had been nicked (probably when it had the accident years ago) and were either completely cut, or corroded so badly that they were useless. I cut out long sections back to good clean copper and soldered in new sections (cut from junk fc harnesses so the colors match - I'm a nerd like that)
While I was at it I decided to remove all the crap I didn't need - things like the 12a emissions stuff, the Auto trans wiring, headlight washers (what a joke), cruise control, power steering etc etc. I also took the few wires that are needed for the stock gagues/warning lights and pulled them back through the harness and have them exit near the driver side strut tower (like they do on an 83) Instead of snaking all around the engine bay. I understand why Mazda did it this way - to keep all the engine related wiring on one side, but since basically that engine passenger side harness is no longer needed I figured it made sense to change it. What I'm left with is a very small harness past the battery tray - basically just the passenger headlight/turn signal wires and the washer fluid pump wiring.
I've got about another hour of work before I can put power to the harness and test all the lights etc, but I'm confident it'll work. I needed a break yesterday from folding myself into the engine bay so I started working on the FC swap harness. I'll post more about that later, at this point I'm still in the stage of removing what i need from a FC body harness, nothing very exciting. This particular harness came from a Vert with air bags, so there's a ton of extra wiring to cut through - fun!
So that's where I'm at, hoping to have most if not all the wiring done this weekend, then it's on to the fuel system
Since the car has been sitting so long I knew there would be mouse nests in there somewhere (had already found one in the cowl when painting this a few months ago) and sure enough the little bastards had a nice disgusting nest made under the ECU cover plate on the passenger side. Thankfully they didn't damage the carpet, but I tore all the insulation out from under it and will replace that. Gave the floor pan a good cleaning and used a bunch of foamy oxy clean stuff on the carpets. Gave everything a good wipe down with F21 protectant (I much prefer this to armorall, or other brands)
Anyway, I am now confident that all mouse nests are gone and am very happy with the overall condition of the interior - smells much better too!
With that done I decided to dive into the wiring. The engine bay portion of the body harness looked pretty rough and was obviously hacked in a few spots. As such I didn't want to risk any problems and decided to cut the whole thing open (again, just the engine bay portion, everything inside looks good for the most part) and go over all the wires to make sure I won't have any problems. Was a good thing too, half a dozen wires near the battery tray had been nicked (probably when it had the accident years ago) and were either completely cut, or corroded so badly that they were useless. I cut out long sections back to good clean copper and soldered in new sections (cut from junk fc harnesses so the colors match - I'm a nerd like that)
While I was at it I decided to remove all the crap I didn't need - things like the 12a emissions stuff, the Auto trans wiring, headlight washers (what a joke), cruise control, power steering etc etc. I also took the few wires that are needed for the stock gagues/warning lights and pulled them back through the harness and have them exit near the driver side strut tower (like they do on an 83) Instead of snaking all around the engine bay. I understand why Mazda did it this way - to keep all the engine related wiring on one side, but since basically that engine passenger side harness is no longer needed I figured it made sense to change it. What I'm left with is a very small harness past the battery tray - basically just the passenger headlight/turn signal wires and the washer fluid pump wiring.
I've got about another hour of work before I can put power to the harness and test all the lights etc, but I'm confident it'll work. I needed a break yesterday from folding myself into the engine bay so I started working on the FC swap harness. I'll post more about that later, at this point I'm still in the stage of removing what i need from a FC body harness, nothing very exciting. This particular harness came from a Vert with air bags, so there's a ton of extra wiring to cut through - fun!
So that's where I'm at, hoping to have most if not all the wiring done this weekend, then it's on to the fuel system
Thread Starter
Joined: Feb 2002
Posts: 8,389
Likes: 120
From: North Jersey
Been a while since I updated this, since the last post I finished up the body harness and put power to it, thankfully the magic smoke stayed inside and all critical items work (headlights, wipers, blower motor etc) although the hazards and rear defroster don't work - will have to investigate that a bit further. Anyway, with that done I moved on to making the FC swap harness. I didn't take many (any!) pics along the way, but I will get a few of the finished product when I think of it.
With the wiring basically done I moved on to the fuel system. Dropped the tank and man what a mess! For how not rusted the rest of the car is I was surprised by how rusted the tank was on the outside - looks about as bad as the one that was on my 83 S, but that whole car was a mess lol. Anyway, the inside of the tank, despite having sat so long was actually very clean. Before bothering to FC'ify the thing I figured I'd sandblast it to make sure I didn't blow any holes through it. Thankfully I didn't, and while there is still some rust lurking in the seam between the two halves that I can't really get, it came out very good I think. Some por15, and rustolium primer later and it was all sealed up.
I flushed it out with simple green and water twice and then with just water 2 more times to make sure it wasn't going to blow up on me when I started welding. More in the next post
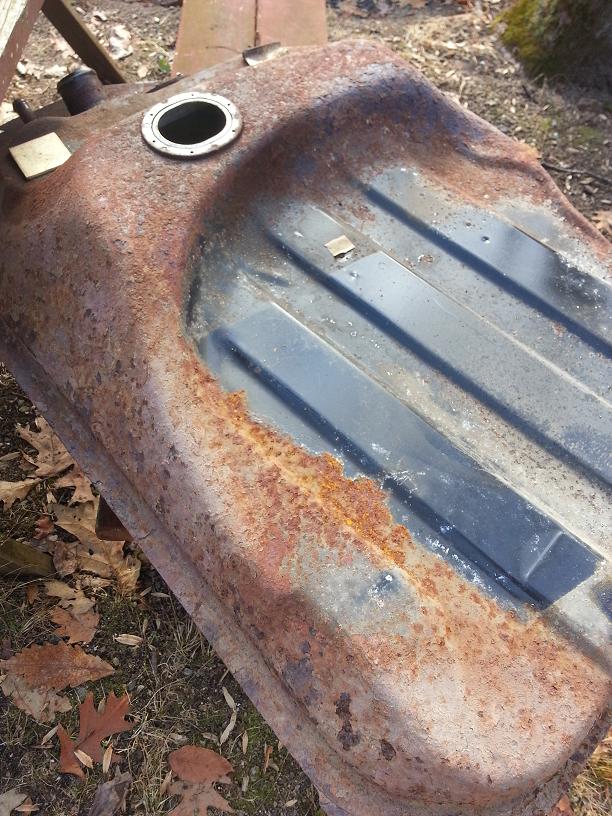
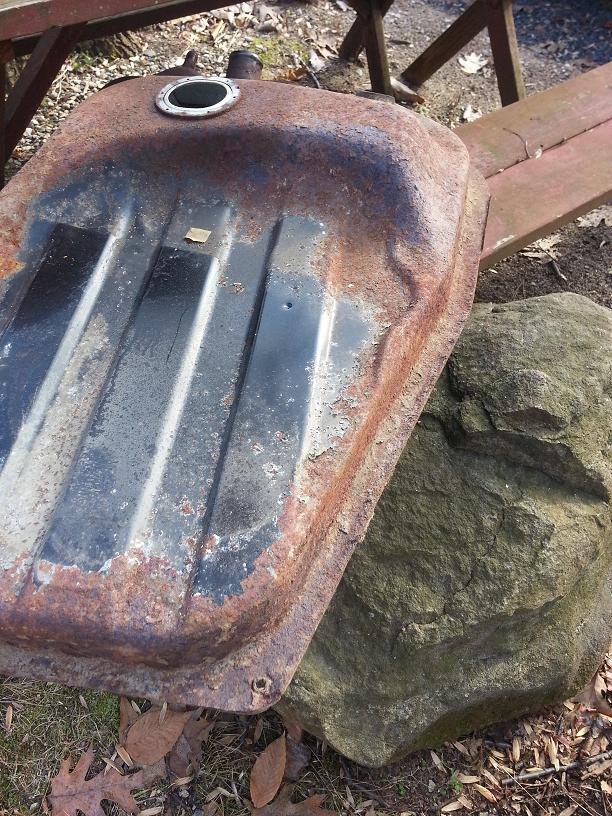
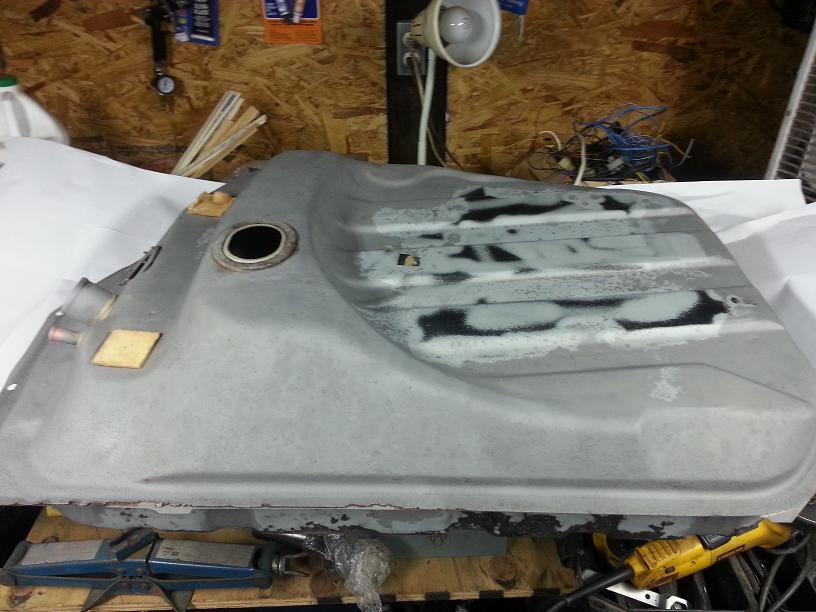
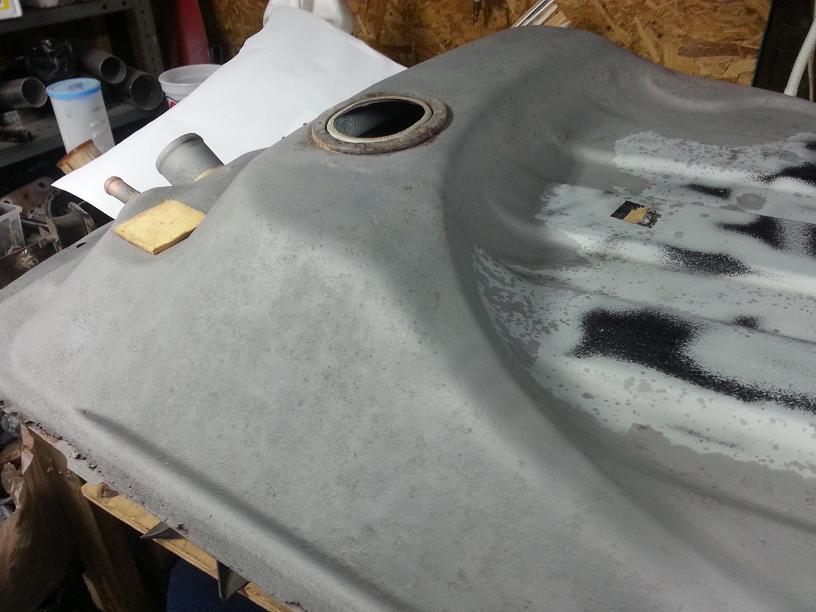
Thread Starter
Joined: Feb 2002
Posts: 8,389
Likes: 120
From: North Jersey
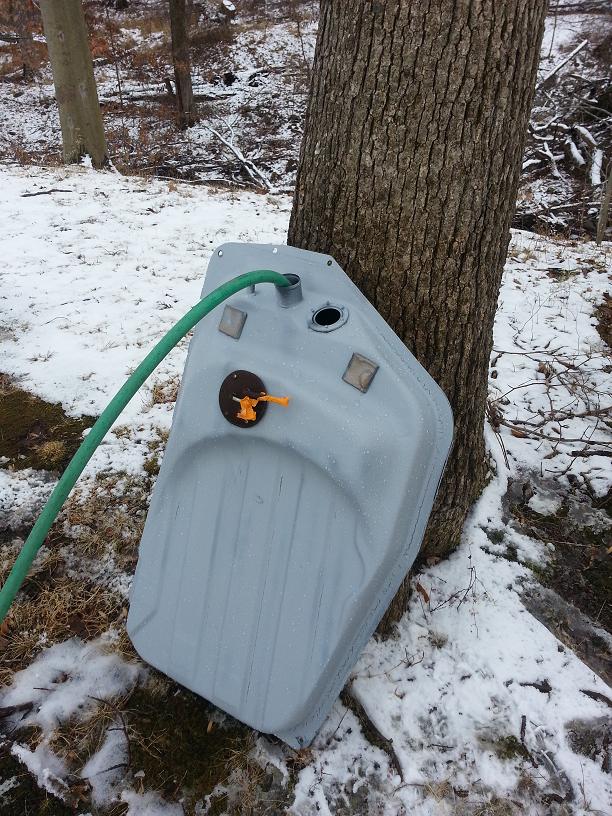
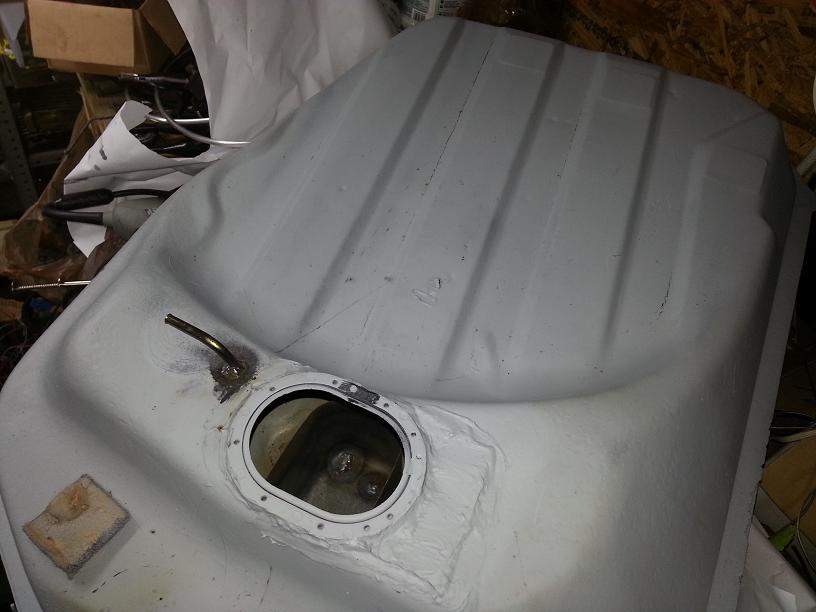
With the tank cleaned out I chopped out the S3 mounting ring and welded the FC slosh baffle and mounting ring on there. This setup has been working flawlessly on my 83 S for many years and it really is the cleanest way to FI a first gen I think. Not pictured is the S4 pump hanger assembly and S5 NA fuel pump ready to install. After welding the ring on I put some Por Patch (basically por15 putty) around the weld to ensure it's leak free (the weld would be anyway, just extra precaution). I still have to undercoat the whole thing and do some minor thread repair on a few of the holes for the fuel level sensor (screws broke from rust, fun!) but basically this thing is done.
Since FB's (the carb'd ones anyway) have a 1/4" fuel return line you need to replace it with a 5/16" (or bigger if you really want) line to match the FC system. Since 5/16" is what the FC uses i just keep things simple and use that - I know some guys go with 3/8".. Whatever. I got a 25' roll of aluminum fuel tubing from Summit and replaced both the feed and return lines on this. Thankfully the brake hard line was basically rust free, but the tank vent one was a mess, so I replaced that as well. No pics, but I mounted the fuel filter (FC unit) using the FC bracket up near where the steering box used to go, that's where the FC's have them so I figured it's a good spot

Since FB's (the carb'd ones anyway) have a 1/4" fuel return line you need to replace it with a 5/16" (or bigger if you really want) line to match the FC system. Since 5/16" is what the FC uses i just keep things simple and use that - I know some guys go with 3/8".. Whatever. I got a 25' roll of aluminum fuel tubing from Summit and replaced both the feed and return lines on this. Thankfully the brake hard line was basically rust free, but the tank vent one was a mess, so I replaced that as well. No pics, but I mounted the fuel filter (FC unit) using the FC bracket up near where the steering box used to go, that's where the FC's have them so I figured it's a good spot
Thread Starter
Joined: Feb 2002
Posts: 8,389
Likes: 120
From: North Jersey
Sorry to triple post, but I have a lot to type lol, didn't want each post to get out of hand.
Anyway, the wiring and fuel systems are almost done, so it won't be long now. I actually abandoned my original plan of rebuilding a NA S5 engine I've had sitting around for years. I'm trying to get this thing done quickly and honestly that engine needed a full rebuild, all seals etc which is over $1000 just for the rebuild kit, and that's using aftermarket gaskets, atkins seals instead of Mazda etc (which isn't a bad thing) not to mention having to clean everything etc etc. Honestly at this point I just don't feel like investing the time. So I posted a WTB ad and sure enough Kevin Landers (RotaryResurrection) had a NA S5 that he had rebuilt 2 years ago, sold to a guy who used it for 8000 miles and then sold back to Kevin to help fund a T2 swap. It's completely drop in/turn key with all manifolds/wiring etc on there. To make things even sweeter Kevin bought a bunch of the parts from my old engine as a "core" charge. It worked out to be less than what I was going to pay for just the rebuild parts, and comes from a reputable builder. Win win in my book. It's currently on a pallet in the back of some truck on the way to my house. Can't wait for it to get here
That's all good news, the minor bad news (more of a pain in the *** than anything else) is the rear end. My plan from the start was to simply swap GSL-SE axles and brakes onto the GSL axle that was already swapped into the car. It has the large driveshaft flange, and I figured it was likely to be a 84/85 axle housing. Those who know FB's will know where this is going.... It's that bastard 83 rear end! The large driveshaft flange with the damn small axles. Needless to say I was a bit annoyed when I pulled the axles out...
Thankfully I have another GSL rear end, an 85 large bearing one, but the catch is.... it's in my blue FB lol ("pandafb") Rather than spend time and money (I've already blown my budget on this car badly) trying to find another big axle rear I'm just going to swap them between the two cars. The Blue FB is kinda in limbo right now anyway (I'll post more on that in my other thread soon) and is still using the 4x110 wheels and brakes etc so it'll work out fine.
Annoying? Yes. End of the world? No, not really.
That's about it for now, I'm slowly chipping away at other misc things this car needs, like making heat shields (it has none on there, that's no good) and installing an old RB muffler etc. I'm hopeful that this car will be in running condition within the next 2-3 weeks, but we'll see how that goes.
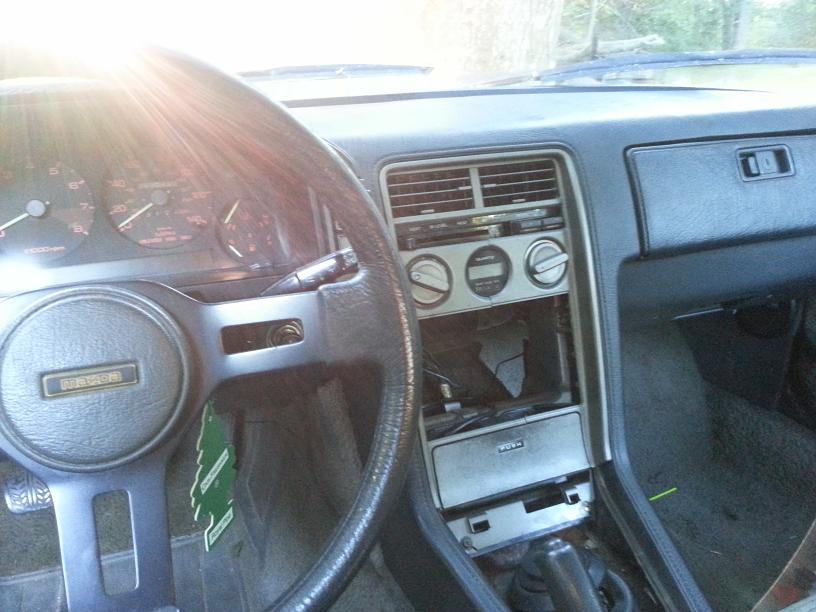
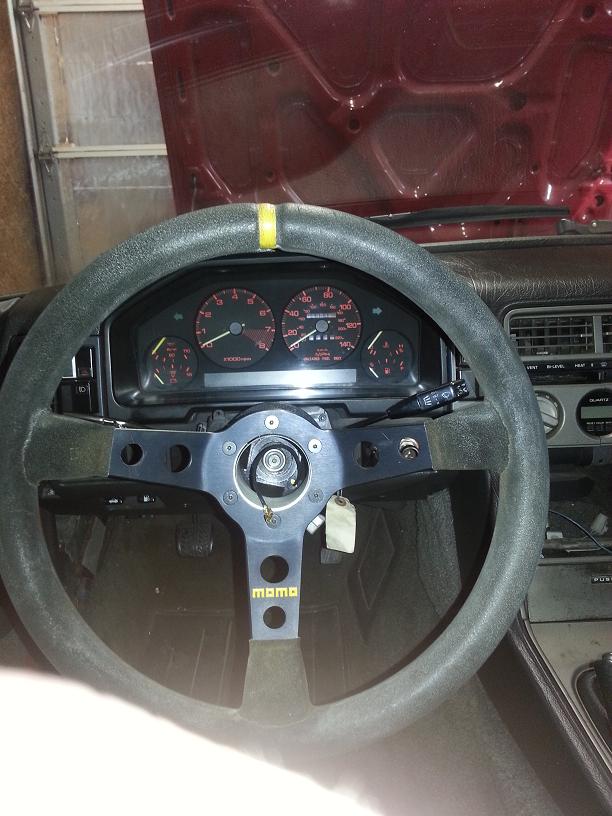
And to close, for no reason whatsoever, a pic of the Momo wheel (70mm dish) and 80mm ebay spacer that I put on there to fit my 6'-3"-ness into it.

Anyway, the wiring and fuel systems are almost done, so it won't be long now. I actually abandoned my original plan of rebuilding a NA S5 engine I've had sitting around for years. I'm trying to get this thing done quickly and honestly that engine needed a full rebuild, all seals etc which is over $1000 just for the rebuild kit, and that's using aftermarket gaskets, atkins seals instead of Mazda etc (which isn't a bad thing) not to mention having to clean everything etc etc. Honestly at this point I just don't feel like investing the time. So I posted a WTB ad and sure enough Kevin Landers (RotaryResurrection) had a NA S5 that he had rebuilt 2 years ago, sold to a guy who used it for 8000 miles and then sold back to Kevin to help fund a T2 swap. It's completely drop in/turn key with all manifolds/wiring etc on there. To make things even sweeter Kevin bought a bunch of the parts from my old engine as a "core" charge. It worked out to be less than what I was going to pay for just the rebuild parts, and comes from a reputable builder. Win win in my book. It's currently on a pallet in the back of some truck on the way to my house. Can't wait for it to get here
That's all good news, the minor bad news (more of a pain in the *** than anything else) is the rear end. My plan from the start was to simply swap GSL-SE axles and brakes onto the GSL axle that was already swapped into the car. It has the large driveshaft flange, and I figured it was likely to be a 84/85 axle housing. Those who know FB's will know where this is going.... It's that bastard 83 rear end! The large driveshaft flange with the damn small axles. Needless to say I was a bit annoyed when I pulled the axles out...
Thankfully I have another GSL rear end, an 85 large bearing one, but the catch is.... it's in my blue FB lol ("pandafb") Rather than spend time and money (I've already blown my budget on this car badly) trying to find another big axle rear I'm just going to swap them between the two cars. The Blue FB is kinda in limbo right now anyway (I'll post more on that in my other thread soon) and is still using the 4x110 wheels and brakes etc so it'll work out fine.
Annoying? Yes. End of the world? No, not really.
That's about it for now, I'm slowly chipping away at other misc things this car needs, like making heat shields (it has none on there, that's no good) and installing an old RB muffler etc. I'm hopeful that this car will be in running condition within the next 2-3 weeks, but we'll see how that goes.
And to close, for no reason whatsoever, a pic of the Momo wheel (70mm dish) and 80mm ebay spacer that I put on there to fit my 6'-3"-ness into it.