85 gsl
 03-28-12, 02:00 AM
#51
Senior Member
Thread Starter
Join Date: May 2009
Location: troy
Posts: 446
Likes: 0
Received 0 Likes
on
0 Posts
pulled the seats out today to clean the carpet and some other random stuff

removed the old sticker

swapped out the roof release for one with the safety latch

new visors and head liner

what the original head liner looks like


quarter glass out of the junkyard

got all the stains out, hooked the wires back up to the bins and found all the screws ad mounted all the bins in like they should be. fixed my rear marker light and drove the hell out of it lol
removed the old sticker
swapped out the roof release for one with the safety latch
new visors and head liner
what the original head liner looks like
quarter glass out of the junkyard
got all the stains out, hooked the wires back up to the bins and found all the screws ad mounted all the bins in like they should be. fixed my rear marker light and drove the hell out of it lol
 03-28-12, 11:56 PM
#52
Senior Member
Thread Starter
Join Date: May 2009
Location: troy
Posts: 446
Likes: 0
Received 0 Likes
on
0 Posts
pulled the old head liner out today and installed the new one. also installed the original rear window spray nozzle so i don't have tape on the paint and no leaks lol
head liner out


cleaned the glue from the tape off

spray nozzle

capped off the end so it wont leak water into the head liner

installed

i was tired of having the hatch wires hanging down and the defrost doest work so instead of cutting the wires i taped off the ends and tucked them into the trim pieces where they fit nicely.. both sides done


this is the hose that connected to the old spray nozzle that was laying in the head liner leaking... now eliminated

pics tomorrow of the new liner and visors enjoy
head liner out
cleaned the glue from the tape off
spray nozzle
capped off the end so it wont leak water into the head liner
installed
i was tired of having the hatch wires hanging down and the defrost doest work so instead of cutting the wires i taped off the ends and tucked them into the trim pieces where they fit nicely.. both sides done
this is the hose that connected to the old spray nozzle that was laying in the head liner leaking... now eliminated
pics tomorrow of the new liner and visors enjoy
03-28-12, 11:58 PM
#53
Senior Member
Thread Starter
Join Date: May 2009
Location: troy
Posts: 446
Likes: 0
Received 0 Likes
on
0 Posts
i might add that all the interior pieces were very easy to take out and re-install and the original clips in great condition with a very firm hold.... i love this car


 04-01-12, 10:38 PM
#55
Senior Member
Thread Starter
Join Date: May 2009
Location: troy
Posts: 446
Likes: 0
Received 0 Likes
on
0 Posts
yesterday before i went off-roading


today after i washed it


car only ended up gaining 3 new scratches and broke the plastic louver up front, but i have another
today after i washed it
car only ended up gaining 3 new scratches and broke the plastic louver up front, but i have another
04-01-12, 10:57 PM
#57
Senior Member
Thread Starter
Join Date: May 2009
Location: troy
Posts: 446
Likes: 0
Received 0 Likes
on
0 Posts
doing some bodywork on Zmzm's rx8.


used ford white touch up paint mixed with a few coats of metalizer and clear coat. looks like it was sprayed in a paint booth. more pics coming soon
used ford white touch up paint mixed with a few coats of metalizer and clear coat. looks like it was sprayed in a paint booth. more pics coming soon


 04-03-12, 11:49 PM
#60
Senior Member
Thread Starter
Join Date: May 2009
Location: troy
Posts: 446
Likes: 0
Received 0 Likes
on
0 Posts
parts shelf

new stereo

e-fan


here is the reason why people break the stereo surround while trying to take it out!...... there are 2 nuts under the adjustment ***** 14mm socket

out

stereo in

back together


new stereo
e-fan
here is the reason why people break the stereo surround while trying to take it out!...... there are 2 nuts under the adjustment ***** 14mm socket
out
stereo in
back together
04-03-12, 11:50 PM
#61
Senior Member
Thread Starter
Join Date: May 2009
Location: troy
Posts: 446
Likes: 0
Received 0 Likes
on
0 Posts
old alt with single pulley

new alt with dual pulley

out with the old

in with the new

just need to get a second alt belt and i'll be good to go. i also replaced the front tires with almost brand new ones, replaced the driver side calliper and the front pads. tomorrow i will be replacing the clutch line with a brand new one :twisted:
new alt with dual pulley
out with the old
in with the new
just need to get a second alt belt and i'll be good to go. i also replaced the front tires with almost brand new ones, replaced the driver side calliper and the front pads. tomorrow i will be replacing the clutch line with a brand new one :twisted:
04-04-12, 12:01 AM
#62
Senior Member
Thread Starter
Join Date: May 2009
Location: troy
Posts: 446
Likes: 0
Received 0 Likes
on
0 Posts
so recently i've been thinking of a cool idea for a custom restoration on an FB. after i finish my new widebody project i all my interior i'm now using will be sitting on a shelf. i really have a soft spot for the sunrise red FB so i thought i would get a second one and just tweak it a bit. the interior will stay completely stock while i slightly tint the windows, install a rear spoiler such as the one loki is using, install black 240 fender flairs. now sense i've seen how the factory plus rims look polished up i love them. i'm going to have a custom set of 15" plus rims made with a little lip on them. i will then finish it off with a cleaned engine bay and painted motor.
how does this sound to you guys?
how does this sound to you guys?
04-05-12, 04:20 AM
#63
Senior Member
Thread Starter
Join Date: May 2009
Location: troy
Posts: 446
Likes: 0
Received 0 Likes
on
0 Posts
took apart and cleaned a clutch slave cylinder i will be putting on tomorrow.
i got a brand new line out of the junkyard in columbus the other day.

it's a little bigger than the stock line

cleaned and taped off to be painted

this is the paint i used on my rims and rotarykittens callipers.... works very good and very durable

push rod and boot

back together


dry

ready to go

just to see what it would look like i re-painted the black on the plate

install pics tomorrow
i got a brand new line out of the junkyard in columbus the other day.
it's a little bigger than the stock line
cleaned and taped off to be painted
this is the paint i used on my rims and rotarykittens callipers.... works very good and very durable
push rod and boot
back together
dry
ready to go
just to see what it would look like i re-painted the black on the plate
install pics tomorrow
04-07-12, 05:16 PM
#66
Senior Member
Thread Starter
Join Date: May 2009
Location: troy
Posts: 446
Likes: 0
Received 0 Likes
on
0 Posts
sense it's a really nice day out i decided to work on the car some today. i'm installing the e-fan, a thermostat for the fan, modifying an ebay strut brace to fit, and eliminating a few things.
the start

clutch fan and shroud out


radiator panel off so i can get to the rest of the a/c stuff

finally out


i'm currently waiting to go get a few bolts, nuts and washers so i can bolt the water pump pulley back on and get the strut bar mounted. i'm also going to start painting a few engine bay pieces even tho i'll be pulling everything apart in about 3 weeks to clean and paint the motor.
the start
clutch fan and shroud out
radiator panel off so i can get to the rest of the a/c stuff
finally out
i'm currently waiting to go get a few bolts, nuts and washers so i can bolt the water pump pulley back on and get the strut bar mounted. i'm also going to start painting a few engine bay pieces even tho i'll be pulling everything apart in about 3 weeks to clean and paint the motor.
04-08-12, 08:48 PM
#67
Senior Member
Thread Starter
Join Date: May 2009
Location: troy
Posts: 446
Likes: 0
Received 0 Likes
on
0 Posts
cleaned

primer

paint

officially OHR branded lol

grinding the mounts to fit

all back together

lower pulley gone, strut bar in and e-fan installed
works like a charm

tried to hide wires as good as i could to stay clean

primer
paint
officially OHR branded lol
grinding the mounts to fit
all back together
lower pulley gone, strut bar in and e-fan installed
works like a charm
tried to hide wires as good as i could to stay clean
04-10-12, 06:53 PM
#68
Senior Member
Thread Starter
Join Date: May 2009
Location: troy
Posts: 446
Likes: 0
Received 0 Likes
on
0 Posts
car is only running on one rotor right now. i'm pretty sure it's my plugs and wires because i've got about 110psi on a 200k motor...... which is amazing i might add lol
04-14-12, 11:59 PM
#70
Senior Member
Thread Starter
Join Date: May 2009
Location: troy
Posts: 446
Likes: 0
Received 0 Likes
on
0 Posts
well i got bored the other day and worked on the car a bit. i changed the spark plugs, stripped and relocated the wiring harness.
got tired of seeing unused wires

staring to strip the harness

all wires on the left side will be deleted

not done, but better

harness originally ran between the carb and water pump inlet

the harness was long enough to run behind the carb along the fire wall

original slave cylinder next o rebuild slave

the culprit

nobody was here to help so i ran this as to not spill or run out or fluid lmao

relocated the charcoal canister

didn't even have to drill any holes lol.
got tired of seeing unused wires
staring to strip the harness
all wires on the left side will be deleted
not done, but better
harness originally ran between the carb and water pump inlet
the harness was long enough to run behind the carb along the fire wall
original slave cylinder next o rebuild slave
the culprit
nobody was here to help so i ran this as to not spill or run out or fluid lmao
relocated the charcoal canister
didn't even have to drill any holes lol.
04-15-12, 06:54 PM
#71
Senior Member
Thread Starter
Join Date: May 2009
Location: troy
Posts: 446
Likes: 0
Received 0 Likes
on
0 Posts
changed the coolant, thermostat, gasket and added Bar's Leak into the system. i decided to drill a hole in the new thermostat about 11/32 and the car runs about 1/8 cooler constantly. very happy with the temp level being lower along with a good working e-fan new plugs and a fresh oil change the car drives very good. it's always been fun to drive, but now it is a pleasure to drive. the new plug wires will be in soon along with a new intake gasket and 20mm freeze plugs for the install of the side draft intake setup....... whenever i can get a carb for it lol.
04-16-12, 10:20 PM
#72
Senior Member
Thread Starter
Join Date: May 2009
Location: troy
Posts: 446
Likes: 0
Received 0 Likes
on
0 Posts
did some wiring on the car today. luckily i cut the harness out for the stereo from the junkyard 7 for my car due to the moron who owned the car last cut everything up for a cd player. wasn't to bad.... thank god i know how to wire lol. everything works great and come to find out i have a new speaker and my equalizer is awesome lol. i also replaced the light bulbs for the heater controls so everything is all coming together. i'm running out of things to do.
after i cut out the cd player harness

all back to stock

all harness

horrible pic of the lights.... looks better in person trust me

after i cut out the cd player harness
all back to stock
all harness
horrible pic of the lights.... looks better in person trust me
05-09-12, 06:29 PM
#74
Senior Member
Thread Starter
Join Date: May 2009
Location: troy
Posts: 446
Likes: 0
Received 0 Likes
on
0 Posts
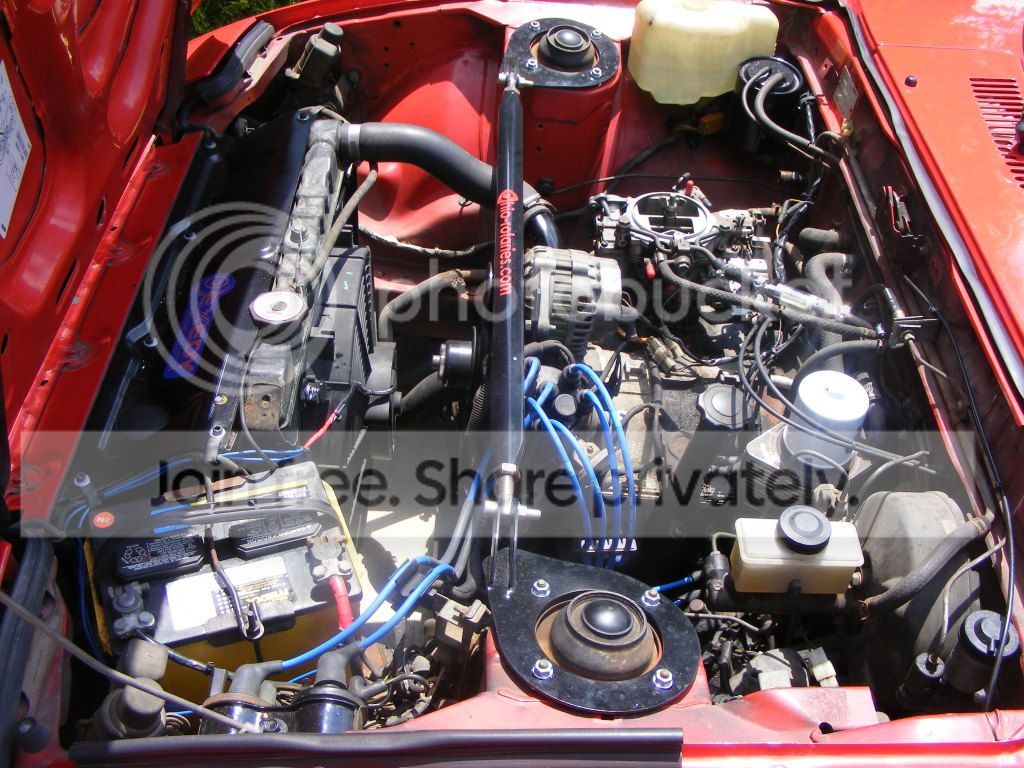
the engine bay as it sits.
been a few months rims are holding up nicely

my new NEVER opened rear tail light reflector from 1981

newspaper that came with it

on the car


pic from a month ago

been a few months rims are holding up nicely
my new NEVER opened rear tail light reflector from 1981
newspaper that came with it
on the car
pic from a month ago