
84 12a bridgeport drift car

The control arms were extended 2". This helps by allowing you to maintain grip in a corner. As you turn the wheel, the camber changes drastically. Literally standind the tire up on the edge. Giving it negative camber allows the tire to ride flatter as the wheel is turned giving more grip because the tire is standing up straight. It also changed the castor quite a bit giving me a lot more positive castor and making it so much easier to steer. It literally felt like I have power steering. It was so light, making transitions so smooth.

Thread Starter
Full Member
Joined: Oct 2012
Posts: 56
Likes: 2
From: Dousman, WI
locked timing is kind of nice because you can just set the timing to like 18BTDC and be done. however if you actually go tune the thing, i think you'd find that it wants a timing curve, although not necessarily the stock one.
for the rev limiter, you need to be a little careful, if you're going to hit it once in a while, its fine to do anything, but if you are going to hit it for long periods of time, it is often better to not have one. the stop/start of the rev limiter can cause huge catastrophic damage. this is an engine that decided it didn't like the 8250rpm limiter FC3S Pro v2.0:  K2RD HOF
cutting the trailing plugs only might actually be a good idea though, instead of scattering the engine, you'd just get a drop in power.
Don't block the vacuum nipples on the dizzy. Leave them open to atmosphere. Why you ask? I'll answer by asking you a series of questions.
Do you like to drive up and down a lot of hills? What happens when you have an air chamber that is connected to your pickups in the dizzy and referenced to the outside air pressure on one side of a diaphram, but the other side is blocked off like you were thinking about doing? Now tell me how many degrees your timing will "drift" and at what altitude? Think about it and get back to me.
Do you like to drive up and down a lot of hills? What happens when you have an air chamber that is connected to your pickups in the dizzy and referenced to the outside air pressure on one side of a diaphram, but the other side is blocked off like you were thinking about doing? Now tell me how many degrees your timing will "drift" and at what altitude? Think about it and get back to me.
Thread Starter
Full Member
Joined: Oct 2012
Posts: 56
Likes: 2
From: Dousman, WI
The control arms were extended 2". This helps by allowing you to maintain grip in a corner. As you turn the wheel, the camber changes drastically. Literally standind the tire up on the edge. Giving it negative camber allows the tire to ride flatter as the wheel is turned giving more grip because the tire is standing up straight. It also changed the castor quite a bit giving me a lot more positive castor and making it so much easier to steer. It literally felt like I have power steering. It was so light, making transitions so smooth.


Joined: Mar 2001
Posts: 31,849
Likes: 3,238
From: https://www2.mazda.com/en/100th/
I'm not sure I follow the logic that it would be better not to have a rev limiter than to run into one... Is this some rotary specific tip that I am unaware of? I would think I'd rather hit a limiter than risk over revving. That engine failure is impressive but I have a hard time believing that the rev limiter was the sole cause of that failure, not due to somethign else. A rev limiter shouldnt cause extra stress on the engine that I am aware of from the start/stop action on the ignition... Care to elaborate on the reasoning? I dont want to have an issue if I can learn something else to do instead. I was just thinking that limiting the leading only could cause serious problems so I was better of the stagger the approach and cut trailing plugs first and then limit the leading plugs last. Again, total rotary rookie here so I appreciate the input and I'm just trying to undertsand more. Thanks
cutting either the leading or trailing isn't a bad idea though, i'd think as a driver you'd notice a drop in power, and react?
you will have to see which side works, a stock port engine barely needs the trailings, but a high power engine has a more even split.
Not sure how I missed this thread, but just wanted to say I'm really liking the work you're doing. Great fab work and an overall cool vibe to the car. Can't wait to see it all done and sliding!
spoon!
Joined: Sep 2002
Posts: 1,208
Likes: 50
From: Dousman, WI
Ha! Finding someone this local is kinda hilarious. Whereabouts are you? My folks shop is out in Ottawa. We have a few spare 1st gen parts if you need, plus I'm working on some strut options for the 1st gen once we get our testbed / roadrace car back up and running.
... plus the Lotus 7 clone...
... plus the casting...
... ugh, too many projects.
... plus the Lotus 7 clone...
... plus the casting...
... ugh, too many projects.
Thread Starter
Full Member
Joined: Oct 2012
Posts: 56
Likes: 2
From: Dousman, WI
Ha! Finding someone this local is kinda hilarious. Whereabouts are you? My folks shop is out in Ottawa. We have a few spare 1st gen parts if you need, plus I'm working on some strut options for the 1st gen once we get our testbed / roadrace car back up and running.
... plus the Lotus 7 clone...
... plus the casting...
... ugh, too many projects.
... plus the Lotus 7 clone...
... plus the casting...
... ugh, too many projects.
I'd love to see that Lotus 7 clone! Sounds great
Here's the most recent progress on the car. Made a little sheet metal bracket for the ignition coils (and a bracket for that bracket to bolt too haha) and made up a custom spark plug wire set.

As you can see I went with the blaster coil SS from MSD. Should be quite the zap for the leading plugs after the Mallory box gets hooked up to them...
Next up is figuring out/drawing the wiring harness and then ordering stuff to make that. I think I am going to use weather pack connectors for the first time as a buddy has the crimpers he will let me use. Stay tuned
spoon!
Joined: Sep 2002
Posts: 1,208
Likes: 50
From: Dousman, WI
Oh, ok, I know where that is (well, everyone in the area should know Waterville/Piper) My folks shop is over by School Section Lake, ish, though I'm in an apartment in Waukesha. No way to work on stuff out there though.
... it's been so long since I've seen an FB without dual master cylinders, I was confused what that big round thing was, heh.
Hm. I should take some other stuff to PM; that just gave me an idea.
... it's been so long since I've seen an FB without dual master cylinders, I was confused what that big round thing was, heh.
Hm. I should take some other stuff to PM; that just gave me an idea.
Thread Starter
Full Member
Joined: Oct 2012
Posts: 56
Likes: 2
From: Dousman, WI
Fresh Paint
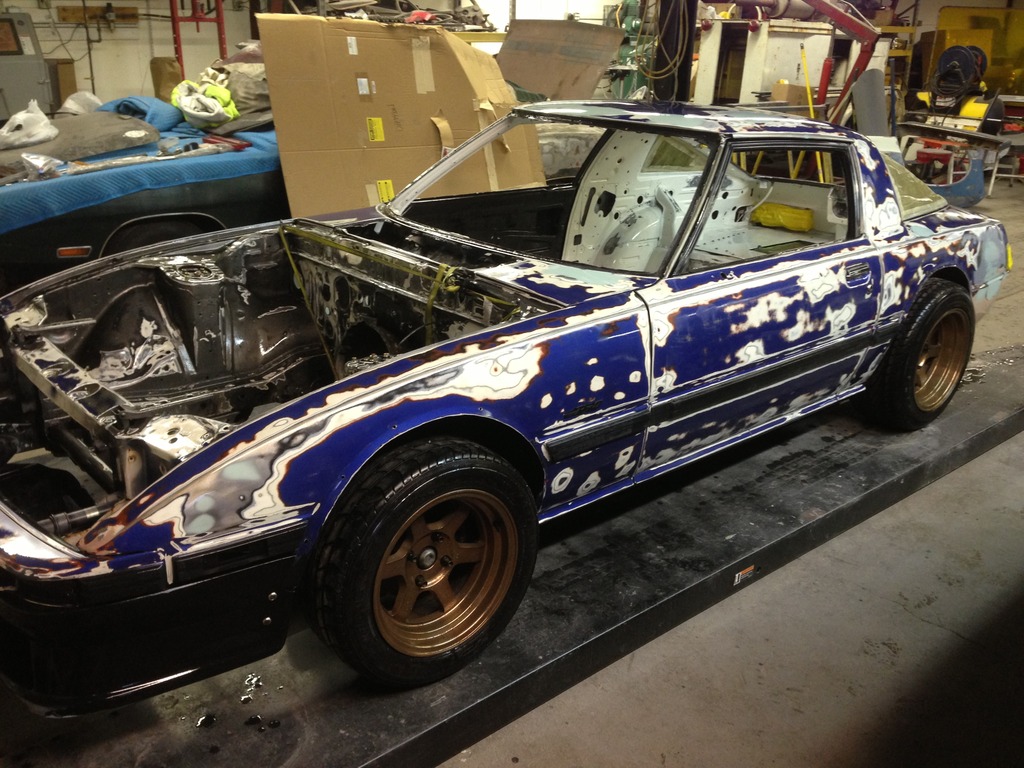
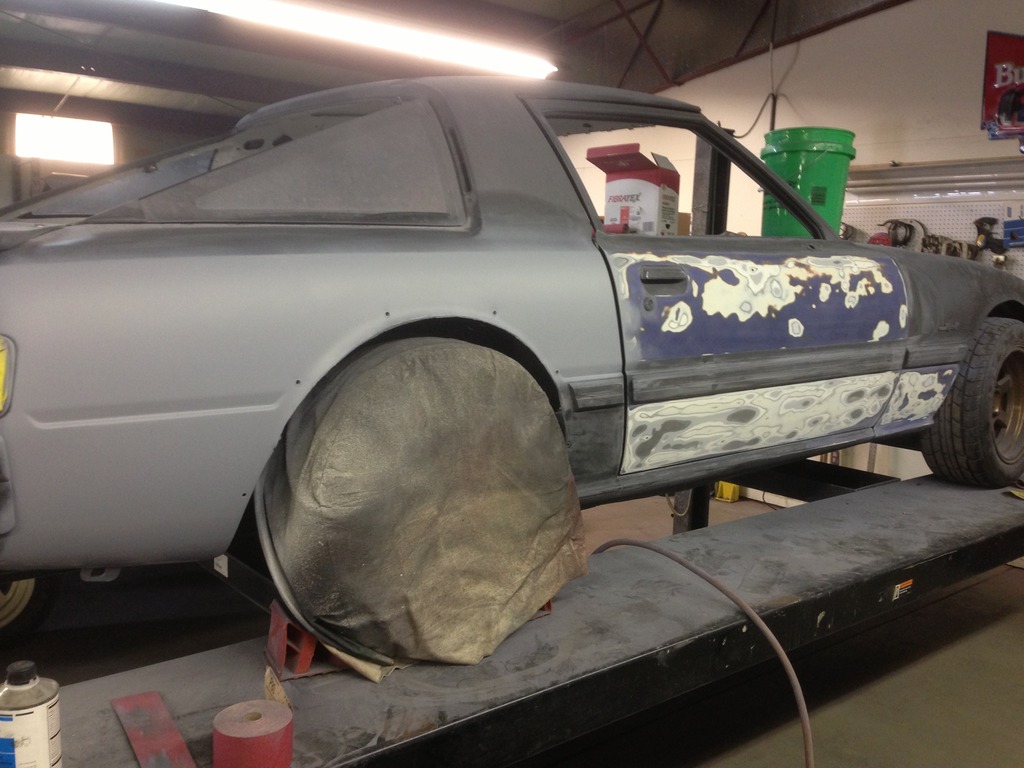
After watching my crappy rattle can paint job flaking off while I assembled the engine bay of the car I decided it was time to get a paint job worthy of the time I've spent on this car. So I took a few steps backwards and stripped the whole car down and sent it off to a friends body shop.
Few progress pics:
Blocking 4 layers of paint
Shaved the corner signals and took off the rear molding trim to help the flares 'pop' a little more
Kept with the same color scheme just executed alot better this time:
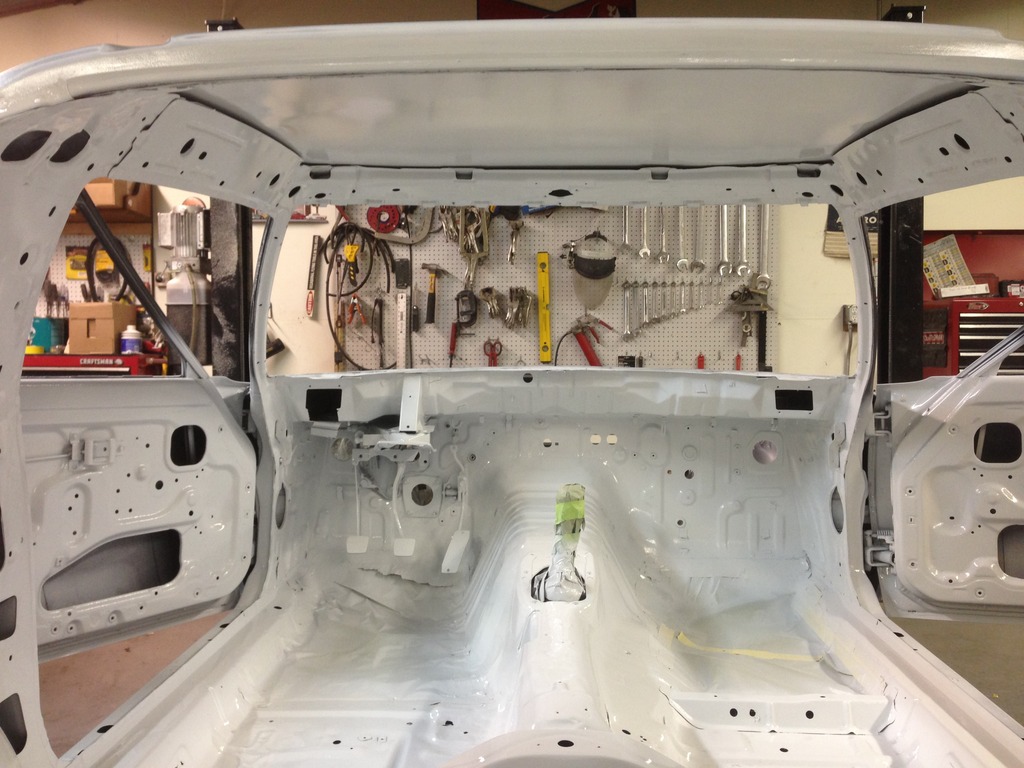
Gloss white on the inside

And the epoxy satin black on the outside with gloss back flares

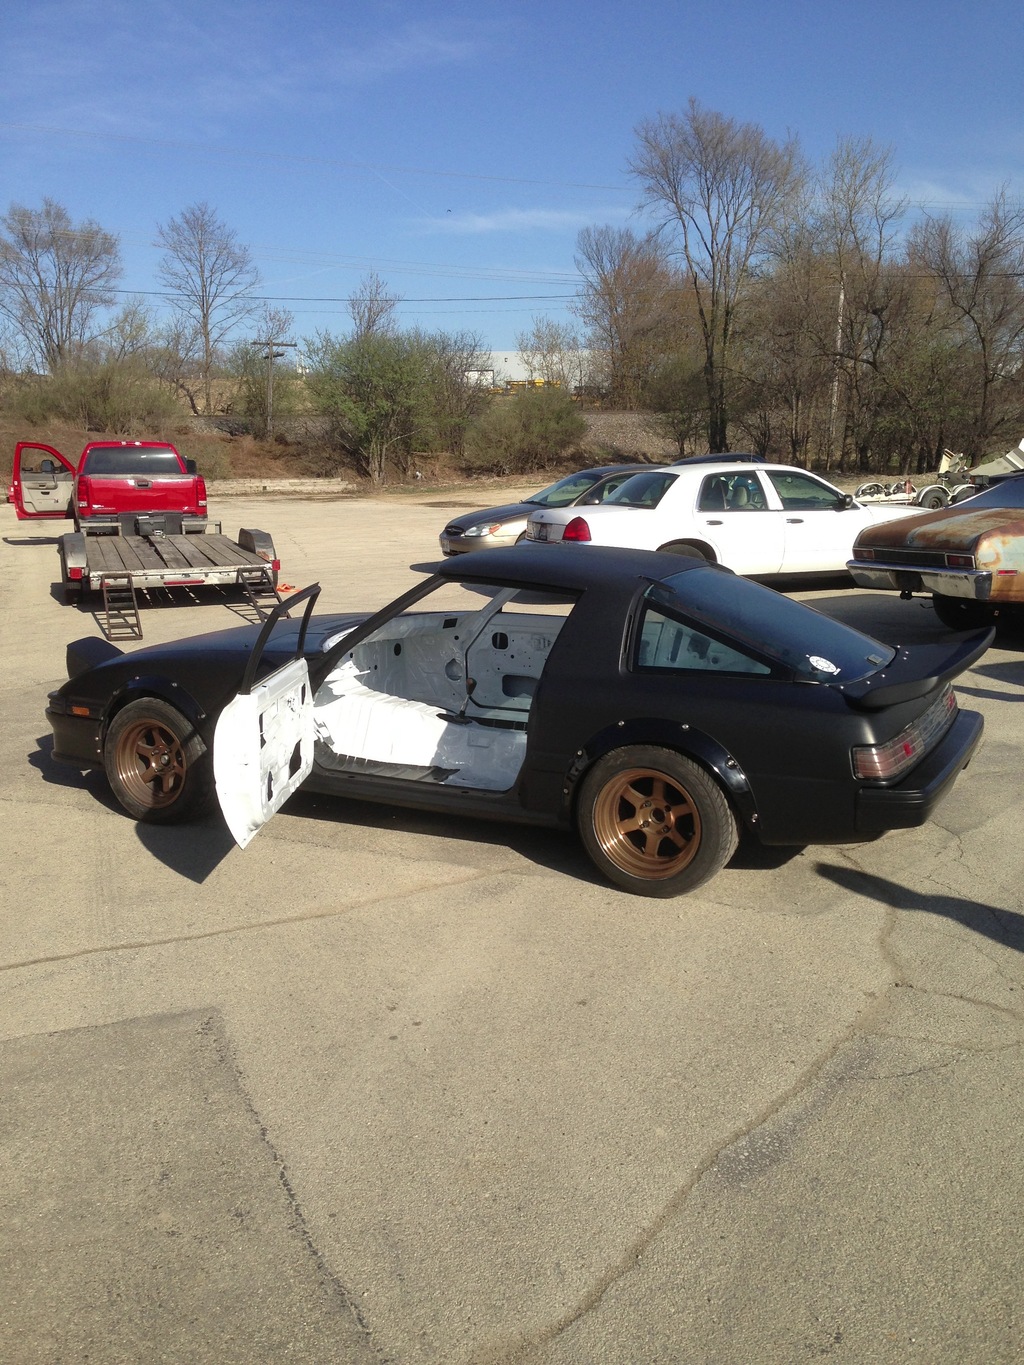
Now its back home and starting to put everything back together
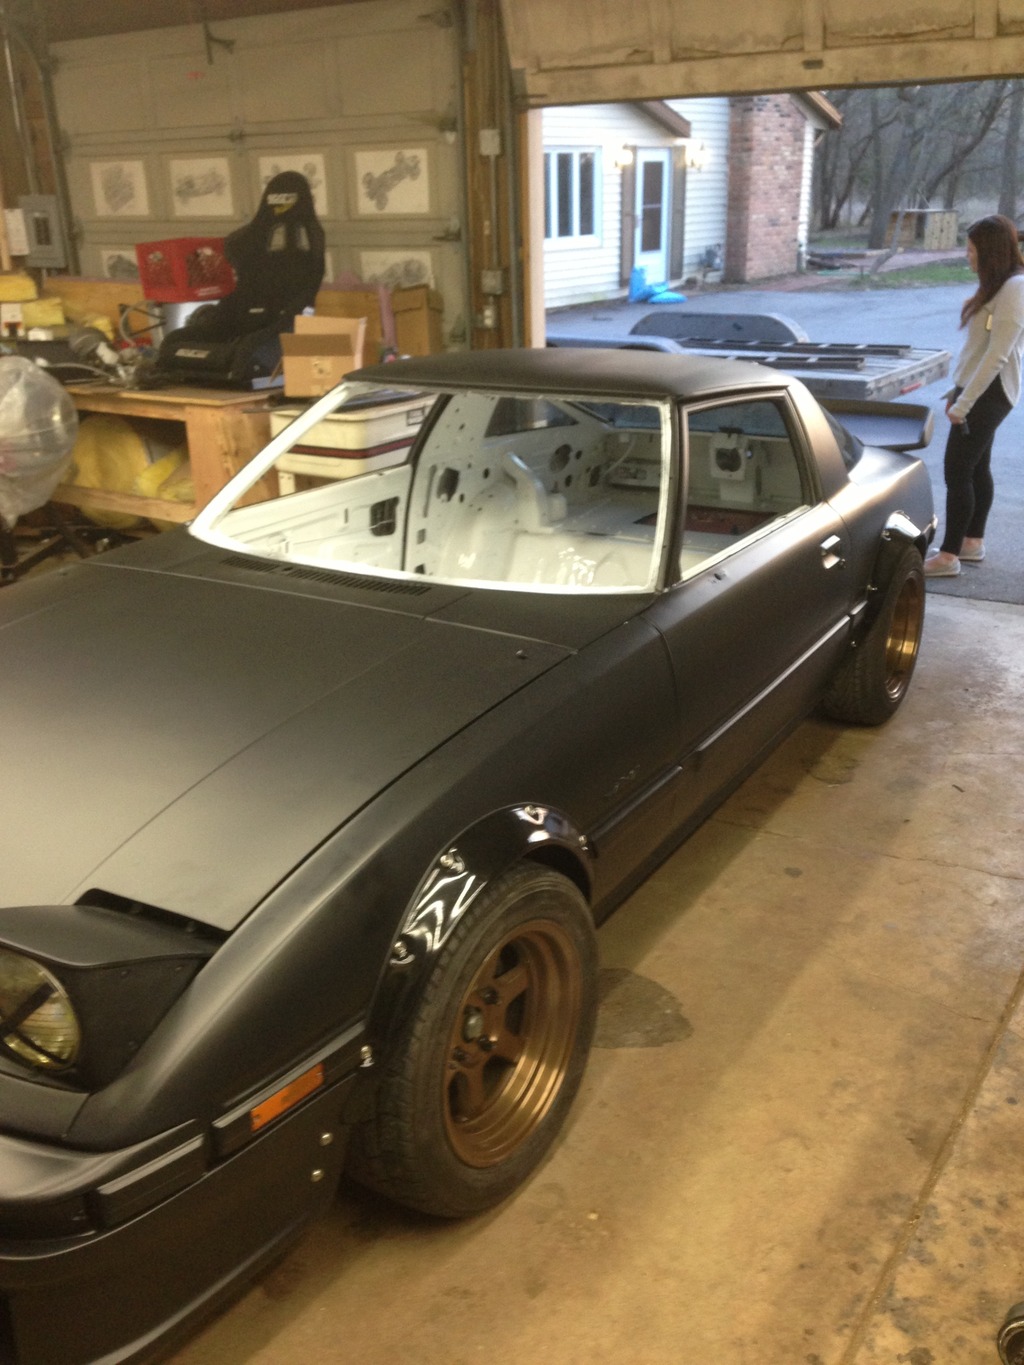
I'll be working on it quite a bit over the next few weeks to try and push through everything and get it running. Updates soon
Few progress pics:
Blocking 4 layers of paint

Shaved the corner signals and took off the rear molding trim to help the flares 'pop' a little more

Kept with the same color scheme just executed alot better this time:
Gloss white on the inside


And the epoxy satin black on the outside with gloss back flares


Now its back home and starting to put everything back together

I'll be working on it quite a bit over the next few weeks to try and push through everything and get it running. Updates soon


Thread Starter
Full Member
Joined: Oct 2012
Posts: 56
Likes: 2
From: Dousman, WI
Thanks again for the steering column, got that one rebuilt (matched the steering column to my old gear box) and painted it so it should make it's way into the car shortly.
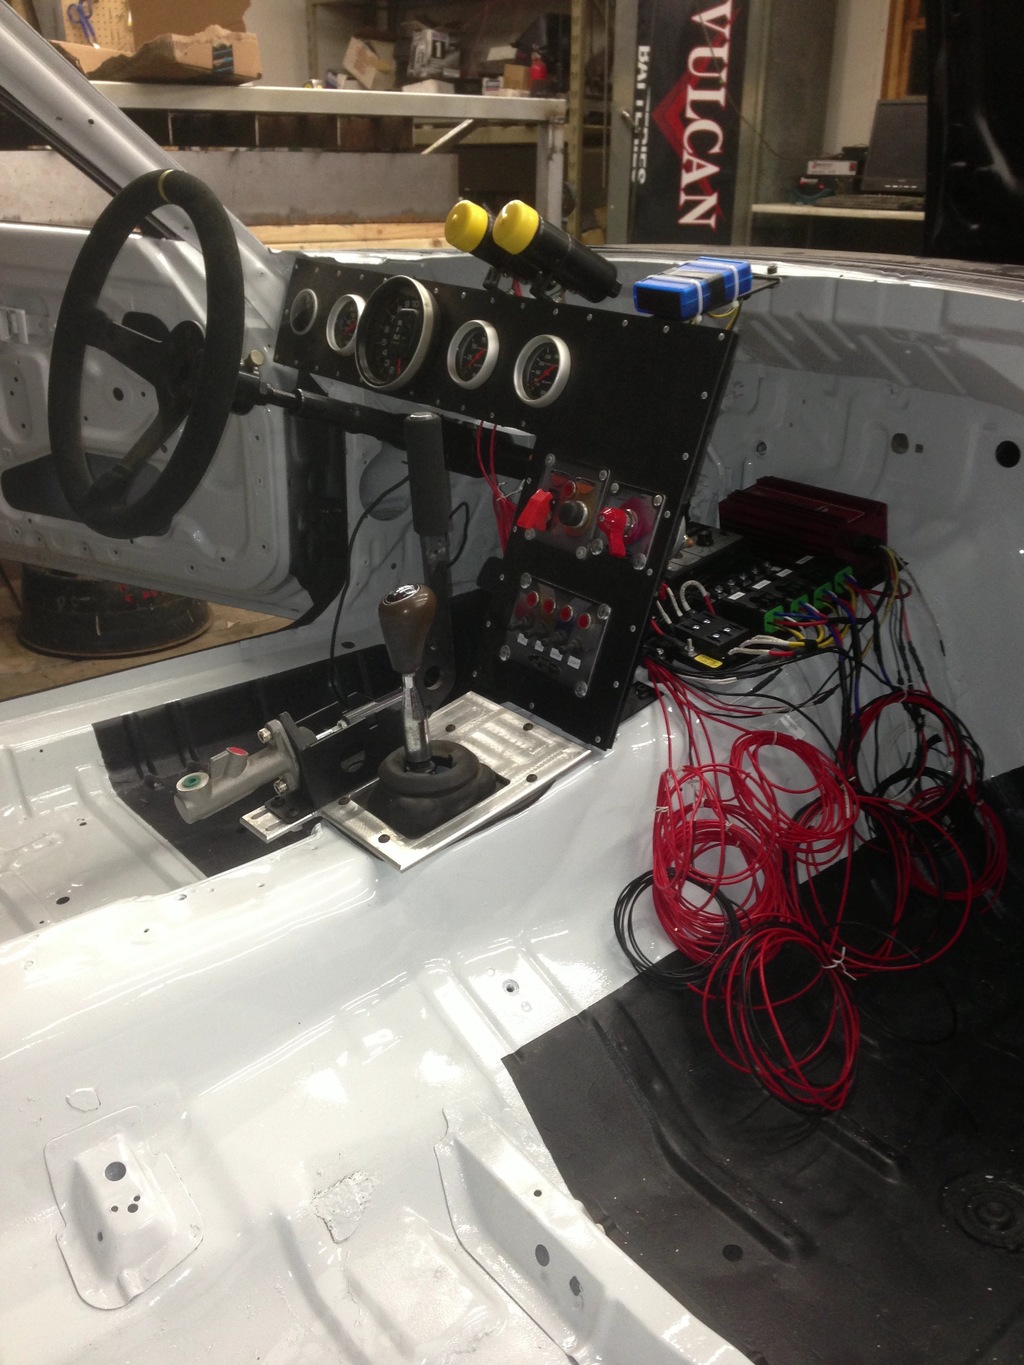
Been working on the wiring, built a main wiring panel and have it mocked up behind the dash so I can start hooking things up. Relays, ignition and positive busses are working, still have to route accesory power and grounds but its a start


Thread Starter
Full Member
Joined: Oct 2012
Posts: 56
Likes: 2
From: Dousman, WI
Almost done with the wiring, fixed a few mistakes I found when I misread the relay instructions and wired the wrong pin out.... 
One question I need help with please:
Here's a diagram of the alternator wiring
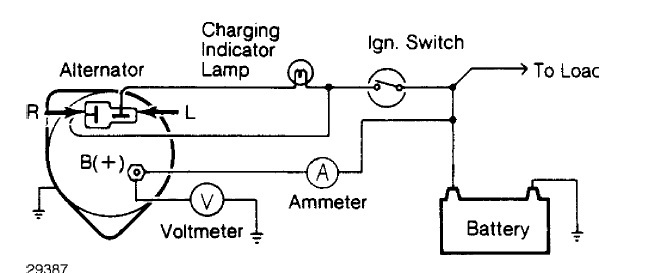
I have a wire off ignition 12V power to serve as the exciter circuit for pin "R". Does "L" need to be wired at all? I'm not using a ammeter or charging indicator so I think I just need the main battery feed and the 12V exciter circuit. Am I reading that correctly?
Thread Starter
Full Member
Joined: Oct 2012
Posts: 56
Likes: 2
From: Dousman, WI
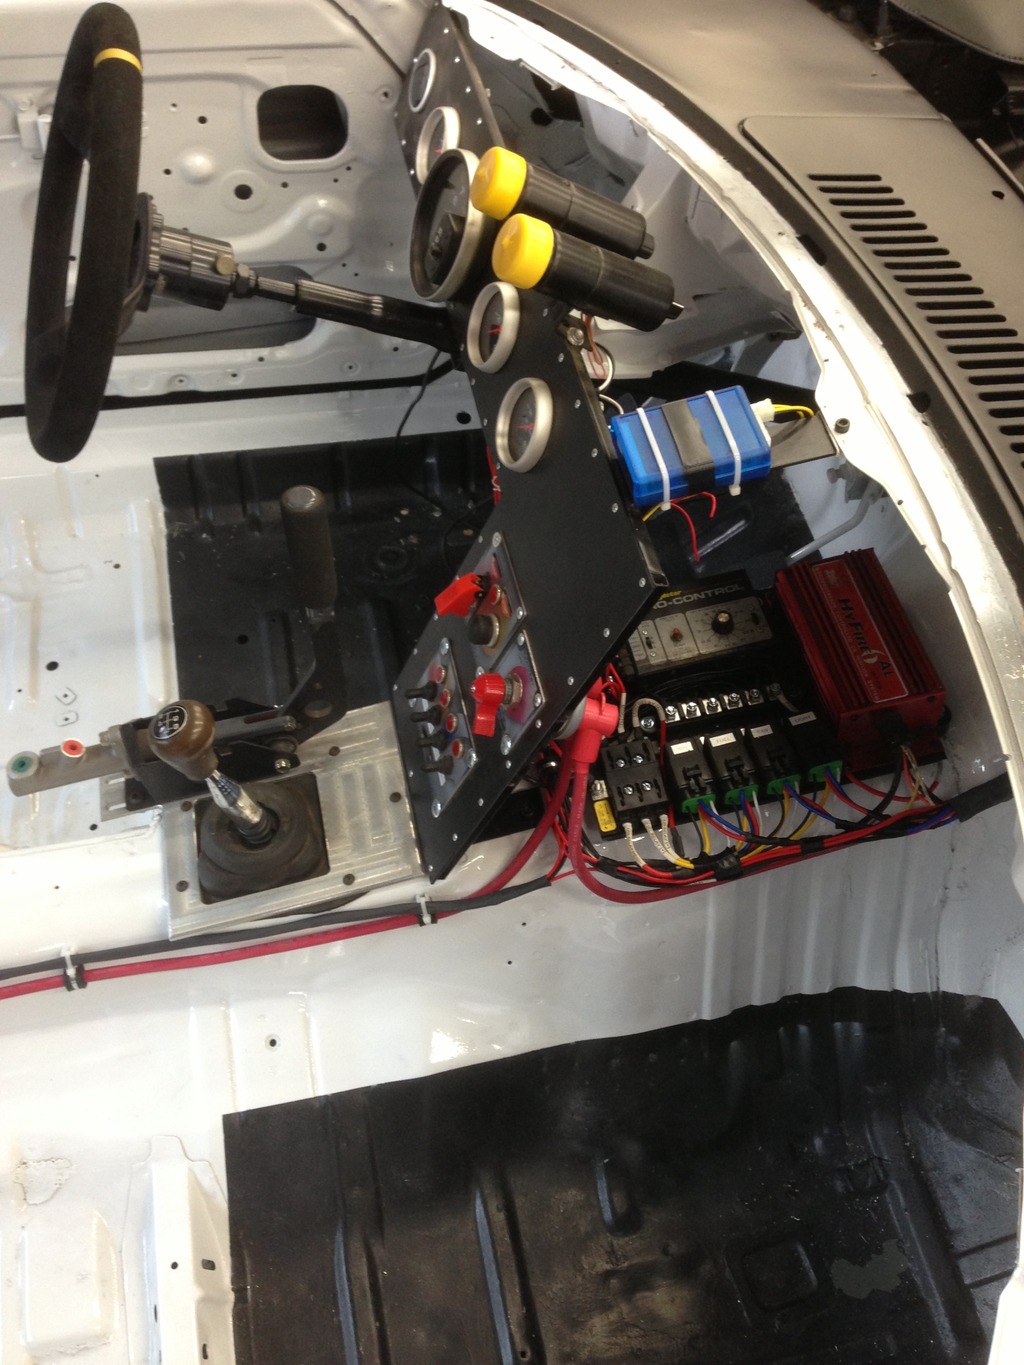
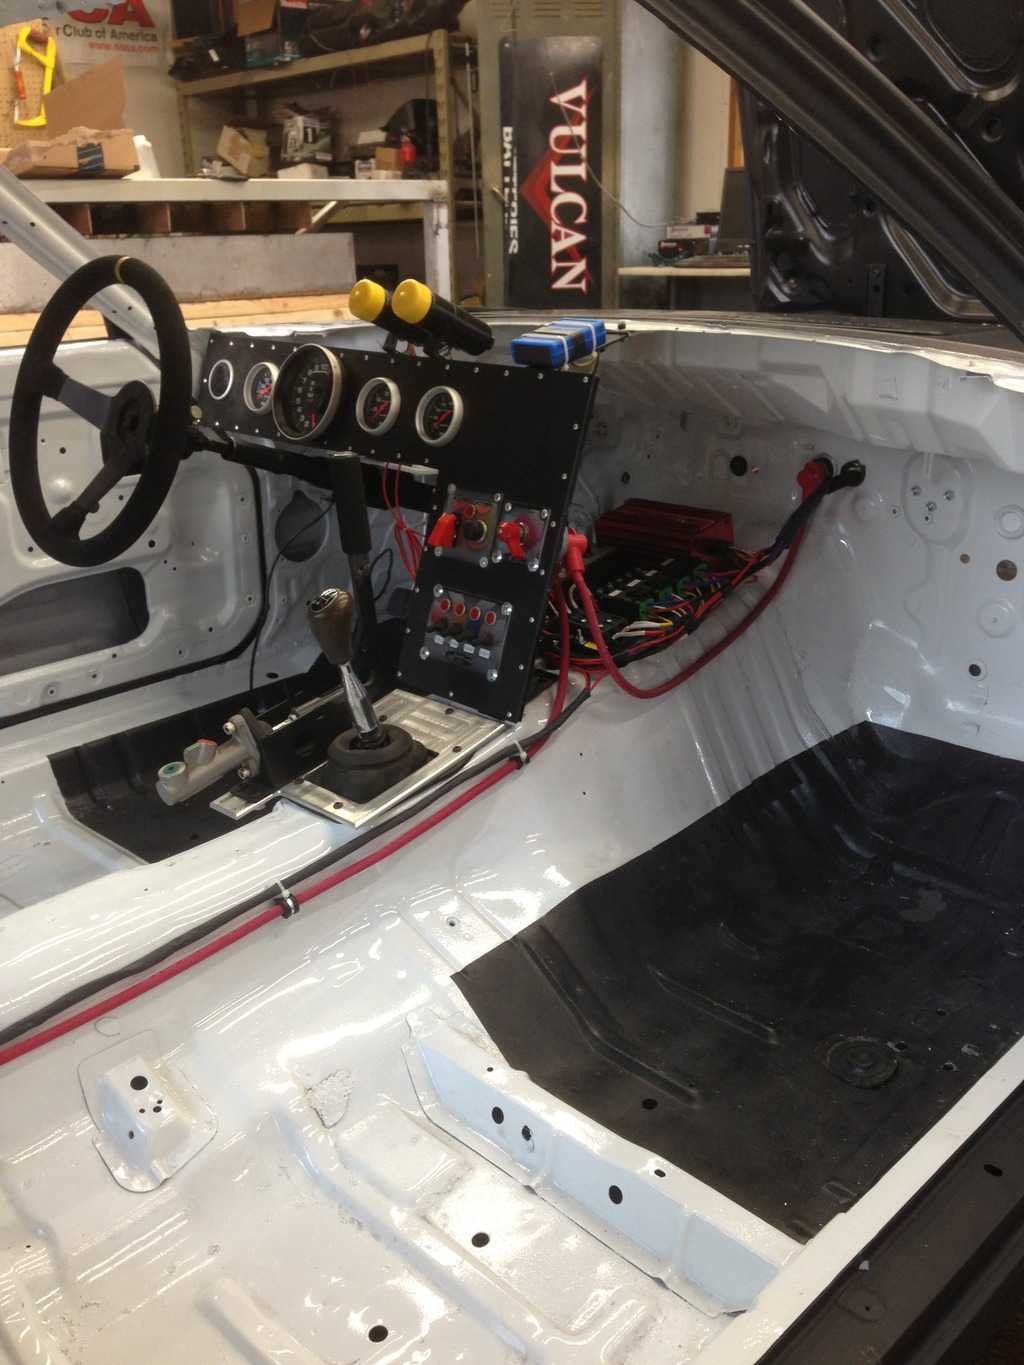
Wiring progress
Finished wiring the dash and electrical panel
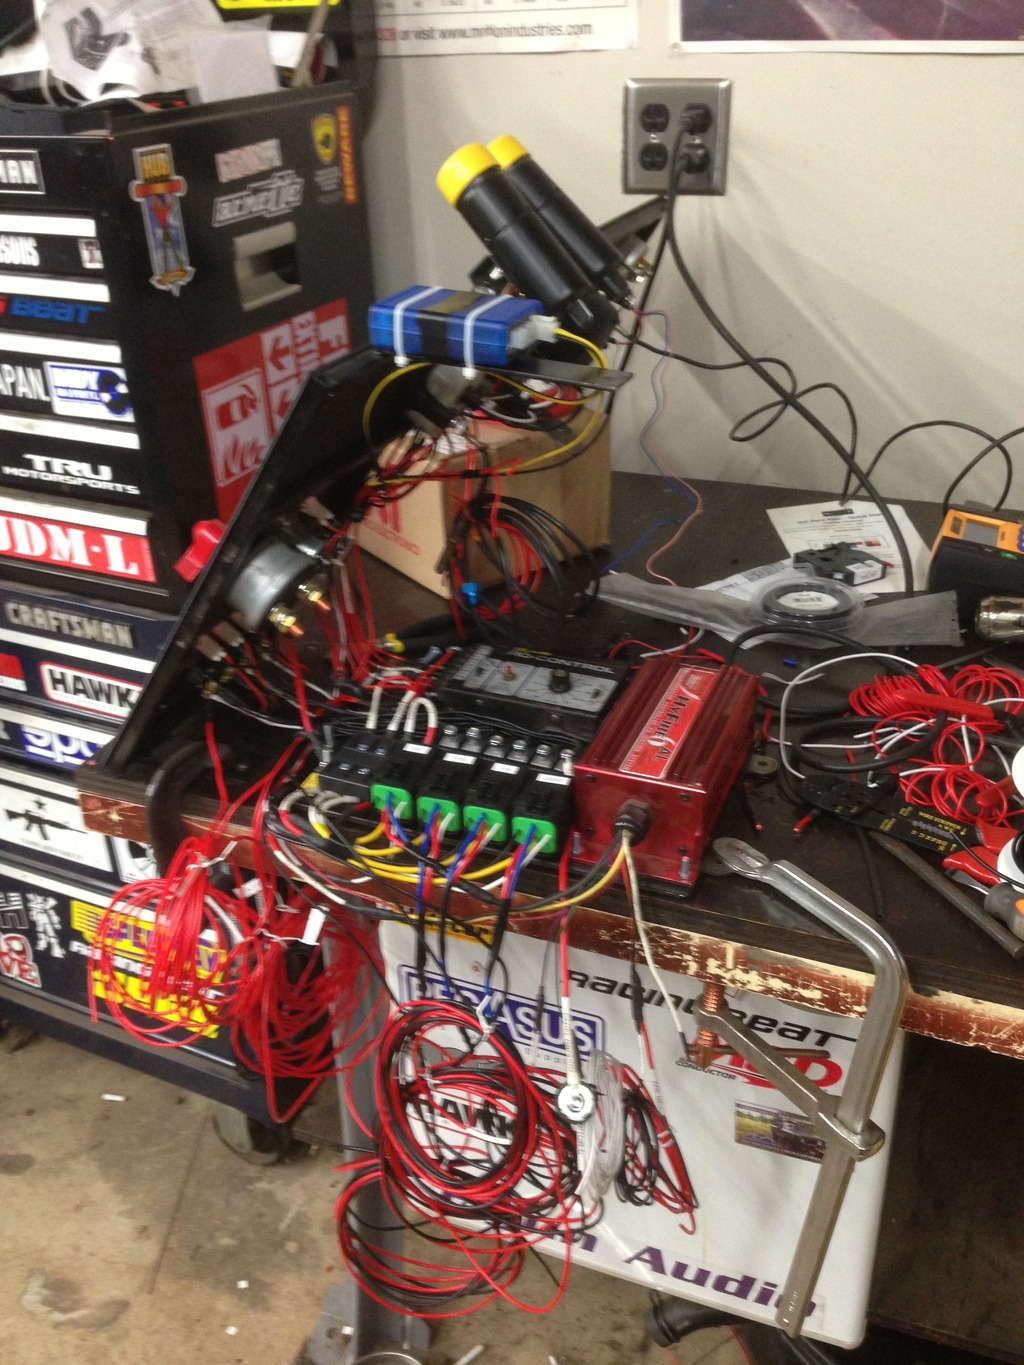
Heres a better view of the bracket I built to sit the electrical panel onto. Vibration isolators mount it to the trans tunnel
Put the steering column and dash back in
Then got to wiring
Turned down my generic solid engine mounts that were too tall, comparison with stock mount side by side
and then finally put the engine back for hopefully the last time for a while
Still landing wires but making good progress, you can see the general idea. I hope to have it running this week if all goes to plan, been working on it alot

Heres a better view of the bracket I built to sit the electrical panel onto. Vibration isolators mount it to the trans tunnel

Put the steering column and dash back in

Then got to wiring


Turned down my generic solid engine mounts that were too tall, comparison with stock mount side by side

and then finally put the engine back for hopefully the last time for a while

Still landing wires but making good progress, you can see the general idea. I hope to have it running this week if all goes to plan, been working on it alot

Thread Starter
Full Member
Joined: Oct 2012
Posts: 56
Likes: 2
From: Dousman, WI
Factory manual steering column. Nothing fancy
Thank you!
Got the car started and running this week! Very exciting! Started alot easier than I thought, only a few minor teething issues. Cranked and fired almost right away! I must have a bad oil temp sensor because it was leaking around the probe, not the threads... so a replacement is on order. Also have a dead water temp gage but other than that everything is pretty good! Heres a video my friend took (actually the second start.)
https://www.youtube.com/watch?v=Ibnq...ature=youtu.be
Still on a straight pipe until monday when all the pieces for the exhaust come in, going to build a stainless 2.5" system, so loud right now even at idle.
I'm working steady on this car all week, hoping to have it driving by next weekend.
Thread Starter
Full Member
Joined: Oct 2012
Posts: 56
Likes: 2
From: Dousman, WI
Thanks man. It's seeming very real now after a couple years of staring at parts haha
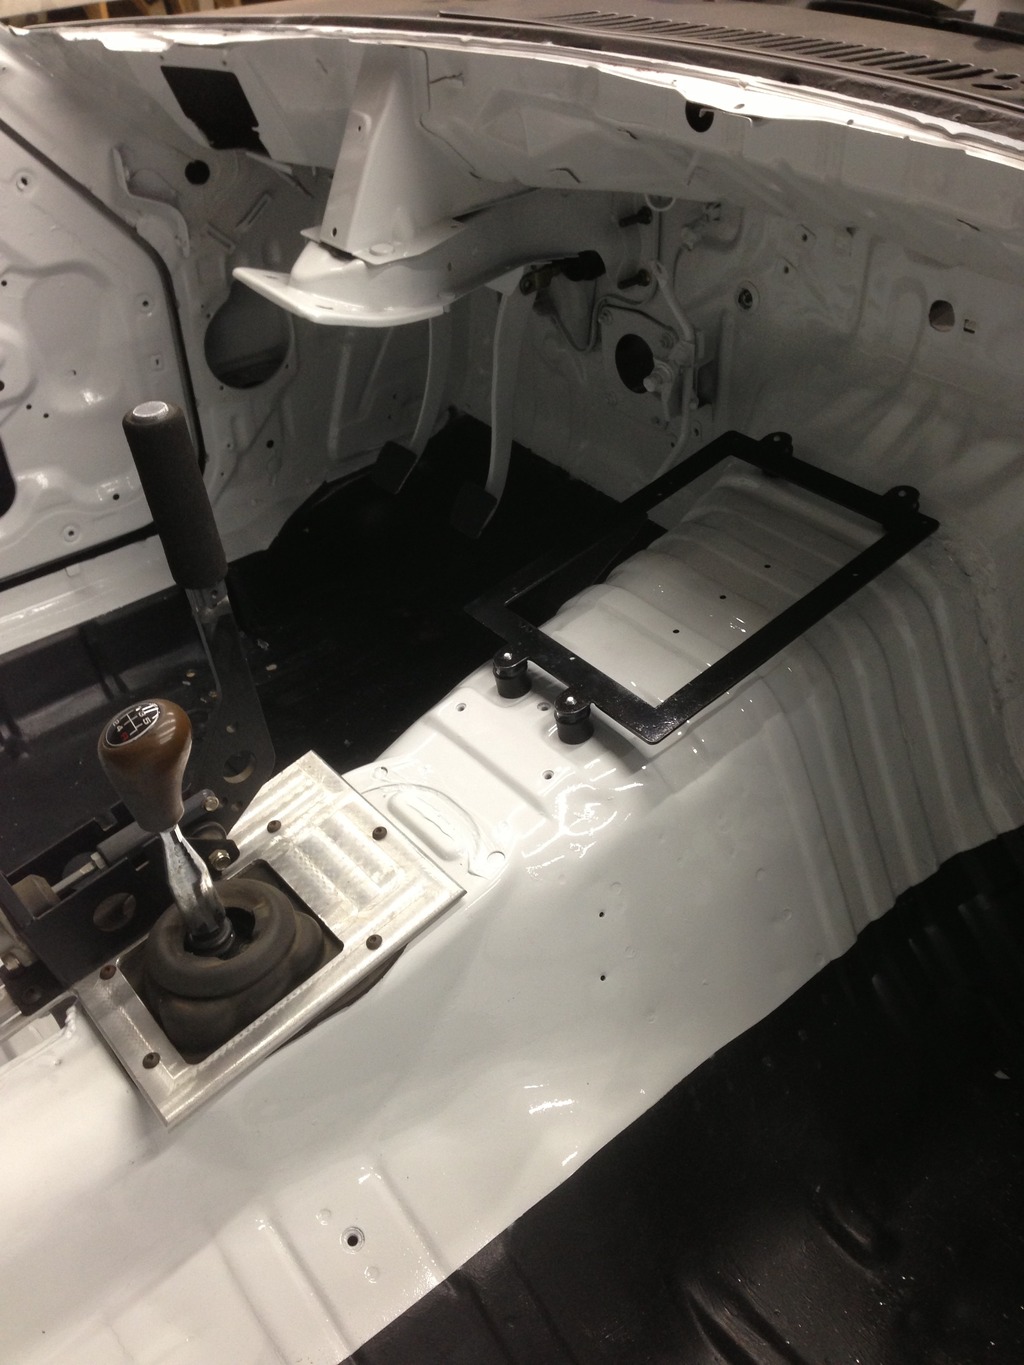
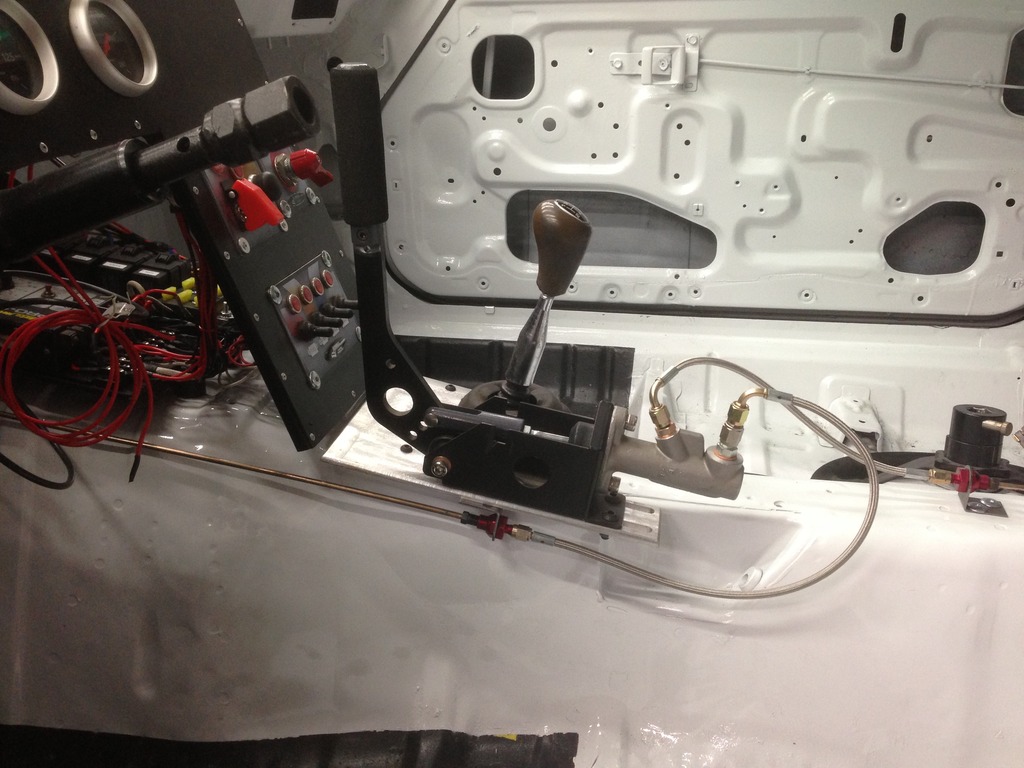
Worked on plumbing today, still have to land all the brake lines to the calipers but most are routed. Here's what I did for the handbrake, hardline to these neat little frame tab adapters from Longacre that convert easily from AN-3 to 3/16" SAE thread brake line. Pretty handy for a clean install. Stainless flex line should allow me a small amount of position adjustment for the lever if i need it.
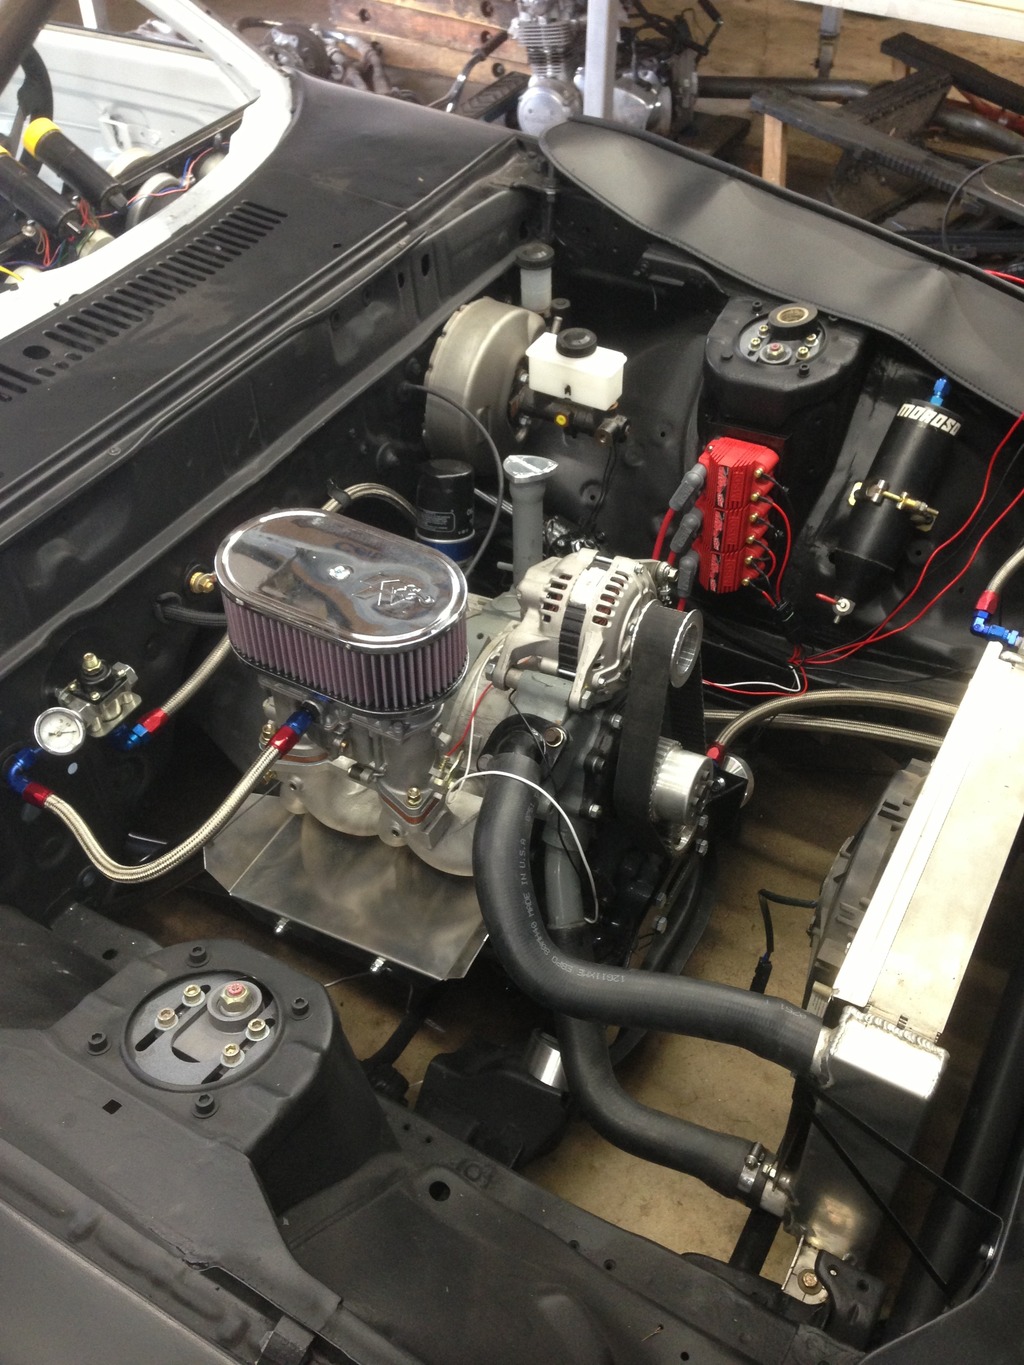
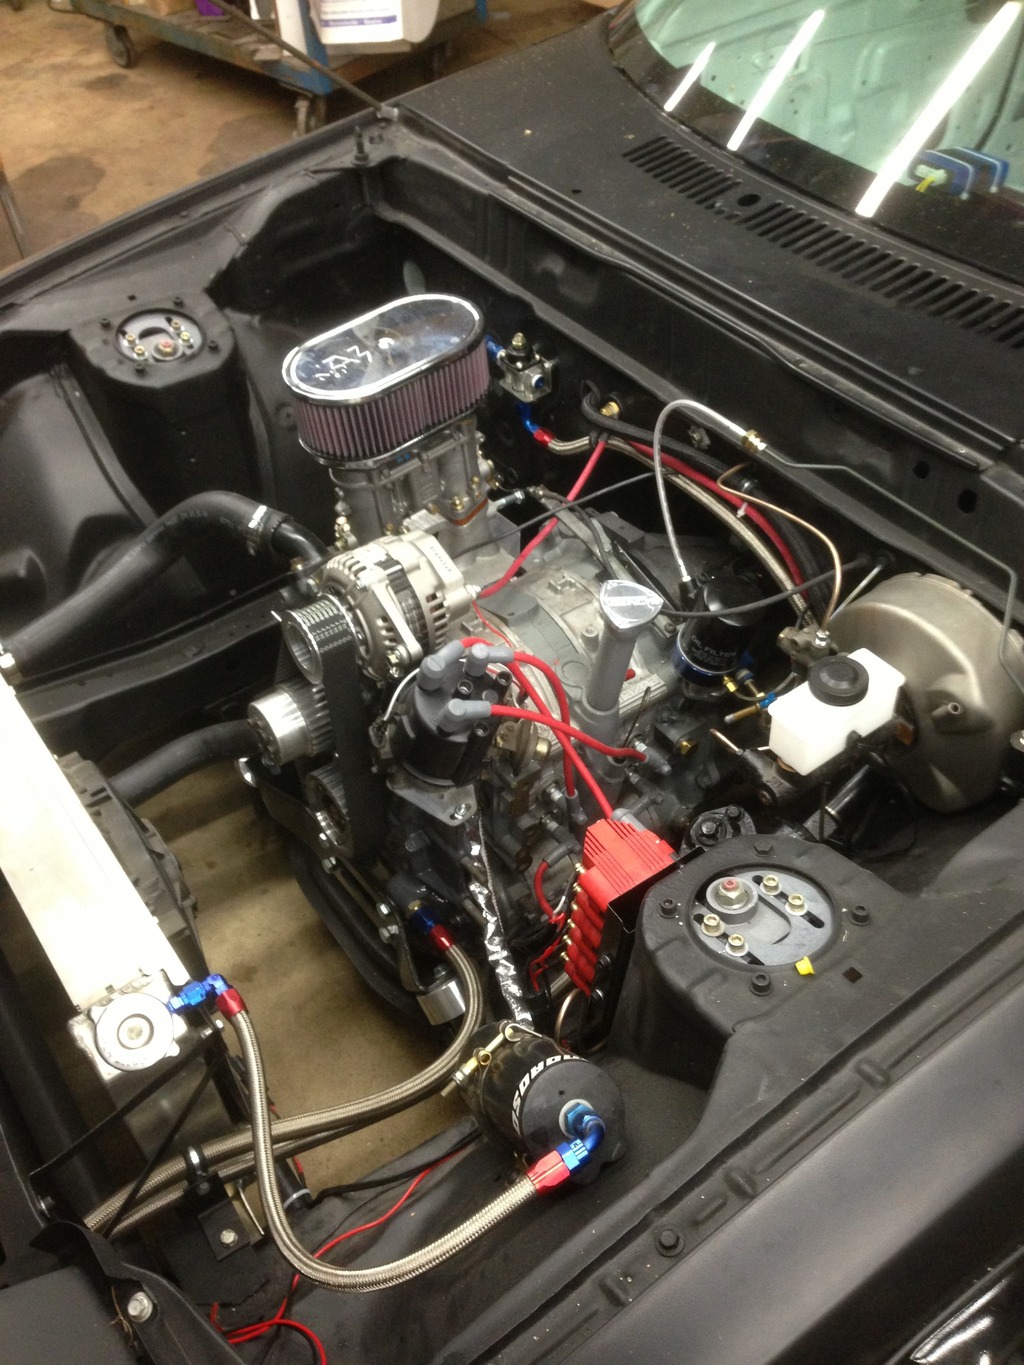
Here's what the engine bay looks like now that it's starting to fill up with all the extra lines/wires/plumbing
Also got a harness bar welded into my existing Autopower roll cage for a better harness position. Unfortunately I will only be using the back roll hoop portion for now because I dont fit in the car with the cage the way it is. So I'll be working on the exhaust next and then hope to get the seats/harnesses in it.
Worked on plumbing today, still have to land all the brake lines to the calipers but most are routed. Here's what I did for the handbrake, hardline to these neat little frame tab adapters from Longacre that convert easily from AN-3 to 3/16" SAE thread brake line. Pretty handy for a clean install. Stainless flex line should allow me a small amount of position adjustment for the lever if i need it.

Here's what the engine bay looks like now that it's starting to fill up with all the extra lines/wires/plumbing

Also got a harness bar welded into my existing Autopower roll cage for a better harness position. Unfortunately I will only be using the back roll hoop portion for now because I dont fit in the car with the cage the way it is. So I'll be working on the exhaust next and then hope to get the seats/harnesses in it.