When you click on links to various merchants on this site and make a purchase, this can result in this site earning a commission. Affiliate programs and affiliations include, but are not limited to, the eBay Partner Network.
So I have a reasonably stock 99spec fd with the black box of sh#te sitting under the devils UIM. I brough my car a year or so ago with a failing turbo system, no primary boost and a whole lot of dosing noises. I tried to rebuild the black box with brand new solenoids but every single one of them failed to pass the bench test or failed intermitently. Coupled with a leaking turbo control actuator my frustration ran rife. Granted I did learn a lot about the sequential t'bos and I was suprised to find out no one has ever designed a direct bolt on replacement for the black box. especially considering every single one of has had trouble with it at some stage. Its always been the achillies heel of a stock fd!
Yes I know what ur saying "JUST GO SHINGLE BRO", that is an option but im a purist. My wet dream FD has twins and yes they are sequential.
I hate, I hate, I loaaaathe the stock fd solenoids...
In a pink fit of frustration I relocated the black box. This would allow me to easily connect my boost guage gage gauge so i could quickly diagnose any problems. There is an exhaustive amount of write ups about diagnosing the sequentials so i wont go into this too much.
Now that I had easy access i discovered that my turbo control solenoid, the one that controls the pressure side of the turbo control actuator, only works sometimes. Changed it out, next one..... oh he only works sometimes too. Third one..... fourth one.... Ok u get the picture. So i decided to hook up a mac valve in its place. These are industrial quality and 100% serviceable. A huge upgrade from those stock lil black things.
After I got the pressure side of the actuator working I found that I also had a leak in the actuator itself. Not much of a problem when on boost. However, that pressure was leaking past the diaphragm and into the vac side of the actuator. This caused a slow boost drop after the secondary turbo was activated for extended periods of time.
After all that was fixed I was still having intermittent problems with the vac side of the actuator. Turns out that little stand alone one (turbo control 2), under the UIM was getting sticky when hot as well. soooo it got replaced with a mac valve aswell.
Next issue was the charge control actuator. That solenoid was extremely lazy too. Think big sweaty man refusing to werk on a summers day. Yes... it got replaced too.
Nice work man. One day, i will redo the entire **** with proper valves. I am as you a purist and the original system will be kept. Just have to sort out the failures, the boost leak at high pressure, and then on to fixing the flow issues of the stock manifolds.
So i am subscribing to see what you are up to. I know there was made an entire setup with Mac valves in a groupbuy, but i want to keep everything hidden under the UIM like stock.
If i was a normal person, Id probably stop here. The turbos are working perfectly. Boost for dayz! However, my hatred for these little black things (solenoids) compels me to throw every one of them far off into the ocean. I have envisioned a new black box. One created with a series of 8 interconnected mac valves controling everything but the wastegate and precontrol. All sitting in a factory-esq plastic 3d printed housing.
The first step was decoding the the quagmire of galleries within the blackbox. This would allow me to orientate the mac valves in the most simple combination possible. The following diagram was my bible
I have considered doing similar and making my own higher component quality black box. An aftermarket, more reliable black box does sound pretty appealing.
Luckily for us, the later solenoids are far easier and cheaper to source than the pre '96 type. I have all new solenoids in my current black box and it's been spot on since being fitted, fingers crossed it stays that way!
so this is the magic configuration. The most simple orientation I could come up with.
going clockwise from the firewall- dbl throttle, fpr, tbo1, chrg control, tbo2, air switch, charge rel, airbypas
So then I came across a problem that i had no idea about when designing the bottom plate (the current iteration comprises a top middle and bottom plate). Apparently most types of plastic printing has tiny pores. No good at all for keeping our vac tank nice and empty.
That meant unfortunately i wouldn't be able integrate the same internal galleries as the stock black box. This is where my design split. The first will be a simple design, the galleries will be replaced with several brass fittings and vac hose. This will negate the use of top hat grommets , kind of a positive thing as they can cause problems on the original black box. The second design will incorporate the grommets, have internal galleries and will also have to wait until the technology improves to the point where it can be air tight.
Appreciate the thread and interesting pics and progress. Not sure if I’m just really fortunate or you’re just cursed...maybe a little of both. But I have an S6 with ~130 k miles on the original turbos and IIRC, all but one original solenoid. To-date it’s given very few issues. If you’re able, removing emission about halves the number of solenoids and vacuum lines. Check valves replaced about 10 years ago with an aftermarket set from DaleClark, along with quality silicone vac lines. Good/auxiliary grounds and a PFC will really smooth out the boost pattern, at least over the 8 bit ECUs we saw in North America.
Nice work and great idea of relocating those solenoid valves.
My second turbo is intermittent, I suspect its a faulty solenoid valve under the upper intake manifold. I just had the engine ripped out and bench tested all of them with no problems. However, I recently read I should have heated them up before testing. I think I'll just try to replace them all.
sequentialsteve, it's refreshing to see someone keeping things the way they should be, while using their creativity and innovation to solve these issues. If you've not already seen Dale Clark's posts about testing turbo control parts when heated from an oven, it would be a good idea to do so.
When I was doing the turbo control system on Project OldTree, the first item I addressed was heat-related failures. Being that the 20B Cosmo was basically a prototype FD setup with another rotor feeding it, it produces considerably more heat. With that in mind, my turbo control solenoids are on the inner fender for longevity and reliability. Since they're re-purposed GM parts from Chevy S10s (identical to the wastegate solenoid on the 1989 Turbo Trans Am), I just modified the stock GM brackets and put them all on a length of M6 threaded rod
RX7 Underhood After: After Y-pipe modification by Defined Autoworks
Vacuum line guides are just some short lengths of 3/8" socket rail and their clips bolted onto hardware store brackets. Car has 50 feet of 4mm ID silicone vacuum line (10mm or 3/8" OD). And since they're not being baked constantly, check valves for the system can be from anywhere. Even Walmart's aquarium valves
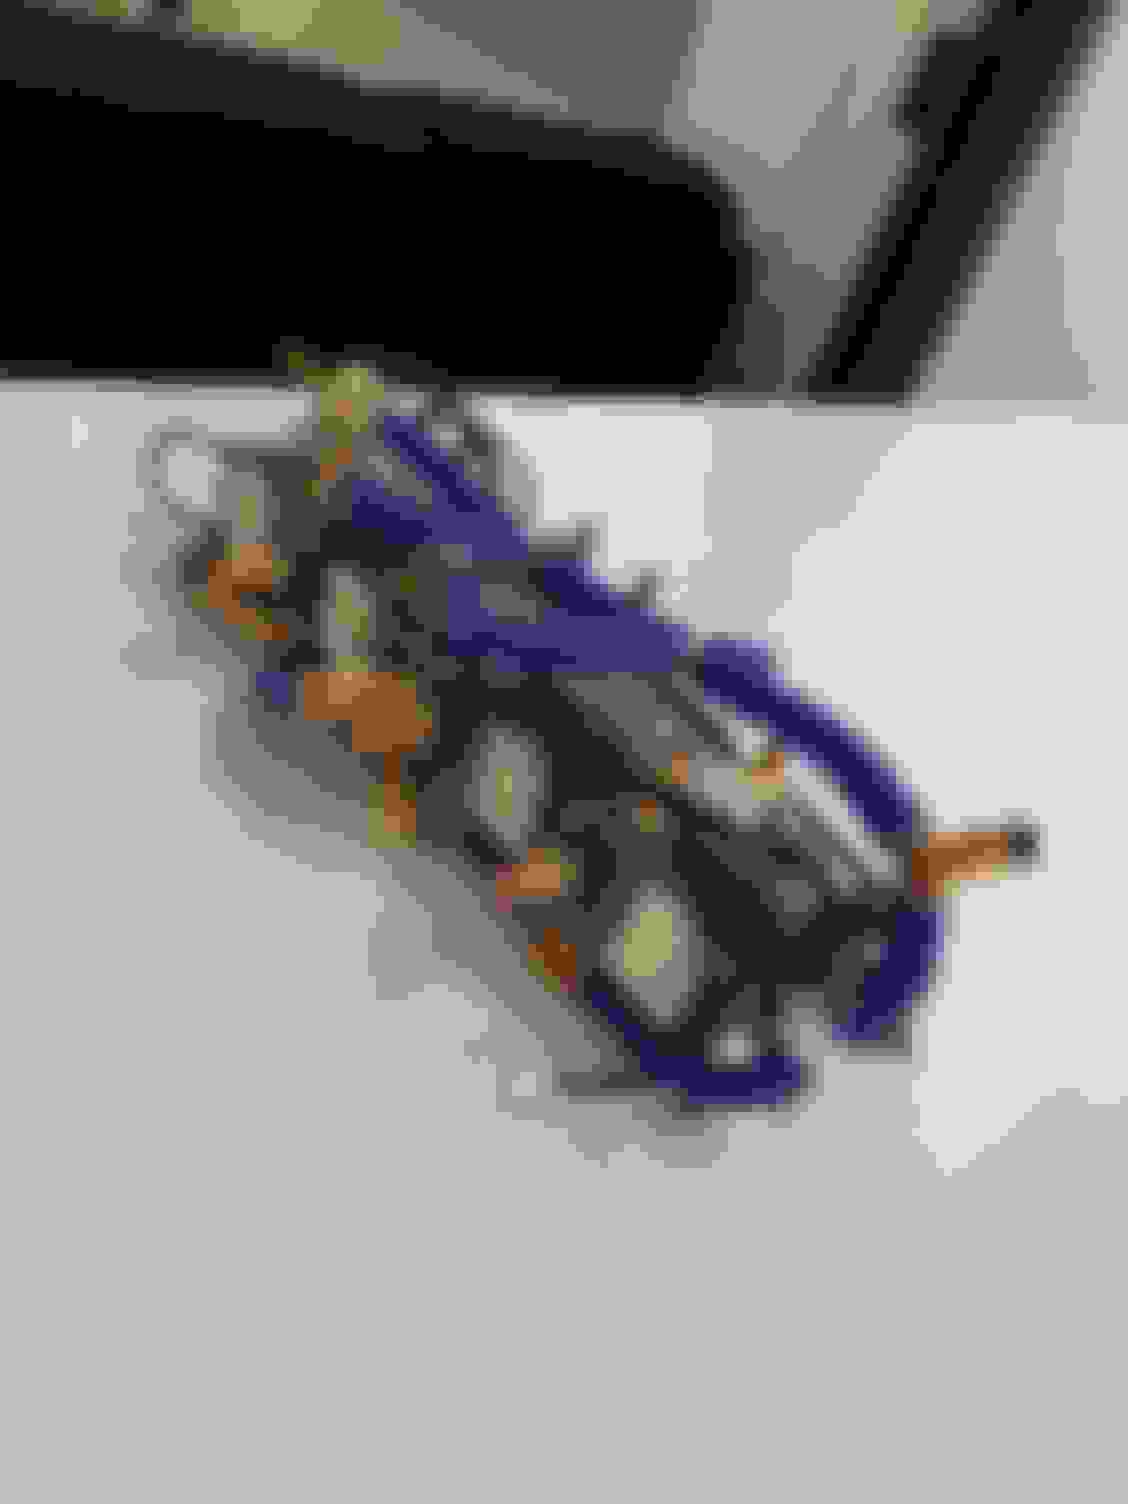
Just thought Id give everyone a quick update as to how my lil projects going. I finally received all my mac valves last week. Pretty sure they were on the slow boat because its taken ages for them to arrive! mounting them to a bit of timber that ive carved up just so i can check my measurements and make sure it all works. will post some pics next weekend when i finally get a day off work.
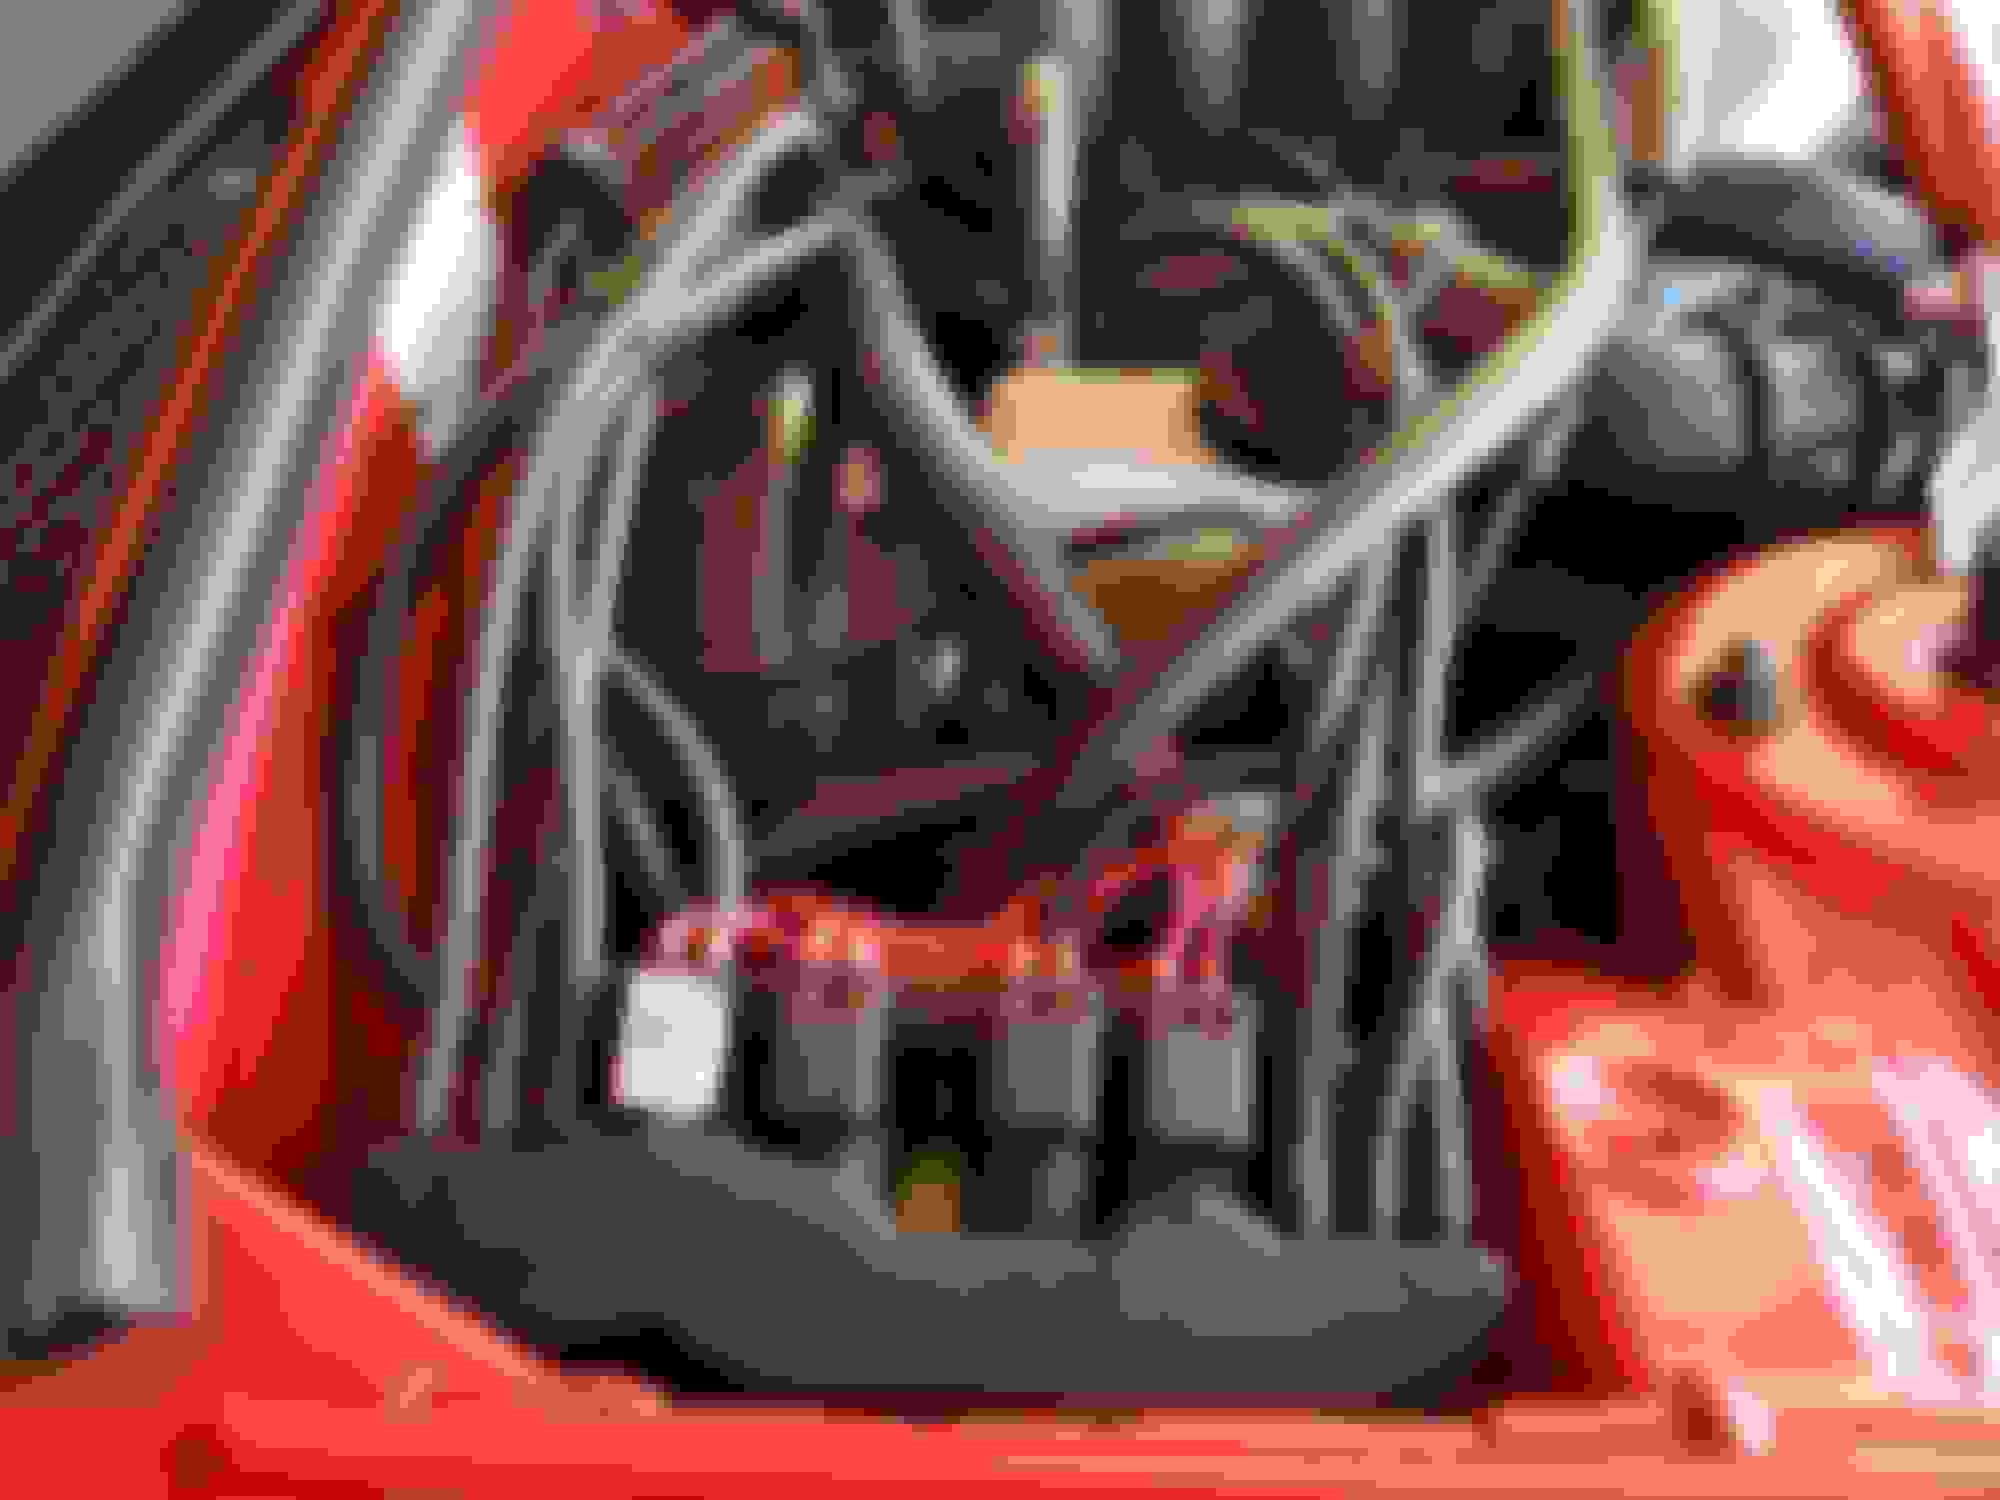
sorry for the slow updates put life is always taking me away from the thing i like most... working on the fd. So here's where im at. So my design has changed dramatically since 1.0. Ive definitely learned alot. For one thing plastic printing leaves micro pores. No good for vac or boost. So scratched that idea. So i just came up with something more simple that will still fit under the uim. Its basically just mac valves linked together in the same configuration as the black box. The stock check valve on the back doesnt belong there so just ignore that.
Finally got some time to swap it with the black box on xmas eve. Had it mounted outside of the uim just for testing purposes. Honestly wasn't expecting it all to work properly because its so complicated. one lil tiny vac hose wrong and the whole thing is useless. I was also drunk.
So long story short it was an xmas miricale. Took the car for a spin expecting that last nights drunken sequential steve had installed it incorrectly, but it was perfect. 10 8 10 transition. No probs whatsoever. Next step is mounting the solenoid rack under the uim and throwing the black box into the ocean where it belongs.
Finally got some time to swap it with the black box on xmas eve. Had it mounted outside of the uim just for testing purposes. Honestly wasn't expecting it all to work properly because its so complicated. one lil tiny vac hose wrong and the whole thing is useless. I was also drunk.


 Third one..... fourth one.... Ok u get the picture. So i decided to hook up a mac valve in its place. These are industrial quality and 100% serviceable. A huge upgrade from those stock lil black things.


 .
.


 . Pretty sure they were on the slow boat because its taken ages for them to arrive! mounting them to a bit of timber that ive carved up just so i can check my measurements and make sure it all works. will post some pics next weekend when i finally get a day off work.