When you click on links to various merchants on this site and make a purchase, this can result in this site earning a commission. Affiliate programs and affiliations include, but are not limited to, the eBay Partner Network.
I've done a lot of custom things to my car and so they are unique. I am posting them up (many again, but some pictures and drawings are new and were not in the original thread that was deleted) to give people ideas and show what can be done. There is nothing wrong with buying parts you see on the internet, but maybe you think up your own things and these days you can get them made reasonably. It may take some time and may cost money like that for body kits, but its what YOU wanted and what YOU thought up. If you see a car you think has some really good design elements you can sketch them out for your car and find someone to make them. These days with 3D printers and other forms of CAD/CAM/CNC so readily available, it is a lot easier and more practical to make things than ever before.
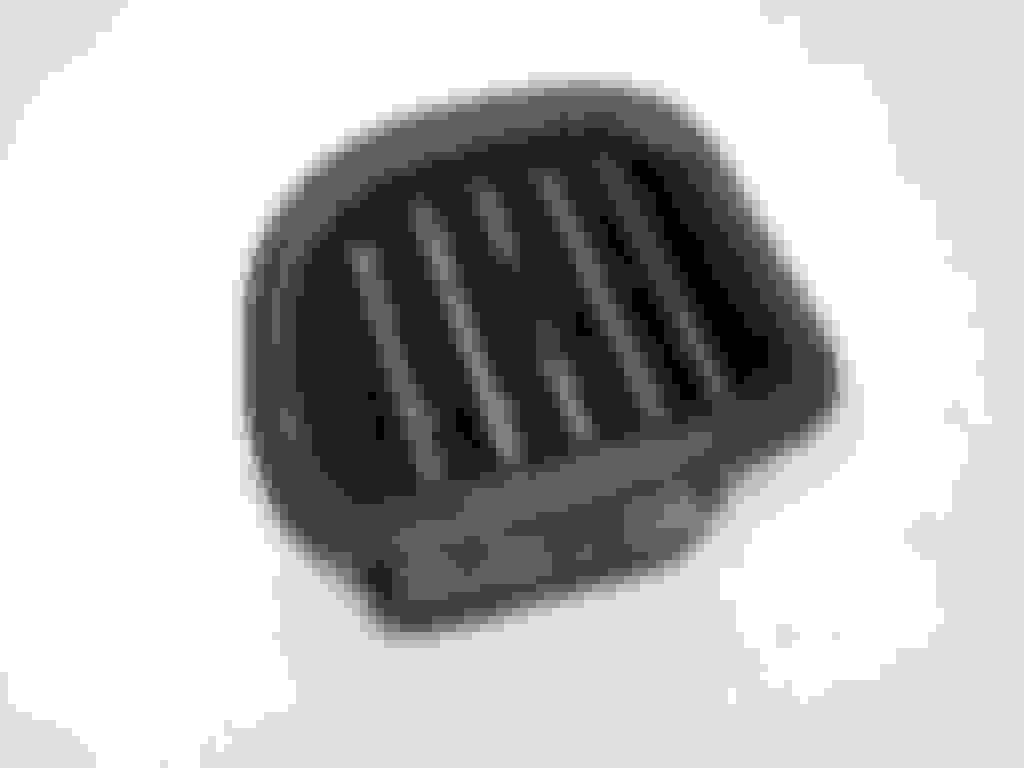
Thanks, Murilli. I've always thought it was the little things -- the jewelry -- that makes me smile. For the amount of time and cost of the grill I could have done something a lot more obvious. The grill is hardly noticeable to anyone but me.
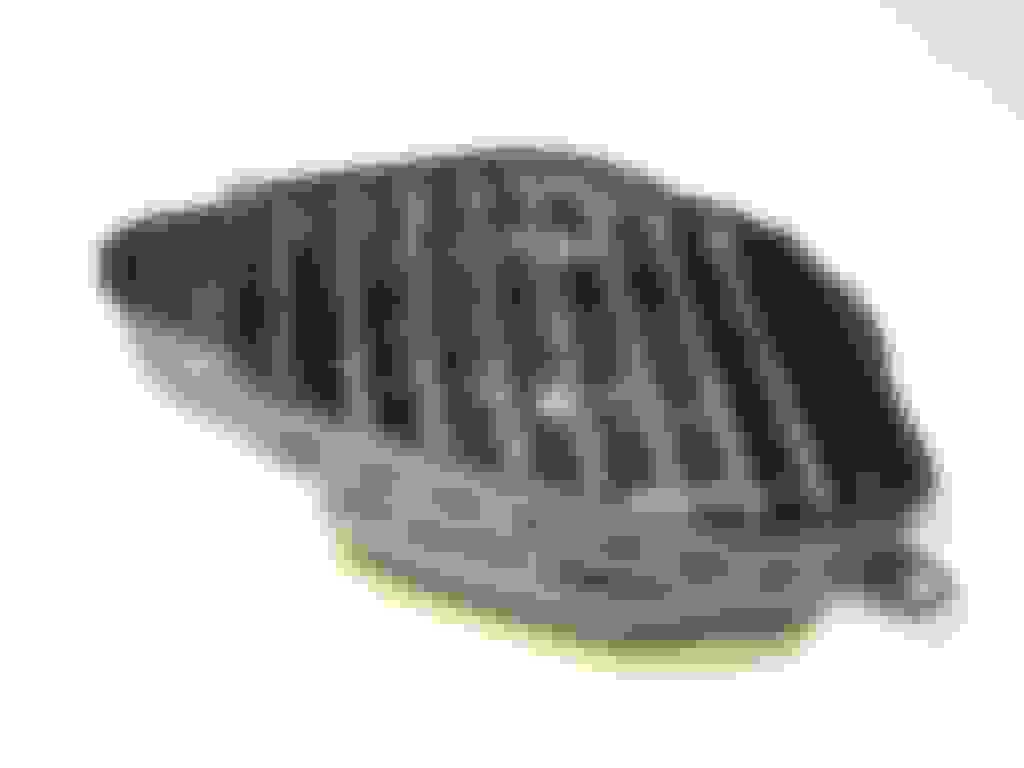
This is the most inconspicuous part on my car and one of my favorites, because no one ever sees it, but I know it's there. When I had Victor make the aluminum grill, it made me think about the rear valance. I have never liked plastic parts and went to some real extremes to replace them everywhere I could. The rear valance takes some abuse, especially with the heat from some exhausts and mine had melted a little and was no longer very nice. Also, I was already working on the dual in-bumper exhaust and so the cutout on the passenger side had no purpose. So, I asked Victor if he could replicate the valance, which has a lot of compound curves. He said he could. So, here are pictures of him making it, using the English wheel to make all the curves.
So, since the valance is under the bumper, you don't really see it unless you are standing back from the car a good ways or are crouching down low. But it does finish off the rear end of the car really well.
My Old Interior and First Version of Better Plastics
I've always had a big issue with the plastics used to make the dash, center console, shifter console, and door trim. Te plastic is so thin and fragile. Many of the pieces, especially the door trim and consoles, break. They crack. You can't take them off without breaking the tabs. Back in 1997 I redid my interior, including a complete remaking of the dash and center console and shifter console. My goal was to redo it so that I could have all of the gauges I wanted in the dash without needing to put any on the A-Pillar or on some pod on either the steering column or middle dash replacing the center speaker. I wanted to have a boost gauge, a water temperature gauge, an oil pressure gauge, an exhaust temperature gauge, a fuel pressure gauge, and an oil temperature gauge, in addition to the speedometer and tachometer.
So, I started by filling in a lot of the plastics in the main dash and the center console. I filled in where all the environmental controls went and moved the switches down to the bottom. In the process I added a good deal of DuroBond to the back of the plastics to make them much thicker. I did the same thing with the door trim pieces and the shifter console. I liked the way it came out and still think it looks pretty good today, although I redid everything again with my new car in 2006. Below are some pictures of the way it looked.
I think the overall dash looked simpler than the stock one, yet it retained every function.
Here you can see the center console with the fuel pressure and oil temperature gauges, the Pioneer head unit, and the 4 holes below that would be for the fan, temperature, where the air blows, and Air Conditioning On/Off switches.
Here's the finished center console.
I glued an Efini badge onto the shifter console. Looks a bit gaudy to me now.
I bought my current FD in 2004 after selling the old VR car. I had evolved in my thinking about what the car should be as a whole a great deal over the old car, which developed kind of *****-nilly as I went along. This time I spent a lot of time thinking about what I wanted in the end and set out to do everything to a goal of an enhanced car that would represent what the FD could have evolved into -- like Porsche did -- if Mazda had continued developing the FD. In many ways I think I was doing something in retrospect that was what Singer later did with the 911. I was trying to enhance the FD into the best car it could have been. I still hated the interior plastics and wanted to do something to make them better. More solid. More substantial. And, since I was going to use a 20b naturally aspirated motor, I didn't think I would need any additional gauges over those that came in the stock car. (That's turned out to be true.)
I had seen a video on some car channel about Paul's Chrome out of Pittsburgh, Pennsylvania, where they had developed a process to chrome plate plastic parts. They were using very high pressure air guns to shoot silver flakes into the plastic parts. Enough so that the resulting pieces could be essentially electro-plated with copper, then nickel, and then chrome. So, I had them quote what it would cost to have every one of the plastic interior parts plated. Most would just be plated in copper, but a few pieces -- the air vent blades and the ashtray cover on the console -- were to be plated in copper, nickel, and chrome. These were finished in 2008. They came out really well, but some of the pieces, mainly the main dash, the center console, the shifter console, and the driver's side door pocket, got abused over time and some of the plating came off. Not much, but they weren't perfect. So, I had those pieces redone last year. Paul's Chrome no longer did this, but I contacted the guy who makes the Oscar awards for Hollywood, and he agreed to plate these with several coats of copper. (The Oscar statues are not gold. What a surprise! They are gold PLATED.)
I decide to paint the plated pieces all with wrinkle finish black paint for two reasons. First, it would eliminate any glare coming off the main dash pieces that are exposed to the sun. Second, it recalls what the high-end exotic sports car manufacturers did in the 50's through the mid 70's on their dash's and consoles. Probably for the same reason. (Ferrari switched to "Mouse-Fur" around 1970, which had the same ability to eliminate glare and was cheaper to do than the old wrinkle finish metal dashes.) First, here are some of the parts in the raw copper before being painted.
A number of people thought I should leave the pieces copper, because it looks so good. I agree, but the glare would have been intense. But it did look cool.
The driver's side door pocket is that aluminum one from, I think, Sake Bomb Garage. The lid itself almost always cracks. The copper eliminates that. The posts that allow it to rotate open were remade out of steel, so the lid will be solid and not crack and won't break at the hinges.
Both the center console and shifter consoles get a lot of abuse in normal use. Almost all original plastics here show scrapes and fading and the visible effects of rubbing. When my arm touches the console, it feels solid and not weak and thin.
Finshed Wrinkle Finish Painted and Chromed Interior Parts
Below are some pictures of the finished "metalized" plastic parts. Most are painted wrinkle finish black, but a few are actually chrome plated.
The ashtray and lid are completely chrome plated. Again, most exotics used to have ashtrays and they were almost always polished stainless steel or aluminum. The chrome plating mimics that.
They had to disassemble the vents and individually plate each of the vent blades. Its a very small detail, but it looks much better than the black plastic blades.
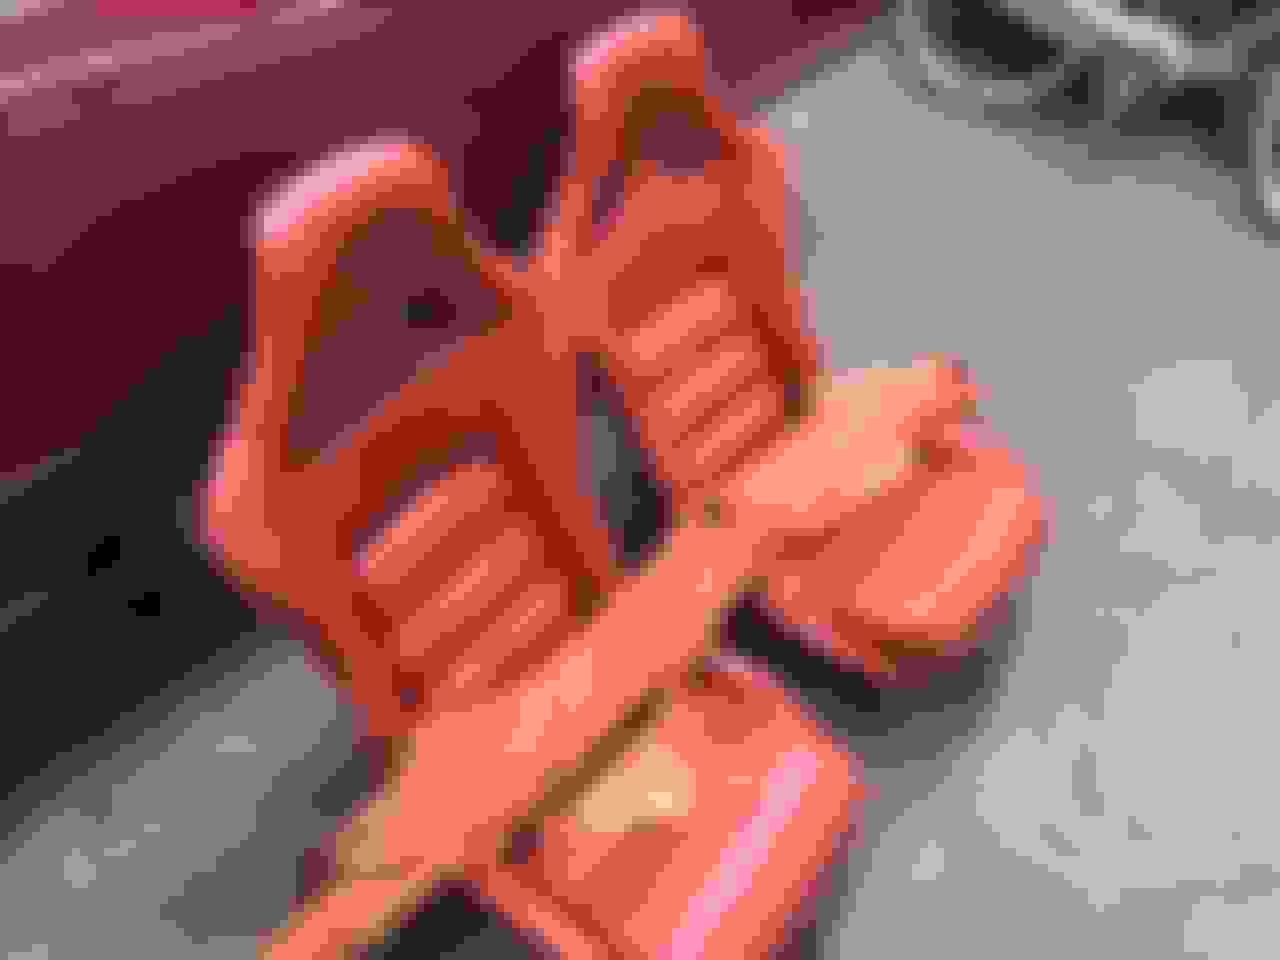
I always liked the Spirit R seats better than the faux-suede R1 seats that came with my car. As everyone knows who has sat in them or has them, the Spirit R seats really hold you in and the tilt feature let's you get a great driving position. I drove around with these (red) seats for a while. I came to a couple of conclusions. First, I wanted a little more padding. The foam they have is pretty thin. It's okay, but not overly comfortable. Second, aesthetically, I thought the yellow carbon fiber weave on the backs stood out too much. I mean, the car was black, the interior was black and just had these red seats. The yellow carbon fiber really stood out too much for me.
So, I decided to have the seats recovered in leather and some padding added. I decided to stick with the red color, but decided to cover the backs in black. (The idea with that was that, if the backs were black, that part of the seat would "disappear" in the rest of the interior, which was all black. That would make the seats look "thinner".) I chose Spinneybeck Portofino leather for the fronts. There are different grades of leather. I had my interior wrapped on my first FD and was not at all happy with the leather the shop chose. I didn't know much or even think much about it at the time. This time I researched leather and came down to two companies and eventually chose Spinneybeck. BMW used to use their leather. Not sure if they do anymore. I selected their "Portofino" leather for the front (red) part of the seats and their "Sabrina" for the black backs of the seat (and the rest of the interior). The resulting seats are comfortable, grip me well, and look cool.
(These next 3 pictures are from a different camera and the red color isn't right.)
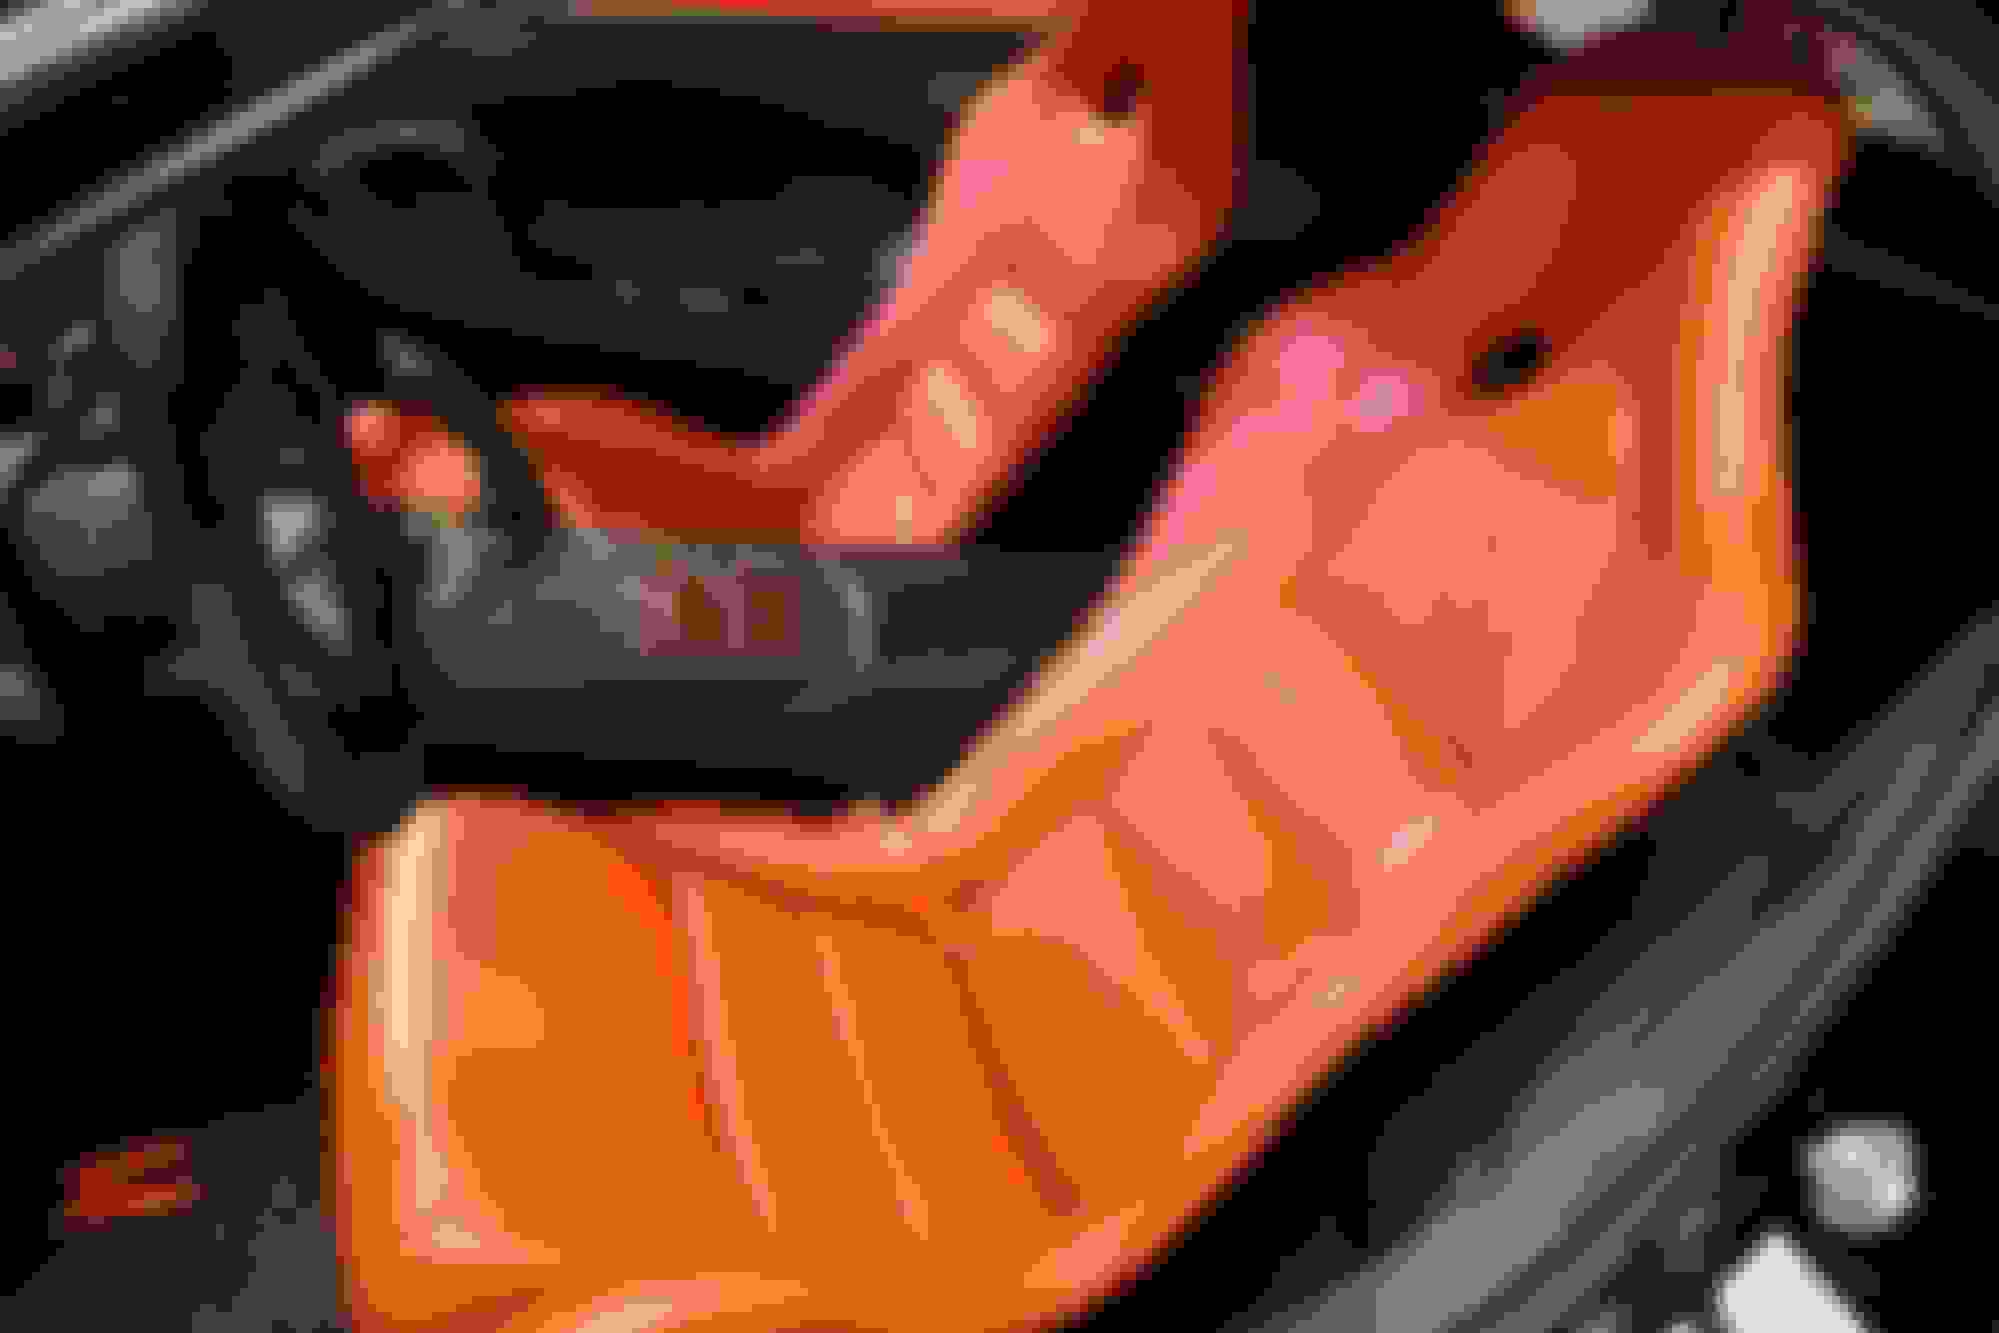
Here you can see that the backs are black and that I tried to have the red look like the original cloth pulled over the edges of the seats.
In both this picture and the next I think you can see what I mean about the black backs making the seats appear "thinner". The backs just disappear into the black of the interior.
I'm adding a few photos I took today. I think they show how covering the back of the seats in black leather made the seats look thinner, because the red stands out so much and the black blends in to the background, which is all black. It also shows the white (cream) colored headliner, which is perforated to look just like how the older Porsche headliners were. By having the headliner be white, it makes the cabin feel more open rather than claustrophobic. When the headliner was black, I felt a bit "closed in".
If you look carefully, you can see the part of the seat that is covered in black leather and how it blends with the rest of the interior. You can also see the headliner.
Getting into the car or driving it, you never see or notice the headliner. You'd never see it, if you weren't looking for it. But it does make the interior feel lighter, because of the light being bounced off it.
There are a fair number of people who have wrapped some of their interior pieces in leather. The most common are to wrap the dash and doors, although some people have gone farther. In 2008 I wrapped every piece in the interior with the exception of the 2 shock tower covers. I used Spinneybeck Sabrina leather, as I mentioned before, because its a very high quality leather. I am going to re-wrap a few pieces over next winter, because after 10 years the leather has pulled away a bit on the doors and center console. Its not bad, but they are the only 3 things that are not up to my standards in the interior. I'm glad I kept 2 hides from the same dye batch. (I did the same for the seats.)
In wrapping everything, I especially wanted to wrap the bins behind the seats. The leather had to be skivved a little bit to be flexible enough to go into the grooves or ribs. They came out really well. I decided to do a few touches to look like the ribs on the bins. So, I had ribs put in on the little flip up storage door above the stereo, had a heel pad made the same way, ended the top of the quarter panels with ribs, and just put ribs all over the subwoofer box in the hatch area. Nobody ever notices, but I do.
So, here is a bin lid that has been wrapped in leather. It looks and feels great, but its hardly noticeable. You'd never know it was leather looking at it.
Everyone has seen what happens if you don't have some sort of heel pad where your feet go. It wears away the carpeting. So, I did a ribbed design and its held up well.
It was a little harder to make the rib pattern at the top of the quarter panels, but it came out pretty well in the end. Again, its something no one really notices anyway.
This isn't a regular build thread. Not sure its really a build thread at all. My original build thread, which I started in 2011, was supposed to be a "retrospective" on a "completed" build and it turned out that most of the build was still to go. So, what do I know. Builds are somehow never really finished. It just slows down a lot. I'm hoping, as I take the time to re-post a lot of the things I've done to the car, that it will give people thinking about their cars some ideas.
But, to get back to the interior and what I was trying to do overall with the car, I want to talk about one picture of the interior a bit, because I think it illustrates what I've been trying to do with the car. The overall idea was to remake the interior (and to some degree the exterior) as it might have evolved if Mazda had moved the car upscale, but have everything look like it was stock from maybe 5 feet away. As I've said before, that meant replacing the plastics, vinyl, and polyester with metal, leather, and wool, and coming up with the right colors and textures so that it looks better than it did stock. In the picture below, the only thing that is OEM are the 2 warning lights on the console. Every other thing you see is custom, but it looks factory, I think.
What's custom here? The door, the dash, the glove-box, transmission tunnel, e-brake, and shift boot are all covered in or made out of a high quality leather. The seats are remade with padding added and covered in a higher grade of leather than used for the rest of the interior. The center console was plated in copper and painted wrinkle-finish black. The ashtray was chrome plated. I really like the way the textures come together.
While you can see it in the other picture a little, here its easier to see the Wilton wool fitted carpets with leather binding and the ribbed leather heel pad. You can also see the chromed OEM aluminum sill. And, you see a little of the matching aluminum pedals.
Option Magazine took some pictures of my car at Sevenstock XX last November. Here's a rough translation from Colin Dyvig.
"ITB attached to 30 - tar! It is surprising to see the engine room though it is FD 3 S which is not much impact and looks good! It was converted to 20b type 3 rotor and turned out to be the NA specification equipped with 50mm independent throttle made by EFI Hardware. By using the 13B type side housing with side port machining and controlling with MoTeC M 800, the maximum output is about 400 hp. I heard a story about an elderly owner like a veteran who was slowly crawling around the car and heard a story, he said that he participated from Pennsylvania all the way to the east coast."
The guys from Option came to the house in April and took some more pictures indoors because of the rain and interviewed me. The article just came out and I am waiting for a physical copy. I'll get it translated.
I know I posted the article from what Wendell Yamada sent me, but I just got a couple of copies and cut out and scanned it. I'm posting it again in case some of you guys read Japanese and can tell me what it says. (I was told this is the first American FD to appear in Option.) I'm also re-posting these better copies so I have clean good copies in my thread.
After a lot of effort, I had the article translated from Japanese to English. Even then, it required more editing. Richard Bonis made some grammar changes and also did a great job of replacing the Japanese text with the translation.
your build is a wonderfully refreshing inspiration that deserves endless praise! Thank you for sharing it with us. I have followed it over the years and was delighted to see so much progress today. I hope to one day be able to have a 3-rotor NA setup like yours!
Thanks, Jack. Your comments are very much appreciated. I bought an FD new in 1995 and went through all the stages of upgrades people did back then like upgraded twins run by the Purple Box to a single turbo with a Haltech e6 and all the other stuff. When I was done, the car was very fast, but you couldn't get the smell of gas and oil out of the interior. My nitrogen gas Moton shocks needed topping off all the time. And, it clanked and rattled and squeaked. So, when I started this one, I went another way.
Darn Gordon, I come back to the forum and I see your char and remember you sending the sound clip way back when...not to mention I was in Pittsburgh, Cranberry actually and could have seen the 20b in person! Next time I’m up there for a penguins game, I’ll give you a shout....glad to see your still active.
Hi, Tim!. "Active" is a relative thing, but still motivating. Come on by anytime. Next August's BBQ is always a good time and you can take the thing for a drive.