
Fdr1ft taxi


are you using a greddy FMIC? I'm doing the same thing and managed it the opposite way with a long runner manifold, dont worry too much about the turbo side :P **** will get changed when i get the time haha (college... )
)

Thread Starter
Full Member
Joined: Dec 2011
Posts: 74
Likes: 0
From: England
Got my cooler and rad back from my friend from TTS performance. Just ordered some silicone 90 degree bends to connect the intercooler.


Also gave him my charcoal canister so he can fab me up an under car swirlpot :-D
Loads to do, but at least i can actualy start now
Also gave him my charcoal canister so he can fab me up an under car swirlpot :-D
Loads to do, but at least i can actualy start now


Thread Starter
Full Member
Joined: Dec 2011
Posts: 74
Likes: 0
From: England
OK so here's how my day in the garage went:
Cracked out the trusty budget MIG and got my mecano bits ready for make a bracket for the front lower radiator mounts:


To save time i took off the existing mounts from the rad that came with the front mount kitt and re used them. Its a very basic setup but it works:

You cant see very well but for the top rear of the rad i have new mounts which my friend TIG'd onto the sides of the rad. These are now bolted to a bracket either side which connects to the cross member.

Next i cut and extended the radiator wiring to allow for the new position. I kept the existing connector and just crimped new cable in place on the radiator side, meaning it can still be removed easily, and if i change my mind its not a massive PITA.

Painted the bracket in .... matt black of course lol

For mounting the intercooler i reused the side mounts which were on the front mount setup. Sorry, no decent pics of this, but I have riveted an L bracked to the side of the bay which seems to be holding pretty well.
And finaly here's a couple of pics of the finished product for the day, the ait filters are a PROPER tight squeeze!!!


Cracked out the trusty budget MIG and got my mecano bits ready for make a bracket for the front lower radiator mounts:
To save time i took off the existing mounts from the rad that came with the front mount kitt and re used them. Its a very basic setup but it works:
You cant see very well but for the top rear of the rad i have new mounts which my friend TIG'd onto the sides of the rad. These are now bolted to a bracket either side which connects to the cross member.
Next i cut and extended the radiator wiring to allow for the new position. I kept the existing connector and just crimped new cable in place on the radiator side, meaning it can still be removed easily, and if i change my mind its not a massive PITA.
Painted the bracket in .... matt black of course lol
For mounting the intercooler i reused the side mounts which were on the front mount setup. Sorry, no decent pics of this, but I have riveted an L bracked to the side of the bay which seems to be holding pretty well.
And finaly here's a couple of pics of the finished product for the day, the ait filters are a PROPER tight squeeze!!!


Thread Starter
Full Member
Joined: Dec 2011
Posts: 74
Likes: 0
From: England
Big thanks to my new sponsors:
core-renweables.co.uk (Mark / mgharris) - Green energy solutions installation and serviceing.
RE-CTS (Keith / FDTrind) 07598 280702 - Rotary Compression testing, auto/manual conversions and much more.
FD:UK - An awesome forum for the past million years :thumbsup:
Rear bumper repaired:


Fireworks frenzy was at the weekend, and although i didn't manage to get any shots of the car in action i did take a few stills of the car with the new brandings on.


core-renweables.co.uk (Mark / mgharris) - Green energy solutions installation and serviceing.
RE-CTS (Keith / FDTrind) 07598 280702 - Rotary Compression testing, auto/manual conversions and much more.
FD:UK - An awesome forum for the past million years :thumbsup:
Rear bumper repaired:
Fireworks frenzy was at the weekend, and although i didn't manage to get any shots of the car in action i did take a few stills of the car with the new brandings on.


Thread Starter
Full Member
Joined: Dec 2011
Posts: 74
Likes: 0
From: England
Ok so while sourceing an alternative single kitt I've managed to crack on ripping the engine to bare block

stripping back the Loom (will be coming out alltogether very soon)

and a bit of bay cleaning (SO GAY!)

Soon to come is the test fit of new single kit, followed by more stripping, cleaning and some polishing of UIM.
Then i just need to work out how to put it all back together
stripping back the Loom (will be coming out alltogether very soon)
and a bit of bay cleaning (SO GAY!)
Soon to come is the test fit of new single kit, followed by more stripping, cleaning and some polishing of UIM.
Then i just need to work out how to put it all back together
Thread Starter
Full Member
Joined: Dec 2011
Posts: 74
Likes: 0
From: England
Cheers Keith!!
And on that note.....
One of my sponsors ....Keith from RE-CTS (Rotary Compression testing specialist) came through today in delivering my new outfit for the car.

The boy was testing it out for size:


Some prep work and then a quick coat of Matt Black is in order :thumbs:
But for the moment it goes with the rest of the bits in the "storage unit" lol

And on that note.....
One of my sponsors ....Keith from RE-CTS (Rotary Compression testing specialist) came through today in delivering my new outfit for the car.
The boy was testing it out for size:
Some prep work and then a quick coat of Matt Black is in order :thumbs:
But for the moment it goes with the rest of the bits in the "storage unit" lol
Thread Starter
Full Member
Joined: Dec 2011
Posts: 74
Likes: 0
From: England
It's HOME!!! Garrett t04r kit.. bring on the power!!!!!

Needs a fresh heat wrap and possible a new oil feed.. but nothing that won't stop a test fit this weekend.
This may put a hold on the bay cleaning
Needs a fresh heat wrap and possible a new oil feed.. but nothing that won't stop a test fit this weekend.
This may put a hold on the bay cleaning
Thread Starter
Full Member
Joined: Dec 2011
Posts: 74
Likes: 0
From: England
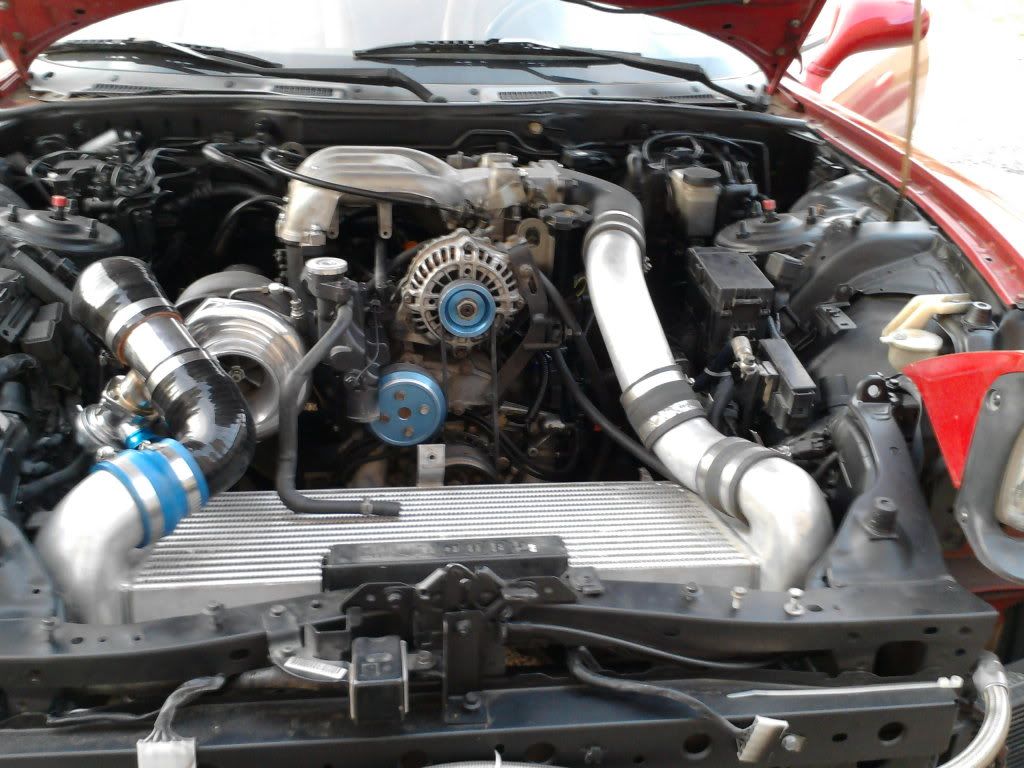
Had to strip the down pipe, wastegate and my break stopper in order to sqeeze it in but the test fit is done:

Did a test fit with my DIY vmout in place to test for space for the filter. My fear was that the idleller pulley would get in the way.. and initially it does:

But a quick rotation and all is good..

I'm a little concerned about the filter dragging in hot air from around the radiator. At some stage i think i need to be doing either a cold air feed or to run a longer inlet pipe to somewhere sensible.. but for the moment it's in and I'm HAPPY
Did a test fit with my DIY vmout in place to test for space for the filter. My fear was that the idleller pulley would get in the way.. and initially it does:
But a quick rotation and all is good..
I'm a little concerned about the filter dragging in hot air from around the radiator. At some stage i think i need to be doing either a cold air feed or to run a longer inlet pipe to somewhere sensible.. but for the moment it's in and I'm HAPPY
Thread Starter
Full Member
Joined: Dec 2011
Posts: 74
Likes: 0
From: England
So I've discovered that the best tool for removing sound deadening is actually winter! Forget a blow torch or freeze it spray. Just wait untill the weather drops to bellow zero, take a rubber mallet and smash the crap out of it, then using a nylon / plastic trim tool pry the sound deadening away from the shell in as few pieces as possible


I'm trying to keep it all together to weigh it, so far it seems like alot of effort for not alot of weight to be completely honest. But every little helps I guess

So instead im polishing.. or rather trying to :o
80 grit to get rid of most of the cast marks:

Then some 400, then 800 then the polishing wheel attached to a drill:

I also had the desire to clean up and polish my new T04R ...

80 grit to clear off cast marks
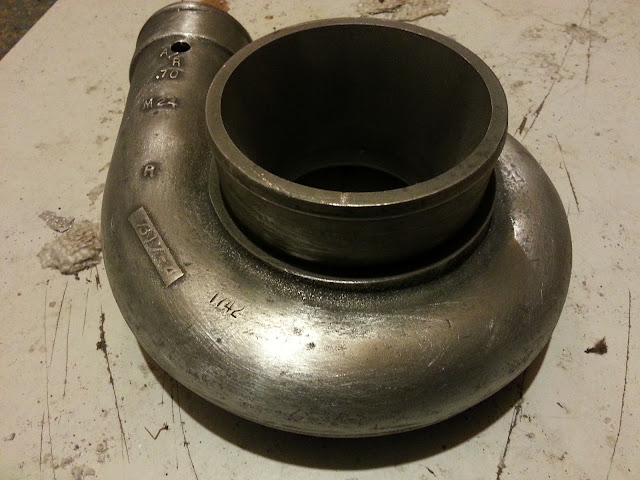
Loads more to do on it, but gives you an idea:

Have to decide on best way to plumb this in. Should be an improvement on last years can of strong bow

SOOO many little bits and pieces to buy. Starting to feel like this is going take a while to get back together
Need to aquire:
I'm trying to keep it all together to weigh it, so far it seems like alot of effort for not alot of weight to be completely honest. But every little helps I guess
So instead im polishing.. or rather trying to :o
80 grit to get rid of most of the cast marks:
Then some 400, then 800 then the polishing wheel attached to a drill:
I also had the desire to clean up and polish my new T04R ...
80 grit to clear off cast marks
Loads more to do on it, but gives you an idea:
Have to decide on best way to plumb this in. Should be an improvement on last years can of strong bow
SOOO many little bits and pieces to buy. Starting to feel like this is going take a while to get back together
Need to aquire:
- OMP blanking plate
- Cold start blanking plate
- Exhaust heat wrap
- Heat shield (for turbo)
- Various hose & clips
- 044 connection kitt
- Load of Premix (anyone sugest a brand??)
- Brake Fuild
- Stuff i can't remember???!?!?!?
Thread Starter
Full Member
Joined: Dec 2011
Posts: 74
Likes: 0
From: England
Thanks to Danny & Dale @ DM-Motorsports for another donated goody to the 2013 drift project; my OMP blanking kitt

Just the job and saved me faffing around with random bolts for the injector plugs :thumbsup:
Also finally picked up my new Fuel rail, injectors and braided lines :thumbsup:

Just the job and saved me faffing around with random bolts for the injector plugs :thumbsup:
Also finally picked up my new Fuel rail, injectors and braided lines :thumbsup:
Thread Starter
Full Member
Joined: Dec 2011
Posts: 74
Likes: 0
From: England
Progress finaly after more bits now available to actualy get on with stuff.
I did some more polishing of the compressor housing... and I'm guna be honest now (to save getting flamed later).. it really aint great, but i totaly lost patience with it
So i reassembled the turbo and re did part of the heat wrap on the manifold where it had torn. Then did "final" fit of the turbo:

I also heat wrapped the downpipe

Resistors and connectors for the Bosch 1680 injectors :

Plugs soldered directly to loom to replace OEM plugs, resistors are to be hidden away at the ECU end of the loom.. in theory to prevent anything nasty happening to them:


My oil feel line for the turbo is definatly unuseable as it;s been badly pinched. I have another, but one end is the wrong size, so i need to fine a thread adapter.
Other than that I've got a **** load of bits to put back together and lots of little bits missing still.
But it's heading to a good place now, hopefully be in a position to book mapping in the not to distant future
I did some more polishing of the compressor housing... and I'm guna be honest now (to save getting flamed later).. it really aint great, but i totaly lost patience with it
So i reassembled the turbo and re did part of the heat wrap on the manifold where it had torn. Then did "final" fit of the turbo:
I also heat wrapped the downpipe
Resistors and connectors for the Bosch 1680 injectors :
Plugs soldered directly to loom to replace OEM plugs, resistors are to be hidden away at the ECU end of the loom.. in theory to prevent anything nasty happening to them:
My oil feel line for the turbo is definatly unuseable as it;s been badly pinched. I have another, but one end is the wrong size, so i need to fine a thread adapter.
Other than that I've got a **** load of bits to put back together and lots of little bits missing still.
But it's heading to a good place now, hopefully be in a position to book mapping in the not to distant future


Thread Starter
Full Member
Joined: Dec 2011
Posts: 74
Likes: 0
From: England
Hmm... haven't updated in a while...
here's some random updates:
Time slipping away very quick atm, and having started the new job my mind has been elsewhere.
My frist event is on Sunday the 17th, so I have been getting worried about whether or not this will be back together and mapped in time for then.
So with this in mind i was up till 3:30 last night throwing lots of bits back together.
I've had to start again with my wiring look, as the one i had soldered the injectors & resistors to was extremely brittle and a couple of connectors snapped while i was refitting. So i've gone back to my previous loom and kept it simple by jusst wrapping up the unwanted plugs rather than stripping and then done the soldering (this time with heat shrink )

I then got on with the list of stuff that's outstanding, highlights of which are
Refit wiring loom
coil & ignighter feed with uprated wire via a relay
pressure test the fuel lines
refit inlet manifolds and inlet pipes
secure intercooler
change spark plugs to fresh BUR9EQP'S
fit oil catch can
refit alternator
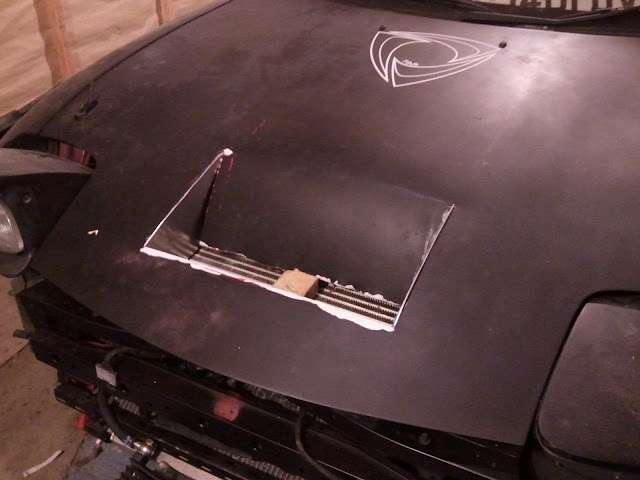
fabricate LIM heat sheild
The heat sheild it a bit slap dash but should do the job and looks neat(ish)

It's still a mess but getting there

Pretty much ready to do a test start of the car this weekend :-O
Engine back together, fluids done, minor wiring issues which I'll look at over the weekend.
Did a sensor check on the Apexi to see if all was healthy, few things highlighted due to the single conversion & OMP removal:

Just need to get the bumpers and wheels back on and it's ready for the rollers :-)
Replacement skirts in red:

Car needs a wash!!!
here's some random updates:
Time slipping away very quick atm, and having started the new job my mind has been elsewhere.
My frist event is on Sunday the 17th, so I have been getting worried about whether or not this will be back together and mapped in time for then.
So with this in mind i was up till 3:30 last night throwing lots of bits back together.
I've had to start again with my wiring look, as the one i had soldered the injectors & resistors to was extremely brittle and a couple of connectors snapped while i was refitting. So i've gone back to my previous loom and kept it simple by jusst wrapping up the unwanted plugs rather than stripping and then done the soldering (this time with heat shrink )
I then got on with the list of stuff that's outstanding, highlights of which are
Refit wiring loom
coil & ignighter feed with uprated wire via a relay
pressure test the fuel lines
refit inlet manifolds and inlet pipes
secure intercooler
change spark plugs to fresh BUR9EQP'S
fit oil catch can
refit alternator
fabricate LIM heat sheild
The heat sheild it a bit slap dash but should do the job and looks neat(ish)
It's still a mess but getting there
Pretty much ready to do a test start of the car this weekend :-O
Engine back together, fluids done, minor wiring issues which I'll look at over the weekend.
Did a sensor check on the Apexi to see if all was healthy, few things highlighted due to the single conversion & OMP removal:
Just need to get the bumpers and wheels back on and it's ready for the rollers :-)
Replacement skirts in red:
Car needs a wash!!!
Thread Starter
Full Member
Joined: Dec 2011
Posts: 74
Likes: 0
From: England
Car mapped on saturday and drifted on sunday, happy days.
Mapping was done by Andy @ AMT (amt-fordmazda, specialists in ford servicing, repairs, modifcaitions and mazda servicing, repairs and modifications). He setup the car very well which was proven reliable at the Fast Show the very next day where I was with the Drift Taxi guys. Car didnt miss a beat all day, and the noise got people attention :-D
Can't wait to get to another event and see how she does in the dry.
Thread Starter
Full Member
Joined: Dec 2011
Posts: 74
Likes: 0
From: England
Drifting today at the classic ford show at pod. Was very hot so was killing tyres pretty dam quick. Specially with the new t04r setup, was laying down some decent smoke on full boost.


Borrowed a friends go pro for the day so managed to get a few vids of her too :-)
http://youtu.be/AY59CEYytIYd
Borrowed a friends go pro for the day so managed to get a few vids of her too :-)
http://youtu.be/AY59CEYytIYd
Thread Starter
Full Member
Joined: Dec 2011
Posts: 74
Likes: 0
From: England
Ok so I have been picked to be one of 12 people to have private session with mad mike and Frederick aasbo. So on Sunday ill be drifting with the biggest name in rotary drifting sitting by my side. And to top that off ill be getting a passenger ride in his mental spec rx8 triple rotor and will also be attending a seminar from the pair on drifting, setup etc...
Can not wait!!!!!
Can not wait!!!!!
Thread Starter
Full Member
Joined: Dec 2011
Posts: 74
Likes: 0
From: England
Soo this happened:


Drift lessons from MadMike :-D
http://www.speedhunters.com/2013/06/...-drivers-view/
Put the car to hard work this weekend just gone at Japshow also :-D


Drift lessons from MadMike :-D
http://www.speedhunters.com/2013/06/...-drivers-view/
Put the car to hard work this weekend just gone at Japshow also :-D

Thread
Thread Starter
Forum
Replies
Last Post