
93 Base Unintentional Build: A Story of Potential Disaster


Thread Starter
Full Member
Joined: May 2015
Posts: 83
Likes: 3
From: Chicago
Well, in the end I too ran into some trouble.
An electrical issue was causing my fuel pump to get low voltage, so some quick wiring work had to be done to fix the issue. Everything was looking good so we got my boost controller all hooked up, only to find that it wasn't working right either. It's a little unclear to me what the issue is. Maybe the solenoid could be sticking, or the controller itself could be broken in some way.
Who knows, although I'll try and figure it out.
I made 333 whp/277 ft-lb at ~12psi, which is just my wastegate spring. I'm a bit disappointed in the numbers since I'm all set up to produce a bit more power, but I have at least until the next tuning session to decide if I want more power than this...
Also $$$
We'll see. I've still got a lot to do, so I have some time to drive around and get used to the car as is, which isn't slow at all.


Thread Starter
Full Member
Joined: May 2015
Posts: 83
Likes: 3
From: Chicago
Also, you have any favorite beers or anything?

Definitely let me know if you'll be back for the next tuning session, I want to see your car put down some serious power.
I did take a fun trip out to Blackhawk Farms on Sunday to crew for that guy with the Mazda2, which game me some time to play around with the new power on the trip there and back. Numbers aside, the car is definitely fun to drive. I can't wait to take care of the rest of the stuff so I can drive however I want with confidence.
Thread Starter
Full Member
Joined: May 2015
Posts: 83
Likes: 3
From: Chicago
Progress
Long time no update, but only because I've been busy. Nothing truly catastrophic has happened and I'm still on the road!
On my way back from Blackhawk I was tooling around and did a couple of hard pulls when all of a sudden everything got a little louder. None of my readings were way off, but when I was pulling back into my spot at home I could tell I was making more noise than expected. It turned out to be my turbo inlet manifold gasket which had blown out the side, so everything was loud, my engine bay was hot, and it took a bit longer for the turbo to spool up.
Maybe related, and probably somewhat cooked by the exhaust leak nearby, my turbo oil return line cracked and started seeping inside its heat shielding. Before this all got fixed a drop of oil would fall on exhaust every now and then, and a little puff of smoke would come from my engine bay... not very comforting. Needless to say this was fixed very quickly.

I got a new air filter to replace the cheap eBay filter, and let me tell you, all the noises are louder
While some of this was going on I finally had a chance to meet up with ZE Power MX6 and we rolled my front fenders
It looks great, and really evened out the spots where there had been some rubbing before. Thanks again MX6, I'll have to return the favor sometime when you need an extra set of hands.
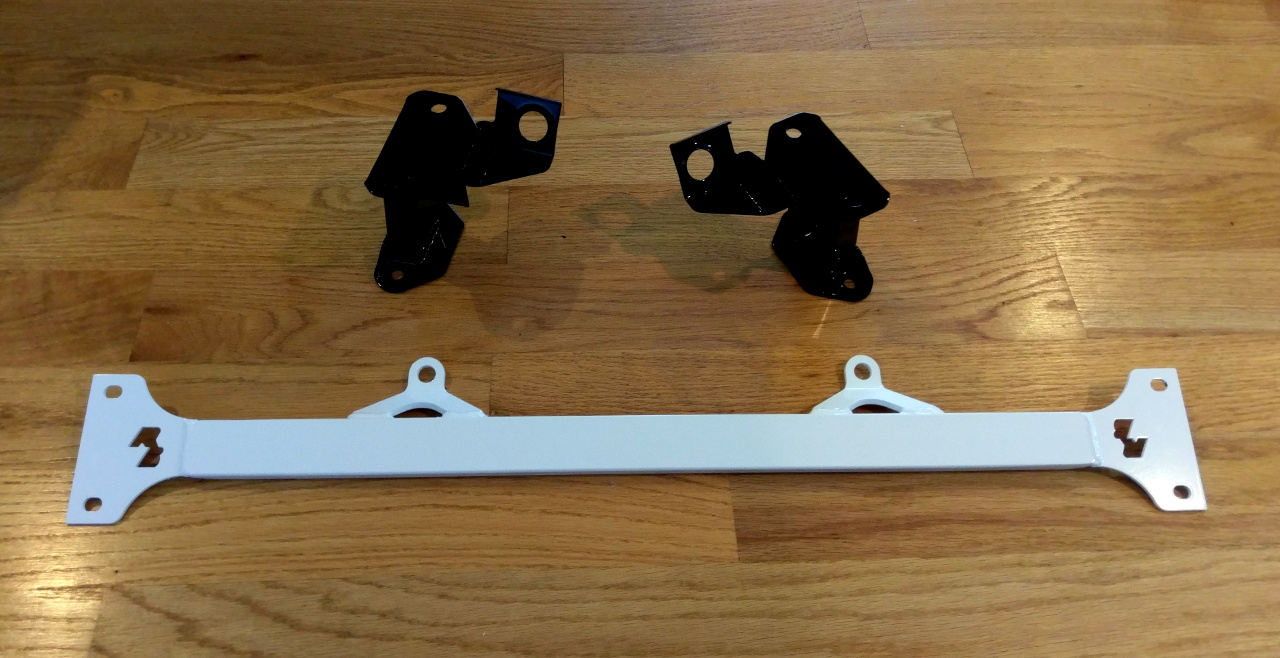
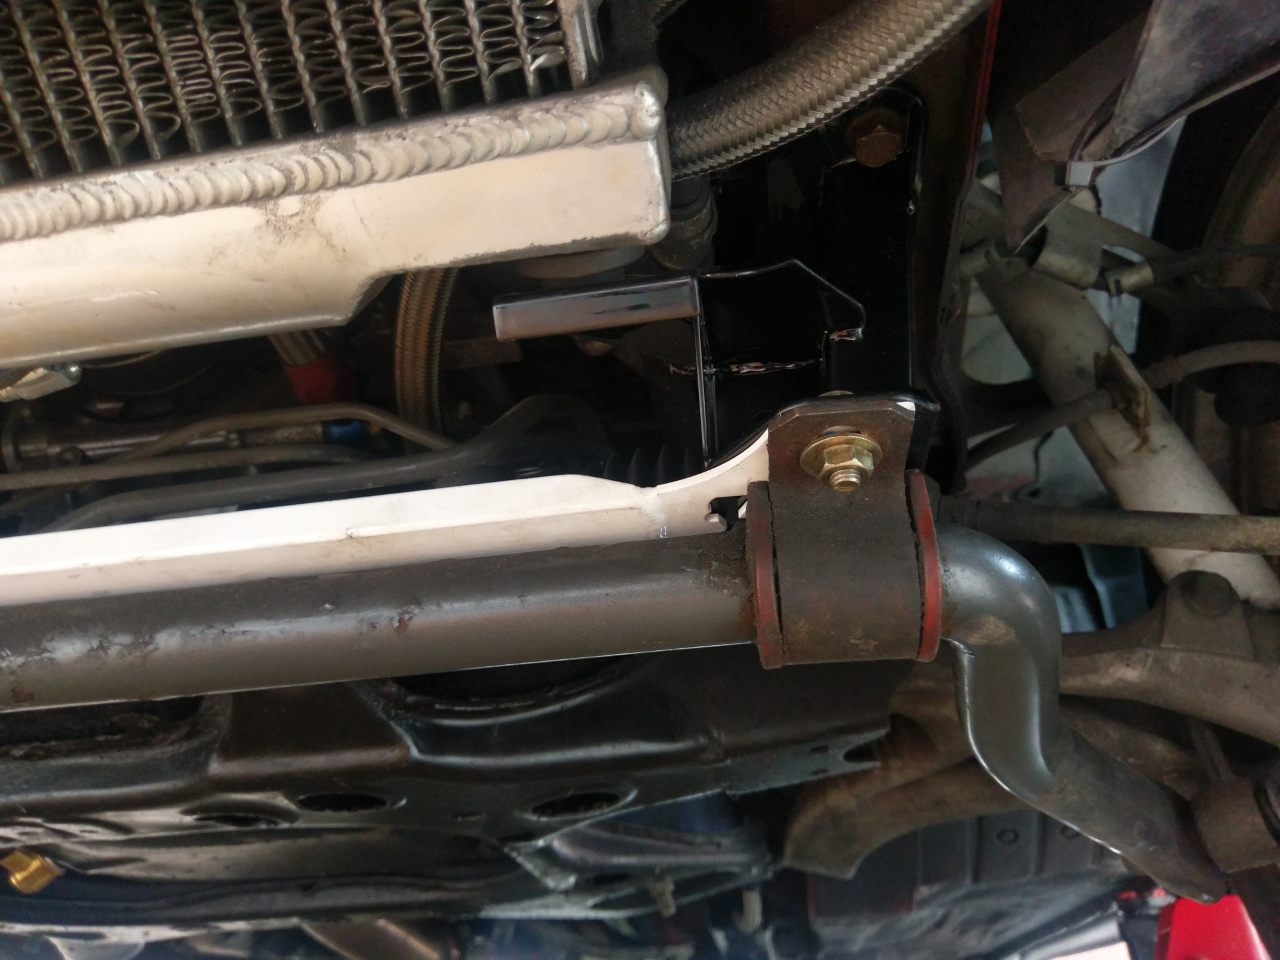
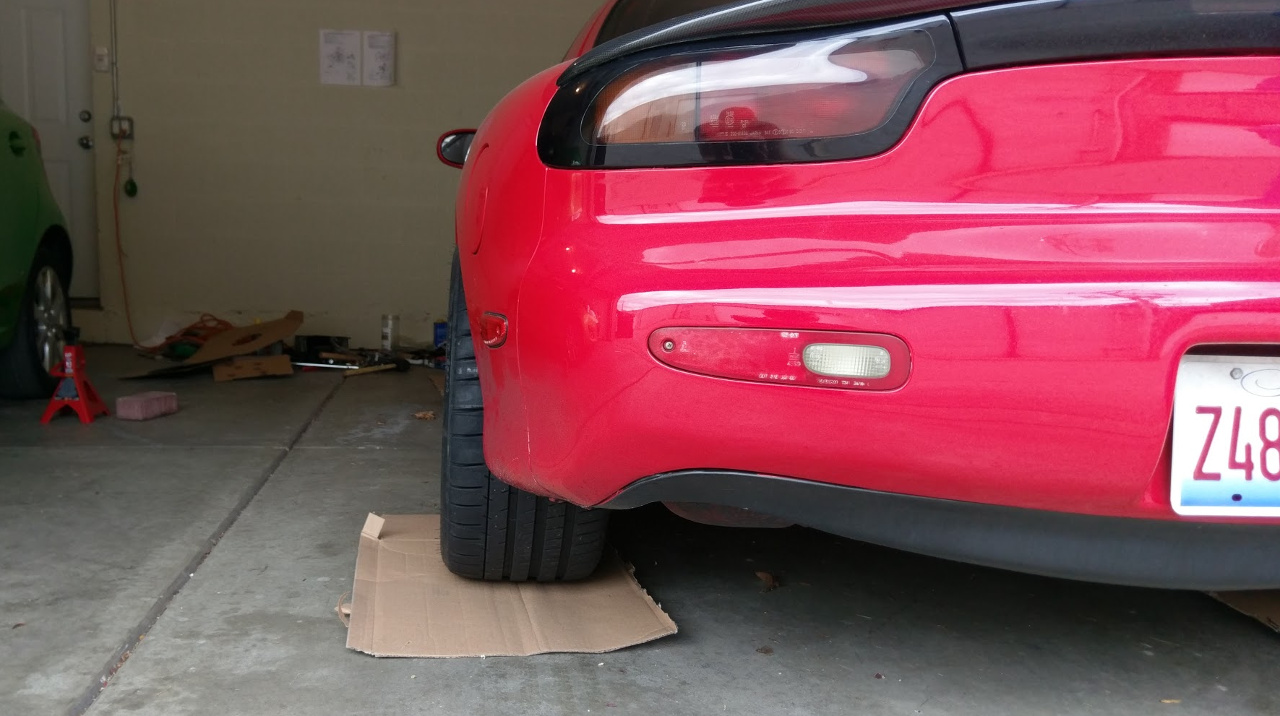
The last thing I did recently was finally replace the front sway bar mounting brackets and the reinforcement bar, which I've had parts to do for quite a while now, but no good weather or time to actually do it. Of course since rolling the fenders went well something else had to go wrong, so what should have been a simple job of unbolting the old pieces and attaching new ones turned into a week long experience...
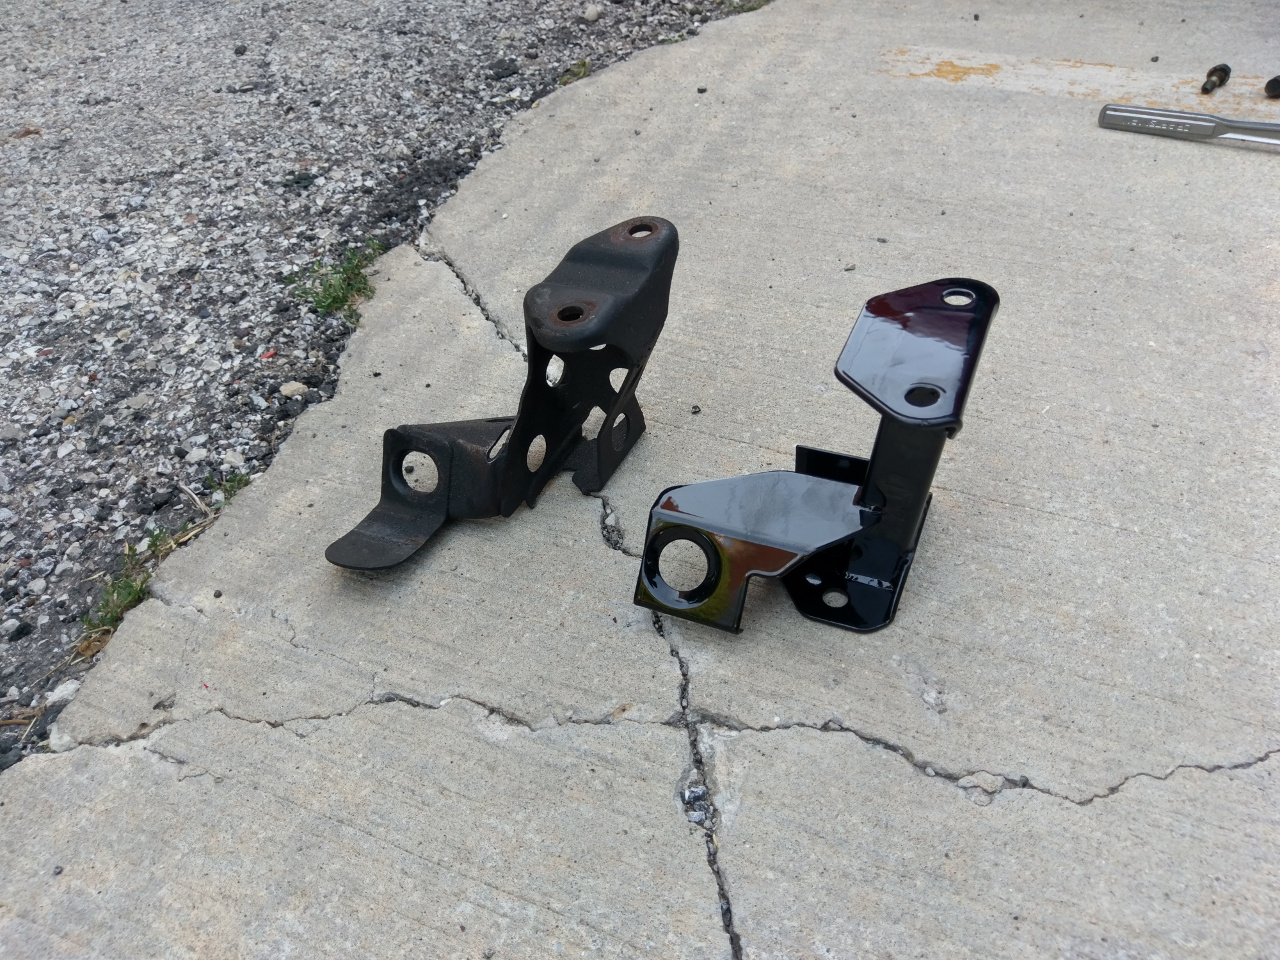
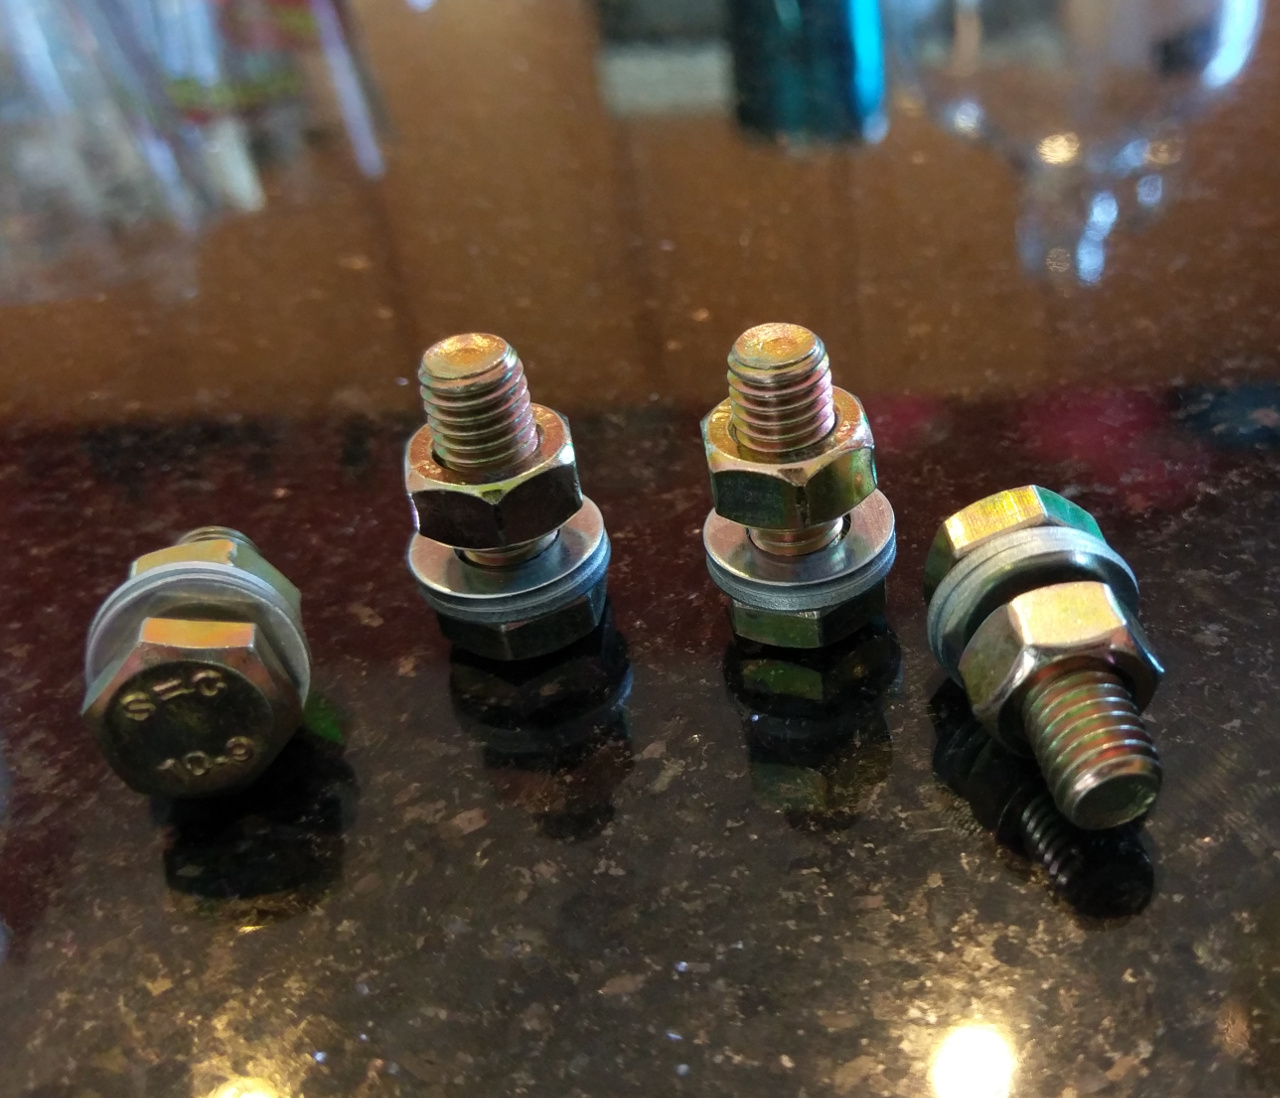
Everything was going fine until almost the very end. I had the front of the car up on stands, my tools handy, thread locker at the ready. I had removed the old pieces without an issue and attached the new brackets to the underside of the car - surprise! - just like they were made to fit there. Then I went to put the reinforcement bar on and realized that while the old brackets had nuts welded on for threads, the new brackets I had attached did not, so I was short some pieces of M8 hardware.
Ok, so I needed to run to the hardware store. Not a big deal.
Well one problem with living in the city and not having a garage is that you can't attempt a project that takes more than a day if the car is on jack stands. You're basically placing an open invitation for someone to try and take your wheels. So running to the hardware store would always have been more time consuming than just running to the hardware store.
The other problem as it turns out, is that nobody ever has anything in stock.
And this is how simple things stretch out into long projects. Having run out of time to work on things I tried out one of the small hardware stores in my neighborhood the next morning.
The first one I tried may be permanently closed, because I haven't seen anyone there since I completed this, and it wasn't open when I stopped by then.
The second small shop I walked to nearby didn't have anything metric.
Next time I got a chance I went to Home Depot, but they had only 3 M8 nuts in the whole store, so I was still going to be missing pieces.
The next day after work I took a cab to an O'Reilly Auto (closest thing to home) and got hit with the curse of a stupid parts person, who both couldn't and wouldn't help me get the nuts and bolts I needed.
I called the next closest Auto place and they too had nothing.
This was getting ridiculous, so when I went home I ordered what I wanted online for in-store pickup at Home Depot, and the next morning I received both a text and an email saying all of my order was in the store and ready for pickup. Of course when I got there most of my order was missing, so I left the rest at the counter and again went home empty handed.
So I gave up and ordered from McMaster-Carr. I did end up with like 10x as many of everything as I needed, and spent more than I wanted, but at least I have the pieces.
And when you have what you need, it's not as difficult to do.
I've been for a drive since, and the front is noticeably less floppy even just driving around the neighborhood.
On my way back from Blackhawk I was tooling around and did a couple of hard pulls when all of a sudden everything got a little louder. None of my readings were way off, but when I was pulling back into my spot at home I could tell I was making more noise than expected. It turned out to be my turbo inlet manifold gasket which had blown out the side, so everything was loud, my engine bay was hot, and it took a bit longer for the turbo to spool up.
Maybe related, and probably somewhat cooked by the exhaust leak nearby, my turbo oil return line cracked and started seeping inside its heat shielding. Before this all got fixed a drop of oil would fall on exhaust every now and then, and a little puff of smoke would come from my engine bay... not very comforting. Needless to say this was fixed very quickly.
I got a new air filter to replace the cheap eBay filter, and let me tell you, all the noises are louder
While some of this was going on I finally had a chance to meet up with ZE Power MX6 and we rolled my front fenders
It looks great, and really evened out the spots where there had been some rubbing before. Thanks again MX6, I'll have to return the favor sometime when you need an extra set of hands.
The last thing I did recently was finally replace the front sway bar mounting brackets and the reinforcement bar, which I've had parts to do for quite a while now, but no good weather or time to actually do it. Of course since rolling the fenders went well something else had to go wrong, so what should have been a simple job of unbolting the old pieces and attaching new ones turned into a week long experience...
Everything was going fine until almost the very end. I had the front of the car up on stands, my tools handy, thread locker at the ready. I had removed the old pieces without an issue and attached the new brackets to the underside of the car - surprise! - just like they were made to fit there. Then I went to put the reinforcement bar on and realized that while the old brackets had nuts welded on for threads, the new brackets I had attached did not, so I was short some pieces of M8 hardware.
Ok, so I needed to run to the hardware store. Not a big deal.
Well one problem with living in the city and not having a garage is that you can't attempt a project that takes more than a day if the car is on jack stands. You're basically placing an open invitation for someone to try and take your wheels. So running to the hardware store would always have been more time consuming than just running to the hardware store.
The other problem as it turns out, is that nobody ever has anything in stock.
And this is how simple things stretch out into long projects. Having run out of time to work on things I tried out one of the small hardware stores in my neighborhood the next morning.
The first one I tried may be permanently closed, because I haven't seen anyone there since I completed this, and it wasn't open when I stopped by then.
The second small shop I walked to nearby didn't have anything metric.
Next time I got a chance I went to Home Depot, but they had only 3 M8 nuts in the whole store, so I was still going to be missing pieces.
The next day after work I took a cab to an O'Reilly Auto (closest thing to home) and got hit with the curse of a stupid parts person, who both couldn't and wouldn't help me get the nuts and bolts I needed.
I called the next closest Auto place and they too had nothing.
This was getting ridiculous, so when I went home I ordered what I wanted online for in-store pickup at Home Depot, and the next morning I received both a text and an email saying all of my order was in the store and ready for pickup. Of course when I got there most of my order was missing, so I left the rest at the counter and again went home empty handed.
So I gave up and ordered from McMaster-Carr. I did end up with like 10x as many of everything as I needed, and spent more than I wanted, but at least I have the pieces.
And when you have what you need, it's not as difficult to do.
I've been for a drive since, and the front is noticeably less floppy even just driving around the neighborhood.
Last edited by Lord Bro; Jul 7, 2016 at 03:37 PM.
Thread Starter
Full Member
Joined: May 2015
Posts: 83
Likes: 3
From: Chicago
catch can vs battery
Ha thanks. I expect to run out of hardware now and then, but not have it be impossible to find...
So I desperately need to install my oil catch can. I've still just got a little tube coming off the oil filler neck that dumps out the bottom of the car. Before I got tuned it wasn't a big deal, but now that everything is running strong I get a few drips when I park.
The issue I'm facing is I don't have room to put the catch can anywhere. I've got a PC680 battery to make space already, I've still got my ABS (which might work?), and my cruise control (which won't work without the wheel controls?), and that air filter takes up the space in the front right.
I had the idea that by shifting my battery forward an inch or so I might be able to create enough room to attach the catch can, but I'm not sure this is going to work. I was going to tap new mount holes an inch forward, but it looks like there are nuts on the backside of the stock battery tie down holes. I would need to get a couple of nuts on the other side of that rail, but I'm not sure there is a way in there, does anyone know?
So the result may be that I have to relocate my battery to the rear in order to accommodate the catch can, which to me is preferable over removing the cruise or abs units, if they even work.
Thread Starter
Full Member
Joined: May 2015
Posts: 83
Likes: 3
From: Chicago
Thanks guys! It wasn't too difficult to do in the end, and it feels great to drive now by comparison.
I do have a couple of things to say about the replacement sway bar mounting brackets that I got, and I'll start by saying I do like them.
I got the brackets from Anthony Woodford Racing, and they took a bit over 2 weeks to ship, 3 weeks to get to my door. This isn't so bad considering they were made after I completed my order, but I'm glad I wasn't on a desperate timeline.
They are definitely beefier than the stock mounts, and the welds are all at least consistent looking under the powder coat. I'm sure they would hold up to abuse which would cause the stock ones to fail.
They are a good 6mm or so taller than the stock units though which presented me with a couple of problems: the radiator won't sit low enough to touch the mounts, and my RB brace sits too low to sit flush against the front subframe since it attaches to the mounting brackets. I was able to bend the front arms of the brackets up to meet and support the radiator and I used some flat washers as spacers between the brace and the subframe, so not quite "perfect".
In other news, I'm about to attempt my largest upgrade yet...
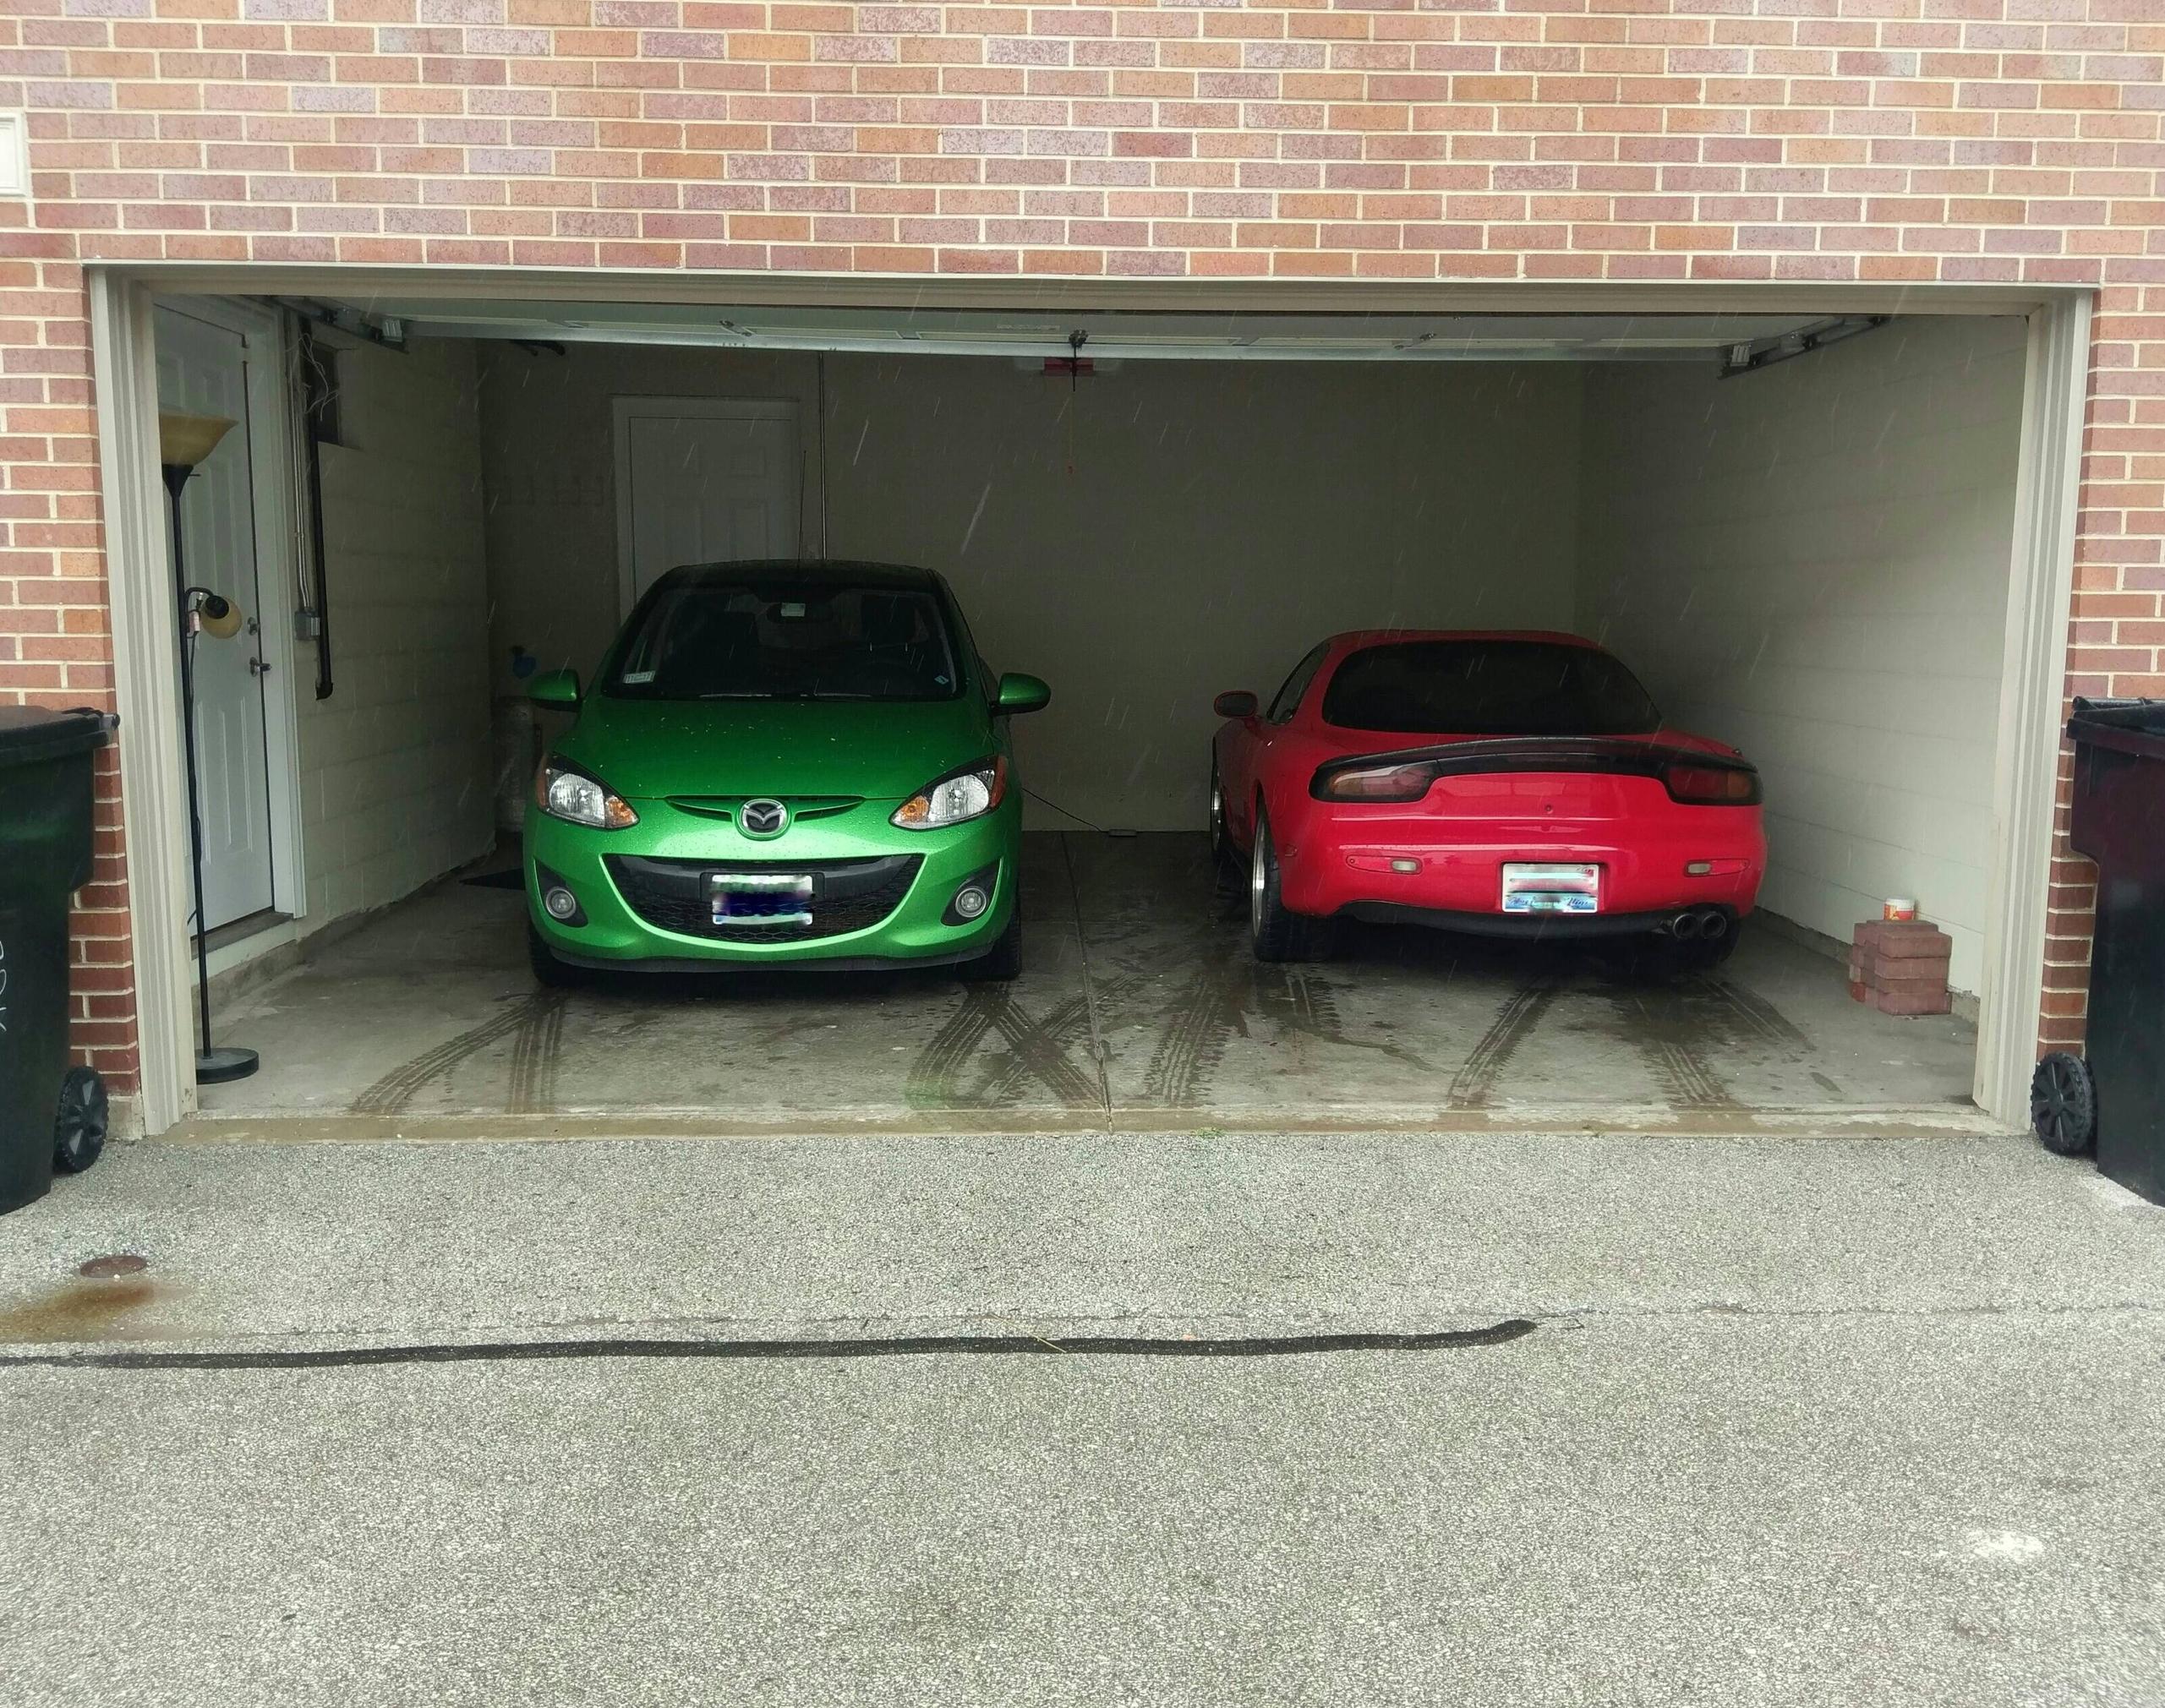
And now comes the projects! My car had sat all year in my garage because of all the projects... And lack or caring/motivation. Once you have a garage you can really start diving deep!
Thread Starter
Full Member
Joined: May 2015
Posts: 83
Likes: 3
From: Chicago
Since moving into the house unfortunately not as much as I would have liked has happened with car progress. I really wanted to try and do an autocross or something before the end of the year, but I waited too late and ended up missing the final one I found, so I'll have to be ready for Spring instead.
When it was a bit warmer out I had a bit of a doing things to cars party. I bled the brakes/clutch and installed speed bleeders. The Death Echo needed some fluids to survive a little bit longer.
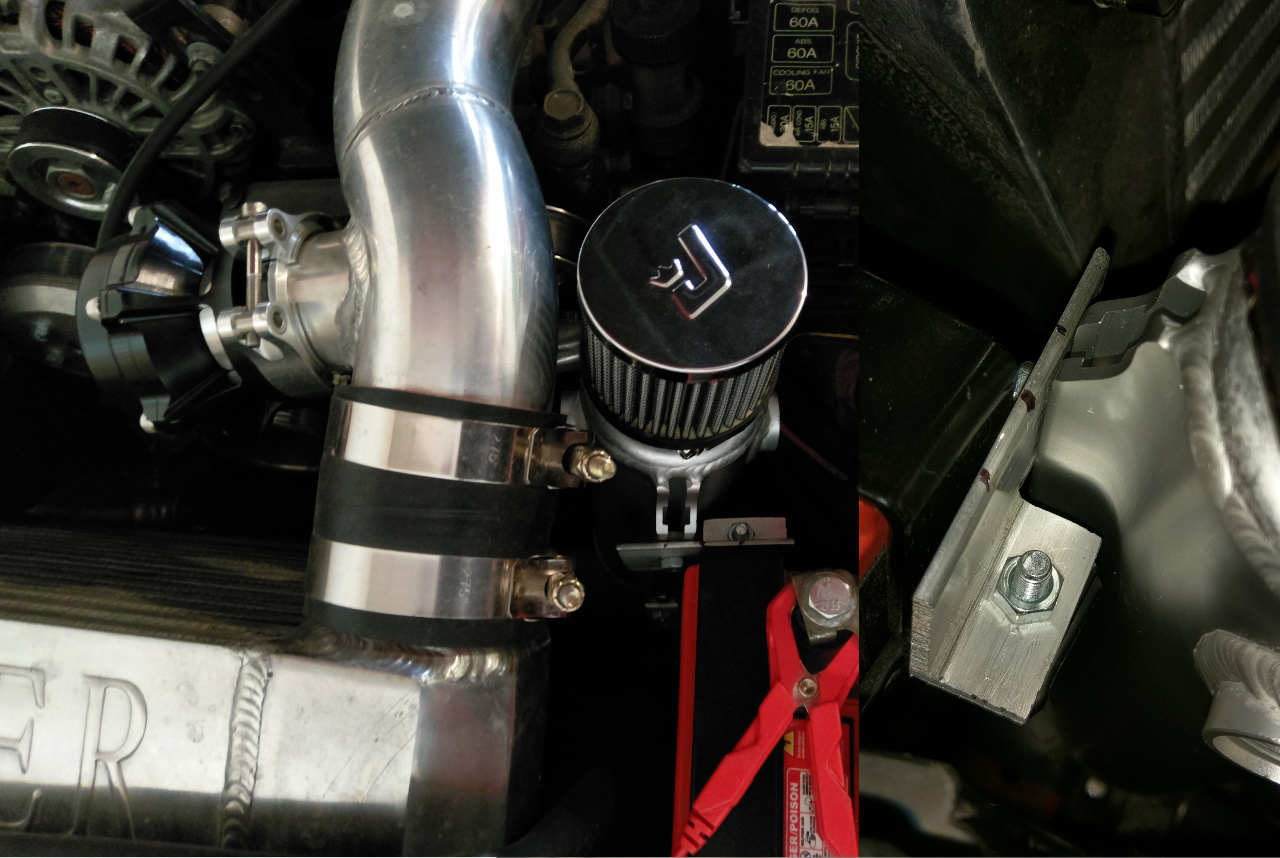
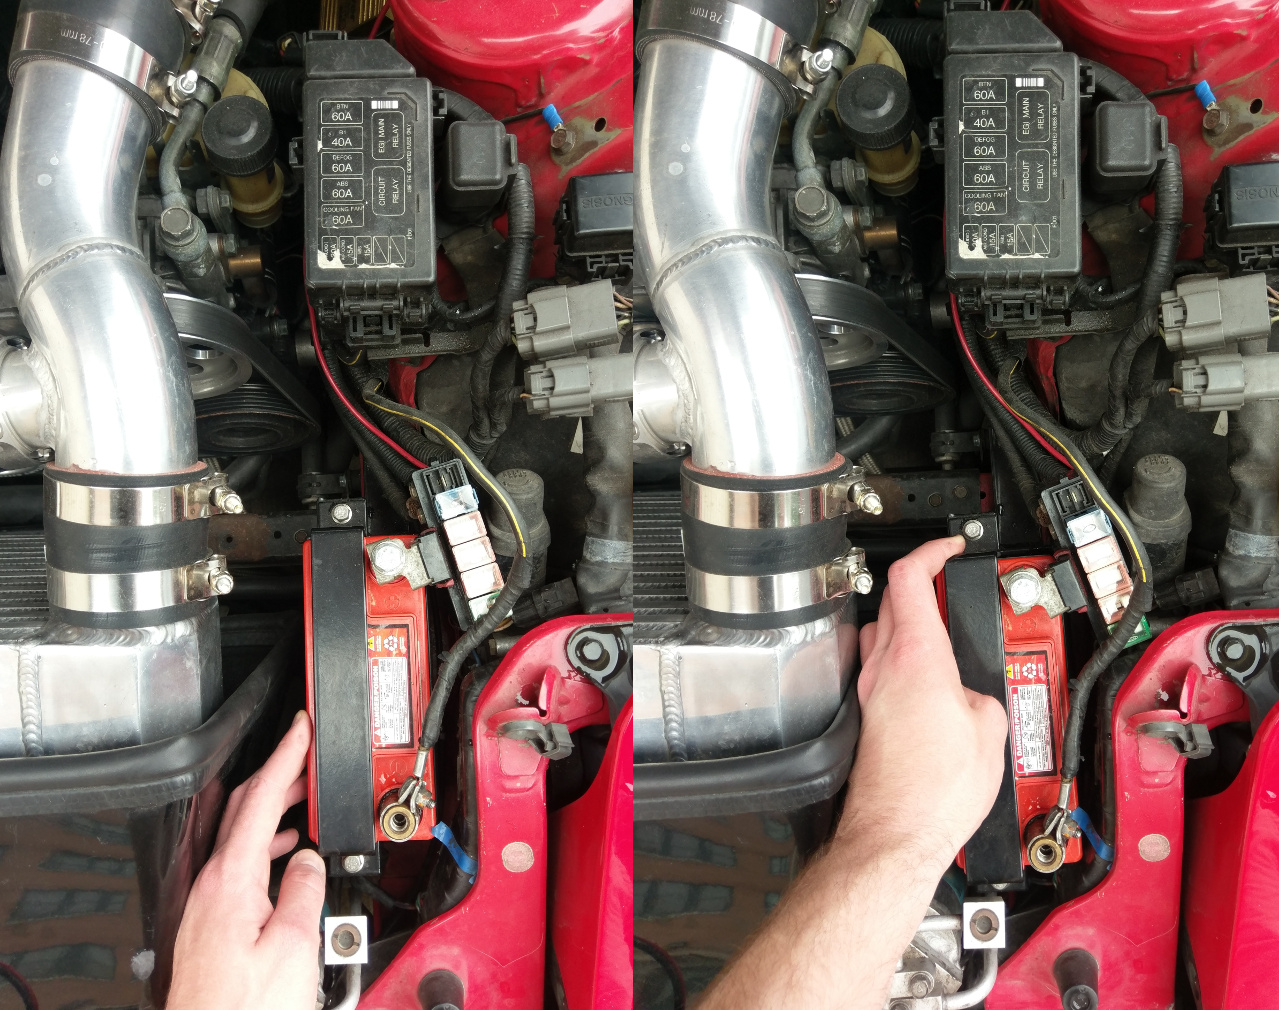
I got the catch can installed in a temporary location next to the battery. I decided that shifting the battery forward to make room wasn't going to work, so I made a bracket to allow me to use some stock mounting locations until I can really move things around.
I'd like to remove the battery from the engine bay, which would make more room for the catch can in this location. I'm thinking of using two motorcycle batteries in parallel mounted in the rear of the car instead of the one pc680... sound fun?
When it was a bit warmer out I had a bit of a doing things to cars party. I bled the brakes/clutch and installed speed bleeders. The Death Echo needed some fluids to survive a little bit longer.
I got the catch can installed in a temporary location next to the battery. I decided that shifting the battery forward to make room wasn't going to work, so I made a bracket to allow me to use some stock mounting locations until I can really move things around.
I'd like to remove the battery from the engine bay, which would make more room for the catch can in this location. I'm thinking of using two motorcycle batteries in parallel mounted in the rear of the car instead of the one pc680... sound fun?
_____________
Joined: Sep 2015
Posts: 140
Likes: 0
From: TEXAS
Nice read. I am also going through my FD and trying to fix things the previous owner has done/or not done.
Glad to see its working though.
Its truly amazing what some people will think is an acceptable modification/fix....
Glad to see its working though.
Its truly amazing what some people will think is an acceptable modification/fix....
Thread Starter
Full Member
Joined: May 2015
Posts: 83
Likes: 3
From: Chicago
Biting off more
Thanks borisf. So far it seems like fixing things left by previous owners is never ending. The story continues.
January and February have come and gone. I dawdled on wheels and random things all winter just because of cold temperatures and cowardice, slowly completing small tasks here and there, but it's time to get going if I'm to have some fun this year.
If I'm good about how I spend my time I want to get through everything in the next month or so:

I've got a head start on a few of the things already and the car is on stands now, so I'll get started on the bushings shortly. There is going to be a lot of learning here.

The battery relocation is something I've wanted to do since my first pc680 died, and after another winter of having to be **** about using the battery tender it's still at the top of the list. Of course another advantage is the space I'm going to gain under the hood. I peeled back some of the interior panels and started pulling some extra wires out. I ended up with 17' or so of speaker cable left from the subwoofer, but I know there's a small power wire that was run that I will also pull out.

The batteries I'm using are going to go into the spare tire area side-by-side, wired in parallel. I've never had a spare tire so I'm not really losing anything, and this way I'll still have all my hatch space. I have pretty good clearance in there with about 0.75" above the top of the battery with the spare tire cover in place, so I'm confident this will work.
I'm going to mechanically anchor the batteries in place, and I've gone to pains to try and design everything so it is SCCA/NASA/what have you (not NHRA I guess) legal. Time and tech inspection will tell unless someone says otherwise beforehand.
I'll have more than double the CCA of the PC680 battery, with more capacity as well. The weight of both of these batteries together edges out the PC680 by a few pounds, but with the extra capacity I think it's worth it. The other weight I'll gain will be from the 0-gauge cables I'm going to be using and from the 2-battery tie-down bracket I'm making, but I think everything still easily comes in under the weight of an Optima or the stock battery.

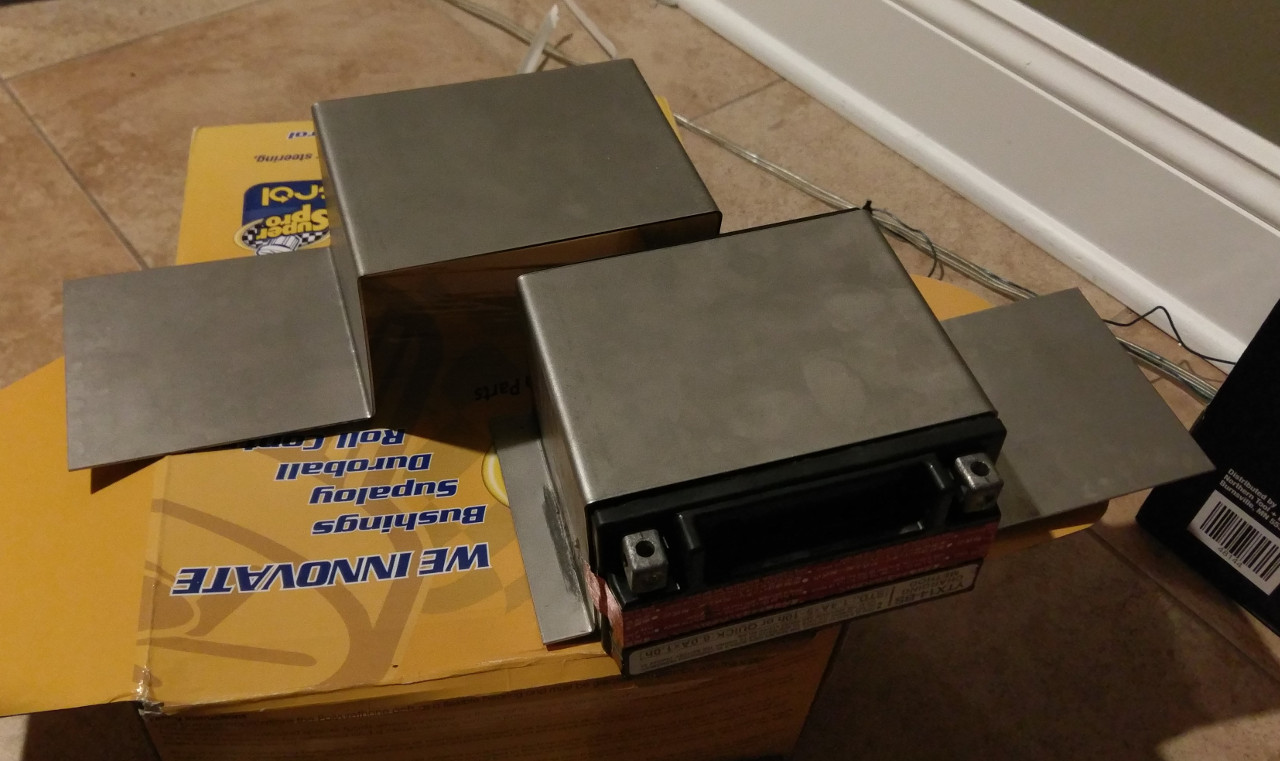
I took out the battery, its box, intercooler and tubes, and the ducting to check everything out. I'm not sure what the ducting was originally, but it's got some huge chunks taken out of it that I'm positive are reducing its effectiveness. The edges of the ducting also don't match up with the face of the intercooler, which is smaller, so really it's just a defective installation from start to finish.
I ordered a different piece of silicon intercooler piping to help shift everything slightly, and once that arrives I'll measure and start cutting into the ducting. I need to make the opening smaller so there is a good seal between the ducting and full area of the heat exchanger, so I'll cut everything down and tape it to start. Once I have a cardboard mockup and duct size that works I'll lay some fiberglass across it to make the changes permanent. Blast with black paint as usual.
January and February have come and gone. I dawdled on wheels and random things all winter just because of cold temperatures and cowardice, slowly completing small tasks here and there, but it's time to get going if I'm to have some fun this year.
If I'm good about how I spend my time I want to get through everything in the next month or so:
- Get new wheels/tires
- Replace all the bushings
- Replace battery with two motorcycle batteries in the trunk
- Pull unnecessary wires from the car. Goal is 0 wires.
- New oil fill neck with -10AN bung
- Move catch can to better location
- Adjust intercooler position
- Learn to use fiberglass and modify the intercooler ducting to fit better
- Oil change
I've got a head start on a few of the things already and the car is on stands now, so I'll get started on the bushings shortly. There is going to be a lot of learning here.
The battery relocation is something I've wanted to do since my first pc680 died, and after another winter of having to be **** about using the battery tender it's still at the top of the list. Of course another advantage is the space I'm going to gain under the hood. I peeled back some of the interior panels and started pulling some extra wires out. I ended up with 17' or so of speaker cable left from the subwoofer, but I know there's a small power wire that was run that I will also pull out.
The batteries I'm using are going to go into the spare tire area side-by-side, wired in parallel. I've never had a spare tire so I'm not really losing anything, and this way I'll still have all my hatch space. I have pretty good clearance in there with about 0.75" above the top of the battery with the spare tire cover in place, so I'm confident this will work.
I'm going to mechanically anchor the batteries in place, and I've gone to pains to try and design everything so it is SCCA/NASA/what have you (not NHRA I guess) legal. Time and tech inspection will tell unless someone says otherwise beforehand.
I'll have more than double the CCA of the PC680 battery, with more capacity as well. The weight of both of these batteries together edges out the PC680 by a few pounds, but with the extra capacity I think it's worth it. The other weight I'll gain will be from the 0-gauge cables I'm going to be using and from the 2-battery tie-down bracket I'm making, but I think everything still easily comes in under the weight of an Optima or the stock battery.
I took out the battery, its box, intercooler and tubes, and the ducting to check everything out. I'm not sure what the ducting was originally, but it's got some huge chunks taken out of it that I'm positive are reducing its effectiveness. The edges of the ducting also don't match up with the face of the intercooler, which is smaller, so really it's just a defective installation from start to finish.
I ordered a different piece of silicon intercooler piping to help shift everything slightly, and once that arrives I'll measure and start cutting into the ducting. I need to make the opening smaller so there is a good seal between the ducting and full area of the heat exchanger, so I'll cut everything down and tape it to start. Once I have a cardboard mockup and duct size that works I'll lay some fiberglass across it to make the changes permanent. Blast with black paint as usual.
Thread Starter
Full Member
Joined: May 2015
Posts: 83
Likes: 3
From: Chicago
Good progress has been made on a lot of fronts, but it's time to get going on those bushings now that I have the tools. I want to drive the car eventually, and to do that I'll need to put everything back together.
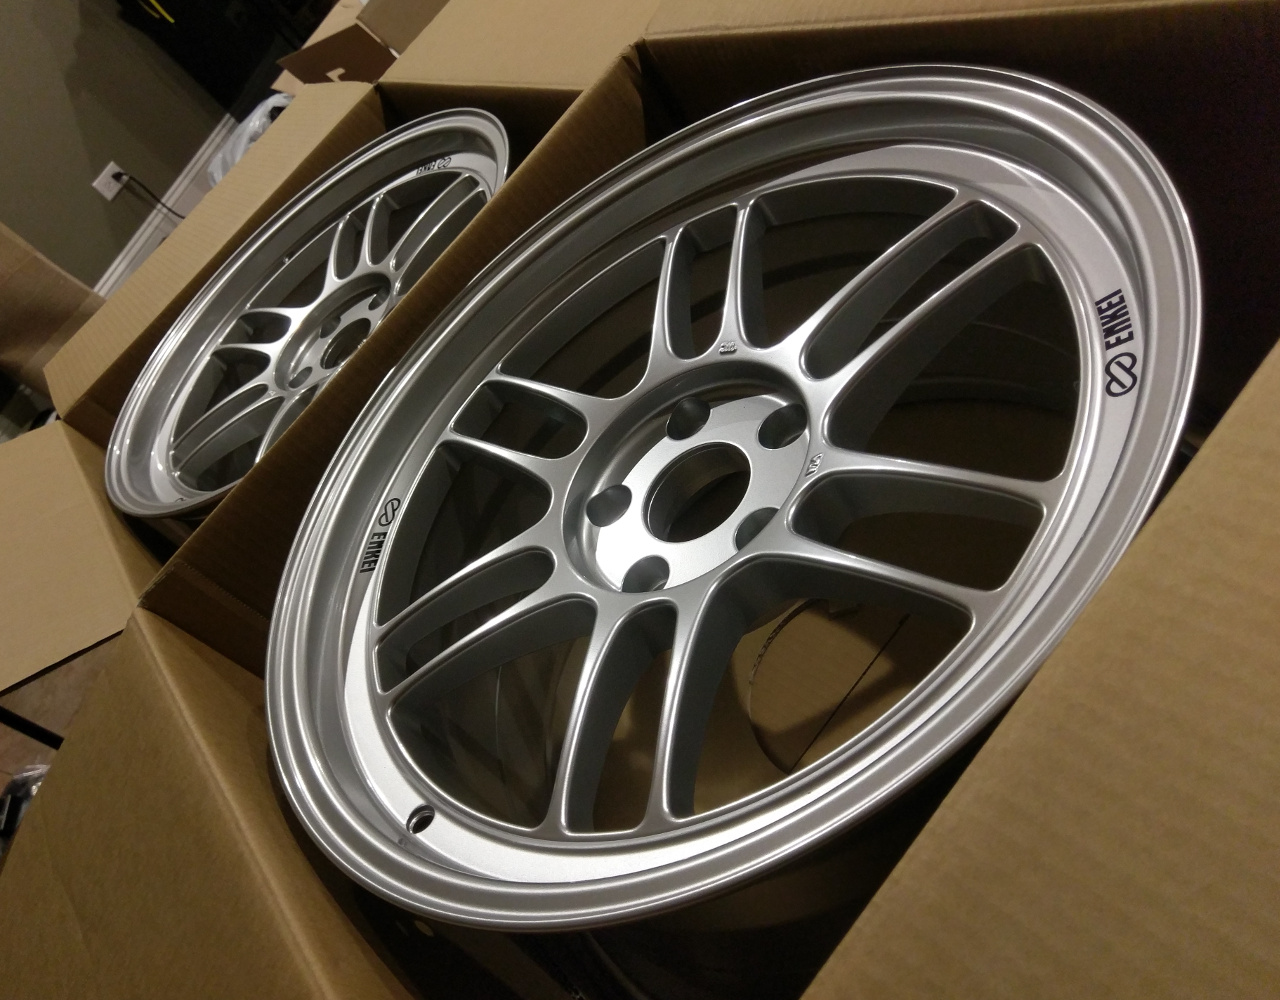
RPF1's in my life have been a long time coming.
Some people don't like them, but I do, which is lucky since they are the 'budget' option. I pulled the trigger and went with 18x9.5 +38 in front, and 18x10 +38 in the rear.
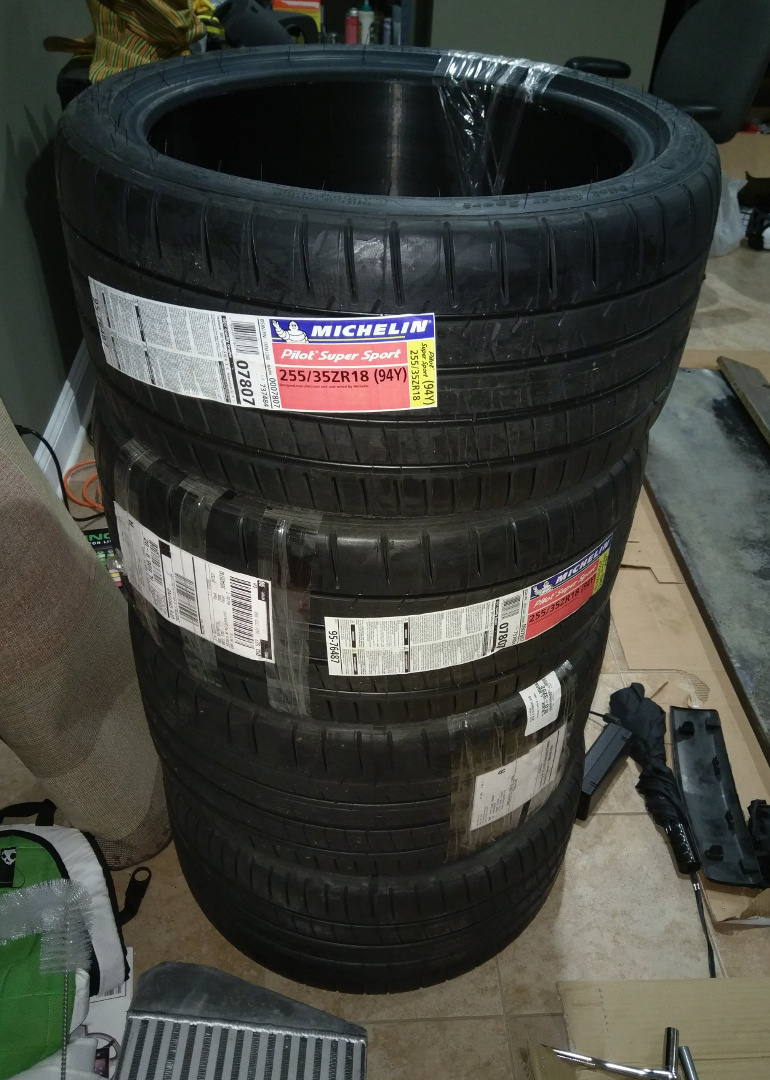
I got some PSS in 255 and 275, so now I've got to find somewhere to mount them.
Hopefully they'll last for a little while, and will at least be decent road tires until I'm ready to get a second set of wheels and have dedicated street/track sets.
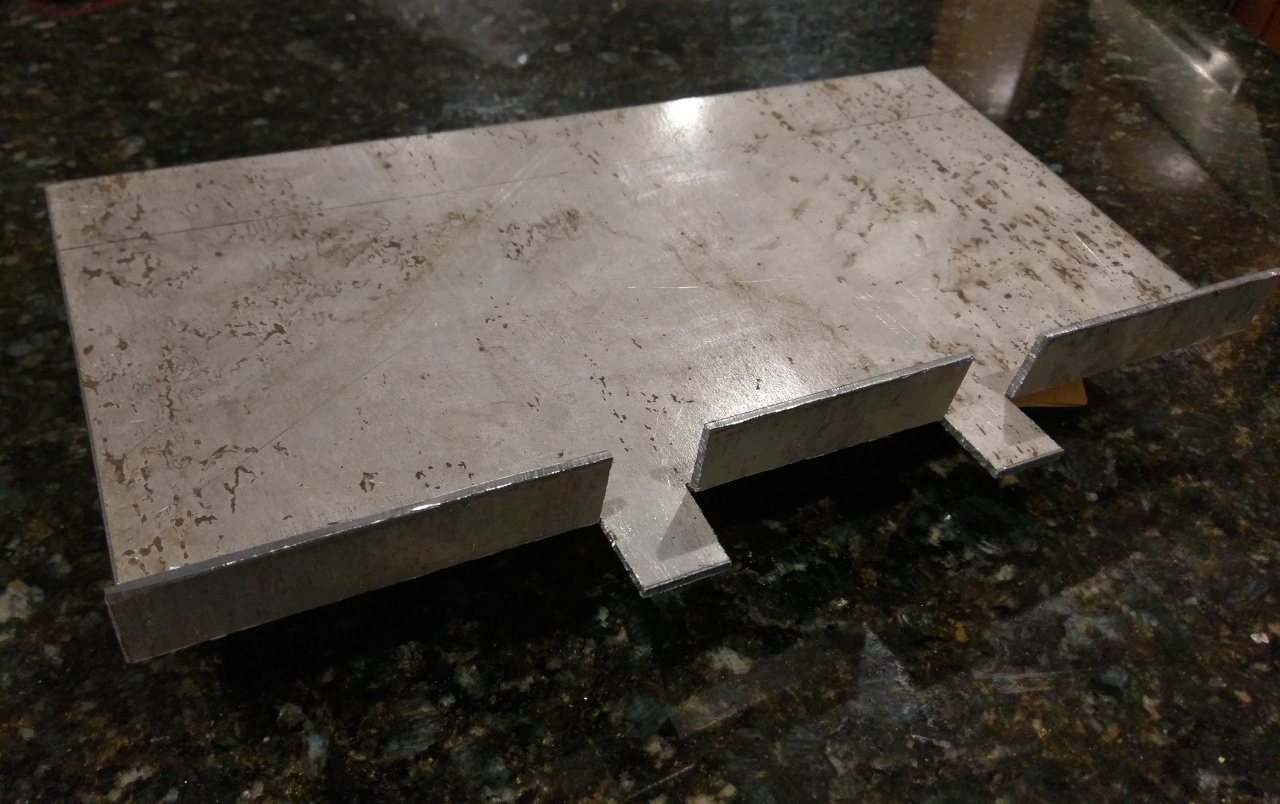
My battery placement system is coming along nicely. Once I figure out exactly where I'm attaching the bottom mounting plate I'll drill holes in it and the battery 'straps' to secure them together. The bottom plate will mount directly to the car. I'll likely leave some of the extra material on the end of one of the battery straps and mount my breaker and a couple of fuses there.
I got a friend with access to a brake to bend up the sheets I'm using to secure the batteries to the bottom plate. There's just no way could I get nice 90 degree bends using a hammer.
For the bottom plate I used my dremel to cut a slot ~2/3 of the way through the metal, and then bent it away from the cut using clamps and a pipe wrench. I'll get a bead welded (for me) along the back of the bend to strengthen it.

I picked up a 20-ton Harbor Freight press and random things to help me with pressing out/in bushings. Overall I'll have spend under $300 in tools for everything, which beats the service fees for installing bushings any day. I'm so looking forward to crushing some stuff with this, aside from using it responsibly.
RPF1's in my life have been a long time coming.
Some people don't like them, but I do, which is lucky since they are the 'budget' option. I pulled the trigger and went with 18x9.5 +38 in front, and 18x10 +38 in the rear.
I got some PSS in 255 and 275, so now I've got to find somewhere to mount them.
Hopefully they'll last for a little while, and will at least be decent road tires until I'm ready to get a second set of wheels and have dedicated street/track sets.
My battery placement system is coming along nicely. Once I figure out exactly where I'm attaching the bottom mounting plate I'll drill holes in it and the battery 'straps' to secure them together. The bottom plate will mount directly to the car. I'll likely leave some of the extra material on the end of one of the battery straps and mount my breaker and a couple of fuses there.
I got a friend with access to a brake to bend up the sheets I'm using to secure the batteries to the bottom plate. There's just no way could I get nice 90 degree bends using a hammer.
For the bottom plate I used my dremel to cut a slot ~2/3 of the way through the metal, and then bent it away from the cut using clamps and a pipe wrench. I'll get a bead welded (for me) along the back of the bend to strengthen it.
I picked up a 20-ton Harbor Freight press and random things to help me with pressing out/in bushings. Overall I'll have spend under $300 in tools for everything, which beats the service fees for installing bushings any day. I'm so looking forward to crushing some stuff with this, aside from using it responsibly.
Thread Starter
Full Member
Joined: May 2015
Posts: 83
Likes: 3
From: Chicago
This is why
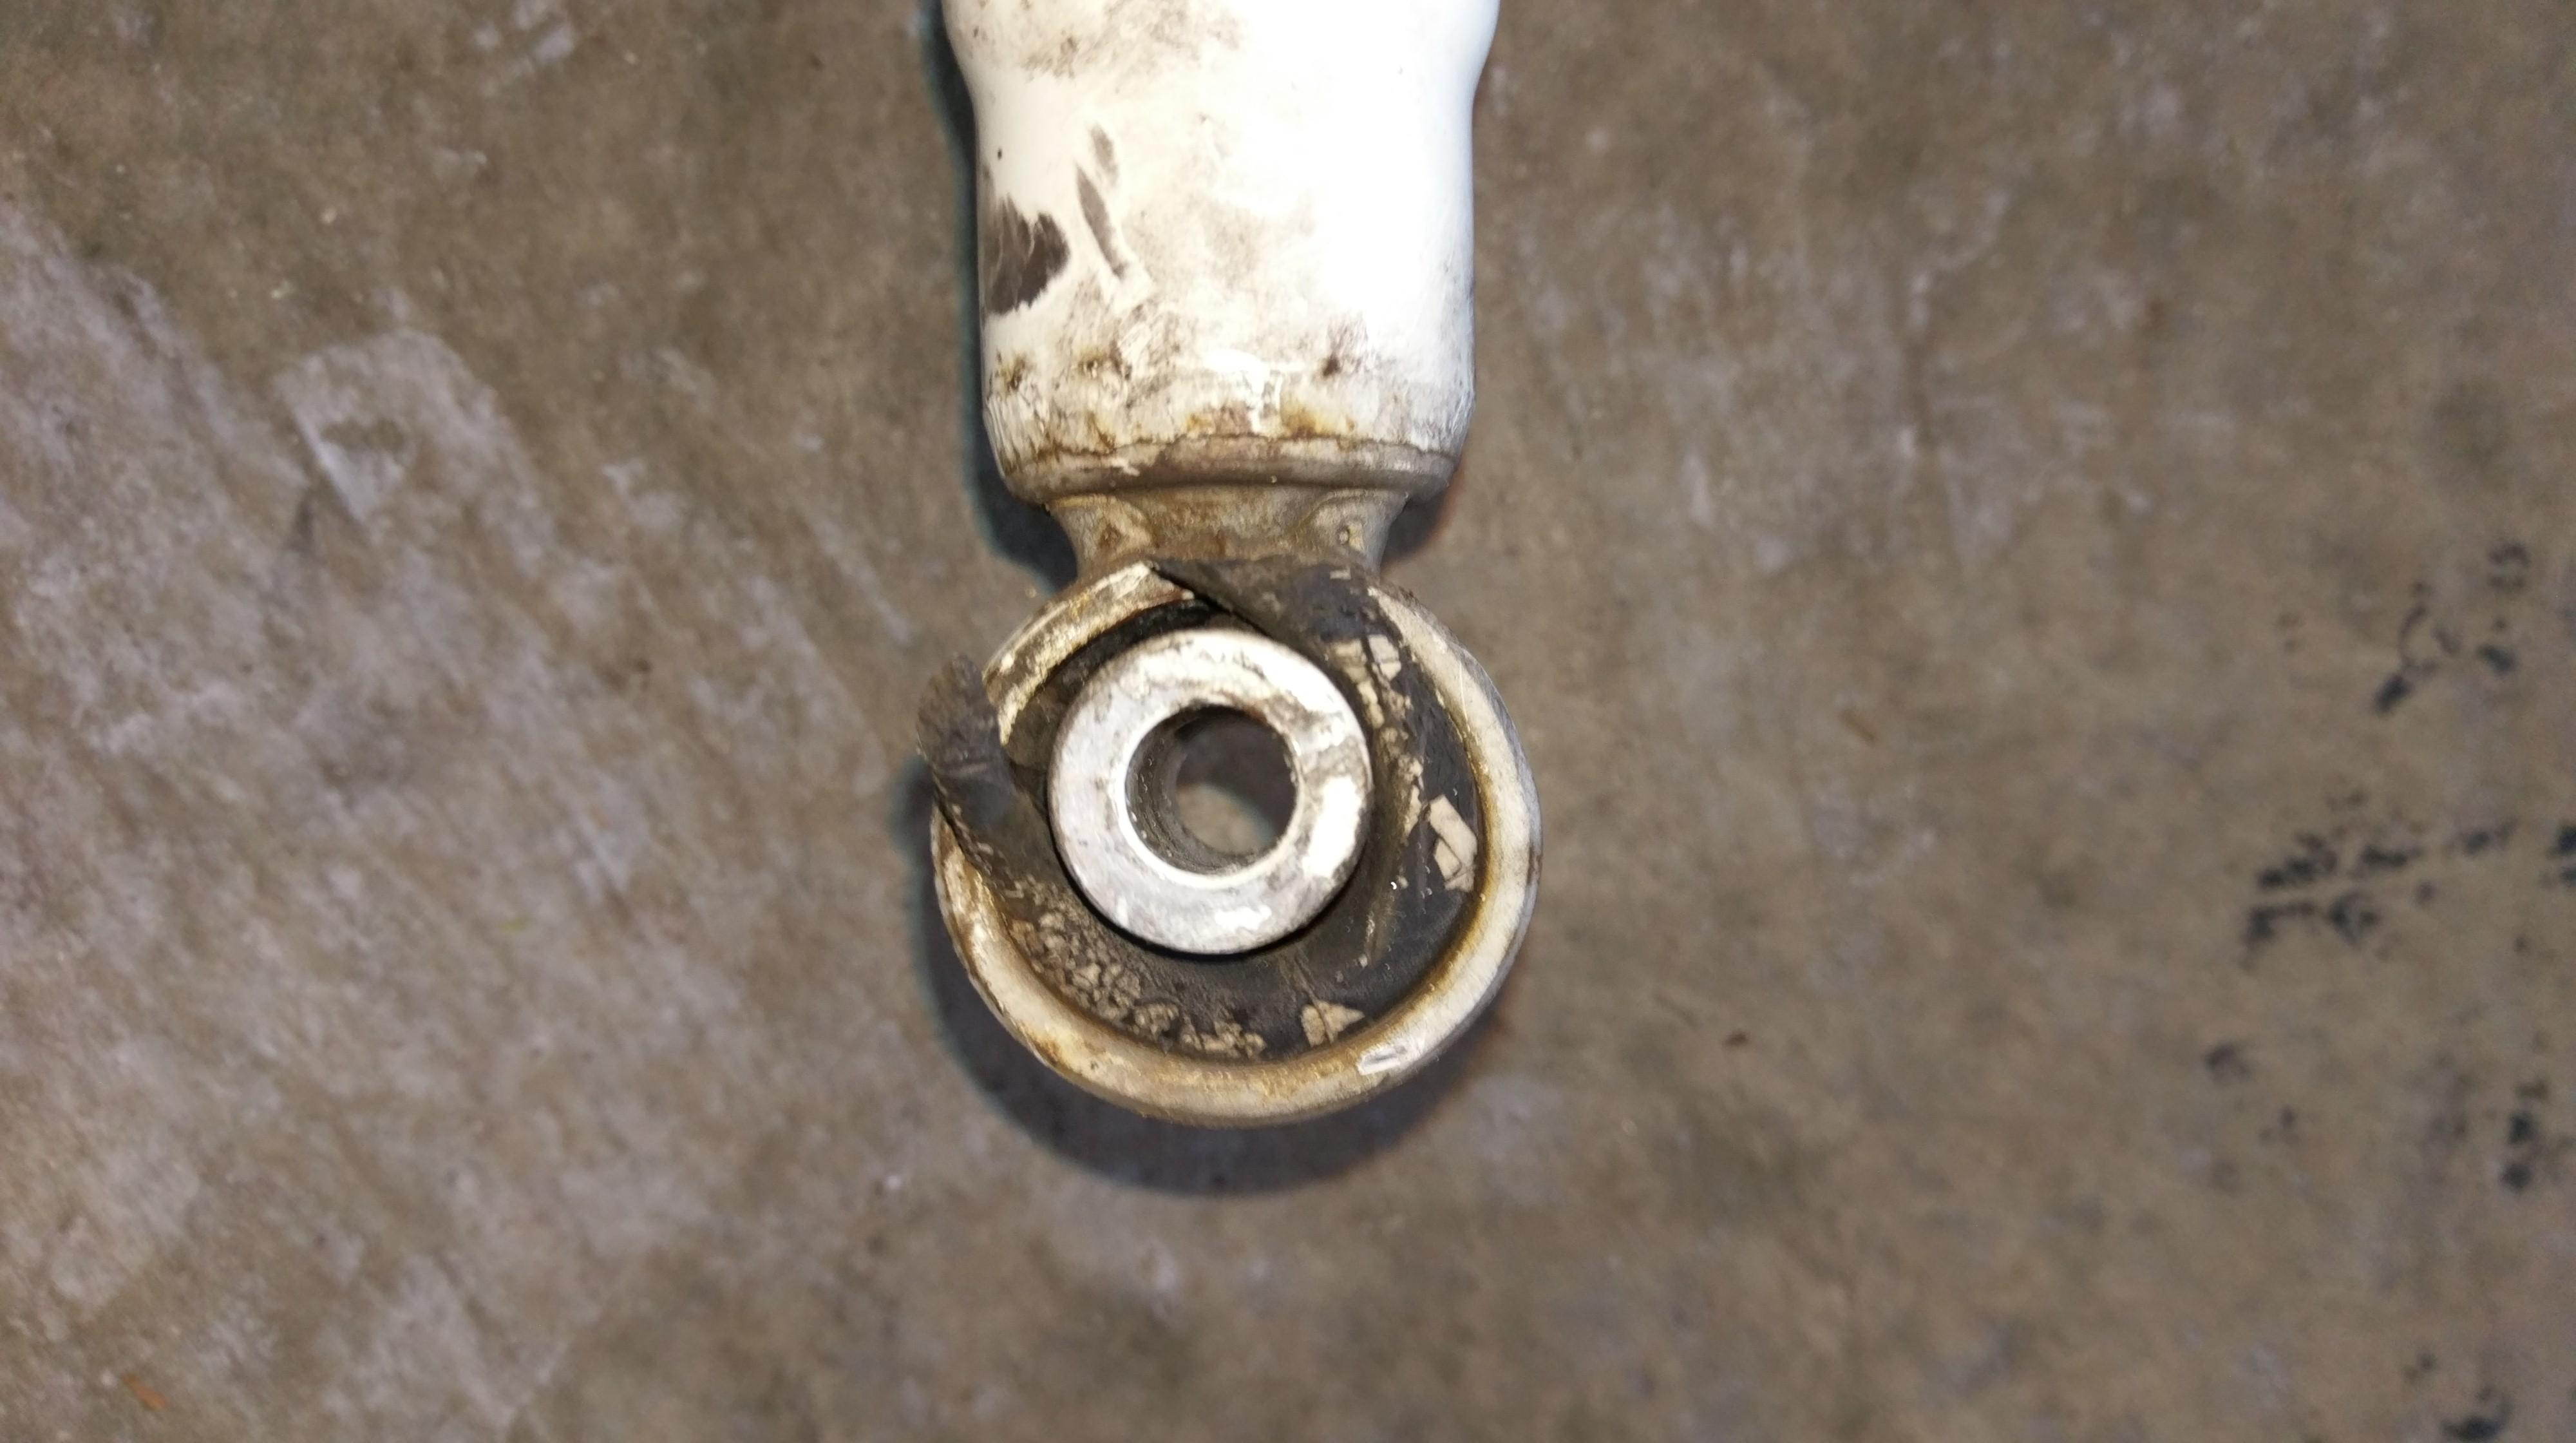
aaaaaand this is why I need to replace my bushings. My front shock eye bushings are the worst, but not the only ones where there are bits of rubber sticking out, or visibly sagging or cracked.
I'll still need to do my pillow-***** in the future since I can feel the slop with my bare hands, but I'm making good progress on the rest.
Now if only USPS would get its act together and deliver those new shock eye bushings....
Thread Starter
Full Member
Joined: May 2015
Posts: 83
Likes: 3
From: Chicago

Doing the bushings was a big undertaking for me, but I was able to finish all 4 corners minus the pillow-ball bushings. As with everything else I've done it was an uphill battle the entire time, with pieces frozen on by 24 years of road grime and oxidation. Probably the worst bushings to get out were the two inner bushings in the rear upper control arms. I had to heat the end of the arms with my heat gun, and then still cranked the press down with enough force to bend my 1"x1" steel bar I've been using before the bushing started to pop free.

I used the SuperPro full bushing kit Kit130K, which replaces all the non-pillow-ball bushings at the corners, steering rack, and the differential bushings. Many of the stock bushings are rubber with a metal sleeve, so pressing the stock bushings out was a real pain, but pressing in the new poly bushings (no sleeve) and pins was comparatively easy. The exception here was the new bushings for the trailing arms in the rear, which were the only SuperPro bushings that also had sleeves. I got some help with those and used some different pressing tools after heating the ends of the arms for a while to get the new ones in.

I also had a lot of trouble getting the ball joint posts from the upper and lower arms out of the knuckles. The front right wasn't actually that bad, but I lost days figuring out how to get the posts pressed out on the driver's side. After a lot of persuasion and some prying, I was finally able to get the upper one out with the ball joint separator. The lower one (with the castle nut) I had to heat the knuckle a bit, crank the separator tool down until I was making new threads, and then pound on the side of the knuckle with a 32oz ball peen hammer. Everything goes back together pretty easily though. I've still got to do the steering rack and diff bushings.
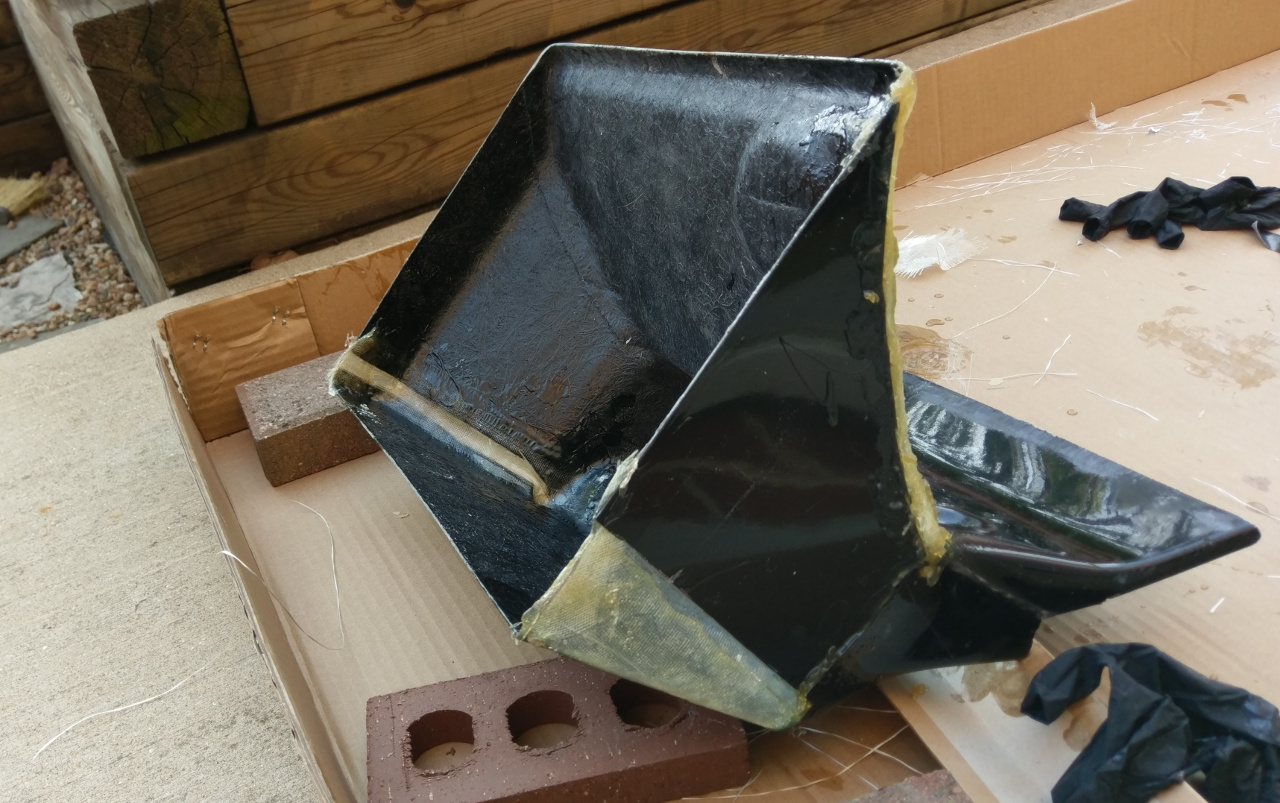
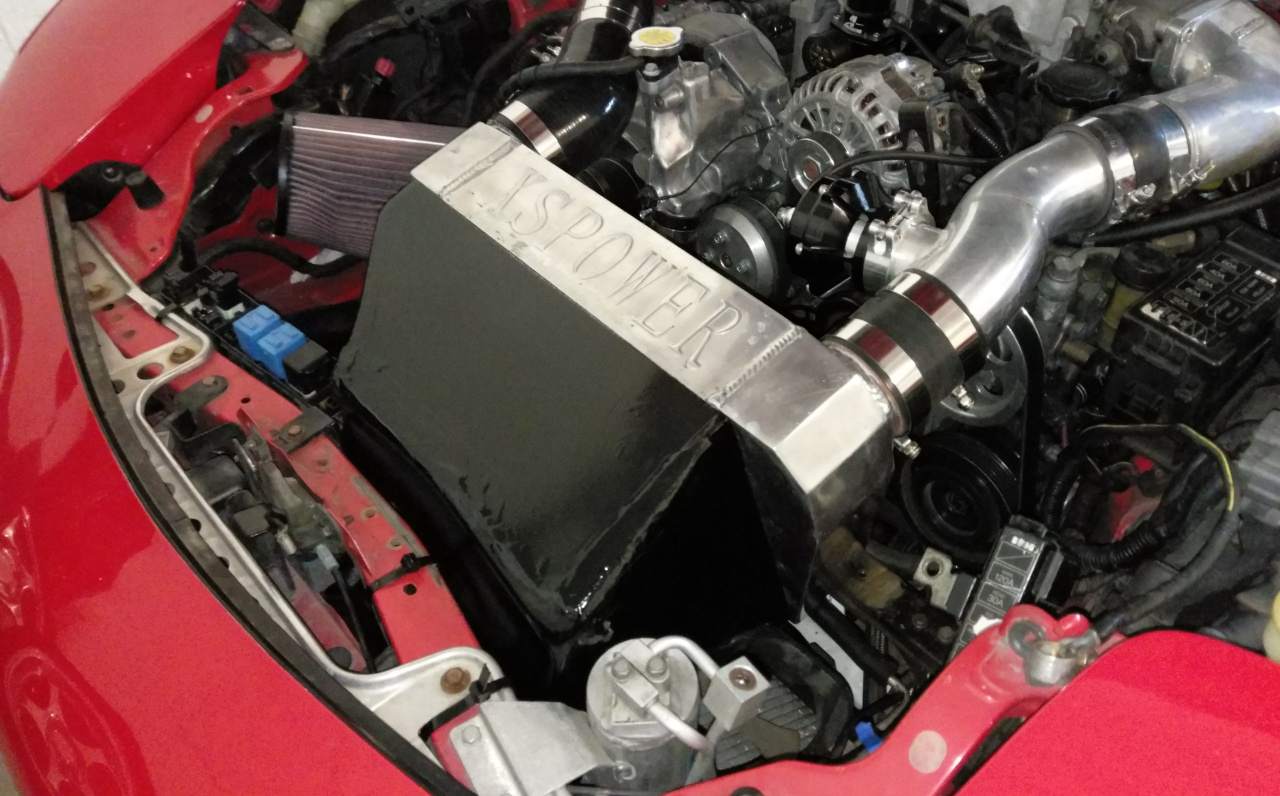
I was able to adjust my intercooler position to the left slightly with a new combination of a bit silicone and and aluminum piping, bringing it away from the radiator tubing on the bottom right. Since my ducting never fit the intercooler right even when I bought the car I wasn't worried about it fitting afterward, so I cut it up, forced it into a different shape, and decided to try using fiberglass.

Apparently my measurements were good enough, and the ducting fits pretty near to perfectly where I wanted it. The face still fits flush, but where before the ducting was too large and and ran over the edge of the face of the intercooler, there is now no gap. On the left hand side this is going to give me way more room to stick my catch can.
Because the outside of my fiberglass was far from perfect and I was short on time, I put some aluminum tape over it and blasted the whole thing with black spray paint. It looks way better and was low effort.

Full Member
Joined: Mar 2004
Posts: 190
Likes: 62
From: Chicago
hey nice to see you're in chicago also! We should meet up when you get a chance. I need to start getting familiar with my fd3s, ive had it for a few years but haven't done anything to it but I would like to start doing some cleanup as well.
Full Member
Joined: Mar 2004
Posts: 190
Likes: 62
From: Chicago
Nah, I'm from the west suburb, weather looks good this weekend.
Here's a link to the event.
Supercar Saturdays
Here's a link to the event.
Supercar Saturdays
Thread Starter
Full Member
Joined: May 2015
Posts: 83
Likes: 3
From: Chicago
Thanks ZE Power MX6. I have the rubber tubing that was on the duct before I started cutting into it, so I could always use that sometime in the future. Since there's pretty much no room between the face of the intercooler and the ducting though, there's not really enough room to use the tubing now. I thought I'd just aluminum tape around the entire edge and call it a day.
Always good to see more people around here NoMiEzVR4, it's always fun to meet up.
I'm out of town this weekend though so I can't come out to Supercar Saturdays, which is a shame if the weather is going to be nice. If I'm not already busy I'm usually down to meet up.
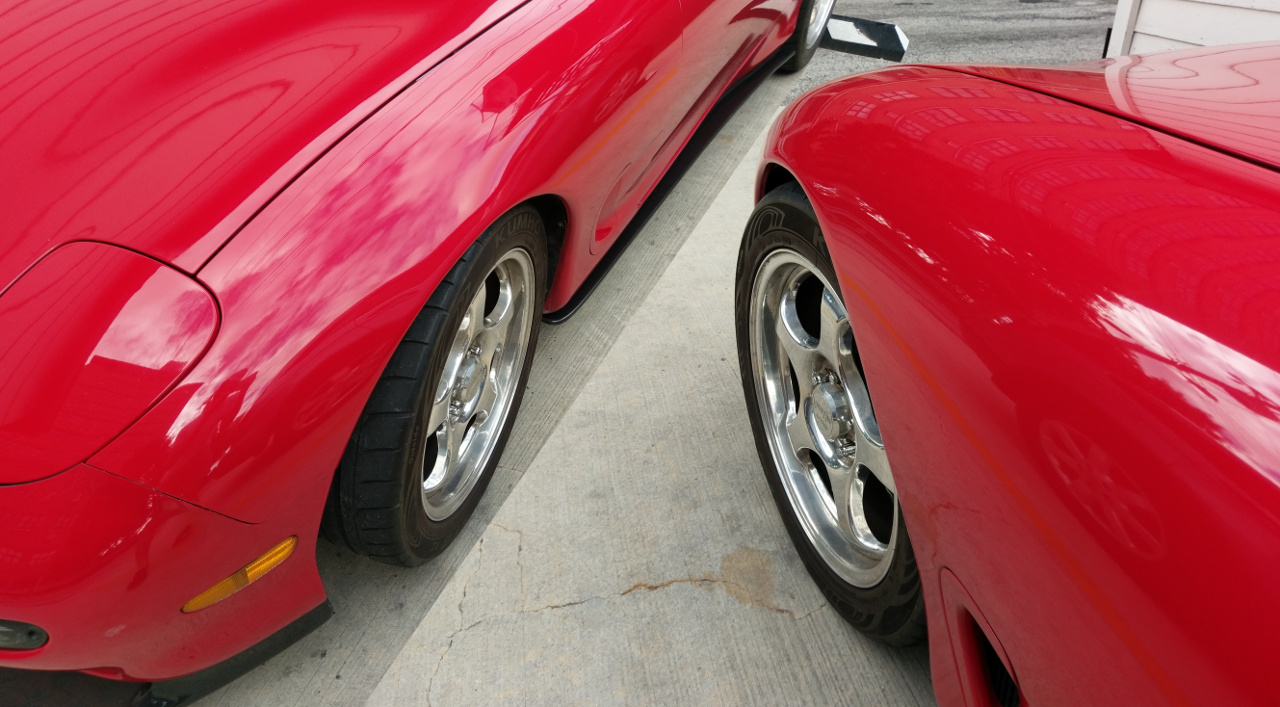
I loaded my rims and tires into the back of the Mazda2 and went over to get my wheels mounted at TopSpeed. Once I had finished the last of the bushings in the front and got the wheels on the car the first thing I noticed was that I'm riding higher than before by at least 0.5" at each corner. My alignment is also predictably messed up. The right side has slightly but noticeably more positive camber than the left, especially the front right which apparently always rides a little higher than the left in the US.

I'm definitely happy with how the wheels look, but I'm especially riding high in the rear so at some point I'll have to remedy the whole ride height situation. I seem to be ok running around on the street, but I'll have to test fender clearance at full compression (probably by removing the shocks) to see if/how much I'm going to have to roll again.
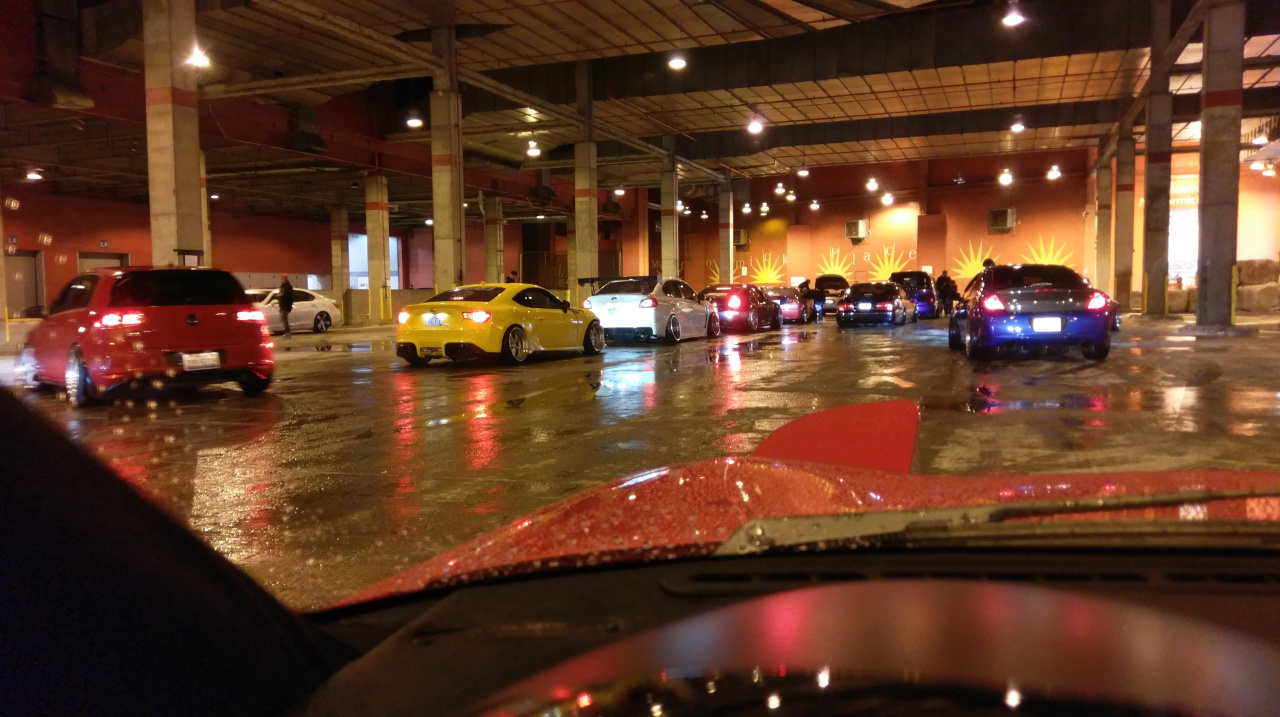
The reason I was 'short on time' is because I got a call from the rotary shop saying they had more spots at Wekfest, and asked if I wanted to show my car.
"Sure! That's not something I've done before."
I reattached all the interior and put the pc680 battery back in the ingine bay, cleaned the interior, and went to get a quick detail the evening before. I also dropped and broke my battery tender.
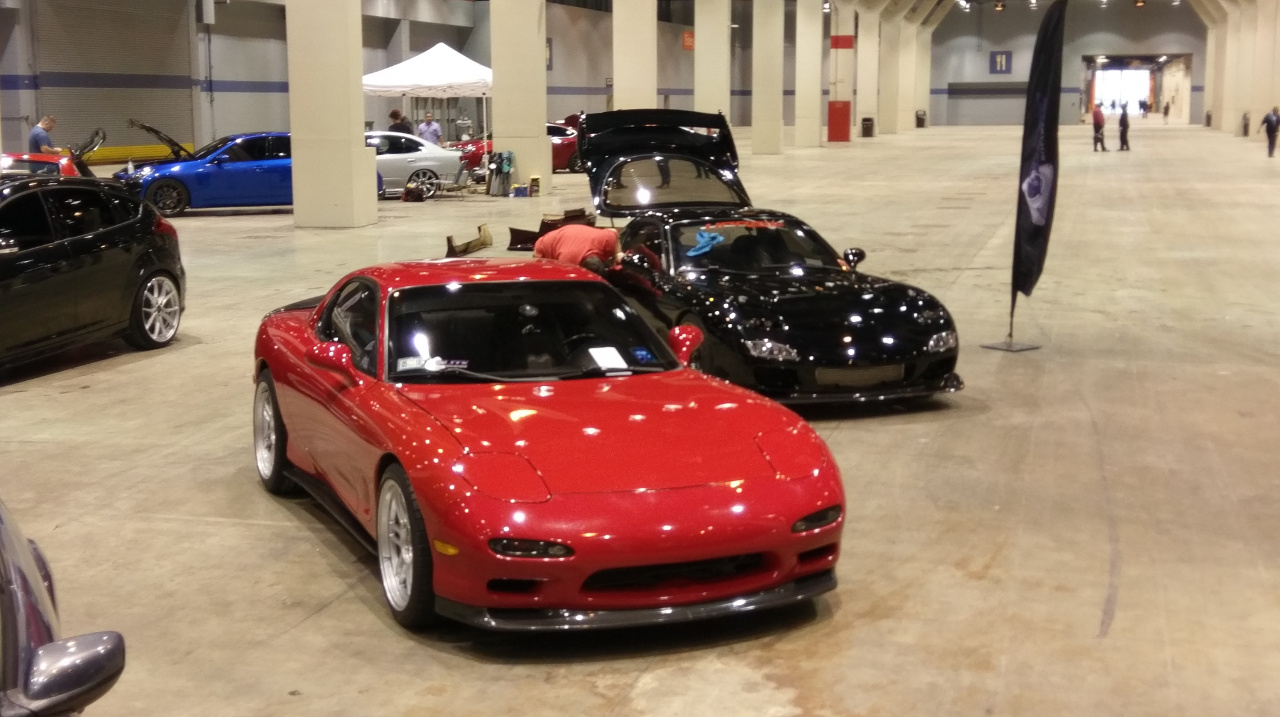
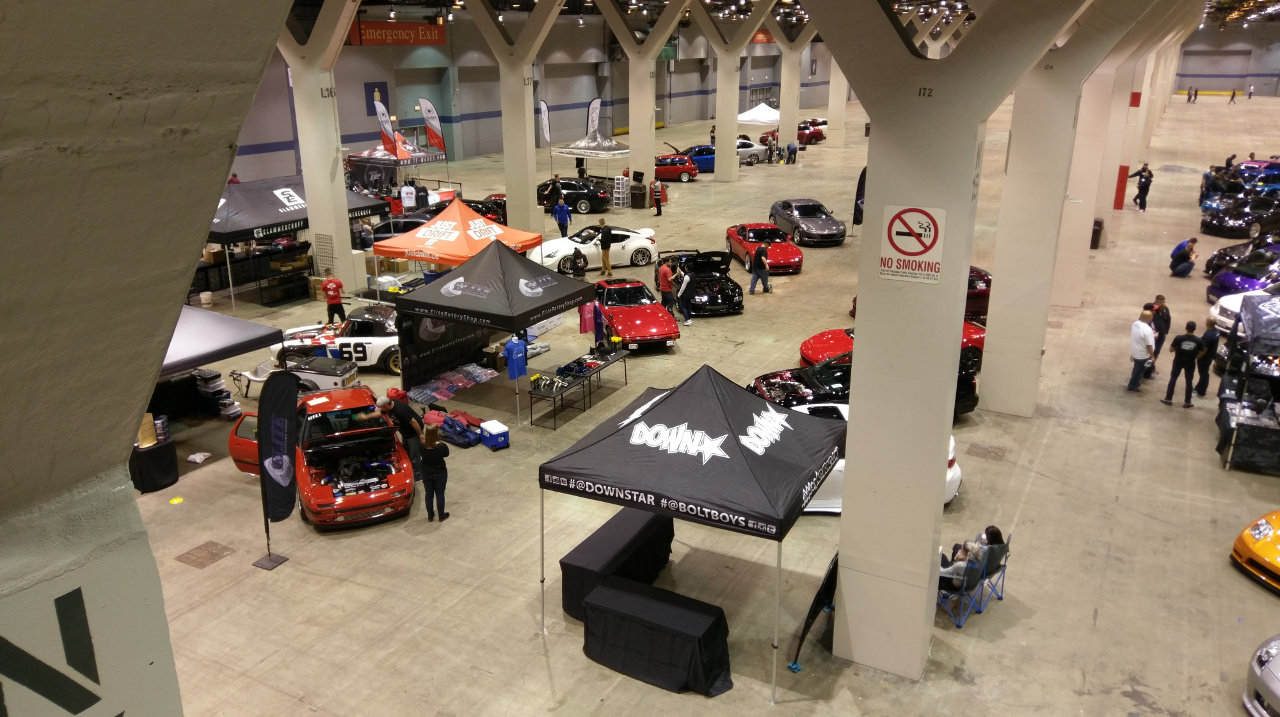
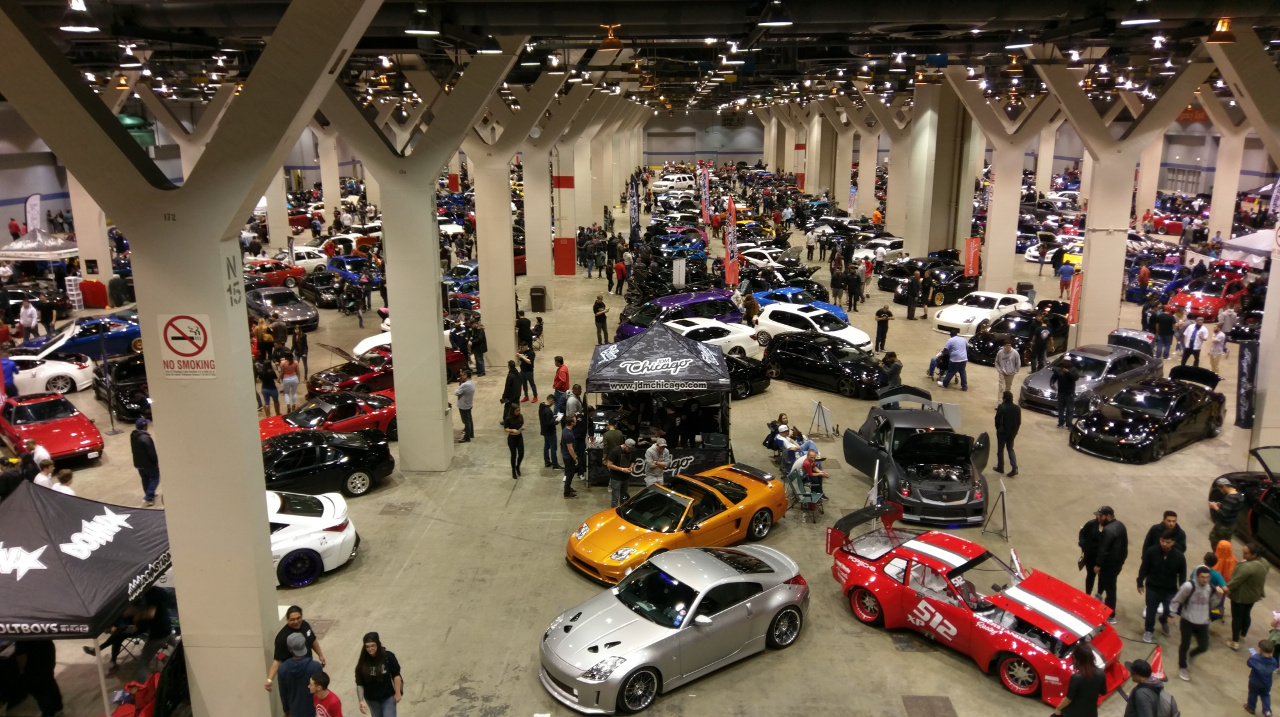
I had a fun time, and got to see a lot of crazy builds.
Always good to see more people around here NoMiEzVR4, it's always fun to meet up.
I'm out of town this weekend though so I can't come out to Supercar Saturdays, which is a shame if the weather is going to be nice. If I'm not already busy I'm usually down to meet up.
I loaded my rims and tires into the back of the Mazda2 and went over to get my wheels mounted at TopSpeed. Once I had finished the last of the bushings in the front and got the wheels on the car the first thing I noticed was that I'm riding higher than before by at least 0.5" at each corner. My alignment is also predictably messed up. The right side has slightly but noticeably more positive camber than the left, especially the front right which apparently always rides a little higher than the left in the US.
I'm definitely happy with how the wheels look, but I'm especially riding high in the rear so at some point I'll have to remedy the whole ride height situation. I seem to be ok running around on the street, but I'll have to test fender clearance at full compression (probably by removing the shocks) to see if/how much I'm going to have to roll again.
The reason I was 'short on time' is because I got a call from the rotary shop saying they had more spots at Wekfest, and asked if I wanted to show my car.
"Sure! That's not something I've done before."
I reattached all the interior and put the pc680 battery back in the ingine bay, cleaned the interior, and went to get a quick detail the evening before. I also dropped and broke my battery tender.
I had a fun time, and got to see a lot of crazy builds.
Last edited by Lord Bro; May 4, 2017 at 11:32 PM.