
Your aftermarket toe links worn? Here's help

WWFSMD
Joined: Jun 2001
Posts: 5,035
Likes: 4
From: SoCal
FDjunkie, was the problem related to how wide the part that the bolt goes through is, or was it some kind of clearance issue with the seal rubber? I think there is a sleeve you can move a bit to widen the area you bolt through. You can see this gold colored sleeve under the nut in the "Location of outer bearing" picture on the MazdaTrix page: http://www.mazdatrix.com/h93-95c.htm
Has anyone tried the rubber seals that go over the whole rod end, listed at the bottom of the page DamonB posted? I've seen these at Baker when I was in there once, but I wasn't sure if they'd fit or what size to get when I saw them.
http://www.bakerprecision.com/rodacc.htm
Also, I want to give DamonB, "props" for posting this info. It took me a while to get in a figure out the dimensions to replace mine, and it is great to see some info about how to protect them from wearing, too. The discussion has been interesting as well. For instance, I was never really sure what load rating the rod ends needed to be, and I am quite confident that mine are at least as strong as the ones I replaced now. I figure a lot of people have these links and can benefit this thread. Thanks, Damon!
-Max

Senior Member
Joined: Oct 2002
Posts: 394
Likes: 1
From: Bartlesville, OK.
Sorry for taking so long, but I've been out of town.
The seals that I got from Baker come molded on to a flat washer that goes on the spacer before it gets inserted into the rod-end. The result is that the overall length (through the spacer, rod-end, and 2nd spacer) is now too wide to fit between the upright's mounting ears, even after the insert is pushed out. I took some pictures but guess which forum still won't allow them to be posted...if your interested send me an e-mail and I'll forward.
To make these seals work on the outboard ends of the Pettit toe-links will require some light machine work to at least one spacer on each rear wheel. I needed a total of about 0.050 to 0.060 inch more clearance, so this is the total amount that I would need removed from the spacer(s).


I just installed some of these protective "covers"
last week. I have the M2 Toe links and trailing arms. Located the covers between spacer and ball. As FDjunkie noted I had to shave the spacers down just a hair for the outborad end of the toe link and the thickness of the washers (in the covers) on the chassis ends (there is no sleeve) for the inboard ends of the trailing arm and toe link. No biggie. All fit fine. It will be interesting to see how well they work. Oh and as for "fit" they fit perfectly. 5/8" size for the sleeves used on the M2 parts.
Regards,
Crispy
PS I can take pics if needed.
Thread Starter
Lives on the Forum
Joined: Feb 2001
Posts: 9,617
Likes: 8
From: Dallas
Crispy, could you add pics to this thread? I have no digicam and a pic is worth a thousand words as they say... Once everyone sees it they will understand.
Max, I have no idea what those covers look like and am interested in finding out as well. The fact that they call them a "boot" makes them sound bulky, but I dunno.
Max, I have no idea what those covers look like and am interested in finding out as well. The fact that they call them a "boot" makes them sound bulky, but I dunno.
Yeah sure thing. I will take pics this evening and post some tomorrow. I should note that I installed the dust covers (little rubber cups with a washer molded into the cup) and NOT the "boot" that covers then entire end link.
Regards,
Crispy
Regards,
Crispy
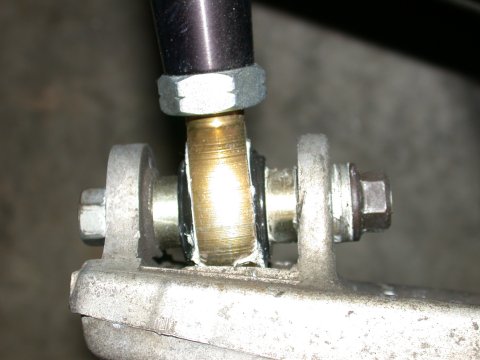
Ok here ya go ...PICS
Two from the outboard toe link - note the spacer sleeve position. And one of the inboard end. Please excuse the messy white grease.
And one of just the seal - dust cover thingie.
Regards,
Crispy
Two from the outboard toe link - note the spacer sleeve position. And one of the inboard end. Please excuse the messy white grease.
And one of just the seal - dust cover thingie.
Regards,
Crispy
Last edited by CrispyRX7; Mar 11, 2003 at 12:17 PM.
WWFSMD
Joined: Jun 2001
Posts: 5,035
Likes: 4
From: SoCal
Originally posted by DamonB
Crispy, could you add pics to this thread? I have no digicam and a pic is worth a thousand words as they say... Once everyone sees it they will understand.
Max, I have no idea what those covers look like and am interested in finding out as well. The fact that they call them a "boot" makes them sound bulky, but I dunno.
-Max
There and back again
Joined: Feb 2001
Posts: 967
Likes: 0
From: Camarillo, Ca
Great thread!
This will be a keeper for sure.
Here�s my 2 cents.
Anyone have any thoughts on using a quality liquid rubber dip to form a dust jacket?
I was thinking of the stuff you can buy for tool handles. You could pre-grease the unit before dipping it (spacers and all) up to the threads.
Undoubtedly the movement would cause there to be some lifting around the spacers, but you could probably counteract it with some zip-ties around the spacers after the rubber has cured.
I thought it would be at least a little prettier than foil.

Super Snuggles
Joined: Feb 2001
Posts: 10,091
Likes: 34
From: Redmond, WA
OK, I ordered 12 (4 for each tie-rod link, 2 for each trailing arm) SE-010 (?) 5/8" dust seals, and one "medium" (1/2-5/8") rod-end boot. I figured it wouldn't be a problem to offload the dust seals to someone else if the boots turn out to be the "trick item", and if they don't, then I only wasted $12. 

Banned. I got OWNED!!!
Joined: Mar 2003
Posts: 116
Likes: 0
From: here
So jimlab how does the protective boot works?
did you manage to install that?
Also, a question for your trailing arm, isnt the trailing arm less than 3/8" of size? Do you have the pettit racing trailing arm or M2?
did you manage to install that?
Also, a question for your trailing arm, isnt the trailing arm less than 3/8" of size? Do you have the pettit racing trailing arm or M2?
Super Snuggles
Joined: Feb 2001
Posts: 10,091
Likes: 34
From: Redmond, WA
The boot looks retarded.
I haven't taken a picture of it, but it's about 1/2" too big all the way around compared to one of the rod ends. The openings are about the right size, but the size of the boot took me by surprise. I'll be making the dust seals work like everyone else, it looks like.
I haven't taken a picture of it, but it's about 1/2" too big all the way around compared to one of the rod ends. The openings are about the right size, but the size of the boot took me by surprise. I'll be making the dust seals work like everyone else, it looks like.
Lives on the Forum
Joined: May 2001
Posts: 5,097
Likes: 1
From: southern NJ
https://www.rx7club.com/forum/showth...5&pagenumber=2
moving to archives. if viewing this in archives, click link above to view any further discussion...
moving to archives. if viewing this in archives, click link above to view any further discussion...

Ok, I realize this is REALLY old, but I got a set of the rod end seals from baker and for the life of me I can't see how these are going to fit on the rod ends. I don't see any pictures in this thread anymore, so can anyone offer any help? I'm using the RP links and arms. Thanks.

Maybe your RP links' specs are different than those of m2 and Pettit?
if thats not the case then hopefully someone will clarify.
u can try PMing the most active users that have already contributed to this thread in order to get the most prompt response.
if thats not the case then hopefully someone will clarify.
u can try PMing the most active users that have already contributed to this thread in order to get the most prompt response.

Bump this old baby up! I know it's a zombie revival, but I wanted to let you guys know that I recently replaced all of the joints on my M2 toe and control arms with the help of this thread.
I used the QA-1 rod ends that Max mentioned earlier in the thread. You can buy them from JEGS (easy for me since they're based in my town). The part numbers were XML-10 for left hand thread, and XMR-10 for right hand. You'll need 2 of each to do the toe arms. I also wanted to note that my trailing arms were LEFT hand thread.
The M2 arms were marked with a round line cut/recessed into the aluminum shaft body for the side of the arms that were left hand thread. If yours are similar you can check them easily that way to know what you need to get.

Thread
Thread Starter
Forum
Replies
Last Post
risingsunroof82
1st Generation Specific (1979-1985)
8
Sep 7, 2015 01:11 PM