
Write-up for the Hyperite gauge mod (white backlighting)


Originally Posted by Hyperite
Excellent write-up!!! I'm glad I could help with a little updated look for anybody willing to take the time to do a little DIY.
I haven't added additional LEDs yet (I haven't removed my cluster again since then), but I did notice some instant dimming when I pressed the brake pedal. To avoid this, I added a ~0.01 Farad capacitor behind the dimming switch, which fixed it right up.
Another thing (my mistake) is that I seem to have pushed and pulled too hard on the tach needle. It lags a little bit behind the engine, but it's not TOO bad. I'll reseat the needle and make sure the alignment of the coils is right next time I open it back up.
Other than that I still love it! Enjoy guys!
Last edited by JhnRx7; Dec 4, 2005 at 12:17 AM.

Thread Starter
Joined: Aug 2002
Posts: 1,084
Likes: 0
From: Pocatello, ID
set the needles on lightly at first and turn them to see where the stop is
once you see where the needle stops, leave it on lightly and get it set to where it is supposed to be and push it down all the way
once you see where the needle stops, leave it on lightly and get it set to where it is supposed to be and push it down all the way

Just found this and great work to BOTTLEFED and hyperite. So has anyone tried this with the inverted cone LEDs and/or a white/transparent film on the back of the gauge face for even distribution of light? And has anyone experienced the brake pedal dimming? Anyone have a link to a capacitor or write up on that?
Just finished up mine.
It is a little uneven as others have said. I'll also be wiring in extra LEDs as soon as they get in the mail. Now I just have to figure out how to dim my water temp gauge to match the others' brightness.
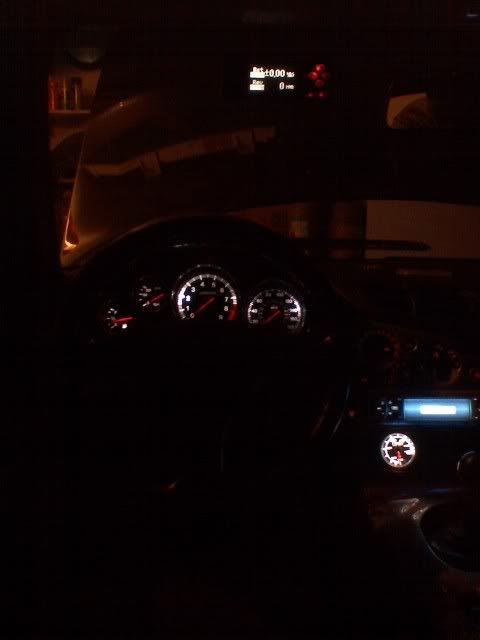
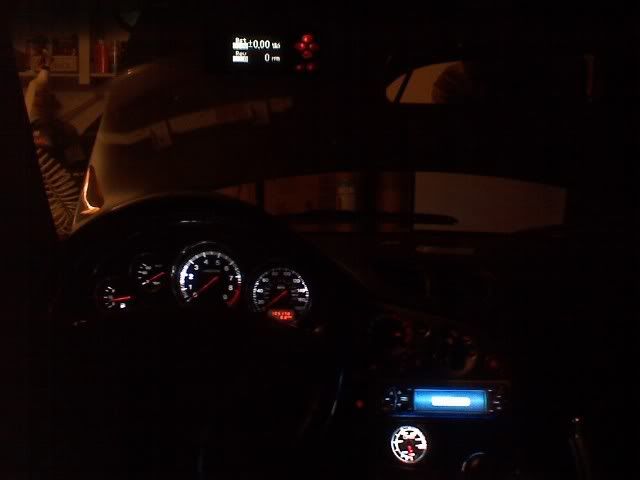
These are bad camera phone pix, but you can compare the gauges to the AC panel lights for the color difference.
It is a little uneven as others have said. I'll also be wiring in extra LEDs as soon as they get in the mail. Now I just have to figure out how to dim my water temp gauge to match the others' brightness.
These are bad camera phone pix, but you can compare the gauges to the AC panel lights for the color difference.
wlel i can move the oil pressure and coolant temp to their max and they automatically go back down to zero and rest on the peg...and i know if the peg wasnt there they would go past it..so when you remove them and replace them they will actually be reading lower then what they really should....
I see what you're saying. Your gauge cluster is out of the car and lying face up? maybe it's just the weight of the needle bringing itself down.
I would suggest to take off the peg and see where it actually stops and mark it, then replace where you marked it, but i think you might have to pull off the needle to take the pegs out. That's my only idea.
I'm not too concerned since I use an aftermarket water temp gauge and the stock one is useless. And I never pay attention to the oil press gauge.


Thread Starter
Joined: Aug 2002
Posts: 1,084
Likes: 0
From: Pocatello, ID
wlel i can move the oil pressure and coolant temp to their max and they automatically go back down to zero and rest on the peg...and i know if the peg wasnt there they would go past it..so when you remove them and replace them they will actually be reading lower then what they really should....
The best way I have found is to mark the max clock-wise turn and pull the needle off - don't worry about where the pin goes for now
When you are ready to put the needle back on, push it on only a little bit (just enough to feel that you are turning the pin when you turn the needle) and turn it to see where it lines up with your max mark
If it is a little past the mark, reposition the needle
If it is a little before the mark just push the needle softly until it lines up with the mark - this shouldn't hurt the motor as long as you didn't push the needle onto the pin too hard
Once you have it lined up with the mark, go ahead and push the needle down to the proper height
hope that made sense

The amber backing works as somewhat of a light diffuser, so it spreads around the light instead of making it more bright where your light bulbs are. Maybe you can get some sort of clear or white diffuser that would help.
If you find something like that, please post it up because that's going to bother me too.
If you find something like that, please post it up because that's going to bother me too.
I think the only real solution is to add more LEDs in the cluster. So I'm going to suck it up and add as many as it takes to make it even.
BOTTLEFED, is there a way to wire the extra LEDs so that they'll dim and brighten with the original bulb locations? With my meter, I was testing the voltage at the screws on the back while turning the dimmer switch, and there wasn't any change in voltage.
Thread Starter
Joined: Aug 2002
Posts: 1,084
Likes: 0
From: Pocatello, ID
It's also that the stock incandescent bulbs have a different light pattern than the LEDs. I put in the LEDs with the stock gauge faces just to see how it would look, and there was still some unevenness.
I think the only real solution is to add more LEDs in the cluster. So I'm going to suck it up and add as many as it takes to make it even.
BOTTLEFED, is there a way to wire the extra LEDs so that they'll dim and brighten with the original bulb locations? With my meter, I was testing the voltage at the screws on the back while turning the dimmer switch, and there wasn't any change in voltage.
but the added LEDs do not dim with the lights, IIRC
also remember, 1 diode and 1 resistor per strand of LEDs
and the less LEDs, the brighter each one will be individually in the strand
I usually only put 2-3 LEDs in each strand
Thread Starter
Joined: Aug 2002
Posts: 1,084
Likes: 0
From: Pocatello, ID


Joined: Aug 2004
Posts: 4,786
Likes: 145
From: Colorado Springs, CO
I did this mod about a year ago, maybe more, but I didn't use ELO, I sanded mine like Hyperite did. My biggest problem was finding LEDs that were bright enough, or rather dispersed the light evenly on the back of the gauges. I didn't add any yet but it was something I was planning to do if all else failed. I thought about spraying some kind of gloss on the back to try to spread the light out evenly, and I bought some aerosol that would do it but I haven't tried it yet. I also didn't take note of where my gauges were when I took the needles off (DUH) so when I put them back on they were WAY off and it took a while to get them to read right again. My fuel gauge still doesn't read right and has left me stranded a couple times, haha. And some MORON on this forum, claiming that he did this kind of stuff for his job, suggested spinning the needle counterclockwise a full turn to reset my speedo, so now it's screwed. I'll have to bookmark this thread and try again with a new gauge cluster when I get home from deployment. Thanks for the write-up BOTTLEFED.
One other thing I wondered about was if there was some kind of film that would light up, kind of like an indiglo gauge but in white, so you could just lay it down behind the stock gauge and it would light up evenly behind it. Anyone ever heard of anything like that?
One other thing I wondered about was if there was some kind of film that would light up, kind of like an indiglo gauge but in white, so you could just lay it down behind the stock gauge and it would light up evenly behind it. Anyone ever heard of anything like that?