
What would you say Defines a "proper SMIC duct" ?

Thread Starter
always modding
Joined: Mar 2005
Posts: 1,667
Likes: 3
From: on a tiny island in the middle of a sea
What would you say Defines a "proper SMIC duct" ?
Well I installed my Greddy SMIC tonight..
and even with no Duct on it, the result is immidiate! (temps have fallen 10*C at both WOT and cruise and back to back runs don't heat up the intercooler nearly as much)
anyway I know with a proper duct it will be Miles better...
the question is What stipulates a good duct?
would you consider the first "half" of the duct as a good part to build upon?
What I've Done so far is seperate the 2 "halves" of the stock duct.. by removing the rivets and tossing the forward half.. I've kept the "Scoop" part of the duct that goes into the bumper which I was planning on adding too.
so what are the goals in making a good duct?
obviously we want it to seal against the SMIC so that the air passes through rather than around it
first of all is the stock part a good piece to work with? or do u guys have bigger wider more "open mouth" ducts fabbed up from Fiberglass.
I don't have the A/C evaporator anymore.. so I've blocked that part in hopes of directing more air thru the duct rather than it being diverted.
Is it that important to have a Curvature on the last part of the duct as it comes up and over to the top of the core?
I was just going to mock up a duct from Cardboard, which would basically be a straight shot to the 4 edges of the SMIC's core.. basically the shroud will go Straight.... then shoot Straight for the core edge.. and then make a sheet metal equivalant.. and rivet that using the existing rivet points to make it a single piece.. and then using rubber to complete the seal. and painting it all black.
/
like this _______/
-----------\
\
is that bad? is it THAT much better for it to start curving as soon as possible, with gradual gradiant increase?
sort of pyramid Funnel vs gradual Cone
is it wise to use a 2nd piece to direct hot fan air away from the SMIC? or is the duct good enough at doing that?
basically I'm trying to start a "duct design" thread..
obviously some of the more capable members have fabbed and carved foam into duct shapes and molded FG around it and such. but I'm not that creative yet..
input is welcome guys


Joined: Jul 2003
Posts: 4,678
Likes: 97
From: Bay Area, CA
No clue on duct design, but you could just buy a Pettit duct for $100 (they are still available separately and I think provide pretty good coverage on the Greddy).
You might try building a frame the same size as your core and stretching fabric from that to your scoop. Resin that and then layup FG on top to make a nice, organic curve from the scoop to the IC. Check out the Fiberglass Forums for some tips on that, see the Audio sections for techniques on stretching fabric for 'glassing.
I contacted pettit about that duct a couple months back, they said they would sell both the tkt cover ( I think thats what is called), and the duct for like $80, but I am not too sure if that is the one you guys are talking about.
Joined: Mar 2006
Posts: 550
Likes: 3
From: Predominantly educated metropolitan area
Ha, yeah i made my first duct out of a pizza box. After i ate a pizza one night (yeah the whole thing) i was thinking about what to use to make a duct and decided to use the box. It worked out great and actually made a huge difference. The best part about it is, now when i go buy some sheet metal and some pop rivets i have a jig to make a real one out of!!! Pizza boxes are pretty pliable and easy to shape into a duct. Be creative. The other thing you should know about ducts is, the opening that is exposed to the front air hole in the bumper should be smaller than the surface that mates up against the intercooler. It causes a venturi effect. It makes air pull through the intercooler. Look at the design for the oil cooler ducts. The stock intercooler duct isnt a good example because it does more than just provide the intercooler with air. Basically try and emulate the oil cooler ducts! Man, i used my pizza box duct for a little while, and, well, i drove it in the rain even, and it did great! So maybe i wont ever make a metal one! Its jdm tight i think?
Trending Topics
I built a duct for my Greddy SMIC out of aluminum using a cardboard template as a mock-up. Used rivets to assemble it and put self adhesive temperature barrier on the hot side (bottom and sides close to the radiator). It took me an afternoon of trial and error to get right (including the fabrication of the final product).
My duct reduced my intake temps 25 to 30 degrees from my "unducted" temps.
My duct reduced my intake temps 25 to 30 degrees from my "unducted" temps.
pettit sells their duct (the one for the Cool Charge III) for $195 + shipping. i called today to find out.

Thread Starter
always modding
Joined: Mar 2005
Posts: 1,667
Likes: 3
From: on a tiny island in the middle of a sea
I built a duct for my Greddy SMIC out of aluminum using a cardboard template as a mock-up. Used rivets to assemble it and put self adhesive temperature barrier on the hot side (bottom and sides close to the radiator). It took me an afternoon of trial and error to get right (including the fabrication of the final product).
My duct reduced my intake temps 25 to 30 degrees from my "unducted" temps.
My duct reduced my intake temps 25 to 30 degrees from my "unducted" temps.
does the radiator panel do anything on our cars?
is your duct sheet metal all the way? or just the 2nd half like I was going to do?
did u re-use the greddy piece that came with the SMIC to make the top half of the duct? and only made the sides?
does the does have a "lip"? on the sides? or is that your sealant?
Glad to hear instant results with the intercooler. How do you like it so far??
What I did before I totally messed it up was use the stock one as a template and shaped the rest using bird caging. After that I used aluminum tape and taped both sides to make the duct completely smooth. I then painted it black. It was extremely fragile, but it worked.
Just giving you ideas. Good luck.

Thread Starter
always modding
Joined: Mar 2005
Posts: 1,667
Likes: 3
From: on a tiny island in the middle of a sea
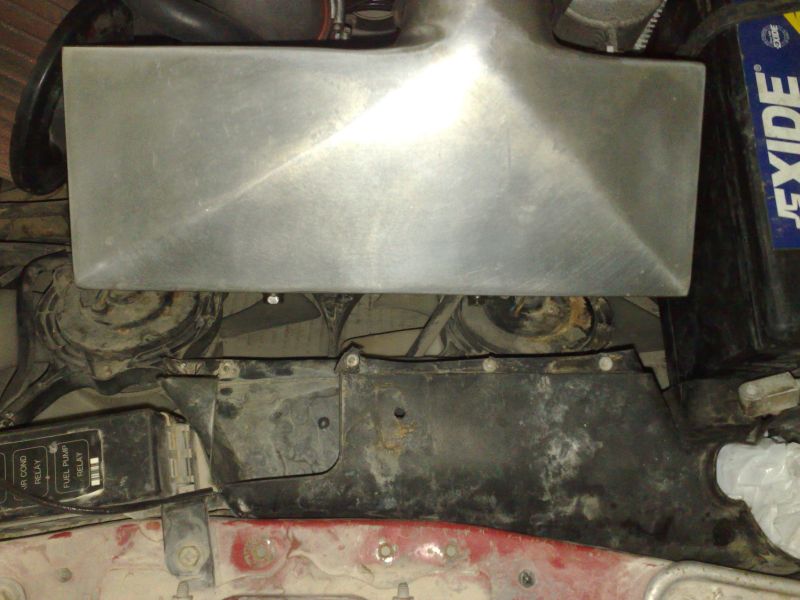
Well I snapped a couple pics.. yes I know the engine bay is filthy.. and the flash doesn't help either..
as u can see the stock shroud doesn't really center with the SMIC.. it's offset..
and the shroud seems like it's going to be very hard angled...
is that ok?
I think if there was no A/C Dryer it would be better.. so that all of the air enters at an angle.. in a unilateral direction..
as u can see the stock shroud doesn't really center with the SMIC.. it's offset..
and the shroud seems like it's going to be very hard angled...
is that ok?
I think if there was no A/C Dryer it would be better.. so that all of the air enters at an angle.. in a unilateral direction..
Last edited by Ottoman; Dec 19, 2008 at 10:10 AM.
damn that's a blinging engine bay! looks hawt..
does the radiator panel do anything on our cars?
is your duct sheet metal all the way? or just the 2nd half like I was going to do?
did u re-use the greddy piece that came with the SMIC to make the top half of the duct? and only made the sides?
does the does have a "lip"? on the sides? or is that your sealant?
The radiator panel you see is really just for looks. I highly doubt that it actually aids in cool very much (but it does look nice
 ).
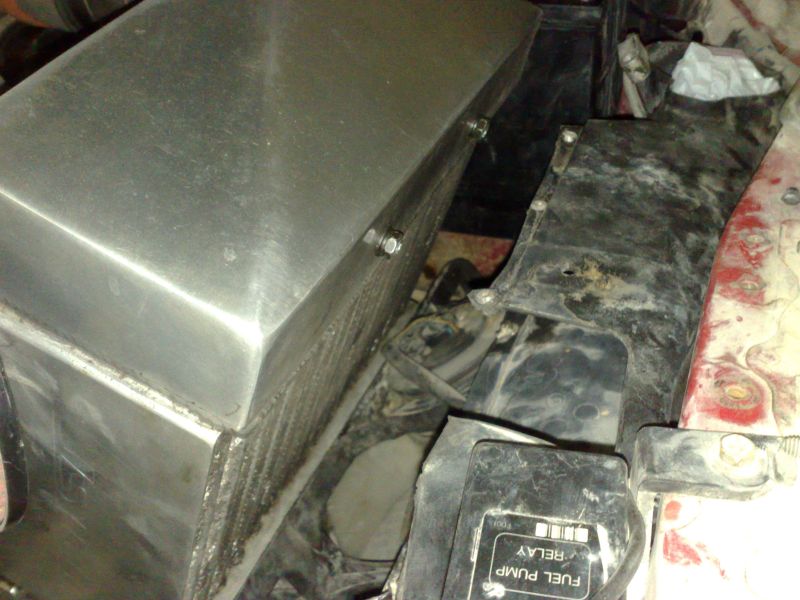
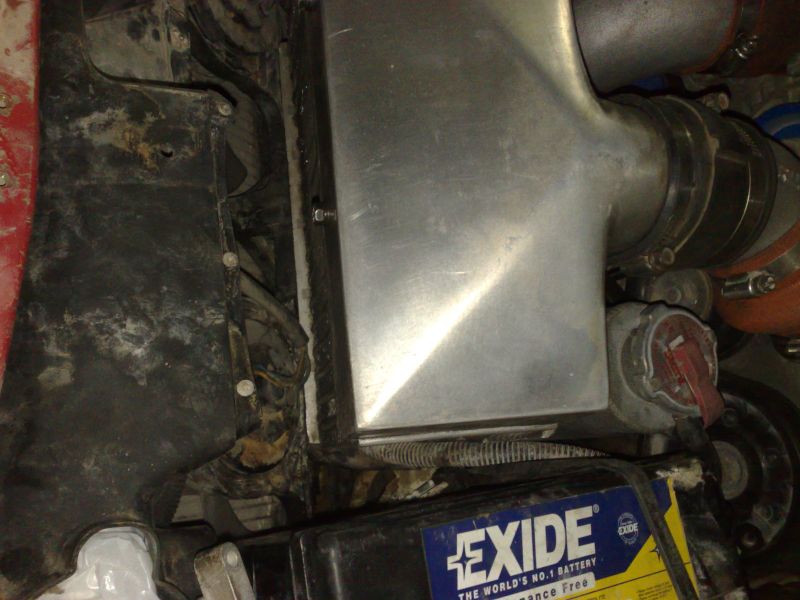
).In my opinion the Greddy "duct" sucked and the Pettit piece was not designed for the Greddy unit, so I built mine from scratch out of aluminum sheet in two pieces and then pop riveted the upper half with the lower half (you can't see the rivets because they are covered by the thermo shielding I used). Building it first out of cardboard and using that as a template help significantly (especially with the layout of tabs etc.).
Yes the duct has "lips" or tabs on both sides and the bottom and was sealed using self adhesive foam weather stripping (1/4" wide and very thin). Worked like a charm!
Thread Starter
always modding
Joined: Mar 2005
Posts: 1,667
Likes: 3
From: on a tiny island in the middle of a sea
interesting...
how did u make it curve down an into the bumper? it's not really a straight shot from the mouth of the bumper up to the SMIC..
were u able to replicate it in the sheetmetal?
how did u make it curve down an into the bumper? it's not really a straight shot from the mouth of the bumper up to the SMIC..
were u able to replicate it in the sheetmetal?
I actually used straight pieces (no curves) when I did mine. However, it wouldn't be that difficult to curve the bottom side of the duct. it would require a little more thought when laying out the tabs for assembly.

Sorry didn't realize you were the OP. The ghettoest but most effective thing you could do is make a shape that extends from the existing one out of fiberboard. Once you have a shape within 2-5mm get yourself some Trunk as in car trunk "water seal" I guess you could call it. It is the rubbery lining that prevents water from entering your trunk.
You will want to have some basic knowledge of fiberglassing techniques. Lay aluminum foil all over your fiberboard shape (out of the engine bay) and you will have a surface which will release pretty easily for your fiberglass. You should think about making this in two parts which at the end you join together with fiberglass fwiw. Once all of this is done you will want to rivet your shape to the existing piece using regular pop-rivets. Take off your IC and attack the rubber to the side facing the IC and that you provide you with a good seal. Ghetto yes, ugly yes, functional YES>
You will want to have some basic knowledge of fiberglassing techniques. Lay aluminum foil all over your fiberboard shape (out of the engine bay) and you will have a surface which will release pretty easily for your fiberglass. You should think about making this in two parts which at the end you join together with fiberglass fwiw. Once all of this is done you will want to rivet your shape to the existing piece using regular pop-rivets. Take off your IC and attack the rubber to the side facing the IC and that you provide you with a good seal. Ghetto yes, ugly yes, functional YES>
Thread Starter
always modding
Joined: Mar 2005
Posts: 1,667
Likes: 3
From: on a tiny island in the middle of a sea
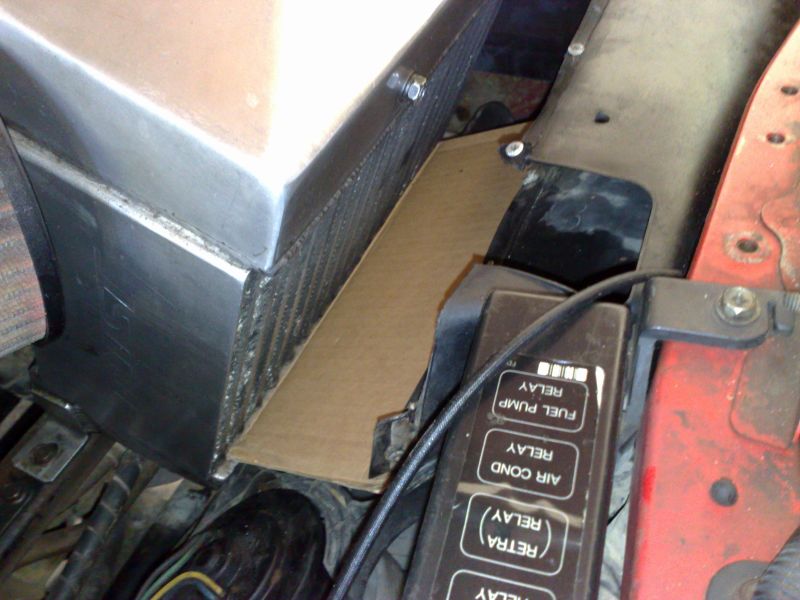
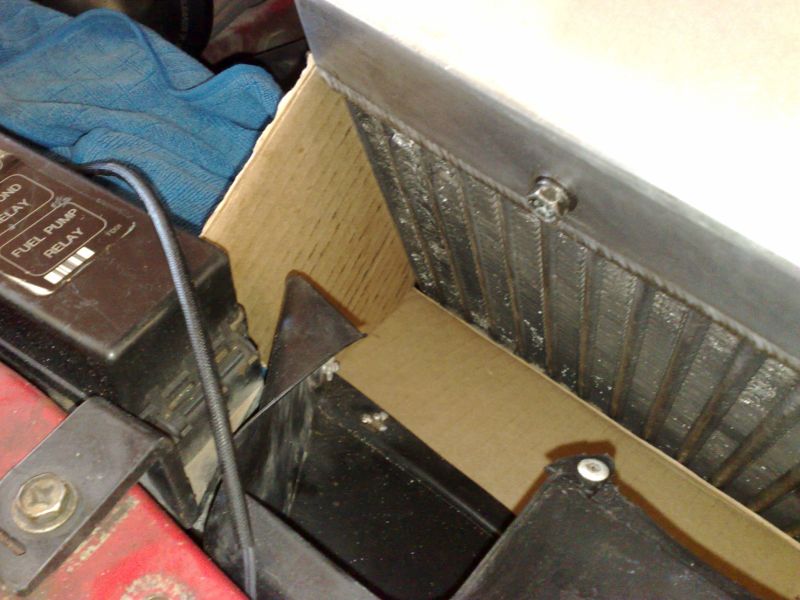
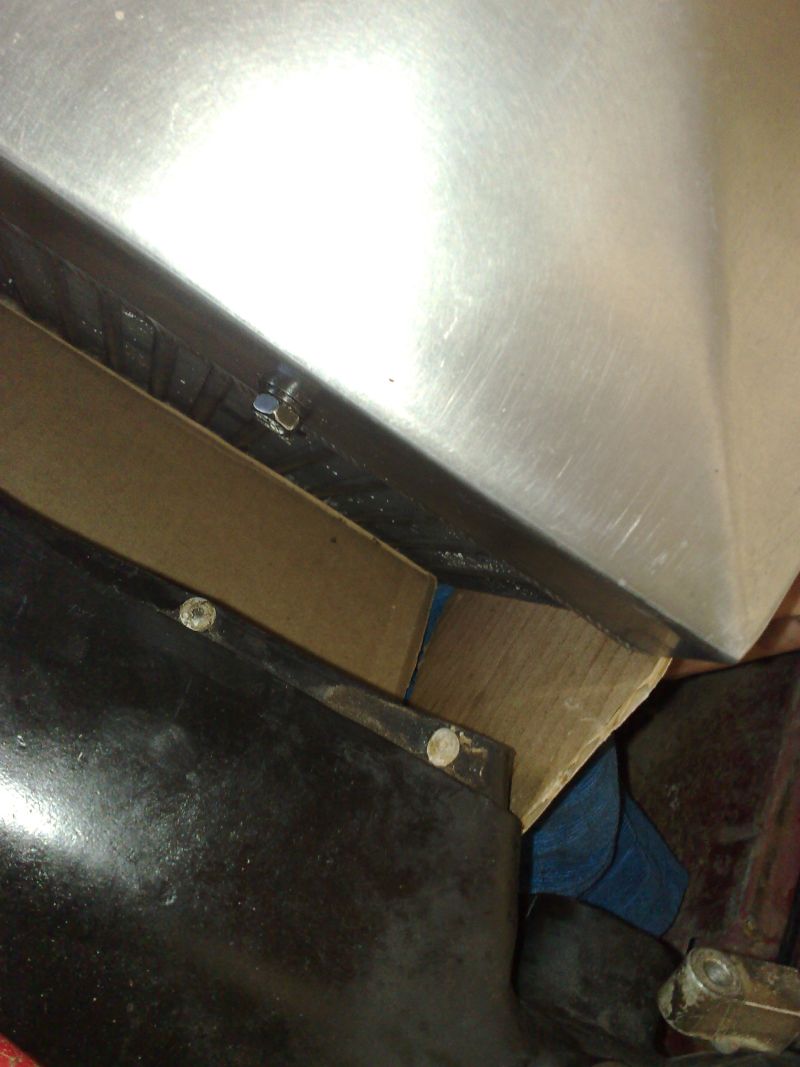
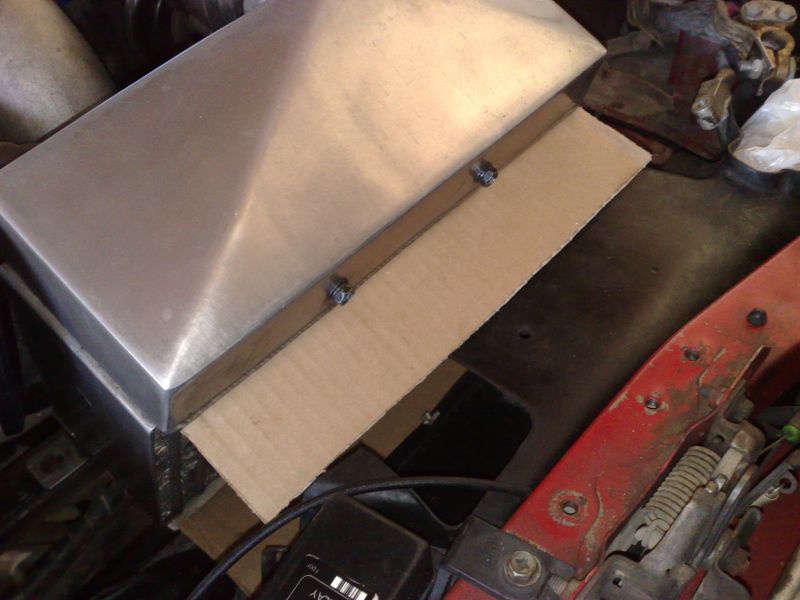
Just an update and results..
well last weekend I made an attempt at an truely ultra ghetto duct
yes I realize it looks like total ****.. it's only temp till I can buy a FG duct that fits the Greddy SMIC..
it took awhile.. looks of measuring cutting trimming testing and retesting..
there's are some in progress pics.. but u get the idea..
I completed it with this aluminum tape like stuff I'll paint it black later to better match the rest of the duct.
now for the numbers!!
this POS cardboard duct made a HUGE difference...
I know this duct is FAR from ideal..and I have my stupid license plate blocking half the mouth of my bumper...
but the temp differences are deffinately noticable...
temps are about 10* C cooler now vs before... (without heavy load)
my air temps were circa 43*C on the stock temp location before and it took absolutely forever for temps to come down on the highway.. once the temps came up.. bringing them down seemd impossible
now temps are in the low 30's.. and after heat soaking, once i start moving at a decent pace.. temps come down much faster as well... the *C will start to tick down very quickly after I start moving... after parking i get back in the car.. heat soaked temp will be ~51*C.. I can get it back into the 30s very quickly when I start moving... on a colder night it will even fall back into the high 20's
another thing I've noticed... after leaving.. I get home.. pop the hood..
the top of the IC is cool to the touch... prior it was "luke warm" at best...if not warmer..
and even the Hot pipe even seems less hot then it was before.. (could hardly touch it for more than 5-10 secs before)
obviously the cold pipe is just that.. cold...
on a side note.. I always thought to myself.. (maaaan how much air could this weedy duct supply)
I had taped the small opening over with just tape... when i popped the hood after a run to check on it.. the taped opening had ballooned and torn from the inside out.. i was impressed! i guess there really is a venturi tunnel effect here
this weekend I'll be taking it to the Track... to see how it fairs under some abuse..
I can only imagine how it will do with no front plate and a constant blast of air all the time feeding it.. I'm confident that it will do well
moral of the story.. get a duct!

Thread
Thread Starter
Forum
Replies
Last Post
Turblown
Vendor Classifieds
12
Oct 17, 2020 03:25 PM

