
Vac Hose Job

Thread Starter
Full Member
Joined: May 2002
Posts: 188
Likes: 0
From: Corvallis OR
Vac Hose Job
Really, honestly, How hard is it? I want to do it myself and I realize I should mark off 3-5 days off my Rx7 driving calender, but how hard is it? I should be able to do it myself correct?

Not really hard. Just time consuming. Ever build a complex plastic scale model? It's kinda like that in that you find yourself constantly staring at the parts and then checking a diagram and/.or schematic over and over again.
You'll probably want a a mity-vac to check that all the solenoids,check-values, etc.etc. are working correctly.
Most people do a hose job because there's a problem with your car. So when you tear into it you might find a bad part that you'll have to order and wait several days for it show up. I.E. your car might be down for a week plus.
As long as you've got the UIM off and the rats-nest out you may want to consider replacing/changing a few things such as the fuel pulsation damper, adding block off plates, plug wires, etc.etc. You may want to re-wrap the wiring harness. You may (like me) find the water hoses to the throttle body to need replacement as well.
Eats, Sleeps, Dreams Rotary
Joined: Feb 2002
Posts: 3,045
Likes: 2
From: North Coast
Originally posted by flunkysama
Not really hard. Just time consuming...
Not really hard. Just time consuming...
Good Luk!
I Sold My Car 2 the Devil
Joined: Oct 2001
Posts: 2,361
Likes: 0
From: Duncanville, Tx
I am about to do the hose techniques one... go get these things if you are going to DIY...
Craftsman cutters... looks like the handiGrip's but has a razorblade on one side and a cutting block on the other...
Small hand torch... use to heat up hoses when you are trying to take them off the solenoids
masking tape for the openings in the uim and such
I'm also going to get some skinny needlenose pliers w/ a crooked end to help get at some of the hoses if I need to.
If you wait till january to do it I will have a complete writeup with pictures of everything done by then. I am going to use the hell out of a digicam when I do mine to show everyone where everything is and how you do what since most of the writeups are very "word of mouthy" instead of direct and to the point of where everything is and what has to come off.
I hope I will help out lot of people when I do this cuz it will take alot of damn time to do... o well.
Ryker

5yr member, joined 2001
Joined: Dec 2001
Posts: 908
Likes: 1
From: Marco Island, FL
Do it!
If you are a true enthusiast, then the knowledge gained from doing a hose job is well worth the blood, sweat, headaches, and downtime.
Be sure to go to a hardware and pick up a pair of big-*** needle-nosed pliars. It's a specific tool is a about a foot long and the tip has a 30� bend. It costed $8, but to me it's worth about $80. Also get:
regular needle-nosed pliars
straight-edge razors
hobby knife with spare blades
large print shop manual
zippo for heating hoses
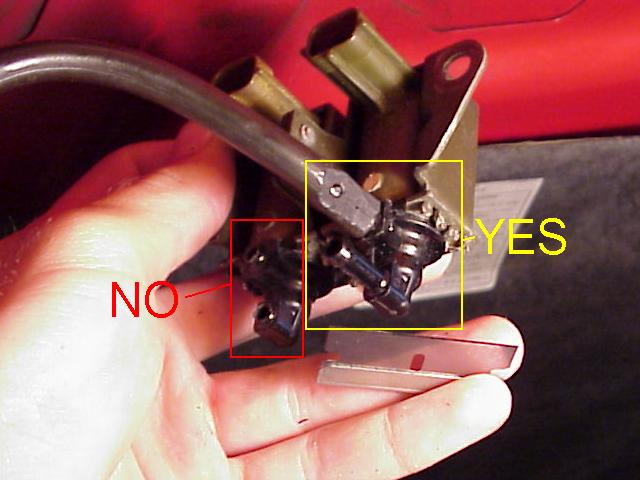
DO NOT PULL THE HOSES OFF OF THE WG AND PC SOLENOIDS! Shave them off with the razor like so:
If you are a true enthusiast, then the knowledge gained from doing a hose job is well worth the blood, sweat, headaches, and downtime.
Be sure to go to a hardware and pick up a pair of big-*** needle-nosed pliars. It's a specific tool is a about a foot long and the tip has a 30� bend. It costed $8, but to me it's worth about $80. Also get:
regular needle-nosed pliars
straight-edge razors
hobby knife with spare blades
large print shop manual
zippo for heating hoses
DO NOT PULL THE HOSES OFF OF THE WG AND PC SOLENOIDS! Shave them off with the razor like so:
Trending Topics
development
Joined: Aug 2002
Posts: 5,714
Likes: 7
From: Lafayette, LA
can we get a growing list of things (maybe part numbers and prices) to replace and change (tools pretty much have all been listed) while in there...gaskets, coolant lines and fpd and such, I know there is a few more then what people have listed here, if everyone puts a thing or two that'd be helpful...maybe I should stop being lazy and look it up but here from people sometimes makes more since...thanks
Yeah I'm about to start mine up in the next few weeks. I'm in the middle of exams right now at university so I'll be busy til about the 10th.
After that, it's time to start up.
After that, it's time to start up.
Eats, Sleeps, Dreams Rotary
Joined: Feb 2002
Posts: 3,045
Likes: 2
From: North Coast
If you buy the hose techniques kit you don't need to buy cutters becasue it comes with a plastic cigar cutter that works excellent...something that Jonski recommended that I couldn't have done without are the
-1 foot lone needle nose plyers, both the straight one and then one with like a 30� bend at the end...(when putting hoses on in the far to reach places cut 2 pieces of 3mm hose and stick on the end of the plyers to protect the hose from the abrasive plyer ends)
Other things I had to buy
- Ratchet screwdriver: to get the solenoid rack out...dont' forget to apply mondo pressure to get the back screws out (the ones to the firewall)...I didn't put my screws back in because it's pretty damn secure without them.
- Socket set: with 10, 12, and 14mm sockets...needed all over the place...
- Exacto knife: to cut the hoses long ways to get them off the nipples ( I said nipple)
- Some razor blades to get the brittle hosese off the VERY brittle plastic solenoid nipples....Be careful with these...the two on the manifold are the ones that I clumsily...
Another thing is did to keep my self from going crazy was to print out a 3" x 2" colour hose diagram and pasted it on my garage wall...everytime a hose is secured at both ends with glue and ty-wraps go over to the diagram and use a black marker and blackout the hose you just did...Makes things easier and helps you feel like you are actually getting somewhere
Well, with all that said, get ready for some busted knuckles and downtime...good luck and have fun! I did (kinda)
-1 foot lone needle nose plyers, both the straight one and then one with like a 30� bend at the end...(when putting hoses on in the far to reach places cut 2 pieces of 3mm hose and stick on the end of the plyers to protect the hose from the abrasive plyer ends)
Other things I had to buy
- Ratchet screwdriver: to get the solenoid rack out...dont' forget to apply mondo pressure to get the back screws out (the ones to the firewall)...I didn't put my screws back in because it's pretty damn secure without them.
- Socket set: with 10, 12, and 14mm sockets...needed all over the place...
- Exacto knife: to cut the hoses long ways to get them off the nipples (
I said nipple)- Some razor blades to get the brittle hosese off the VERY brittle plastic solenoid nipples....Be careful with these...the two on the manifold are the ones that I clumsily...
Another thing is did to keep my self from going crazy was to print out a 3" x 2" colour hose diagram and pasted it on my garage wall...everytime a hose is secured at both ends with glue and ty-wraps go over to the diagram and use a black marker and blackout the hose you just did...Makes things easier and helps you feel like you are actually getting somewhere
Well, with all that said, get ready for some busted knuckles and downtime...good luck and have fun! I did (kinda)
development
Joined: Aug 2002
Posts: 5,714
Likes: 7
From: Lafayette, LA
Originally posted by apneablue
Another thing is did to keep my self from going crazy was to print out a 3" x 2" colour hose diagram and pasted it on my garage wall...
Another thing is did to keep my self from going crazy was to print out a 3" x 2" colour hose diagram and pasted it on my garage wall...
 )
)Thanks for that, I believe the only thing I need is the screw driver rachet, curved needle nose, and what about replacing the gaskets? Metal but someone said replace them anyway??? What about testing solenoids??? best technique?
Thread Starter
Full Member
Joined: May 2002
Posts: 188
Likes: 0
From: Corvallis OR
ok cool. thanks for all of the info. Yeh I agree with dubulup. Is there like a complete list of parts and other things I should be looking for to replace while im conducting sugury? anything would be helpful.
I Sold My Car 2 the Devil
Joined: Oct 2001
Posts: 2,361
Likes: 0
From: Duncanville, Tx
Whould anyone be interested in trying to get in on a GB on FPD's? I have a hook that will give me one for less than 100 bucks.... I'm sure the price will go down w/ the amount of orders... List is $126... thats some nice savings.
Ryker
*Forgot to add... my shop man told me to definatly do it while your down there... Also I might suggest replacing your air intake sensor if your car has 100k+ miles... I only know mine is bad because I have PFC
Ryker
*Forgot to add... my shop man told me to definatly do it while your down there... Also I might suggest replacing your air intake sensor if your car has 100k+ miles... I only know mine is bad because I have PFC

Full Member
Joined: Jan 2002
Posts: 246
Likes: 0
From: south jersey
i'd be interested in a gb for the fpd's if the price was right.
for the guys w/ the hose techniques kit: did you use all of the hose the kit came w/? seems like alot of hose. i was looking on the rob robinette site and in his write-up it only calls for 35ft of 4mm and 10ft of 6mm. just wondering why the hose tech. kit comes w/ so much hose in diff sizes.
nick
for the guys w/ the hose techniques kit: did you use all of the hose the kit came w/? seems like alot of hose. i was looking on the rob robinette site and in his write-up it only calls for 35ft of 4mm and 10ft of 6mm. just wondering why the hose tech. kit comes w/ so much hose in diff sizes.
nick
Rotary Enthusiast
Joined: Nov 2001
Posts: 1,483
Likes: 0
From: US
Its good way to learn.. apneablue helped me alot on this I'll be finishin by today...takes about 1-3 days if u don't F__up any solenoids.. take ur time and do it right.
get hose from hosetech.. i got mine from summit and didn't like it that much.. 3.5mm is good.
I'll be finishin by today...takes about 1-3 days if u don't F__up any solenoids.. take ur time and do it right.get hose from hosetech.. i got mine from summit and didn't like it that much.. 3.5mm is good.
Full Member
Joined: Jan 2002
Posts: 246
Likes: 0
From: south jersey
fstfd3spower,
did you find yourself only using two sizes. i see you mention the 3.5mm but did you also have to use the 6mm hose? i'm getting ready to do it and i just wanna buy rolls of the two sizes i need.
nick
did you find yourself only using two sizes. i see you mention the 3.5mm but did you also have to use the 6mm hose? i'm getting ready to do it and i just wanna buy rolls of the two sizes i need.
nick
Full Member
Joined: Dec 2001
Posts: 78
Likes: 0
From: Greenville, OH
The color diagram is the most important thing you need just looking at the black and white one will confuse you more than anything. Digital camera will help also I took about seventy five pics when i did mine. Also take short breaks and double check everything I found a few mistakes that I made and it was a lot easier to correct them with the rack out of the car than tearing everything back apart.
Junior Member
Joined: May 2002
Posts: 45
Likes: 0
From: Arlington, VA
[i]
- Ratchet screwdriver: to get the solenoid rack out...dont' forget to apply mondo pressure to get the back screws out (the ones to the firewall)...I didn't put my screws back in because it's pretty damn secure without them.
- [/B]
- Ratchet screwdriver: to get the solenoid rack out...dont' forget to apply mondo pressure to get the back screws out (the ones to the firewall)...I didn't put my screws back in because it's pretty damn secure without them.
- [/B]
Here come four pictures (in separate posts) to show what I mean. They show pictures taken as if from the firewall, assembled and disassembled, and from the front, assembled and disassembled. In the back the third screw holds a gas line onto the big bracket under the rack, and on the front two screws can come up with the rack. In the 'disassembled' shots, the solenoid rack is moved toward the passenger side - with the big bracket on the engine you'd have to move the rack up, not sideways. By the way, the big bracket is what you need to remove if you screwup the screws, along with a bunch of other stuff.