
Power plant frame install


Thread Starter
Senior Member
Joined: Feb 2001
Posts: 376
Likes: 2
From: CA
Power plant frame install
I recently cracked my power plant frame and was wondering how hard an install job would be. I would take a look under my car, but its currently at a shop right now. I am debating wheather I should perform the work there or just pull it out and do the job myself. What would need to be removed to replace the PPF? Also, what tools would I need beside basic hand tools? If anyone has any other tips or suggestions I would greatly appreciate it. thanks.

Full Member
Joined: Apr 2001
Posts: 156
Likes: 1
From: Metro Detroit, MI
it would be pretty easy as long as the PPF bolts are willing to come free. i needed an extra long breaker bar to get mine free, but once you break them free its basically all there is to it. the old PPf drops right out, put the new PPF up there and bolt it in. not sure if you need to remove the driveshaft or not, i already had mine out. if you loosen the two motor mount bolts in front you can swing the tail end of the tranny a little bit if you need the maneuverability.
Thread Starter
Senior Member
Joined: Feb 2001
Posts: 376
Likes: 2
From: CA
I am concerned about having to remove the drive shaft. This would probably be too dificult for me to do in my garage. Is it necessary to remove the driveshaft to access the ppf? thanks for your input.
1JZ powered
Joined: Jul 2001
Posts: 4,423
Likes: 0
From: Where there's only two seasons, hot and wet! I love Okinawa
Originally posted by Dont_Be_A_Rikki
Remove the tork tube(it is easy dude use PB blaster its money) then the PPF. It is always easier with air tools.
-Rikki
Remove the tork tube(it is easy dude use PB blaster its money) then the PPF. It is always easier with air tools.
-Rikki
Thread Starter
Senior Member
Joined: Feb 2001
Posts: 376
Likes: 2
From: CA
sorry for the dumb question, but can someone explain what the torque tube is? Does this mean that the drive shaft and other parts do not have to be removed? By just removing the torque brace I should be able to access the ppf? Pics would help if anyone has any. thanks for the help.
Trending Topics
No the Tranny does not need to come out to remove the PPF.
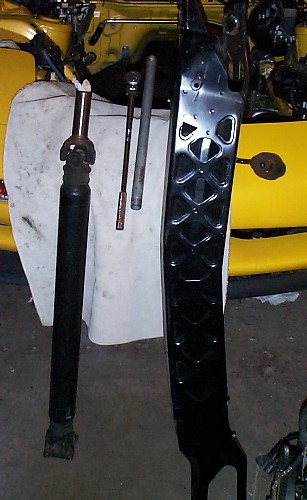
Tork Tube = Propeller shaft (official Mazda term) = Drive shaft
First you have to remove your cat (have fun) and some braces, plates, cat air tube, etc... Not to hard just remove anything that looks in the way of the PPF and Drive shaft. To remove the drive shaft, unbolt the four bolts that connect it to the rear differential noting the placement of the shaft to the Dif. I don�t know why the placement matters but that�s what the Mazda manual says to do (I numbered the bolt holes on both the diff and shaft). Drop the rear of the drive shaft down then slide the front of it out from the tranny (be ready for some smelly tranny lube to spill out). You will need to be ready to support the differential with a jack and some wood befor removing the ppf. Now simply remove all the bolts for the PPF, there are a total of nine. I don�t have air tools so I used an 18� breaker bar with a 24� cheater bar on the end. This is an easy job if you have jacked the car up high enough to get under it and if you have the right extensions and a big breaker bar. Almost forgot to mention that it's best to use a jack and a piece of wood to support the tranny when the PPF is off the car. Enjoy!
Last edited by ziftar; Sep 14, 2002 at 10:22 PM.


Thread
Thread Starter
Forum
Replies
Last Post