
motor mount ?


Though id mention that the black version of what you got has a higher tensil strenght (6500 vs 3000), but same durometer rating (80A)...mcmaster part number = 8695K653
I think i may try the black, is there any reason you went with the amber?
I think i may try the black, is there any reason you went with the amber?
Thread Starter
Joined: Apr 2002
Posts: 2,194
Likes: 2
From: Dayton, OH
Originally posted by damian
Though id mention that the black version of what you got has a higher tensil strenght (6500 vs 3000), but same durometer rating (80A)...mcmaster part number = 8695K653
I think i may try the black, is there any reason you went with the amber?
Though id mention that the black version of what you got has a higher tensil strenght (6500 vs 3000), but same durometer rating (80A)...mcmaster part number = 8695K653
I think i may try the black, is there any reason you went with the amber?
I put in some urethane "washers" under the subframe. I still get vibration, but it is dampend. definiately an improvement. The vibration is only noticable when idling and if the engine lugs. I'm still very happy with the results.
i don't know if I would go with a different durometer. I surely wouldn't go any harder. I'd like to see how much softer the 60 A is than the 80 A, and see if it would still be stiff enough to resist too much engine movement.
I'll post pics as soon as I get them off of my friend's camera.
cool, cant wait to see the pixs, maybe when i get my material I'll try using the 'hocky puck' washers and see if that removes all vibration...
..also, it may just take a bit of 'wear in' time...so maybe after a month or 2 of driving you will not have nay vibration, just like some mentioned with the rotorspotsracing mounts http://www.rotorsportsracing.com/products2175.html
..also, it may just take a bit of 'wear in' time...so maybe after a month or 2 of driving you will not have nay vibration, just like some mentioned with the rotorspotsracing mounts http://www.rotorsportsracing.com/products2175.html
Thread Starter
Joined: Apr 2002
Posts: 2,194
Likes: 2
From: Dayton, OH
PICS!!
here are the pics:
http://wave.prohosting.com/isuposs/p...eak-97_jpg.htm
http://wave.prohosting.com/isuposs/p...eak-96_jpg.htm
http://wave.prohosting.com/isuposs/p...eak-95_jpg.htm
http://wave.prohosting.com/isuposs/p...eak-94_jpg.htm
http://wave.prohosting.com/isuposs/p...ak-101_jpg.htm
http://wave.prohosting.com/isuposs/p...ak-102_jpg.htm
http://wave.prohosting.com/isuposs/p...ak-106_jpg.htm
http://wave.prohosting.com/isuposs/p...ak-107_jpg.htm
http://wave.prohosting.com/isuposs/p...ak-108_jpg.htm
http://wave.prohosting.com/isuposs/p...ak-109_jpg.htm
http://wave.prohosting.com/isuposs/p...ak-110_jpg.htm
If i were to do it again, i'd probably get longer bolts and put a longer hunk of urethane on the bottom, to offer more dampening. I didn't want to remove my engine mount to pull out the bolt and put a longer one in. (I just got the oil pan sealed so I'm not going to touch anything related to it finally no leaks!)
to do this, we just cut the left over urethane to proper length. I found some fender washers and used a hole saw to cut out the proper diameter washer. then drilled out the hole left by the hole saw, slapped the fender washer, regular smaller diameter washer, lock washer, and the nut on. I also used some loctite to make sure it wasn't going anywhere. The thought of a 330+ hp motor spinning around in the engine bay scares me a little.
the vibration used to be more harsh. it's still there, but reduced and much more "smooth." Like you said, I wonder if they will go away after a few months.
Damian,
if you try it, let me know how things work out for ya.
http://wave.prohosting.com/isuposs/p...eak-97_jpg.htm
http://wave.prohosting.com/isuposs/p...eak-96_jpg.htm
http://wave.prohosting.com/isuposs/p...eak-95_jpg.htm
http://wave.prohosting.com/isuposs/p...eak-94_jpg.htm
http://wave.prohosting.com/isuposs/p...ak-101_jpg.htm
http://wave.prohosting.com/isuposs/p...ak-102_jpg.htm
http://wave.prohosting.com/isuposs/p...ak-106_jpg.htm
http://wave.prohosting.com/isuposs/p...ak-107_jpg.htm
http://wave.prohosting.com/isuposs/p...ak-108_jpg.htm
http://wave.prohosting.com/isuposs/p...ak-109_jpg.htm
http://wave.prohosting.com/isuposs/p...ak-110_jpg.htm
If i were to do it again, i'd probably get longer bolts and put a longer hunk of urethane on the bottom, to offer more dampening. I didn't want to remove my engine mount to pull out the bolt and put a longer one in. (I just got the oil pan sealed so I'm not going to touch anything related to it
finally no leaks!)to do this, we just cut the left over urethane to proper length. I found some fender washers and used a hole saw to cut out the proper diameter washer. then drilled out the hole left by the hole saw, slapped the fender washer, regular smaller diameter washer, lock washer, and the nut on. I also used some loctite to make sure it wasn't going anywhere. The thought of a 330+ hp motor spinning around in the engine bay scares me a little.
the vibration used to be more harsh. it's still there, but reduced and much more "smooth." Like you said, I wonder if they will go away after a few months.
Damian,
if you try it, let me know how things work out for ya.
Last edited by ISUposs; Apr 1, 2003 at 02:28 AM.
Ok, I have my black poly-bar in hand :-)
questions for you:
how did you determine the length of each mount, in other words why is one slightly longer than the other? did you just compare to the stock, or use some measurment?
also, did you have to use the metal straps? how do they help in this case?
and finaly, can you give me an idea on the lenth of the bolt you used so that I can extend it a bit for a bigger 'washer' on the underside?
My Custom Title > Your's
Joined: Feb 2002
Posts: 629
Likes: 1
From: Charleston, SC
I bought a 93tt and on the way home from buying it the engine blew. Just pulled the engine and was delighted to find more wonderful news... driver's side mount is broken. I am not about to pay that insane price for a stupid piece of rubber and metal. I intend to make my own. I've checked into it and a guy I know deals with urethane on a regular basis and said you make a mold, melt the urethane, press it and then make the mount. Im kind of confused as to why people that make their own dont have to do that. Also Ive never heard of just buying a block of urethane. I've heard of buying the liquid form and pouring it around a broken mount before though. I guess some pictures might be helpfull in making me understand all this.
Thread Starter
Joined: Apr 2002
Posts: 2,194
Likes: 2
From: Dayton, OH
Originally posted by damian
Ok, I have my black poly-bar in hand :-)
questions for you:
how did you determine the length of each mount, in other words why is one slightly longer than the other? did you just compare to the stock, or use some measurment?
also, did you have to use the metal straps? how do they help in this case?
and finaly, can you give me an idea on the lenth of the bolt you used so that I can extend it a bit for a bigger 'washer' on the underside?
I have also been doing some modifications to that site, so the links posted above are wrong.
just go to http://wave.prohosting.com/isuposs/ and they will be on there somewhere.
IIRC, I cut the lengths to 2.1" and 2.3"
I have been thinking about it and I don't think the steel bands are needed and I'll probably take them out sometime in the future. I also want to check them in a few months for any signs of wear.
I don't know if I have mentioned this before, but the aluminum part of the driver's side mount is a little goofy. Where the bolt goes through is actually recessed into the mount a little bit. I wish I would have taken pictures of it because it's kind of hard to explain. this one requires that a hole be cut in the top of the urethane to fit the flat part of the urethane against the flat part of the mount. I'm sure you'll see what I'm talking about when you make yours, but just a little FYI.
I just used some 3/8" bolts. I don't know the length but I think 2.5" or 2.75" is what I used. As I have said before, I'd probably go a little longer to put a thicker section on the bottom. I think my "washer" ended up being 3/8" thick. I just used some 3/8" fenderwashers to support and distribute pressure.
I would probably try to find some metric bolts, that way you don't have to dig out the standard tools when you are working on it.
Thread Starter
Joined: Apr 2002
Posts: 2,194
Likes: 2
From: Dayton, OH
Originally posted by COsborne
I bought a 93tt and on the way home from buying it the engine blew. Just pulled the engine and was delighted to find more wonderful news... driver's side mount is broken. I am not about to pay that insane price for a stupid piece of rubber and metal. I intend to make my own. I've checked into it and a guy I know deals with urethane on a regular basis and said you make a mold, melt the urethane, press it and then make the mount. Im kind of confused as to why people that make their own dont have to do that. Also Ive never heard of just buying a block of urethane. I've heard of buying the liquid form and pouring it around a broken mount before though. I guess some pictures might be helpfull in making me understand all this.
I bought a 93tt and on the way home from buying it the engine blew. Just pulled the engine and was delighted to find more wonderful news... driver's side mount is broken. I am not about to pay that insane price for a stupid piece of rubber and metal. I intend to make my own. I've checked into it and a guy I know deals with urethane on a regular basis and said you make a mold, melt the urethane, press it and then make the mount. Im kind of confused as to why people that make their own dont have to do that. Also Ive never heard of just buying a block of urethane. I've heard of buying the liquid form and pouring it around a broken mount before though. I guess some pictures might be helpfull in making me understand all this.
http://wave.prohosting.com/isuposs/
and you can see what it looks like.
My Custom Title > Your's
Joined: Feb 2002
Posts: 629
Likes: 1
From: Charleston, SC
if you want I can set you up with a gallery account at www.illstreet.com it takes like 2 seconds to setup.
Thread Starter
Joined: Apr 2002
Posts: 2,194
Likes: 2
From: Dayton, OH
no, the hole in the middle for the bolt should hold everything square. but I am by no means an expert on teh situation, that's just what I did.
thanks for the offer on the hosting thing, I might take you up on that.
thanks for the offer on the hosting thing, I might take you up on that.
My Custom Title > Your's
Joined: Feb 2002
Posts: 629
Likes: 1
From: Charleston, SC
Im still testing it out before I integrate it into the front page of the site. http://www.illstreet.com/gallery/MyFD is the main idea though. I emailed some places to get some info on welding it to the mount.
Originally posted by ISUposs
[B]...IIRC, I cut the lengths to 2.1" and 2.3"..
[b]
[B]...IIRC, I cut the lengths to 2.1" and 2.3"..
[b]
>>I have been thinking about it and I don't think the steel bands are needed and I'll probably take them out sometime in the future. I also want to check them in a few months for any signs of wear.
yeah, I probably just toss the bands.
>>I don't know if I have mentioned this before, but the aluminum part of the driver's side mount is a little goofy. Where the bolt goes through is actually recessed into the mount a little bit.
yep, i get what you mean, and im sure it will be clear when I see the mount in hand.
>>I just used some 3/8" bolts. I don't know the length but I think 2.5" or 2.75" is what I used. As I have said before, I'd probably go a little longer to put a thicker section on the bottom.
more good info, I'll measure the length I need to go wiht the urehtane washer (1/2 or whatever), metal washer, and then the bolt.
>>I would probably try to find some metric bolts, that way you don't have to dig out the standard tools when you are working on it.
good idea, but no problem for me, I use metwrench tools, then work on standard and metric nuts/bolts. :-)
install update
ok, I started the install and have the old mounts out, just though I would mention at this point that my mounts are almost identical to each other, ... you mentioned one being a bit different, having a recces that you needed to account for in order for the unrethane surface to sit flat on the mount...however mine are both the same, just a flat surface. I think this is because my car is a 95 and had the newer mounts.
here is a pic of my dismanteled mounts:
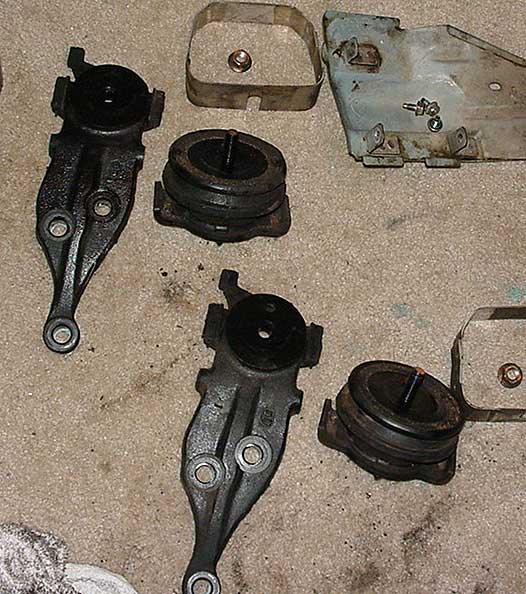
and this is how I got the engine proped up to get the mounts off:
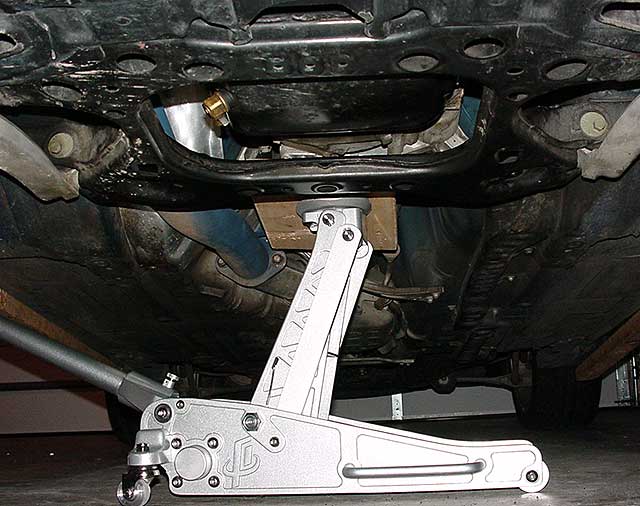
more to come tommorrow...
here is a pic of my dismanteled mounts:
and this is how I got the engine proped up to get the mounts off:
more to come tommorrow...
Last edited by damian; Apr 21, 2003 at 12:13 AM.
My Custom Title > Your's
Joined: Feb 2002
Posts: 629
Likes: 1
From: Charleston, SC
Damian... I have a 93 and my stock replacements look the same too. however, one of the mounts I pulled off my car was made of aluminum...Anyone have any idea where that came from?

I Sold My Car 2 the Devil
Joined: Oct 2001
Posts: 2,361
Likes: 0
From: Duncanville, Tx
I'm about to replace mine...so...
you:
1)jacked up the car
2) unbolted the motor mounts from the subframe
3) unconnected sway bar and such
4) jacked up the engine using the wood block on the tranny method.
5) unbolted the heat shield
6) pulled the motor mounts using 1/2" drive
7) unconnected the mounts from the brackets
8) put back together...
Does this sound right am I missing something?
thanks,
Ryker
update
ok, here is a pic of the mounts ready to go in...

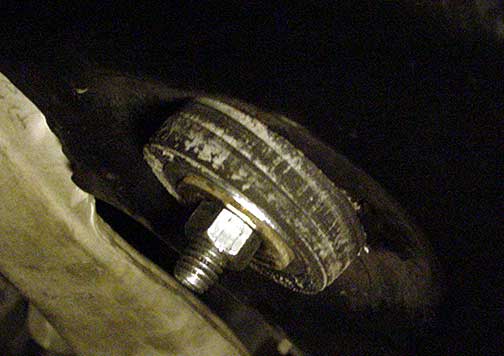
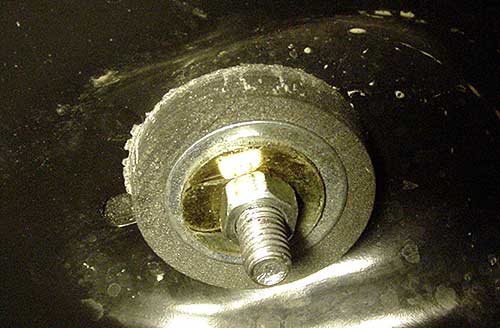
here are some pics of them installed
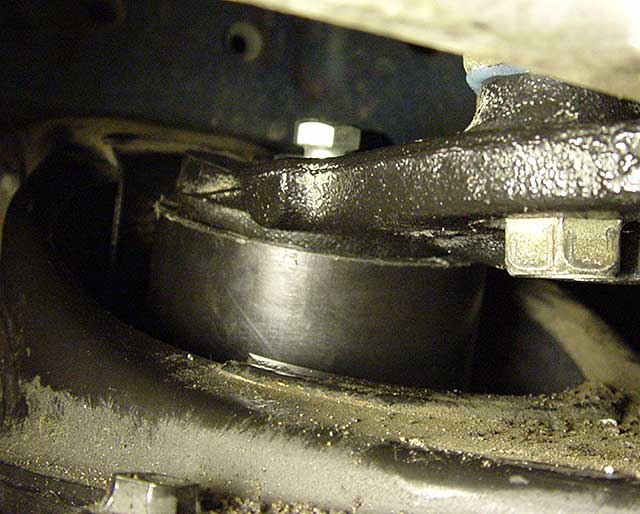
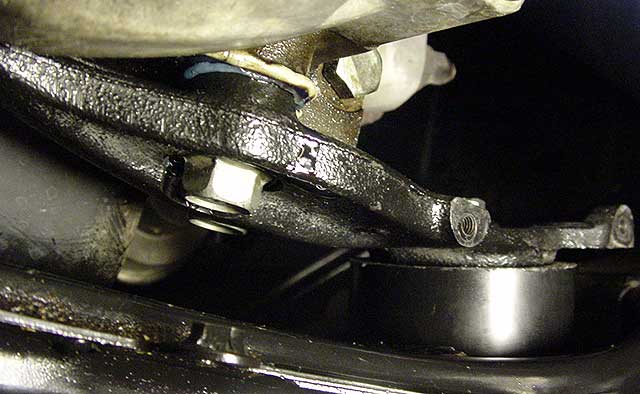
here are pics of the small 'washer' bushing made from the left over unrethane to dampen the 'pull' vibration
I will be driving it to the club in a bit and will post on the results.
one thing that I was not sure of was how tight to make the bottom nut that holds the mount assembly together, its no longer like the stock mount that just tightens against the bottom mettl part of the mount and not on the mount itself, but in this case you are actualy compressign the mount (and small urethane washer on teh bottom) at a certain point, so I just tightened it so that the under washer was a bit compressed and then stopped (it was pretty tight so I doubt it will come loose, I added locktight just in case).... also, i probably need to trim a bit of the bolt ends down, they stick out too much for my liking, I dont want them hitting somthing and causing some kinda warped metal mess (heheh)...so after soem testign I will dremmel the ends of flush with the nut
dont forget this was all ISUposs' idea, mad props to him for doing it up
here are some pics of them installed
here are pics of the small 'washer' bushing made from the left over unrethane to dampen the 'pull' vibration
I will be driving it to the club in a bit and will post on the results.
one thing that I was not sure of was how tight to make the bottom nut that holds the mount assembly together, its no longer like the stock mount that just tightens against the bottom mettl part of the mount and not on the mount itself, but in this case you are actualy compressign the mount (and small urethane washer on teh bottom) at a certain point, so I just tightened it so that the under washer was a bit compressed and then stopped (it was pretty tight so I doubt it will come loose, I added locktight just in case).... also, i probably need to trim a bit of the bolt ends down, they stick out too much for my liking, I dont want them hitting somthing and causing some kinda warped metal mess (heheh)...so after soem testign I will dremmel the ends of flush with the nut
dont forget this was all ISUposs' idea, mad props to him for doing it up
Originally posted by wonder1and
I'm about to replace mine...so...
you:
1)jacked up the car
2) unbolted the motor mounts from the subframe
3) unconnected sway bar and such
4) jacked up the engine using the wood block on the tranny method.
5) unbolted the heat shield
6) pulled the motor mounts using 1/2" drive
7) unconnected the mounts from the brackets
8) put back together...
Does this sound right am I missing something?
thanks,
Ryker
dont forget to put RTV silicone (or some other sealant) on the mount-to-engine bolts or you might leak oil from the bolt holes...
try to jack the engine up as straight as you can (its hard, cramped space) so that the mount-to-frame bolts align up well, or else you may have a struggle getting them in later.
Thread Starter
Joined: Apr 2002
Posts: 2,194
Likes: 2
From: Dayton, OH
Re: update
lookin good
thanks, but i just stole little bits of ideas from eveyone else. 
so far, I have no serious complaints about mine though.
Originally posted by damian
dont forget this was all ISUposs' idea, mad props to him for doing it up
dont forget this was all ISUposs' idea, mad props to him for doing it up
so far, I have no serious complaints about mine though.
Schadenfreude...Ha Ha
Joined: Feb 2002
Posts: 1,202
Likes: 0
From: Austin, TX
Thanks for the write up guys. I'm going to have to give this a shot. I need new motor mounts bad.
Couple quick questions though. Is the diameter of the bolt running through the urethane crucial? I see you guys using 3/8". Is that the largest diameter that will fit? Why not Keep things metric with an M10, or M12 bolt?
Couple quick questions though. Is the diameter of the bolt running through the urethane crucial? I see you guys using 3/8". Is that the largest diameter that will fit? Why not Keep things metric with an M10, or M12 bolt?
I Sold My Car 2 the Devil
Joined: Oct 2001
Posts: 2,361
Likes: 0
From: Duncanville, Tx
hey damian... go buy another nut and tighten it down ontop of what you got so it won't free itself so easily... keeping in mind tightening too much will strip the threads...
Thanks for the help,
Ryker
Thanks for the help,
Ryker