
Finished my custom stock-mount intercooler today...write up & pics


Wow, that looks awesome.
I know i feel stupid for saying it but i cant wait til i have to overhaul my engine bay so i can make it look all pretty and nice like that lol.
**knock on wood**
I hope i dont have to do that anytime soon
I know i feel stupid for saying it but i cant wait til i have to overhaul my engine bay so i can make it look all pretty and nice like that lol.
**knock on wood**
I hope i dont have to do that anytime soon
Nice work man. Hopefully the ducting gives you what you need for cooling issues. On another note,.. What Hood pins are those? I have seen them before on some race cars I think. Are the a lever type? I need some good quality, nice looking hood hold downs. Thanks
Dave
Dave
He still has A/C that makes things much more difficult. Anyways it doesn't matter he doesn't need a v-mount, both coolers will see direct fresh air once ducted.
sure the radiator will see more air but I'm my opinion that's the way it should be. Seems like with a v-mount there's a possibility you could be getting more air into the intercooler than the rad, Wouldn't care for that too much.
sure the radiator will see more air but I'm my opinion that's the way it should be. Seems like with a v-mount there's a possibility you could be getting more air into the intercooler than the rad, Wouldn't care for that too much.
so i finally got a duct for this budget-build intercooler. i picked up a duct from the petit "cool-charge 3" setup, which fits exactly to my xspower intercooler.
unducted i was seeing temps up to 60c (heatsoak ftw!), now with the duct i'm seeing about 30c while driving. 40c at idle. i was thinking of also installing a small fan which could be activated at idle to help prevent heat soak...but that will have to wait for next time.
i had an idead to modify the efini y pipe (again) to make it easier for us to make the intake-side intercooler piping. we shortened the y pipe by about an inch and rotated the mount so that it would line up better with the new intercooler pipe. see pics below...
also i was wondering if anyone with this petit intercooler duct has added an extension onto the front of the ducting (where it comes to the front bumper) to make it scoop up more air. i noticed that it doesn't actually come down behind the bumper opening at all - it stops right where it makes contact with the radiator. i was thinking i might get even better temps if i extended this duct a little bit...thoughts?
anyway, here are some pics. we had to remake all the intercooler piping but it came out pretty good.
intercooler removed

pettit duct

another angle

chopped off the angled inlet/outlet

cutting the mount off the y pipe

mount removed

cutting off an inch of y pipe

midget y pipe

test fitting (not the final orientation on the mount)

welding the mount back on

midget y pipe complete

installed

unducted i was seeing temps up to 60c (heatsoak ftw!), now with the duct i'm seeing about 30c while driving. 40c at idle. i was thinking of also installing a small fan which could be activated at idle to help prevent heat soak...but that will have to wait for next time.
i had an idead to modify the efini y pipe (again) to make it easier for us to make the intake-side intercooler piping. we shortened the y pipe by about an inch and rotated the mount so that it would line up better with the new intercooler pipe. see pics below...
also i was wondering if anyone with this petit intercooler duct has added an extension onto the front of the ducting (where it comes to the front bumper) to make it scoop up more air. i noticed that it doesn't actually come down behind the bumper opening at all - it stops right where it makes contact with the radiator. i was thinking i might get even better temps if i extended this duct a little bit...thoughts?
anyway, here are some pics. we had to remake all the intercooler piping but it came out pretty good.
intercooler removed
pettit duct
another angle
chopped off the angled inlet/outlet
cutting the mount off the y pipe
mount removed
cutting off an inch of y pipe
midget y pipe
test fitting (not the final orientation on the mount)
welding the mount back on
midget y pipe complete
installed
making the flange for the intercooler pipe

almost done with it...

welded up to a piece of elbow pipe

another angle

new inlet/outlets

everything installed

another shot

and another

well, that's about it. i still need to sand the old weld beads off the top of the intercooler and do some polishing. much better than before though.
almost done with it...
welded up to a piece of elbow pipe
another angle
new inlet/outlets
everything installed
another shot
and another
well, that's about it. i still need to sand the old weld beads off the top of the intercooler and do some polishing. much better than before though.


man i liked the way you had it setup the first time. you should have just flipped the radiator and made a vmount. would have been about the same amount of work (maybe less) and your vented hood would have been even more beneficial.
the stock-mount setup looks great though. nice job.
the stock-mount setup looks great though. nice job.
thanks for all the feedback guys.
i'm pretty confident that the intercooler isn't junk. i did some research before i ordered this and apparently the brand i bought is pretty good, and people have had great results with it. it's constructed very well and the end tanks are a single cast piece. looking at the internal fins, the cooling potential should be pretty good as well.
we are most likely going to put it on a flowbench sometime in the next few days, so i'll share info about that.
Are you still going to test the ic or get aftermarket radiator fans?
I got a lot of PMs asking me about the specific parts that I used, so here is the list:
+ $219 CXRacing 24" x 12" x 3.5" Intercooler, 2.5" Backwards inlet/outlet
+ $16.50 2.5" L-Bend Aluminum Pipe, Mandrel Bent Polished, 2.0mm Thick Tube, 18" Lenght
+ $16.50 2.5" U-Bend Universal Aluminum Pipe, 2.0mm Thick Tube, 18" Lenght
+ $199 Pettit Racing CoolCharge III Fiberglass Intercooler Duct
Total cost for parts: $451
Labor: $0
(Keep in mind I already had 2.5" couplers & clamps, but you can get these very cheap also if you don't have them...)
Cost for Pettit CoolCharge III: $1450
DIY Savings: $999
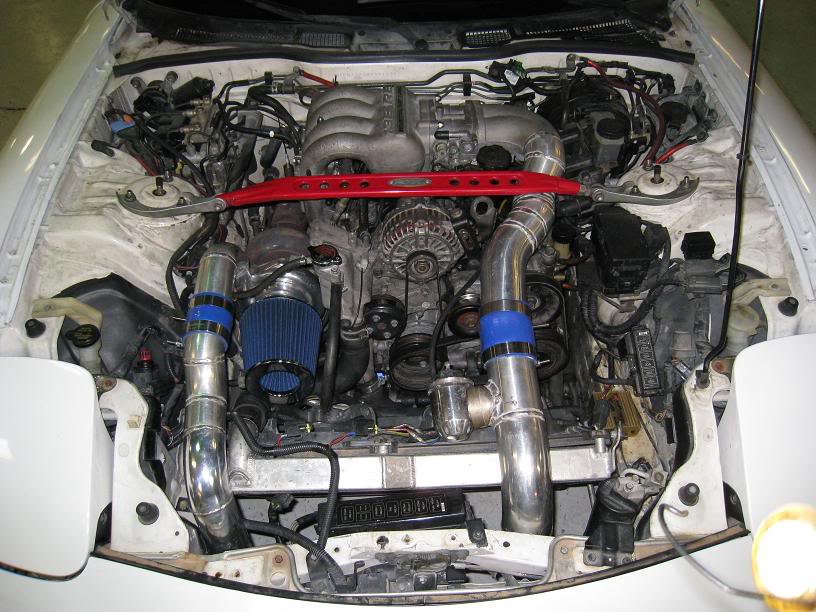
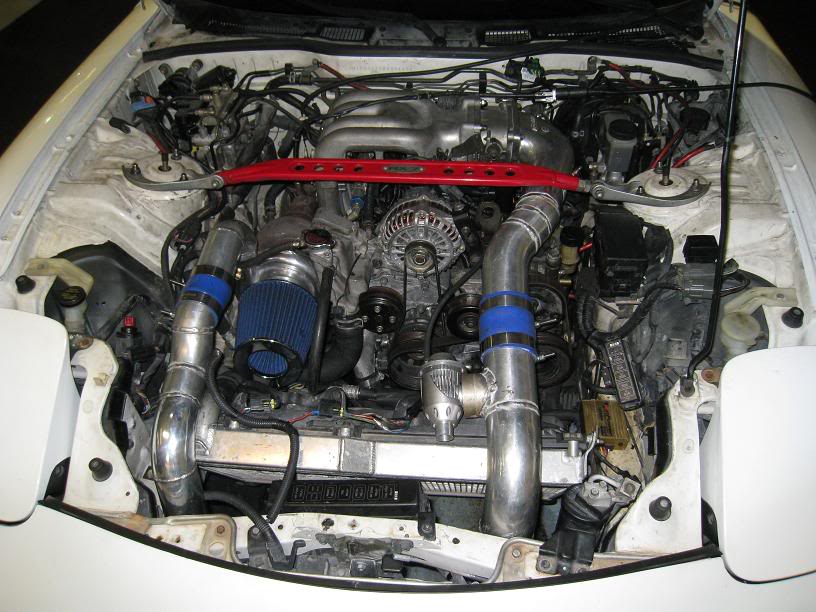
Just for fun, here is a pic of my custom setup next to the Pettit setup...
$451 DIY Setup:
$1450 Pettit CoolCharge III:

Cheers!
+ $219 CXRacing 24" x 12" x 3.5" Intercooler, 2.5" Backwards inlet/outlet
+ $16.50 2.5" L-Bend Aluminum Pipe, Mandrel Bent Polished, 2.0mm Thick Tube, 18" Lenght
+ $16.50 2.5" U-Bend Universal Aluminum Pipe, 2.0mm Thick Tube, 18" Lenght
+ $199 Pettit Racing CoolCharge III Fiberglass Intercooler Duct
Total cost for parts: $451
Labor: $0
(Keep in mind I already had 2.5" couplers & clamps, but you can get these very cheap also if you don't have them...)
Cost for Pettit CoolCharge III: $1450
DIY Savings: $999
Just for fun, here is a pic of my custom setup next to the Pettit setup...
$451 DIY Setup:
$1450 Pettit CoolCharge III:
Cheers!

omg.. thats freaking amazing. Id love to pick that up! and your 99spec mod tails looks perfect!
Now i really want to give it a go! wow! just... wow! haha want to fab some up and sell them to us? group buy from you! haha.
Good job looks GREAT!
Now i really want to give it a go! wow! just... wow! haha want to fab some up and sell them to us? group buy from you! haha.
Good job looks GREAT!
If the average person was to take this on they would more than likely be paying someone for all the welding that was done just becasue yu didint pay for it dont forget to factor it in  ... still much cheaper than its Petit Counterpart... Good job... I as well think you should have done a V-mount with all the work you went through...
Chris
... still much cheaper than its Petit Counterpart... Good job... I as well think you should have done a V-mount with all the work you went through...Chris
Joined: Mar 2004
Posts: 1,670
Likes: 0
From: King George, VA USA

Here's my Greddy IC setup, with custom-welded piping. Only 2 couplers on each side.
With the 13B-RE:
With my current 13B-REW:

I bought that same intercooler, I was going to do the exact same thing, very nice!But decided to go front mount instead, gonna sell the intercooler, new in box if anyone wants to do this.
the pc680 is 7.0625" (L) x 3" (W) x 6.5625 (D) so it looks like it will just fit (at an angle) on the drivers side, next to the duct (if you don't have AC) or on the passenger side's of the duct if you move the fuse box. don't quote me on that though.
