
painting engine bay


painting engine bay
hey guys i just degreased my engine bay ... and about to paint it black.. its original color is white.. what steps should i take before i shoot the coat? im not gonna use a primer and dont wanna sand it down to the factory primer or metal.. what steps should i take.. thanks guys!
The engine bay is a brutal environment...heat, chemicals, damage from working on stuff...and there is simply no easy way to repaint it.
Yeah, you could do some minimal cleaning and masking, then rattle can it flat black and it might look OK...for about a week.
After that it'll be worse than when you started.
If you're not willing to invest the sweat equity to do it right I think you're better off just cleaning the hell out of it and calling it good.
Banned. I got OWNED!!!
Joined: Mar 2006
Posts: 1,970
Likes: 1
From: Connecticut
Yeah, you need to use a quality product and do it right. You don't neccissarily need to use 220 though. In fact with all the compound curves I specifically skipped the sandpaper & block routine and used a scotch brite.
Here's what I did step by step
1) Strip EVERYTHING out
2) Clean with simple green and scrub brush
3) Use a real wax & grease remover. Something found at an autobody supply... Prepall Wax & grease remover can be found @ autobone I believe.
4) I have a air powered pressure washer thingy... I used that with a simple green solution and scotch-brited the entire bay.
5) Rinses
6) Taped it off
7) Wax a grease removered everything again
8) Primer
9) Sealer
10) Base - 2 coats
11) Clear - 3 coats
Took some time but ooooohhhhhh. If you wanted to go black though with no metallic there are single stage paints that do not need a clear coat, PPG had a really great paint... DC something rings a bell... I cannot remember exactely what it was called. Just remember though with painting, the prep makes all the difference.
Here's what I did step by step
1) Strip EVERYTHING out
2) Clean with simple green and scrub brush
3) Use a real wax & grease remover. Something found at an autobody supply... Prepall Wax & grease remover can be found @ autobone I believe.
4) I have a air powered pressure washer thingy... I used that with a simple green solution and scotch-brited the entire bay.
5) Rinses
6) Taped it off
7) Wax a grease removered
everything again8) Primer
9) Sealer
10) Base - 2 coats
11) Clear - 3 coats
Took some time but ooooohhhhhh. If you wanted to go black though with no metallic there are single stage paints that do not need a clear coat, PPG had a really great paint... DC something rings a bell... I cannot remember exactely what it was called. Just remember though with painting, the prep makes all the difference.
Trending Topics
Cleaning and prep are the key to a decent paint job. As well, NO RATTLE CAN! I just repainted mine after rattle canning a couple years ago. It looked like **** the first time a bit of gas, carb fluid ect is sprayed on it.
1. Remove everything possible.
2. Clean clean clean.
3. Scuff it up with some sand paper.
4. Wash off with a non-residue clenser.
5. Paint with a self etching primer. They sell some at your local PRO Paint shop in a rattle can for about 15 bucks a can. TOP QUALITY ****.
6. Then paint a final couple coats. 2-3 coats of a single stage will do.
Just painted mine a couple days ago.
Winter sucks
Joined: Jan 2004
Posts: 3,083
Likes: 0
From: Newberg, Oregon
When I did mine, I did the following:
*Hot water heater + high temp hose + 3000psi pressure washer
*Wax/grease remover (like mad.... I used a gallon of the stuff before I had even sanded). Keep using it until you can white-glove test the bitch and come back clean.
*Purple scuffed the entire engine bay (didn't use sandpaper because its hard to get the weird contours of the engine bay).. Used about 10 of those scuff pads.
*wax/grease remover again... used about 1/2gal this time... very thorough... especially in the areas underneath the hydraulics and near the oil cooler.
*Use a really high quality primer, non-self etching (since you won't have any metal showing.. if you DO have metal showing, use an etch wash for those areas, NOT DTM primer). The primer is the most important stage of this entire process (arguably) since if it doesn't stick.. your paint won't either...
At this point you have two options.. Go with a high quality single stage urethane, or a basecoat/clearcoat method. I went the single stage because clear coat tends to get EVERYWHERE whether you want it or not... I don't like shooting it unless I'm painting the rest of the car too. If you aren't worried, then don't.
*basecoat/color coat.. apply it in even wet coats. Allow FULL FLASH or prepare to kill yourself with endless nightmares (especially this time of year).
*clear coat. a couple wet even coats... let cure for a week or so before "putting it to the test". Clear tends to breath for months after you apply it. So keeping contaminants out for that long is a good thing.
Well.. started typing this off and on for the last couple minutes.. I'm sure there's other replies by now.... man.. I hope it makes sense... lol
Cleaning and prep are the key to a decent paint job. As well, NO RATTLE CAN! I just repainted mine after rattle canning a couple years ago. It looked like **** the first time a bit of gas, carb fluid ect is sprayed on it.
1. Remove everything possible.
2. Clean clean clean.
3. Scuff it up with some sand paper.
4. Wash off with a non-residue clenser.
5. Paint with a self etching primer. They sell some at your local PRO Paint shop in a rattle can for about 15 bucks a can. TOP QUALITY ****.
6. Then paint a final couple coats. 2-3 coats of a single stage will do.
Just painted mine a couple days ago.
1. Remove everything possible.
2. Clean clean clean.
3. Scuff it up with some sand paper.
4. Wash off with a non-residue clenser.
5. Paint with a self etching primer. They sell some at your local PRO Paint shop in a rattle can for about 15 bucks a can. TOP QUALITY ****.
6. Then paint a final couple coats. 2-3 coats of a single stage will do.
Just painted mine a couple days ago.
I'm re-doing mine as well and hope it comes out as nicely as yours does. But why did you paint the grill piece under the wipers?
Painted it just to see how it looks. I can always go to the wrecker and get a black one and paint it again. Its all about variety! :0)
When I did mine, I did the following:
*Hot water heater + high temp hose + 3000psi pressure washer
*Wax/grease remover (like mad.... I used a gallon of the stuff before I had even sanded). Keep using it until you can white-glove test the bitch and come back clean.
*Purple scuffed the entire engine bay (didn't use sandpaper because its hard to get the weird contours of the engine bay).. Used about 10 of those scuff pads.
*wax/grease remover again... used about 1/2gal this time... very thorough... especially in the areas underneath the hydraulics and near the oil cooler.
*Use a really high quality primer, non-self etching (since you won't have any metal showing.. if you DO have metal showing, use an etch wash for those areas, NOT DTM primer). The primer is the most important stage of this entire process (arguably) since if it doesn't stick.. your paint won't either...
At this point you have two options.. Go with a high quality single stage urethane, or a basecoat/clearcoat method. I went the single stage because clear coat tends to get EVERYWHERE whether you want it or not... I don't like shooting it unless I'm painting the rest of the car too. If you aren't worried, then don't.
*basecoat/color coat.. apply it in even wet coats. Allow FULL FLASH or prepare to kill yourself with endless nightmares (especially this time of year).
*clear coat. a couple wet even coats... let cure for a week or so before "putting it to the test". Clear tends to breath for months after you apply it. So keeping contaminants out for that long is a good thing.
Well.. started typing this off and on for the last couple minutes.. I'm sure there's other replies by now.... man.. I hope it makes sense... lol
Good directions!
Just look online for Painting Prep Steps. There is great info out there.
Best recomendation.
AVOID THE RATTLE CAN.
Banned. I got OWNED!!!
Joined: Mar 2006
Posts: 1,970
Likes: 1
From: Connecticut
Yeah - rattlecan is just a waste of time. Some not bad equipment can be had from the Home Depot *gag* and if you have an air compressor there are some budget paint products that aren't bad either. I've used PPG's Omni line before with some good results.
Prep is the key though
Prep is the key though
thanks guys.. i just finished scuffin up the paint .. looks pretty dull.. gonna blow it with air tomorrow.. and degrease again.. soo i have some spots of metal..
MICAH said that i should use an etch wash? what is that? can i just use duplicolor primer sealer, which is specifically for metal? And then coat over it with regular non etching primer after it dries? .. any suggestions thanks for all your help guys
MICAH said that i should use an etch wash? what is that? can i just use duplicolor primer sealer, which is specifically for metal? And then coat over it with regular non etching primer after it dries? .. any suggestions thanks for all your help guys
If its just a few areas that have been cut through, I wouldn't hesitate to use a direct-to-metal high build primer such as BASF's Powerfill series.
In reality though, a straight high build without etch shouldn't really be bothered by a couple tiny areas of bare metal. However to do things by the book you either need a DTM primer (contains its own etch) or regular etch applied to the bare areas before regular high build, or epoxy applied to the bare areas before regular highbuild.
In reality though, a straight high build without etch shouldn't really be bothered by a couple tiny areas of bare metal. However to do things by the book you either need a DTM primer (contains its own etch) or regular etch applied to the bare areas before regular high build, or epoxy applied to the bare areas before regular highbuild.
Agreed. I personaly spent the few extra bucks for those few bare spots. It is worth it to me.
I am strating my new build again Classis. Nothing crazy, just tasty!
Well heres the final product.. still wet when picture was taken.. annd ohh yeah i forgot to tell you guys i was a first gen owner but second gen engine 
 ill take better pictures during the day .. thanks again guys!!
-Marvin
[IMG]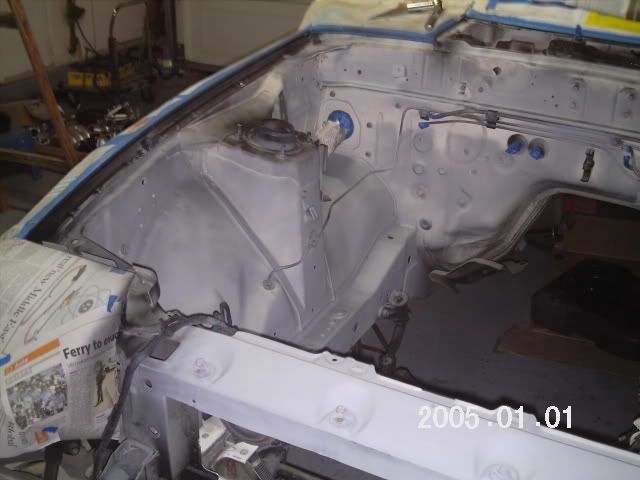 [/IMG]
[IMG]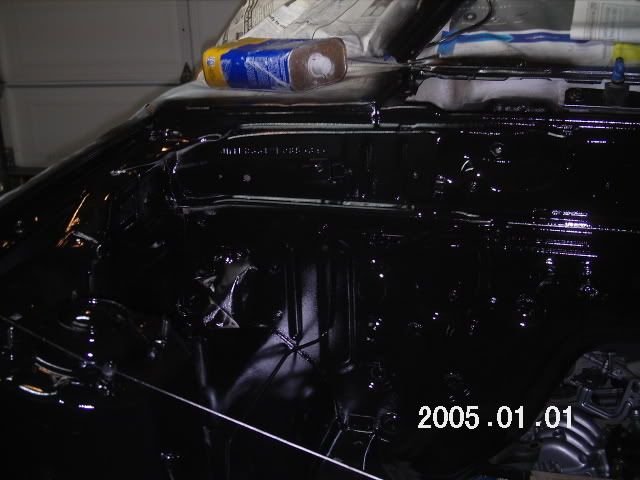 [/IMG]
ill take better pictures during the day .. thanks again guys!!-Marvin
[IMG]
[/IMG][IMG]
[/IMG]